Table of Contents
Advertisement
Quick Links
Advertisement
Table of Contents

Related Manuals for AT&T 8525


Summary of Contents for AT&T 8525
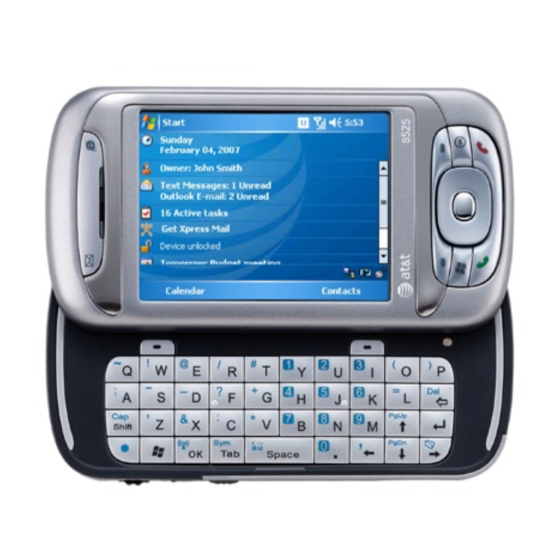
- Page 1 User Manual AT&T 8525 Handheld with Windows Mobile ®...
-
Page 2: Important Health Information And Safety Precautions
Please Read Before Proceeding THE BATTERY IS NOT FULLY CHARGED WHEN YOU TAKE IT OUT OF THE BOX. DO NOT REMOVE THE BATTERY PACK WHEN THE DEVICE IS CHARGING. YOUR WARRANTY IS INVALIDATED IF YOU OPEN OR TAMPER WITH THE DEVICE’S OUTER CASING. PRIVACY RESTRICTIONS Some countries require full disclosure of recorded telephone conversations, and stipulate that you must inform the person with whom you are speaking... - Page 3 SAFETY PRECAUTIONS FOR PROPER GROUNDING INSTALLATION CAUTION: Connecting to an improperly grounded equipment can result in an electric shock to your device. This product equipped with an USB Cable for connecting with desk-top or notebook computer. Be sure your computer is properly grounded (earthed) before connecting this product to the computer.
- Page 4 SAFETY PRECAUTIONS FOR DIRECT SUNLIGHT Keep this product away from excessive moisture and extreme temperatures. Do not leave the product or its battery inside a vehicle or in places where the temperature may exceed 60°C (140°F), such as on a car dashboard, window sill, or behind a glass that is exposed to direct sunlight or strong ultraviolet light for extended periods of time.
- Page 5 and are reminded of the need to observe restrictions on the use of radio equipment in fuel depots, chemical plants, or where blasting operations are in progress. Areas with a potentially explosive atmosphere are often, but not always, clearly marked. These include fueling areas, below deck on boats, fuel or chemical transfer or storage facilities, and areas where the air contains chemicals or particles, such as grain, dust, or metal powders.
- Page 6 • Avoid hot areas The product should be placed away from heat sources such as radiators, heat registers, stoves, or other products (including, but limited to, amplifiers) that produce heat. • Avoid wet areas Never use the product in a wet location. •...
-
Page 7: Table Of Contents
Contents Chapter 1 Getting Started 1.1 Getting to Know Your Device and Its Accessories ....12 1.2 About the SIM Card and Battery ........18 1.3 Starting Up ..............20 1.4 The Today Screen ............22 1.5 Using the Programs ............25 1.6 Device Settings .............. - Page 8 Chapter 3 Using Phone Features 3.1 Using the Phone ............40 3.2 Making a Call ..............42 3.3 Receiving a Call ............. 44 3.4 Smart Dialing ..............45 3.5 In-call Options ..............49 3.6 Additional Dialing Information ........50 3.7 Setting Up SIM Access Profile (SAP) ......51 Chapter 4 Synchronizing Information and Setting Up E-mail Security 4.1 Setting Up ActiveSync ..........
- Page 9 Chapter 6 Getting Connected 6.1 Connecting to the Internet ..........84 6.2 Internet Explorer Mobile ..........88 6.3 Using Comm Manager ........... 91 6.4 Using Bluetooth ............. 92 6.5 Using Wi-Fi ..............100 6.6 Using Internet Sharing ..........104 6.7 Using Terminal Services Client ........105 Chapter 7 Mail and Messaging 7.1 E-mail and Text Messages ..........
- Page 10 Chapter 9 Using Other Applications 9.1 Word Mobile ..............170 9.2 Excel Mobile ..............171 9.3 Viewing Slide Shows with PowerPoint Mobile ..172 9.4 Using ClearVue PDF ............ 173 9.5 Using MIDlet Manager ..........174 9.6 Using ZIP ..............177 9.7 Using Voice Speed Dial ..........
-
Page 11: Chapter 1 Getting Started
Chapter 1 Getting Started 1.1 Getting to Know Your Device and Its Accessories 1.2 About the SIM Card and Battery 1.3 Starting Up 1.4 The Today Screen 1.5 Using the Programs 1.6 Device Settings... -
Page 12: Getting To Know Your Device And Its Accessories
12 Getting Started 1.1 Getting to Know Your Device and Its Accessories Front View... -
Page 13: Getting Started
Getting Started 13 No. Item Function Sliding Keyboard See Chapter 2 for details. Messaging Button Press for quick access to your messaging application(s). Notification LED 1 This LED shows a blinking Blue light for Bluetooth system notification of powered-up and ready to transmit radio frequency signal, and a blinking Green light for Wi- Fi status. - Page 14 14 Getting Started 20 21 Left / Back / Right View...
- Page 15 Getting Started 15 No. Item Function Trackwheel When in the Today screen or using applications, scroll up or down to navigate through menus, program instructions; press the trackwheel to carry out selection. During a call or playing music, scroll up or down to adjust the sound volume.
-
Page 16: Bottom View
16 Getting Started Bottom View No. Item Function Strap Attachment Attach a strap for carrying your device. Infrared Port Exchange file(s) or data with other devices wirelessly (maximum of 8 inches or 20 cm, at an angle of 30 degrees or less). Battery Cover Latch Slide this latch to release the battery cover. - Page 17 Getting Started 17 Accessories No. Accessory Function AC adapter Recharge the battery. USB Sync cable Connects your device to a PC and synchronizes data. Stereo headset Provides a volume control slider and a Send/End button. Press the Send/End button to pick up a call or put a call on hold;...
-
Page 18: About The Sim Card And Battery
18 Getting Started 1.2 About the SIM Card and Battery Always turn off your device before installing/replacing the battery and SIM card. Follow the instructions in the Quick Start Guide to install a 3G SIM (Subscriber Identity Module) card provided by Cingular and to install the battery. -
Page 19: Charge The Battery
Getting Started 19 To check the battery power Do one of the following: • Tap the battery level icon ( ) on the Today screen. • Alternatively, tap Start > Settings > Systems tab > Power. Power Information Charge the battery The battery in the box is partially charged. -
Page 20: Starting Up
20 Getting Started 1.3 Starting Up Turn your device on and off To turn on your device, press the Power button. When you turn on your device for the first time, you are asked to complete a calibration process. For more information, see “Calibrate the device”. To turn off your device, press and hold the Power button for a few seconds. - Page 21 Getting Started 21 Manage screen settings The device’s display has three orientation modes: Portrait, Landscape (right-handed), and Landscape (left-handed). Portrait mode allows you to get a better view or a better operation of certain programs, while Landscape mode may be optimal for viewing lengthy files. Portrait mode Landscape mode •...
-
Page 22: The Today Screen
22 Getting Started 1.4 The Today Screen The Today screen displays important information, such as upcoming appointments and status indicators. You can tap a section on the screen to open the associated program. • To access the Today screen, tap Start > Today. •... - Page 23 Getting Started 23 Indicators The following are some of the status icons that you may see on the device. Icon Description Icon Description New e-mail, MMS, and text Roaming. messages. New voice mail. Connection is active. There are more notifications. Connection is not active.
-
Page 24: The Start Menu
24 Getting Started Note The USB to PC ( ) icon appears on the Today Screen when your device is connected to your computer and you enable a serial USB connection between them. For more information about USB to PC, see “Device Settings”... -
Page 25: Using The Programs
Getting Started 25 1.5 Using the Programs The following are some of the programs that are already installed on your device. Icon Description ActiveSync Synchronizes information between your device and a PC or the Exchange Server. Calculator Perform basic arithmetic and calculations. Calendar Keep track of your appointments and create or respond to meeting requests. - Page 26 26 Getting Started Icon Description Phone Make and receive calls, switch between calls, and set up conference calling, or use speakerphone. Pictures & Videos View, organize, and sort picture and video files on your device or a storage card. Captured photos are stored in the My Pictures folder, and video clips are saved in the My Videos folder of your device.
-
Page 27: Device Settings
Getting Started 27 1.6 Device Settings You can adjust the device settings to suit the way you work. To see all available settings, tap Start > Settings, then tap the Personal, System, and Connections tabs located at the bottom of the screen. Personal tab Icon Description... -
Page 28: System Tab
28 Getting Started System tab Description About Specify a name for your device. Also shows the Windows Mobile version and copyright information. Backlight Sets the backlight timeout and brightness. Certificates Shows information about certificates that are installed on your device. Clear Storage Removes all your data and files from the memory and resets your device to factory default settings. -
Page 29: Connections Tab
Getting Started 29 Connections tab Icon Description Beam Enables your device to receive incoming infrared and Bluetooth beams. Bluetooth Turns Bluetooth on, sets your device to Visible mode, and allows you to scan for other Bluetooth devices. Comm Manager Opens the Comm Manager screen to manage phone features and data connections on your device. - Page 30 30 Getting Started...
-
Page 31: Chapter 2 Entering And Searching For Information
Chapter 2 Entering and Searching for Information 2.1 Using the Sliding Keyboard 2.2 Input Methods 2.3 Using the On-screen Keyboard 2.4 Using Letter Recognizer 2.5 Using Block Recognizer 2.6 Using Transcriber 2.7 Using Symbol Pad 2.8 Using Notes to Draw, Write, and Record Voice Notes 2.9 Searching for Information... -
Page 32: Using The Sliding Keyboard
32 Entering and Searching for Information 2.1 Using the Sliding Keyboard Your device provides you with a QWERTY keyboard, which is similar to a standard keyboard on your PC. To use the QWERTY keyboard, slide the screen panel to the right to reveal the keyboard. You can do the following with the QWERTY keyboard: •... -
Page 33: Input Methods
Entering and Searching for Information 33 2.2 Input Methods When you start a program or select a field that requires text or numbers, the Input Panel automatically becomes available. The Input Panel provides access to the various input methods available on your device, including Block Recognizer, Keyboard, Letter Recognizer, Symbol Pad, and Transcriber. -
Page 34: Using The On-Screen Keyboard
34 Entering and Searching for Information 2.3 Using the On-screen Keyboard The on-screen Keyboard is available when text entry is possible. You can enter text by tapping keys on the keyboard that are displayed on the screen. To enter text using the on-screen Keyboard In a program, tap the Input Selector arrow, and tap Keyboard. -
Page 35: Using Block Recognizer
Entering and Searching for Information 35 2.5 Using Block Recognizer With Block Recognizer, you use a single stroke to write letters, numbers, symbols, and punctuation, which are then converted into typed text. To use Block Recognizer From a program, tap the Input Selector arrow, and tap Block Recognizer. - Page 36 36 Entering and Searching for Information To write using Transcriber In a program, position the cursor where you want text to appear. Use the stylus to write anywhere on the screen. The handwriting will be converted to text shortly after you lift the stylus from the screen.
-
Page 37: Using Symbol Pad
Entering and Searching for Information 37 2.7 Using Symbol Pad Symbol Pad provides a comprehensive list of common symbols such as parentheses, brackets, currency signs, and more, as well as punctuation marks and special characters. Tap a symbol to select it. When using the Navigation Control or the sliding keyboard, press UP, DOWN, LEFT, or RIGHT to navigate through the available... -
Page 38: Using Notes To Draw, Write, And Record Voice Notes
38 Entering and Searching for Information 2.8 Using Notes to Draw, Write, and Record Voice Notes Using Notes, you can draw directly on the screen, or write on the screen and save notes in your own handwriting. You can also create a stand-alone recording (voice note) or you can add a recording to a note. -
Page 39: Chapter 3 Using Phone Features
Chapter 3 Using Phone Features 3.1 Using the Phone 3.2 Making a Call 3.3 Receiving a Call 3.4 Smart Dialing 3.5 In-call Options 3.6 Additional Dialing Information 3.7 Setting Up SIM Access Profile (SAP) -
Page 40: Using The Phone
40 Using Phone Features 3.1 Using the Phone Like a standard mobile phone, you can use your device to make, receive, and keep track of calls and send text or MMS messages. You can also dial directly from Contacts, and easily copy phonebook entries from your SIM card to Contacts on your device. - Page 41 Using Phone Features 41 To resume call function, turn on the phone function by tapping the Phone button again on the Comm Manager screen. • Tap the Signal icon ( ) at the top of the Today screen, then tap Turn on flight mode.
-
Page 42: Making A Call
42 Using Phone Features 3.2 Making a Call With your device, you can make a call from Phone, Contacts, Speed Dial, Call History, and SIM Manager. Make a call from Phone Tap Start > Phone. On the Phone screen, tap the desired phone number, and tap Talk. - Page 43 Using Phone Features 43 To choose one of the numbers of a contact to dial By default, the mobile telephone number (m) of a contact is dialed when you make a call from Contacts. However, you can specify that a different phone number is dialed instead.
-
Page 44: Receiving A Call
44 Using Phone Features Tips • To create a Speed Dial entry from Contacts, tap and hold the contact name, tap Add to Speed Dial, then select the phone number for which to create a Speed Dial and an available location for the new Speed Dial entry. -
Page 45: Smart Dialing
Using Phone Features 45 3.4 Smart Dialing Smart Dialing is a program that makes it easy for you to dial a phone number. When you start entering numbers or characters, Smart Dialing will automatically search and sort the contact entries on the SIM card, in Contacts, and the phone numbers in Call History (including incoming, outgoing, and missed calls). - Page 46 46 Using Phone Features Letters appear on the left side of the entry box when typing on the sliding keyboard Tips on using Smart Dialing Smart Dialing starts looking for numbers or contacts that match the sequence you have entered. Below are some tips on how to use Smart Dialing to quickly find a desired phone number or contact.
- Page 47 Using Phone Features 47 Make a call or send an SMS using Smart Dialing Begin entering the first few numbers or characters. In the Smart Dialing panel, browse the list by tapping the arrows ) or pressing Navigation Control up or down to select the desired contact or phone number.
- Page 48 48 Using Phone Features Set up Smart Dialing On the Phone screen, tap Menu > Smart Dialing Options. On the Options tab, select the Enable Smart Dialing check box. Smart dialing options • Select the Automatically expand selected contact check box to enable a contact’s name and phone number to be displayed when the contact is selected in the matching list.
-
Page 49: In-Call Options
Using Phone Features 49 3.5 In-call Options To put a call on hold Your device notifies you when you have another incoming call, and gives you the choice of rejecting or accepting the call. If you are already on a call and accept the new call, you can choose to switch between the two callers, or set up a conference call between all three parties. -
Page 50: Additional Dialing Information
50 Using Phone Features To mute a call You can turn off the microphone during a call, so that you can hear the caller but the caller cannot hear you. • During a call, tap Mute. • When the microphone is turned off, the mute icon ( ) appears on the screen. -
Page 51: Setting Up Sim Access Profile (Sap)
Using Phone Features 51 3.7 Setting Up SIM Access Profile (SAP) You can access your SIM card content, called SIM Access Profile (SAP) using a car kit phone that supports Bluetooth connectivity. The SAPSettings program on your device allows you to connect your car kit phone with your device’s SIM card via Bluetooth. - Page 52 52 Using Phone Features...
-
Page 53: Chapter 4 Synchronizing Information And Setting Up E-Mail Security
Chapter 4 Synchronizing Information and Setting Up E-mail Security 4.1 Setting Up ActiveSync 4.2 Synchronizing Information 4.3 Synchronizing via Infrared and Bluetooth 4.4 Synchronizing Music, Video, and Pictures 4.5 Setting Up E-mail Security... -
Page 54: Setting Up Activesync
54 Synchronizing Information and Setting Up E-mail Security 4.1 Setting Up ActiveSync Microsoft ActiveSync synchronizes information on your device with information on your PC, such as Microsoft Outlook content. ActiveSync can also synchronize over a wireless or cellular network with Microsoft Exchange Server, if your company or service provider is running Microsoft Exchange Server with Exchange ActiveSync. - Page 55 Synchronizing Information and Setting Up E-mail Security 55 If you want to synchronize your device with Exchange Server, select the Synchronize directly with a server running Microsoft Exchange Server check box, then click Next. On the Exchange server credentials screen, enter the Exchange server address, your user name and password, and the domain name.
- Page 56 56 Synchronizing Information and Setting Up E-mail Security • To check the domain name, click Start > Settings > Control Panel, then double-click System. • In the System Properties dialog box, click the Computer Name tab. You will then see the domain name. On your device, you also need to enter the Exchange server settings.
- Page 57 Synchronizing Information and Setting Up E-mail Security 57 If you want to synchronize your device with both your computer and Exchange Server, do the following: • For the Contacts, Calendar, E-mail, and Tasks items, choose whether to synchronize them with the computer or with the Exchange Server.
-
Page 58: Synchronizing Information
58 Synchronizing Information and Setting Up E-mail Security 4.2 Synchronizing Information When you connect your device to the PC using a USB cable, an infrared connection, or a Bluetooth connection, ActiveSync will immediately synchronize. While your device is connected, ActiveSync synchronizes every time you make a change on either the PC or your device. - Page 59 Synchronizing Information and Setting Up E-mail Security 59 Location New state Pocket PC All Outlook contacts and calendar appointments from both Phone PC1 and PC2 are on your device. Note Outlook e-mail can be synchronized with only one computer. To change which information is synchronized ActiveSync synchronizes a limited amount of information by default to save storage space on your device.
- Page 60 60 Synchronizing Information and Setting Up E-mail Security To synchronize directly with Exchange Server In ActiveSync on your device, tap Menu > Configure Server. If you have not yet set up synchronization with Exchange Server, this appears as Add Server Source. In Server address, enter the name of the server running Exchange Server, and tap Next.
- Page 61 Synchronizing Information and Setting Up E-mail Security 61 Using Comm Manager to Enable Direct Push On the Today screen, tap the Comm Manager icon ( On the Comm Manager screen, tap the Microsoft Direct Push button. The button will turn to , which indicates that you will receive e-mail as they arrive.
-
Page 62: Synchronizing Via Infrared And Bluetooth
62 Synchronizing Information and Setting Up E-mail Security In ActiveSync on your device, tap Menu > Schedule. Select a shorter time interval in the Peak times box for you to be able to receive e-mails more frequently. Select a longer interval in the Off-peak times box. To set the days and hours that make up your peak and off-peak times, tap Adjust peak times to fit your schedule. -
Page 63: Synchronizing Music, Video, And Pictures
Synchronizing Information and Setting Up E-mail Security 63 Notes • To preserve battery power, turn off Bluetooth when not in use. • To connect and synchronize your device with a computer via Bluetooth, your computer must have a Bluetooth adapter or dongle. 4.4 Synchronizing Music, Video, and Pictures If you want to carry your music or other digital media along with you while you travel, ActiveSync works with Windows Media Player to... -
Page 64: Setting Up E-Mail Security
64 Synchronizing Information and Setting Up E-mail Security Select the storage card. Click Set up Sync. Choose whether to synchronize automatically or manually. For more information about Windows Media Player on your device, see “Using Windows Media Player” in Chapter 8. 4.5 Setting Up E-mail Security Windows Mobile on your device protects your Outlook e-mail through Secure/Multipurpose Internet Mail Extension (S/MIME), which allows... - Page 65 Synchronizing Information and Setting Up E-mail Security 65 Note S/MIME encryption and digital signatures for Windows Mobile-based devices are available only with Exchange Server 2003 Service Pack 2 or a later version that supports S/MIME. If you are not using one of these products, or have not yet synchronized, these options are unavailable.
- Page 66 66 Synchronizing Information and Setting Up E-mail Security Tap Choose Certificate to select a certificate for signing or encrypting outgoing e-mail messages. You can select certificates to sign or encrypt e-mail messages individually if you do not choose to sign or encrypt all outgoing e-mail.
-
Page 67: Chapter 5 Managing Your Pocket Pc Phone
Chapter 5 Managing Your Pocket PC Phone 5.1 Personalizing Your Pocket PC Phone 5.2 Adding and Removing Programs 5.3 Managing Memory 5.4 Backing Up Files 5.5 Protecting Your Pocket PC Phone 5.6 Resetting Your Pocket PC Phone... -
Page 68: Personalizing Your Pocket Pc Phone
68 Managing Your Pocket PC Phone 5.1 Personalizing Your Pocket PC Phone Customize the Today screen The Today screen shows your upcoming appointments, active tasks, and information about incoming messages. You can customize the Today screen on your device. To customize the Today screen Tap Start >... - Page 69 Managing Your Pocket PC Phone 69 • Select Next appointment to show only the next appointment in your schedule, or Upcoming appointments to show multiple appointments. • Clear the Display all day events check box if you do not want to display all-day events.
- Page 70 70 Managing Your Pocket PC Phone To change the device name Tap Start > Settings > System tab > About. Tap the Device ID tab. Enter a name. Note The device name must begin with a letter, consist of letters from A to Z, numbers from 0 to 9, and cannot contain spaces.
- Page 71 Managing Your Pocket PC Phone 71 To set the time and date for a different location If you visit or communicate with someone in a particular time zone often, you can select it as your visiting time zone. Tap Start > Settings > System tab > Clock & Alarms > Time tab.
- Page 72 72 Managing Your Pocket PC Phone To increase or decrease the size of text on the screen Tap Start > Settings > System tab > Screen > Text Size tab. Move the slider to increase or decrease the text size. To choose how to be notified about events or actions Tap Start >...
-
Page 73: Phone Settings
Managing Your Pocket PC Phone 73 To make the battery last longer • Tap the battery icon ( ) on the Today screen. On the Advanced tab of the Power settings screen, you can specify when your device turns off the display to conserve battery power. For optimum conservation, specify 3 minutes or less. - Page 74 74 Managing Your Pocket PC Phone To change the ring type You can change the way that you are notified of incoming calls. For example, you can choose to be notified by a ring, a vibration, or a combination of both. On the Phone screen, tap Menu >...
-
Page 75: Adding And Removing Programs
Managing Your Pocket PC Phone 75 To set preferred networks Tap Start > Settings > Phone > Network tab. By default, the Network selection field is set to Automatic. However, you can set it to Manual to choose your own network at any point of time. Tap Set Networks. -
Page 76: Managing Memory
76 Managing Your Pocket PC Phone is designed for a different type of computer. You will need to copy this program to your device. If you cannot find any installation instructions for the program, use ActiveSync to copy the program file to the Program Files folder on your device. - Page 77 Managing Your Pocket PC Phone 77 • Delete unnecessary files. Tap Start > Programs > File Explorer. Tap and hold the file, and tap Delete. • Delete large files. To find your largest files, tap Start > Programs > Search. In the Type list, tap Larger than 64 KB, and tap Search.
-
Page 78: Backing Up Files
78 Managing Your Pocket PC Phone 5.4 Backing Up Files You can back up files to your PC using ActiveSync, or copy files to a storage card you insert into your device. Your device has an expansion slot for inserting a Mini SD card. Using ActiveSync, you can copy or move information from the PC to your device and vice versa. -
Page 79: Protecting Your Pocket Pc Phone
Managing Your Pocket PC Phone 79 To copy a file from your PC to your device: • On your PC, navigate to the folder that contains the file you want to copy. • Right-click the file, then click Copy. • Right-click the destination folder under Mobile Device, then click Paste. - Page 80 80 Managing Your Pocket PC Phone To protect your SIM card with a PIN On the Phone screen, tap Menu > Options > Phone tab. Tap Require PIN when phone is used. To change the PIN at any time, tap Change PIN. Emergency calls can be placed at any time, without requiring a PIN.
-
Page 81: Resetting Your Pocket Pc Phone
Managing Your Pocket PC Phone 81 To display owner information on the ‘my info’ screen Having your contact information displayed on the ‘my info’ screen on startup allows for easy identification of the device in case it is lost. Tap Start > Settings > Personal tab > Owner Information. On the Options tab, select the Identification information check box. - Page 82 82 Managing Your Pocket PC Phone To perform a soft reset • Use the stylus to lightly press and hold the Reset button on the bottom of your device. Your device restarts and displays the Today screen. RESET button To perform a hard reset Press and hold the Left Soft Key and the Right Soft Key, and at the same time, use the stylus to press the Reset button at the bottom of your device.
-
Page 83: Chapter 6 Getting Connected
Chapter 6 Getting Connected 6.1 Connecting to the Internet 6.2 Internet Explorer Mobile 6.3 Using Comm Manager 6.4 Using Bluetooth 6.5 Using Wi-Fi 6.6 Using Internet Sharing 6.7 Using Terminal Services Client... -
Page 84: Connecting To The Internet
84 Getting Connected 6.1 Connecting to the Internet Your device is equipped with powerful networking functions that enable you to connect to the Internet through Wi-Fi or GPRS/EDGE/UMTS/ HSDPA. Connecting your device to the Internet through a private or free wireless network is your best choice since this will not incur any cost. - Page 85 Getting Connected 85 On the Make New Connection screen, enter a name for the connection. In the Select a modem list, select Cellular Line (GPRS, 3G), then tap Next. Enter the Access point name, then tap Next. Enter the user name and password, only if required. Tap Finish.
- Page 86 86 Getting Connected To set up a dial-up connection to your ISP When you use your device to dial up to your ISP and connect to the Internet, you will be billed by the number of minutes that you use. To establish a dial-up connection on your device, you need the same settings that you normally use when you dial up from your computer.
- Page 87 Getting Connected 87 To set up a network card You can insert and use a network card on your device to connect directly to a local area network (LAN) at your home or workplace. Once connected, you can view the Internet or intranet, or download e-mail on your device.
-
Page 88: Internet Explorer Mobile
88 Getting Connected 6.2 Internet Explorer Mobile Internet Explorer Mobile is a full-featured Internet browser, optimized for use on your device. To start Internet Explorer Tap Start > Internet Explorer. • To set a Home page In the address bar on top of the Internet Explorer screen, enter the desired Web page address. - Page 89 Getting Connected 89 In ActiveSync on your PC, on the Tools menu, click Options, and select Favorites. In Internet Explorer on your PC, click Favorites > Add to Favorites and save or move favorite links to the Mobile Favorites subfolder in the Favorites list. Connect your device to your PC.
- Page 90 90 Getting Connected To clear the History list In Internet Explorer Mobile, tap Menu > Tools > Options > Memory tab. Tap Clear History. To save a picture from a Web page In Internet Explorer Mobile, tap and hold the picture, and tap Save Image.
-
Page 91: Using Comm Manager
Getting Connected 91 6.3 Using Comm Manager Comm Manager acts like a central switch that lets you enable or disable phone features as well as manage your data connections easily. To open Comm Manager • Tap the Comm Manager icon ( ) on the Today screen. -
Page 92: Using Bluetooth
92 Getting Connected 6.4 Using Bluetooth Bluetooth is a short-range wireless communications technology. Devices with Bluetooth capabilities can exchange information over a distance of about 10 meters without requiring a physical connection. You can even beam information to a device in a different room, as long as it is within the Bluetooth signal coverage range. - Page 93 Getting Connected 93 Note By default, Bluetooth is turned off. If you turn it on, then turn off your device, Bluetooth also turns off. When you turn on your device again, Bluetooth automatically turns on. To turn Bluetooth on and make your device visible On your device, tap Start >...
- Page 94 94 Getting Connected Select the check boxes of services that you want to use from the paired device. Tap Finish. To accept a Bluetooth partnership Ensure that Bluetooth is turned on and in visible mode. Tap Yes when prompted to establish a partnership with the other device.
- Page 95 Getting Connected 95 To connect a Bluetooth hands-free headset Make sure that both your device and the Bluetooth headset are turned on and within close range, and that the headset is visible. Refer to the manufacturer’s documentation to find out how to set the headset in visible mode.
- Page 96 96 Getting Connected Beam information using Bluetooth You can beam information, such as contacts, calendar items, and tasks, as well as files from your device to your computer or to another Bluetooth-enabled device. Note If your computer does not have built-in Bluetooth capability, you need to connect and use a Bluetooth adapter or dongle on your computer.
- Page 97 Getting Connected 97 To beam a contact, tap Menu > Send Contact > Beam. To beam other types of information, tap Menu > Beam [type of item]. Tap the device name to which you want to send the beam. If you beamed an Outlook item and it is not automatically added to Outlook, select File >...
- Page 98 98 Getting Connected Alternatively, you can initiate a Bluetooth partnership from the computer by following these steps (based on Windows XP SP2): In the Control Panel or System Tray, double-click the Bluetooth Devices icon. In the Bluetooth Devices window, click Add. The Add Bluetooth Device Wizard opens.
- Page 99 Getting Connected 99 Under Network Tasks, click View Bluetooth network devices. In the Bluetooth Personal Area Network Devices dialog box, select your device, then click Connect. On the Internet Sharing screen on your device, check if a connected status is displayed, which indicates that your computer has been successfully connected to the Internet using your device as a Bluetooth modem.
-
Page 100: Using Wi-Fi
100 Getting Connected Select the phone from the list and tap Next. Enter a passkey and tap Next. Enter the same passkey on the phone and tap Finish. In the My Connections list on your device, select the phone and tap Next. - Page 101 Getting Connected 101 On the next pop-up message window, tap The Internet if the wireless LAN connects your device to the Internet. Otherwise, tap Work if the wireless LAN connects your device to a private network. If the wireless LAN is secured by a network key, enter this key, then tap Connect.
- Page 102 102 Getting Connected To save battery power while connected to a Wi-Fi network Tap Start > Settings > Connections tab > Wireless LAN to open the Wireless LAN Settings screen. On the Power Mode tab of the Wireless LAN Settings screen, move the Power Save Mode slider to a position that optimizes performance with the least power consumption.
- Page 103 Getting Connected 103 • Configure Wireless Networks screen. Tap Start > Settings > Connections tab > Network Cards > Wireless tab. This screen displays the wireless networks currently available. • To connect to a wireless network in the list, tap and hold on the desired network, then tap Connect.
-
Page 104: Using Internet Sharing
104 Getting Connected 6.6 Using Internet Sharing Internet Sharing connects your PC or notebook computer to the Internet by using your device’s data connection. You can choose to connect via USB or Bluetooth. Follow the procedure in this section to set up your device as a USB modem. -
Page 105: Using Terminal Services Client
Getting Connected 105 6.7 Using Terminal Services Client The Terminal Services Client allows you to log on to a PC running Terminal Services or Remote Desktop, and use all the resources available on that PC. For example, instead of running Word Mobile on your device, you can run the PC version of Word and access the .doc files available on that PC. - Page 106 106 Getting Connected Notes • Do not use the Start menu on your device. • If a network administrator has configured Terminal Services Client on your device to reconnect to disconnected sessions, and you previously disconnected from a Terminal Server without ending the session, the Terminal Services Client reconnects to that session.
-
Page 107: Chapter 7 Mail And Messaging
Chapter 7 Mail and Messaging 7.1 E-mail and Text Messages 7.2 Set up Xpress Mail 7.3 MMS Messages 7.4 Pocket MSN 7.5 Calendar 7.6 Contacts 7.7 Tasks 7.8 Notes... -
Page 108: E-Mail And Text Messages
108 Mail and Messaging 7.1 E-mail and Text Messages Messaging is where all of your e-mail accounts and your text message account are located. You can send and receive Outlook e-mail, Internet e-mail through an Internet service provider (ISP), as well as text (SMS) messages using your mobile phone network. - Page 109 Mail and Messaging 109 Everytime you want to manually send or receive Outlook e-mail on your device, just connect your device to your computer, LAN, or over- the-air connection, then tap Sync on the ActiveSync screen or tap Menu > Send/Receive in Outlook on your device. You can also use the GetGood program offered by Cingular for real- time push synchronization of your e-mail, attachments, and PIM data.
- Page 110 110 Mail and Messaging For example: • Change the time intervals for downloading new messages. • Limit the amount of messages that are downloaded and authentication method for outgoing mails. • Download full messages or parts of messages. If Auto configuration is unsuccessful or you have an account you access using a VPN server connection, contact your ISP or network administrator for the following information and enter it manually: Setting...
-
Page 111: Send And Receive Messages
Mail and Messaging 111 Outgoing server settings: User name Enter your user name for the outgoing e-mail server. Password Enter your password for the outgoing e-mail server. Domain Enter the domain of the outgoing e-mail server. Require SSL Select this to ensure you always send e-mail from this for outgoing account using an SSL connection. - Page 112 112 Mail and Messaging To reply to or forward a message Open the message and tap Reply, or Menu > Reply All, or Menu > Forward. Enter your response. To quickly add common messages, tap Menu > My Text and tap a desired message. To check the spelling, tap Menu >...
- Page 113 Mail and Messaging 113 To add an attachment to a message In a new message, tap Menu > Insert and tap the item you want to attach: Picture, Voice Note, or File. Select the file you want to attach, or record a voice note. To receive attachments An attachment sent with an e-mail message or downloaded from the server appears below the subject of the message.
-
Page 114: Download Messages
114 Mail and Messaging Download messages The manner in which you download messages depends on the type of account you have: • To send and receive e-mail for an Outlook e-mail account, begin synchronization through ActiveSync. For more information, see “Set up Outlook e-mail”... - Page 115 Mail and Messaging 115 Individually sign and encrypt a message Encrypting an Outlook e-mail message protects the privacy of the message by converting it from plain, readable text into cipher (scrambled) text. Only the recipient who has the authorization key can decipher the message.
- Page 116 116 Mail and Messaging Verify the digital signature on a signed message you receive To verify a digital signature in the message that you receive, do the following: Open the Outlook e-mail message that has been digitally signed. At the top of the message, tap View Signature Status. Tap Menu >...
- Page 117 Mail and Messaging 117 If you use an Outlook e-mail account, e-mail messages in the Inbox folder in Outlook will be synchronized automatically with your device. You can select to synchronize additional folders by designating them for synchronization. The folders you create and the messages you move will then be mirrored on the e-mail server.
-
Page 118: Set Up Xpress Mail
PC. Xpress Mail supports Microsoft Exchange, Lotus Notes, and IMAP. Tap Get Xpress Mail on the Today screen of your AT&T 8525 to download the program, and follow the instructions to complete the... - Page 119 Mail and Messaging 119 setup and registration process. For more information or assistance, contact Cingular customer service. To download Xpress Mail Tap Get Xpress Mail on your Today screen. Tap Install Now to launch the Xpress Mail download site. Tap Download Now on the download page.
- Page 120 Click on OK to go to your settings. After successfully registering, your 8525 will automatically display the Xpress Mail Settings screen. No setting changes are required; just click Xpress Mail at the bottom right hand corner.
- Page 121 A Corporate email account (like Microsoft Exchange or Lotus Notes) is an account managed by a company’s IT organization. There are two ways to access your corporate email on your 8525: 1. Self Service – Xpress Mail is a self service option for accessing your corporate email from your 8525 without support from IT.
- Page 122 When Xpress Mail has successfully connected to your corporate email account, you will receive a message confirming that your software is installed and you are now connected to Xpress Mail. Now all you need to do is access your corporate email from your 8525...
- Page 123 Mail and Messaging 123 Complete the Setup Process on your 8525 Tap Get Xpress Mail on your Today screen. Tap Install Now to launch the Xpress Mail download site. Tap Download Now on the download page. Tap Yes (Open file after download should be checked).
-
Page 124: Mms Messages
124 Mail and Messaging Send and Receive Corporate Email Tap Start, then Messaging. When you are in Messaging, tap on the Inbox drop down menu and select the Xpress Mail section. In the Xpress Mail section tap on the Inbox view. To compose a new email, tap New. - Page 125 Mail and Messaging 125 To access MMS Tap Start > Messaging. Tap Menu > Go To > MMS. MMS message folders Change MMS settings When you send an MMS message, an SMS notification message will first be sent to the recipient, while your MMS message will be temporarily stored on an MMS server of your wireless service provider.
- Page 126 126 Mail and Messaging In the Preferences tab, select or clear the provided check boxes according to your needs. You can choose to keep track of your MMS messages, retrieve messages immediately, accept or reject messages, and request a delivery or read receipt. You can also specify a resolution for images you send and message delivery attempts.
- Page 127 Mail and Messaging 127 Tap OK. The MMS server settings will then be added as an entry on the MMS Configuration screen. Note If you add several MMS service providers to the MMS Configuration screen, you can choose one as your default MMS provider. Select the MMS provider's name in the list then tap Set As Default.
- Page 128 128 Mail and Messaging Enter text and insert audio clips by tapping the respective areas. See “To add text to an MMS message” and “To add an audio clip to an MMS message” for details. To add more slides, tap or tap Menu >...
- Page 129 Mail and Messaging 129 Note To save a message as a template, open the message and tap Menu > Template > Save as Template. To add text to an MMS message When entering text into an MMS message, you can do the following: •...
-
Page 130: Pocket Msn
130 Mail and Messaging View and Reply to MMS messages To view an MMS message • Use the playback controls , and • Tap Objects to see a list of files included in the message. On the Message Objects screen, you can do the following: •... - Page 131 Mail and Messaging 131 To start MSN Messenger Tap Start > Programs > Pocket MSN. Tap MSN Messenger. To sign in or out • To sign in, tap anywhere on the MSN Messenger screen. Enter the e-mail address and password for your Passport or Hotmail account, and tap Sign In.
-
Page 132: Calendar
132 Mail and Messaging 7.5 Calendar Use Calendar to schedule appointments, including meetings and other events. Your appointments for the day can be displayed on the Today screen. If you use Outlook on your PC, you can synchronize appointments between your device and PC. You can also set Calendar to remind you of appointments with a sound or flashing light, for example. -
Page 133: Contacts
Mail and Messaging 133 To invite each additional attendee, tap Add and tap the name. Tap OK. The meeting request will be sent to the attendees the next time you synchronize your device with your PC. Note When attendees accept your meeting request, the meeting is automatically added to their schedules. - Page 134 134 Mail and Messaging Tips • If someone who is not in your list of contacts calls you or sends you a message, you can create a contact from Call History, or from the message by holding a phone number and tapping Save to Contacts from the shortcut menu.
- Page 135 Mail and Messaging 135 To copy SIM contacts to your device If you have saved contacts on your SIM card, you can copy them into Contacts on your device. Tap Start > Programs > SIM Manager. Select the desired item, or select all SIM contacts by tapping Menu >...
- Page 136 136 Mail and Messaging • Begin entering a name or phone number in the provided text box until the contact you want is displayed. To show all contacts again, tap the text box and clear the text, or tap the arrow to the right of the text box.
- Page 137 Mail and Messaging 137 • In a new meeting request using Calendar, tap Attendees and then tap Menu > Find Online. Enter the part or full contact name and tap Find. Tap Select to choose the desired contact(s) from the list.
-
Page 138: Tasks
138 Mail and Messaging Notes • Your device must be set up with a data connection. • You can search on the following information as long as that information is included in your organization’s GAL: First name, Last name, E-mail name, Display name, E-mail address, or Office location. - Page 139 Mail and Messaging 139 To change the priority of a task Before you can sort tasks by priority, you need to specify a priority level for each task. Tap Start > Programs > Tasks. Tap the task you want to change the priority for. Tap Edit and in the Priority box, tap a priority level.
-
Page 140: Notes
140 Mail and Messaging To filter your tasks further, tap Menu > Filter > Active Tasks or Completed Tasks. 7.8 Notes Notes help you to quickly capture thoughts, questions, reminders, to-do lists, and meeting notes. You can create handwritten and typed notes, record voice notes, convert handwritten notes to text for easy reading, and send notes to others. - Page 141 Mail and Messaging 141 Notes • To select handwritten text, tap and hold next to the writing. As soon as dots appear, and before they form a complete circle, quickly drag across the writing. • If a letter crosses three ruled lines, it is treated as a drawing rather than text.
- Page 142 142 Mail and Messaging Record a voice note You can create a stand-alone recording (voice note) or you can add a recording to a note. To create a voice note Tap Start > Programs > Notes. Do one of the following: •...
-
Page 143: Chapter 8 Experiencing Multimedia
Chapter 8 Experiencing Multimedia 8.1 Using Camera 8.2 Using Pictures & Videos 8.3 Using Windows Media Player Mobile... -
Page 144: Using Camera
144 Experiencing Multimedia 8.1 Using Camera Taking photos and recording video clips along with audio are easy with your device’s built-in camera. Before capturing a photo or video clip, adjust the lens found at the back of the device to one of the following modes: Normal mode - to take shots at normal range Switch between modes by sliding the selector up or down... - Page 145 Experiencing Multimedia 145 the screen displays the active capture mode. To switch to other capture modes, do any of the following: • on the screen. • Press Navigation Control left or right. Current capture mode The available capture modes of the camera are as follows: •...
-
Page 146: Camera Controls
146 Experiencing Multimedia File formats supported Using the above capture modes, the camera in your device captures files in the following formats: Capture type Format Still image JPEG Video MPEG-4 (.mp4) MMS Video H.263 baseline (.3gp), MPEG-4 (.mp4) Panorama / Sports / Burst JPEG Camera controls Use the following device buttons and on-screen controls to take photos... - Page 147 Experiencing Multimedia 147 On-screen controls and indicators Video mode 10 11 12 Photo mode Picture Theme mode Mode Switching control. Tapping the left/right arrow ( ) on the screen allows you to switch the capture mode. Resolution. The resolution icon ( indicates the current resolution.
- Page 148 148 Experiencing Multimedia Remaining information indicator. In Photo, Contacts Picture, Picture Theme, Panorama, Sports, and Burst modes, this shows the remaining, available shots of pictures based on current settings. In Video and MMS Video modes, this shows the remaining duration that can be recorded. While recording video, this shows the recorded duration.
- Page 149 Experiencing Multimedia 149 Still image capture modes While using Still Image capture modes, such as Photo, Contacts Picture, Picture Theme, Panorama, Sports, and Burst, you can capture still image(s) by pressing the Camera button on the device or the Enter button on the Navigation Control. Still images will be saved in JPEG format.
- Page 150 150 Experiencing Multimedia The Review screen After taking a still image or recording a video clip, you can view the image or video clip on the Review screen. In addition, you can tap the icons at the bottom of the Review screen to delete a captured image or video, send it via e-mail or MMS, and more.
- Page 151 Experiencing Multimedia 151 Browse. After you have taken photos in Sports or Burst mode, the total number of consecutive shots is shown in the lower right corner of the Review screen. Tap the up/down arrow ( ) to browse through the sequence of photos. To change the display duration of the Review screen to open the Camera Settings screen.
-
Page 152: Experiencing Multimedia
152 Experiencing Multimedia Capture Capture size setting Zoom range mode Medium (176 x 144) 1.0x to 2.0x Video Small (128 x 96) 1.0x to 2.0x Large (640 x 480) 1.0x to 4.0x Contacts Medium (320 x 240) 1.0x to 8.0x Picture Small (160 x 120) 1.0x to 8.0x... - Page 153 Experiencing Multimedia 153 The Camera Settings screen While capturing a still image or video clip using any capture modes, tap the Tool icon ( to access the Camera Settings screen. The Camera Settings screen allows you to configure the capture settings. Camera Settings screen in Photo mode When you tap the icons at the bottom of the Camera Settings screen, different menus will appear.
- Page 154 154 Experiencing Multimedia Tap or press the Enter button to select a setting and close the submenu. Alternatively, press Navigation Control up/down to select a setting, then press Navigation Control left to close the submenu. For more information about the different menus and settings, see the succeeding sections.
- Page 155 Experiencing Multimedia 155 Flash Light menu • Flash Light. Set this option to On to turn on the flash light (located at the back of your device) so that you can shoot photos or video clips in a dark-lit environment. This also allows the camera to give off a flash when taking photos.
- Page 156 156 Experiencing Multimedia Advanced menu Tap the left/right icon in this bar to switch between the menu pages in the Advanced menu. Alternatively, when using the Navigation Control buttons, keep pressing down until this bar is selected (bar becomes black in color).
- Page 157 Experiencing Multimedia 157 • Review Duration. Set a time length for displaying the captured image/video on the Review screen before automatically saving it and returning to the live Camera screen. Select No Limit if you do not want to impose a time limit. Select No Review to immediately return to the live Camera screen after capturing.
-
Page 158: Using Pictures & Videos
158 Experiencing Multimedia In the submenu, tap one of the properties to adjust. Alternatively, press Navigation Control up/down to select a property. To increase/decrease the value, tap the plus/minus icon or press Navigation Control left/right. The live Camera screen on the background immediately displays the effect of changes. - Page 159 Experiencing Multimedia 159 For more information about copying files from your PC to your device, see ActiveSync Help on your PC. Note You can also copy pictures, GIF animation files, and video files from your PC to your device using a memory card. Insert the memory card into the memory card slot on your device, then copy the files from your PC to the folder you created on the memory card.
- Page 160 160 Experiencing Multimedia Tap to select a video and play it in Windows Media Player. To view slide shows You can view your pictures as a slide show on your device. Pictures are shown in full-screen view with 5-second intervals between slides. Tap Start >...
- Page 161 Experiencing Multimedia 161 To edit a picture You can rotate, crop, and adjust the brightness and color contrast of your pictures. Tap Start > Programs > Pictures & Videos. Tap the picture you want to edit. Tap Menu > Edit, and do any of the following: •...
- Page 162 162 Experiencing Multimedia Enter the recipient name and subject, and tap Send. The message will be sent the next time you synchronize your device. Note Pictures and video clips are saved automatically before they are sent. To beam a picture or video clip You can beam a picture or video file to another mobile device using Infrared.
-
Page 163: Using Windows Media Player Mobile
Experiencing Multimedia 163 8.3 Using Windows Media Player Mobile You can use Microsoft Windows Media Player 10 Mobile for Pocket PC to play digital audio and video files that are stored on your device or on a network, such as on a Web site. Using Windows Media Player, you can play both audio and video files. - Page 164 164 Experiencing Multimedia About the controls The following are available controls on the Windows Media Player. This control Does this Plays/Pauses a file. Displays the video in full screen. Displays a Web site where you can find music and videos to play.
- Page 165 Experiencing Multimedia 165 About the screens and menus Windows Media Player has three primary screens: • Playback screen. The default screen that displays the playback controls (such as Play, Pause, Next, Previous, and Volume) and the video window. You can change the appearance of this screen by choosing a different skin.
- Page 166 166 Experiencing Multimedia Copy files to your device Use the latest version of the desktop Player (Windows Media Player 10 or later) to synchronize digital media files to your device (instead of dragging a file from a folder on your PC to a folder on your device, for example).
- Page 167 Experiencing Multimedia 167 • In the rightmost pane, click the drop-down list and select Sync List. • In the Playlist which is the leftmost pane, select a desired playlist. • In the File List which is the middle pane, multi-select desired files then drag them to the Sync List.
-
Page 168: Troubleshooting
168 Experiencing Multimedia the screen), then tap the media storage that you want use, for example, Storage Card. In most cases, Windows Media Player Mobile automatically updates the library. However, you can manually update the library to ensure that it contains new files that you recently copied to your device or storage card. -
Page 169: Chapter 9 Using Other Applications
Chapter 9 Using Other Applications 9.1 Word Mobile 9.2 Excel Mobile 9.3 Viewing Slide Shows with PowerPoint Mobile 9.4 Using ClearVue PDF 9.5 Using MIDlet Manager 9.6 Using ZIP 9.7 Using Voice Speed Dial 9.8 Using PTT (Push to Talk) -
Page 170: Word Mobile
170 Using Other Applications 9.1 Word Mobile Word Mobile is a streamlined version of Microsoft Word. Word documents created on your PC can be opened and edited on your device. You can also create and edit documents and templates in Word Mobile and save them as *.doc, *.rtf, *.txt, and *.dot files. -
Page 171: Excel Mobile
Using Other Applications 171 9.2 Excel Mobile Excel Mobile makes it easy for you to open and edit Excel workbooks and templates created on your PC. You can also create new workbooks and templates on your device. To create an Excel file In Excel Mobile, tap New. -
Page 172: Viewing Slide Shows With Powerpoint Mobile
172 Using Other Applications 9.3 Viewing Slide Shows with PowerPoint Mobile With PowerPoint Mobile, you can open and view slide show presentations created on your PC. Slide shows in *.ppt and *.pps format created using PowerPoint '97 and later can be viewed in PowerPoint Mobile. -
Page 173: Using Clearvue Pdf
Using Other Applications 173 9.4 Using ClearVue PDF ClearVue PDF allows you to open and view Portable Document Format (PDF) files. These files usually have a *.pdf file extension. To open a PDF file on your device Tap Start > Programs > ClearVue PDF. Tap File >... -
Page 174: Using Midlet Manager
174 Using Other Applications 9.5 Using MIDlet Manager MIDlets are Java applications that can run on mobile devices. Your device supports Java 2 Micro Edition, J2ME. The MIDlet Manager allows you to download Java applications, such as games and tools that are specifically designed for mobile devices. - Page 175 Using Other Applications 175 To run MIDlets on your device Tap Start > Programs > MIDlet Manager. Tap a MIDlet to run. To view the MIDlets currently running • Tap the down arrow on the top left of the MIDlet Manager screen, then tap Running.
- Page 176 176 Using Other Applications To change the display name of a MIDlet Tap and hold a MIDlet, and tap Rename. Enter a new name for the MIDlet, then tap OK. Note You cannot change the name of a MIDlet suite. To uninstall a MIDlet/MIDlet suite Before you uninstall a MIDlet/MIDlet suite, make sure that it is not running.
-
Page 177: Using Zip
Using Other Applications 177 Security Option Description Determines whether a MIDlet/MIDlet suite can access Net Access the Internet. Local Enables a MIDlet/MIDlet suite to access services, such Connectivity as infrared and Bluetooth. Enables a MIDlet/MIDlet suite to run at specified times, App Auto Run or any time. - Page 178 178 Using Other Applications • Double-tap a file. Note You cannot select multiple ZIP files. The files contained in the zip file are then displayed. Select files by doing one of the following: • Tap to select a file. • To select several files, tap Action and make sure Multi- Select Mode selected.
- Page 179 Using Other Applications 179 Choose a folder in which files will be extracted to, then tap Extract. To create a zip archive Tap File > New Archive. On the Save As screen, enter a zip file name and choose a folder in which to save the zip file.
-
Page 180: Using Voice Speed Dial
180 Using Other Applications 9.7 Using Voice Speed Dial You can record voice tags so that you can dial a phone number or launch programs simply by speaking a word. Create a voice tag for a phone number Tap Start > Contacts to open the Contacts list. Do one of the following: •... - Page 181 Using Other Applications 181 To ensure voice recognition accuracy, please record your voice in a quiet place. Create a voice tag for a program Tap Start > Settings > Personal tab > Voice Speed Dial. The Application tab displays a list of all installed programs on your device.
-
Page 182: Using Ptt (Push To Talk)
182 Using Other Applications 9.8 Using PTT (Push to Talk) PTT (Push to talk) provides a “walkie-talkie” like feature for the mobile phone user, which is a half-duplex communication service that allows the user to instantly talk to the other user(s) one-to-one or one-to-many by simply pressing one button on his/her regular cellular phone. -
Page 183: Using Other Applications
Using Other Applications 183 Control Description PTT Contacts Tap to open the PTT Contact screen. Tap to open the PTT New Contact screen, which Add Contacts allows you to add a new contact. Tap to open the PTT New Group screen, which allows Add Croup you to add a new group. - Page 184 184 Using Other Applications Group PTT To create a group Tap Add Group on the PTT Main Menu or tap Menu > Add Group on the PTT Contact screen. On the PTT New Group screen, enter the group name and tap Select the members from the list to add them to this group (the selected member will be marked with a “check mark”).
- Page 185 Using Other Applications 185 Convert to Cellular During a PTT call, the call originator can upgrades the PTT call to a cellular call by tapping the Convert to Cellular button on the PTT call screen. If the PTT call originator upgrade the PTT call to a cellular call, the other members will hear a notification sound indicating the call has been convert to a cellular call.
- Page 186 186 Using Other Applications To set up Contact Alert The Contact Alert function allows you to be alerted when a particular contact has changed his/her status; for example, from Unavailable to Available. On the PTT Contact screen, tap Menu > My Availability > Contact Alert.
- Page 187 Using Other Applications 187 Voice Message for Quick Group On the PTT Contact screen, select an available contact and tap Menu > Quick Group to open the PTT Quick Group screen. Select the desired contacts then tap Menu > Voice Message. Press and hold the PTT button to start recording your message.
- Page 188 188 Using Other Applications SMS/MMS for Dynamic Group On the PTT Contact screen, select available contacts and tap Menu > Send Message > SMS or MMS. Compose your message and tap Send when completed.
-
Page 189: Appendix
Appendix A.1 Regulatory Notices A.2 PC Requirement to Run ActiveSync 4.x A.3 Specifications... -
Page 190: Regulatory Notices
190 Appendix A.1 Regulatory Notices Regulatory Agency IDs For regulatory identification purposes, your product is assigned a model number of HERM100. To ensure continued reliable and safe operation of your device, use only the accessories listed below with your HERM100. The Battery Pack has been assigned a model number of PA16A, HERM160 or HERM161. - Page 191 Appendix 191 and portable radio and ancillary equipment of digital cellular radio telecommunications systems (GSM and DCS). • ETSI EN 301 489-17 Electromagnetic compatibility and Radio spectrum Matters (ERM); ElectroMagnetic Compatibility (EMC) standard for radio equipment and services; Part 17: Specific conditions for 2.4 GHz wideband transmission systems and 5 GHz high performance RLAN equipment.
-
Page 192: Federal Communications Commission Notice
192 Appendix This equipment may be operated in: Federal Communications Commission Notice This device complies with part 15 of the FCC Rules. Operation is subject to the following two conditions: (1) This device may not cause harmful interference, and (2) this device must accept any interference received, including interference that may cause undesired operation. -
Page 193: Sar Information
Appendix 193 Modifications The FCC requires the user to be notified that any changes or modifications made to the device that are not expressly approved by High Tech Computer Corp. may void the user’s authority to operate the equipment. Safety Precautions for RF Exposure Tests for SAR are conducted using standard operating positions specified by the FCC with the phone transmitting at its highest certified power level in all tested frequency bands. -
Page 194: Safety Information
194 Appendix Telecommunications & Internet Association (TIA) safety information Pacemakers The Health Industry Manufacturers Association recommends that a minimum separation of six inches be maintained between a handheld wireless phone and a pacemaker to avoid potential interference with the pacemaker. These recommendations are consistent with the independent research by and recommendations of Wireless Technology Research. -
Page 195: Weee Notice
Appendix 195 WEEE Notice The Directive on Waste Electrical and Electronic Equipment (WEEE), which entered into force as European law on 13th February 2003, resulted in a major change in the treatment of electrical equipment at end-of-life. The purpose of this Directive is, as a first priority, the prevention of WEEE, and in addition, to promote the reuse, recycling and other forms of recovery of such wastes so as to reduce disposal. -
Page 196: Pc Requirement To Run Activesync 4.X
196 Appendix A.2 PC Requirement to Run ActiveSync 4.x To connect your device to the PC, you must have Microsoft® ActiveSync® program installed on your PC. ActiveSync 4.x is included in the Getting Started Disc, which is compatible with the following operating systems and applications: •... -
Page 197: Specifications
Appendix 197 A.3 Specifications System Information Processor 400MHz Samsung stacked CPU Memory ROM : 128 MB RAM : 64 MB SDRAM Operating System Windows Mobile™ Version 5.0 Power Battery Rechargeable Lithium-ion polymer battery, 1350 mAh Charging Time 3 hours Battery Life Standby time: up to 200 hours for GSM;... - Page 198 198 Appendix Camera Module Type 2 Megapixel color CMOS camera with adjustable lens for normal and macro shooting, and with flash light Resolution Photo: 1600x1200, 1280x1024 (SXGA), 640x480 (VGA), 320x240 (QVGA), 160x120 (QQVGA) Video: 352x288 (CIF), 320x240 (QVGA), 176x144 (QCIF), 128x96 Digital Zoom Up to 8x Controls and Lights...
- Page 199 Appendix 199 Audio Audio Controller Microphone/ Built-in/Dual, Hands-free Speaker Headphone AMR/AAC/WAV/WMA/MP3 codec Connections Infrared IrDA SIR I/O Port mini-USB (for USB, serial, audio, and power connections) Car Antenna External connector for WCDMA, GSM and EDGE Connector Wireless Bluetooth, Wi-Fi Connection...
- Page 200 200 Appendix...
-
Page 201: Index
Index... - Page 202 Add attachment to message 113 Calendar search 38 Alarm 70 Calibration 20 Answer/end a call 44 Camera (8525 only) Appointment search 38 - capture modes 144, 145 Assign pictures to contacts 162 - controls 146 Assign programs or shortcuts to - file formats 146...
- Page 203 Index 203 Contacts search 38 - security 64 Cookies 90 - settings (POP3/IMAP4) 110 Copy Edit picture 161 - contacts to SIM card 135 Emergency call 50 - files between device and PC 78 Encrypt messages 65, 115 - files to storage card 78 Excel Mobile 25, 173 - media files from PC to device Exchange Server...
- Page 204 204 Index Hard reset 82 Mail search 38 Help 25 Make call Help search 38 - from Call History 43 Home page (Internet Explorer) 88 - from Contacts 42 - from Phone program 42 - from SIM Manager 44 - from Speed Dial 43 IMAP4 109 MEdia Net 88 Infrared (IR)
- Page 205 Open PDF file 175 - Calculator 25 Outlook e-mail 108 - Calendar 25, 132 Owner information 81 - Camera (8525 only) 25, 144 - ClearVue PDF 25, 175 - Comm Manager 91 - Contacts 25, 133 Panorama capture mode 145...
- Page 206 206 Index - Tasks 26, 138 Security settings (Internet Explorer) - Terminal Services Client 26, 105 - Voice Speed Dial 26, 182 Send messages 111 - Windows Media Player Mobile Send pictures and videos via e-mail 26, 163 - Word Mobile 26, 172 Settings (Connections tab) - ZIP 26, 179 - Beam 29...
- Page 207 Index 207 - Remove Programs 28 - schedule synchronization with - Screen 28 Exchange Server 60 Set picture as Today screen - via Bluetooth 62 background 161 - via Infrared 62 SIM card 18 - Windows Media Player 63, 166 SIM Manager Sync Setup Wizard 54 - copy contacts to SIM card 135...
- Page 208 208 Index Voice call 42 Voice note 142 Voice Speed Dial - create voice tags 182 - overview 26, 182 Voice tags - create for phone numbers 182 - create for programs 183 - use 183 Volume 41 Web pages - layout 89 - text size 89 Wi-Fi 91, 100...
Need help?
Do you have a question about the 8525 and is the answer not in the manual?
Questions and answers