Table of Contents
Advertisement
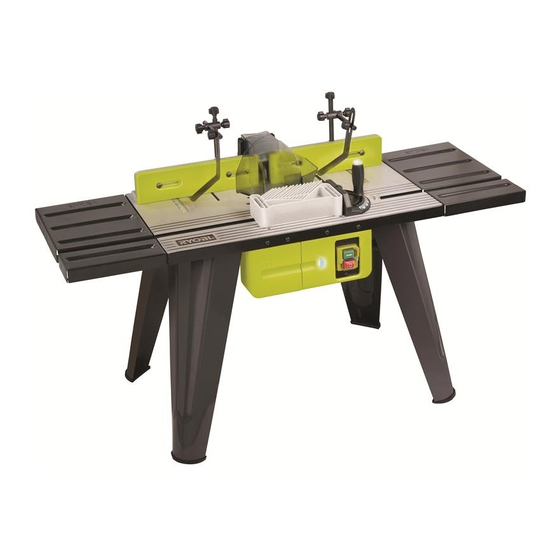
ART3
ROUTER TABLE
OWNER'S OPERATING MANUAL
THANK YOU FOR BUYING A RYOBI ROUTER TABLE
Your new router table has been engineered and manufactured to Ryobi's high standard for
dependability, ease of operation and operator safety. Properly cared for, it will give you years of rugged,
trouble free performance.
CAUTION: Carefully read through this entire owner's manual before using
Pay close attention to the Rules for Safe Operation, Warnings and Cautions.
If you use your router table properly and only for what it is intended, you will enjoy years of safe,
reliable service.
Thank You again for buying Ryobi tools.
your router table.
SAVE THIS MANUAL FOR FUTURE REFERENCE
Double
Insulated
Advertisement
Table of Contents

Related Manuals for Ryobi ART3


Summary of Contents for Ryobi ART3
- Page 1 Insulated THANK YOU FOR BUYING A RYOBI ROUTER TABLE Your new router table has been engineered and manufactured to Ryobi’s high standard for dependability, ease of operation and operator safety. Properly cared for, it will give you years of rugged, trouble free performance.
- Page 2 Fig. 2 Fig. 1 Fig. 4 Fig. 3 Fig. 6 Fig. 5...
- Page 3 Fig. 8 Fig. 7 Fig. 10 Fig. 9 Fig. 12 Fig. 11 Fig. 14 Fig. 13...
- Page 4 WARNING WARNING This router table can use Ryobi router When using electric tools, basic safety precautions ERT1250VN, ERT241200 and ERT1500VK. Do should always be followed to reduce the risk of fire, not use cutters with undersized shanks. electric shock and personal injury. Use common Undersized shanks will not tighten properly and sense.
-
Page 5: Rules For Safe Operation
Save these instructions. Refer to them frequently ■ RULES FOR SAFE OPERATION and use to instruct other users. If you loan someone this tool, loan them these instructions also. Reduce the risk of unintentional starting. Make ■ sure switch is in the OFF position before plugging in WARNING the tool. -
Page 6: Specification
FEATURES SPECIFICATION FENCE ASSEMBLY Table Dimensions 610 x 355mm Extension Table 355 x 200mm Provides an adjustable surface to support and guide Safety Guard / Dust Hook-up ø 57mm work. The fence may be adjusted to compensate for the Maximum Cutter Depth 37.9mm stock reduced in the cut. -
Page 7: Operation
ATTACH ROUTER TO TABLE (Fig. 7) ASSEMBLY Carefully turn the table right side up and check to ■ make sure it rests on all four legs and does not rock. PRESSURE CLAMP ASSEMBLY (Fig. 5) Locate the nine counter sunk holes surrounding the PRESSURE CLAMP throat of the table. - Page 8 The selection of the proper size throat plate depends ■ OPERATION on the size and shape of the cutter you are using. When inserted, the throat plate opening should be WARNING within approximately 6.35 mm of the outer most edge Failure to unplug your router table could result in of the cutter.
-
Page 9: Maintenance
FITMENT OF THE TABLE DUST EXTRACTION OPERATION SYSTEM Place the black part of the dust extraction module in ■ WARNING the centre of the guide piece and align the 4 screw Direction of feed for work piece is always against holes on the dust extraction module to the 4 screw the sharp edges of the bit, therefore into the holes on the guide piece. -
Page 10: Environmental Protection
Contact your supply to avoid risk of serious personal injury. local recycling centre or council for advise. Ryobi takes the care of the environment very GENERAL MAINTENANCE seriously. Avoid using solvents when cleaning plastic parts. - Page 11 '5!2!.4%%...
Need help?
Do you have a question about the ART3 and is the answer not in the manual?
Questions and answers