Table of Contents
Advertisement
Quick Links
Download this manual
See also:
Service Manual
Advertisement
Table of Contents
Troubleshooting

Related Manuals for Akai DVR-3400SS


Summary of Contents for Akai DVR-3400SS
-
Page 2: Important Safety Instruction
Important Safety Instructions The lightning flash with an arrowhead symbol, within the equilateral triangle, is intended to alert the user to the presence of uninsulated "dangerous voltage" within the product's enclosure that may be of sufficient magnitude to cause an electric shock. The exclamation point within the equilateral triangle is intended to alert the user to the presence of WARNING: TO REDUCE THE RISK OF ELECTRIC... -
Page 3: Table Of Contents
Table of Contents CD programmable memory ........25 Important Safety Instruction ....... 1 Track programmed playback ......25 Disc Formats ..........3 Repeat Playback ........26-27 Before You Start ........... 4 Repeating a title/chapter (DVD) ......26 Using the remote control .......... 4 Repeating a single track/whole disc (CD) ... -
Page 4: Disc Formats
Disc Formats The Unit can playback discs bearing any of the following marks: DVDs [8cm(3")/12cm(5”) disc] Compatible Audio CDs [8cm(3")12cm(5”) disc] Region Management Information Region Management Information: This Unit is designed and manufactured to respond to the Region Management Information that is encoded on DVD discs. If the Region number printed on the DVD disc does not correspond to the Region number of this Unit, this Unit cannot play that disc. -
Page 5: Before You Start
Before You Start Using the Remote Control • Point the Remote Control at the REMOTE SENSOR located on the Unit. • When there is a strong ambient light source, the performance of the infrared REMOTE SENSOR may be degraded, causing unreliable operation. •... -
Page 6: Parts And Functions
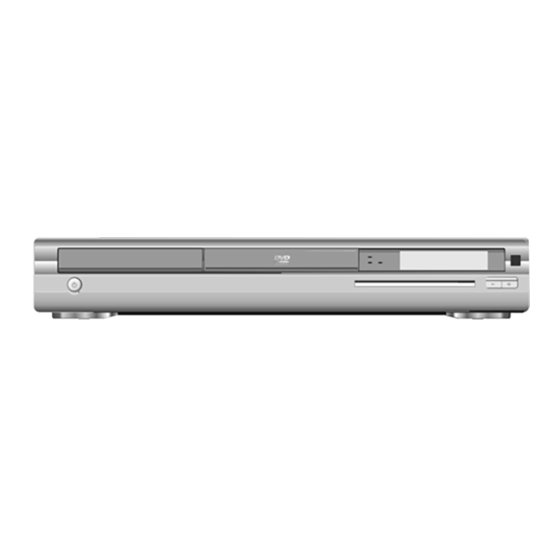
Parts and Functions Front Panel 1) Disc tray 8) FUNCTION button Open or close tray by pushing OPEN/CLOSE button. Select the source. Place a disc on the disc tray, label side up. STOP button PRO LOGIC indicator Stop playing a disc. When DOLBY PRO LOGIC sound selected in AV_IN PAUSE button mode, the light will illuminate. -
Page 7: Subwoofer
Parts and Functions Sub-Woofer Front Panel Rear Panel 26) Front speaker (R) terminals 27) SUBWOOFER AUDIO IN 5.1CH jack 28) Rear speaker (R) terminals 29) Center speaker terminals 30) Rear speaker (L) terminals 31) Front speaker (L) terminals 32) Power cord 33) POWER indicator (Continued on next page) (Continued on next page) -
Page 8: Remote Control
Parts and Functions Remote Control 1) POWER / button Turns the Unit power on and puts it in standby mode. 2) RETURN button O P E N / P O W E R Return to the normal operation after using the SETUP C LO S E menu. -
Page 9: Remote Control
Parts and Functions Remote Control 19) FUNCTION button Display the FUNCTION screen where you can check or change various setting. O P E N / P O W E R C LO S E 20) OPEN / CLOSE button F U N C T IO N R E T U R N Use to open or close the disc tray. -
Page 10: Display
Display Front Panel Display ANGLE indicator MEMORY CHAPTER / TRACK indicator REPEAT 1 Appears when multiple camera angles indicator When a DVD is loaded in the playback are recorded in the section of the DVD Displayed Unit, this indicator appears indicator that is currently playing. -
Page 11: Setup
Setup For better reception Connect FM antenna (included) to the FM ANTENNA jack. AM(MW) Connect the loop antenna (included) to the AM(MW) LOOP ANTENNA terminals. FM antenna SUBWOOFER AUDIO OUT 5.1 CH To wall outlet AM(MW) LOOP ANTENNA (SUPPLIED) A.Connecting your TV The Unit can be connected to your TV in several different ways, depending on the design of your TV. -
Page 12: Connecting A Vcr
Setup B. Connecting a VCR 1. Using the supplied 3 Phono/Scart AV cable, connect the yellow plug from VIDEO OUT jack on your Unit to SCART jack on your TV, connect the left and right AUDIO OUT jacks on your Unit to SCART jacks on your TV. If you want the sound come from the speakers of the Main Unit, you need not to connect these left and right Audio cable from the Main Unit to your TV. -
Page 13: Connecting Another Source
Setup C. Connecting another source Using the not supplied Audio/Video cable, connect ONLY the left and right AUDIO OUT jack on your Unit to the AUDIO IN jack or use a coaxial digital Audio cable (not supplied) to connect to the coaxial in jack on your another equipment. -
Page 14: Connecting The Speakers & Subwoofer
Setup D. Connecting the speakers & subwoofer 1. The speaker cords have been color-coded to simplify connection. Just plug the POSITIVE (+) and NEGATIVE (-) ends of each speaker wire into the corresponding jacks on the rear of the Unit, matching the color tube on the end of the speaker wire to the color-coded connector. -
Page 15: Positioning The Speakers And Subwoofer
Setup E. Positioning the speaker and subwoofer CENTER Place on the top of or below the TV. CENTER FRONT LEFT FRONT SPEAKERS FRONT RIGHT Place on both sides of the TV, equal distances apart. SUB- REAR WOOFER LEFT SUB-WOOFER Can be placed anywhere. REAR RIGHT REAR SPEAKERS... -
Page 16: Mounting Rear Surround Speakers
Setup Mounting rear surround speakers 1) Mark the correct mounting position on the wall. 2) Insert a fixing screw(s) at the marked position on the wall. 3) Align the slot hole(s) of the speaker over the screw and pull the speaker downward until it is firmly hooked. Turning on the Unit and TV 1)Press the POWER button to turn the Unit ON, or 2)Press the /POWER button on the remote control or the FUNCTION button or the... -
Page 17: Adjusting The Sound
Adjusting the Sound To adjust the surround sound balance while Pro Logic decoding is in effect Use the remote control to make the following changes to speaker balance: Front speaker (left) • Press the SOUND button repeatedly to display LEFT, then press the CURSOR button to adjust the sound level. -
Page 18: Adjusting The Sound
Adjusting the Sound To select the listening channel 1. When the disc is stopped. At stop mode of DVD function, you can press 5.1 CH and 2.1 CH buttons on the remote control to select different speakers output status shown as below table. 2. -
Page 19: Playing A Disc
Playing a Disc Basic playback This owner’s manual explains the basic instructions of this DVD Unit. Some DVD discs are produced in a manner that allows specific or limited operation during playback. As such, the DVD Unit may not respond to all operating commands. This is not a defect in the DVD Unit. Refer to the instruction notes of discs. -
Page 20: Fast Foward/Fast Reverse
Playing a Disc Fast Forward/Fast Reverse 1. Press the button when a disc is playing. • The disc begins fast scan at x2 speed. • Four speeds are available. Each time button is pressed, the speed of fast scan changes in the following sequence: Note : You also can press and hold SKIP... -
Page 21: Angle Selection
Playing a Disc Angle selection Some DVDs contain scenes which have been shot from a number of different angles. For these discs, the same scene can be viewed from each of these different angles. 1. While you are playing a DVD with different angles recorded, press the ANGLE button to view the number of the current angle. -
Page 22: Subtitle Selection
Playing a Disc Subtitle selection 1. While a DVD is playing, press the SUBTITLE button to display the current language setting, as shown in the example below. 2. Press the SUBTITLE button repeatedly to select the desired subtitle language. Notes : •... -
Page 23: Special Functions
Special Functions Basic playback DISPLAY function Using DISPLAY, you can check and change the current settings of the following items: ANGLE, AUDIO and SUBTITLE. • While the disc is playing, press the DISPLAY button to display the screen shown below. Elapsed time: Elapsed time from the beginning of the chapter which is currently playing. -
Page 24: Locating A Specific Title
Special Functions Basic playback Locating a specific title If a DVD disc contains title numbers, you can locate a specific title by directly selecting a title number. 1. In stop mode, press the GOTO button. 2. Press button to highlight a specific field and press the corresponding number button(s) for the title you want. -
Page 25: Locating A Specific Time
Special Functions Basic playback Locating a specific time You can move to a specific location by entering its corresponding time (hours, minutes, seconds) 1. Press the GOTO button. 2. Press button to highlight time. 3. Press the corresponding number buttons for the setting point you want. •... -
Page 26: Cd / Dvd Programmable Memory
Advanced CD / DVD programmable memory playback Programmable memory The two types of programmed playback provided by this Unit are title programmed playback and chapter programmed playback. Title / Chapter programmed playback 1.Press the MEMORY button while the disc is stopped. 2.Enter the title numbers in . -
Page 27: Repeat Playback
Advanced Repeat Playback playback You can play a specific title or chapter repeatedly. (Title repeat, chapter repeat, A-B repeat) Repeating a title You can play the same title repeatedly. 1. While the disc is playing, press the REPEAT DISC button until the “... -
Page 28: Repeating A Specific Section Dvd
Advanced Repeat Playback playback Repeating a specific section You can play a specific section repeatedly. 1. While the disc is playing, press the REPEAT A-B button at the beginning of the section ( ) is displayed you want to play repeatedly. -
Page 29: Playing Mp3 And Picture File Disc
Playing MP3 and Picture File Disc This Unit will play MP3 and Picture files recorded on CD-R and CD-RW discs Playing a MP3 file disc 1. Press the OPEN /CLOSE button, the disc tray opens. 2. Insert a MP3 file disc on the disc tray with the label side up. 3. -
Page 30: Playing A Picture File Disc
Playing MP3 and Picture File Disc Playing a Picture file disc 1. Press the OPEN /CLOSE button, the disc tray opens. 2. Insert a Picture CD on the disc tray with the label side up. 3. Press the OPEN/CLOSE button, the disc tray closes. 4. -
Page 31: Radio Operation
Radio Operation Tuning into a station manually 1.Press the FUNCTION button until the frequency band appears on the display. 2. Press the BAND button on the remote remote or STOP button on the front panel to select the desired band. 3.Press the TUNING button to tune in the desired station. -
Page 32: Rds Station Service
Radio Operation RDS STATION SERVICE Today many stations transmit so-called RDS (Radio Data System) codes that contain a variety of additional information along with regular sound signals through FM broadcasting. If the stereo is currently receiving an RDS station, it displays the station name. Example: PROGRAM TYPES (PTY) The currently program type is displayed briefly. -
Page 33: Customizing The Function Settings
Customizing the Function Settings LANGUAGE setting 1. Press the FUNCTION button until DVD appears on the display. 2. Press the STOP button so that no disc is playing. 3. Press the SETUP button. 4. Use button to select the Language, then press the ENTER button. 5. -
Page 34: Video Setting
Customizing the Function Settings VIDEO setting TV Shape 1. Press the SETUP button. 2. Use button to select Video, then press the ENTER button. 3. Use button to select TV Shape, then press the ENTER button. 4. Use button to shift and select the TV type, then press the ENTER button. 5. -
Page 35: Video Output
Customizing the Function Settings Video Output 1. Press the SETUP button. 2. Use button to select Video, then press the ENTER button. 3. Use button to select Video Output, then press the ENTER button. 4. Use button to shift and select the signal, then press the ENTER button. 5. -
Page 36: Edges
Customizing the Function Settings Edges 1. Press the SETUP button. 2. Use button to select Video, then press the ENTER button. 3. Use button to select Edges, and then press the ENTER button. 4. Use button to shift and select the Sharpen / Soften / Off, then press the ENTER button. 5. -
Page 37: Audio Setting
Customizing the Function Settings AUDIO setting Digital Out 1. Press the SETUP button. 2. Use button to select Audio, press the ENTER button. 3. Use button to select Digital Out, and then press the ENTER button repeatedly to select Digital Out type. 4. -
Page 38: Subwoofer
Customizing the Function Settings Subwoofer 1. Press the SETUP button. 2. Use button to select the Audio, press the ENTER button. 3. Use button to Subwoofer, and then press the ENTER button. 4. Use button to select the desired setting, and then press the ENTER button. 5. -
Page 39: Center Delay
Customizing the Function Settings Center Delay 1. Press the SETUP button. 2. Use button to select the Audio, press the ENTER button. 3. Use button to Center delay, then repeatedly press the ENTER button to select the desired Center Delay type. -
Page 40: Rating Setting
Customizing the Function Settings RATING setting Password/Parental lock DVD discs equipped with the password function are rated according to their content. The contents allowed by a parental lock level and the way a DVD disc can be controlled may vary from disc to disc. For example, if the disc allowed, you could edit out violent scenes unsuitable for children and replace them with more suitable scenes, or you could lock out playback of the disc altogether. -
Page 41: Factory Set
Customizing the Function Settings Factory Set If you want to return the initial language setting to the factory default, do the following: 1. Press the SETUP button. 2. Use button to select the Rating, then press the ENTER button. 3. Use button to shift and select the Factory Set, then press the ENTER button. -
Page 42: Language Code List For Disc Language
Language Code List for Disc Language... -
Page 43: Maintenance
Maintenance Cleaning Disc A defective or soiled disc inserted into the Unit can cause sound to drop out during playback. Handle the disc by holding its inner and outer edges. • Do NOT touch the surface of the unlabeled side of the disc. •... -
Page 44: Trouble Shooting Guide
Trouble Shooting Guide SYMPTOM CAUSE (AND REMEDY) • The location and orientation of the antenna are incorrect. If you use an indoor antenna, change to an outdoor antenna. • The TV antenna wire is too close to the Unit. Separate the antenna wire of the TV set from the Unit. -
Page 45: Specifications
Specifications Unit Power supply AC 230V ~ 50Hz Power consumption 25 W Signal system Standard PAL Laser Semiconductor laser, wavelength 650/780nm Signal-to-noise More than 95dB Audio dynamic range More than 93dB Harmonic distortion Less than 1% Operating temperature 41°F to 95°F (+5°C to 35°C) Operating humidity 5% to 85% ( no condensation) Video Output / Input...
Need help?
Do you have a question about the DVR-3400SS and is the answer not in the manual?
Questions and answers