
Related Manuals for Summit PRO24G


Summary of Contents for Summit PRO24G
- Page 1 GAS RANGE PRO24G Model User's Manual FELIX STORCH, INC. Write Serial No. from rating label here: 770 Garrison Avenue Bronx, New York 10474 _______________________________ www.summitappliance.com...
- Page 3 Tip-Over Hazard A child or adult can tip the range and be killed. Install the anti-tip device to the structure and/or the range. Connect the range to the anti-tip device by the anti-tip brackets included with the oven as shown in Figs. 2 and 3 on page 13.
- Page 4 Please read these instructions before installing or using your appliance! Dear Customer, We would like you to obtain the best performance from your product, which has been manufactured in modern facilities and has passed through strict quality control procedures. Therefore, we advise you to read through this User's Manual carefully before using your product and keep it for future reference.
-
Page 5: Table Of Contents
Table of Contents Introductory Material How to operate the oven General information on baking, Safety Instructions roasting and broiling ..... 25 Basic safety instructions ...... 5 Tips for baking ........25 Safety for children ....... 6 Tips for roasting ........ 25 Safety when working with electricity .. -
Page 6: Safety Instructions
Safety Instructions Basic safety instructions Ensure that no flammable materials This appliance is not intended for use • • are adjacent to the appliance as the by persons (including children) with sides become hot during use. reduced physical, sensory or mental capabilities, or lack of experience and Fire risk! Do not store flammable •... -
Page 7: Safety For Children
Leftover grease in a broiler can catch Do not use the oven with door glass • fire the next time you use the pan. removed or broken. Check that all controls on the Rear surface of the oven gets hot •... -
Page 8: Safety When Working With Electricity
You know you have a Class ABC Safety when working extinguisher and you already know with electricity how to operate it. WARNING: Before installing, The fire is small and contained in the turn power OFF at the service panel. area where it started. Lock service panel to prevent power The fire department is being called. -
Page 9: Intended Use
Gas appliances and systems must be The manufacturer shall not be held • regularly checked for proper liable for any damage caused by functioning. Please arrange for improper use or handling errors. annual maintenance. The appliance can be used for Clean the gas burners regularly. - Page 10 To prevent the wire shelf and tray inside If you do not have the original carton the oven from damaging the oven door, Pack the appliance in bubble wrap or place a strip of cardboard onto the thick cardboard and tape it securely in inside of the oven door that lines up with order to prevent damage during the position of the trays.
-
Page 11: Installation
Installation To ensure that critical air gaps are ventilation, for example, the opening maintained under the appliance, we of a window or the use of a recommend that this appliance be permanent fixed mechanical mounted on a solid base and that the ventilation system such as an feet do not sink into any carpeting or extractor fan or range hood that... - Page 12 25"...
-
Page 13: Clearances & Dimensions
Important notes to the installer: NOTICE: Read manual before installing the Material damage! range. The door and/or handle must not be Observe all governing codes and used for lifting or moving the appliance. ordinances. The appliance must be placed directly •... -
Page 14: Anti-Tip Stability Device Installation Instructions
Anti-Tip stability device installation instructions 1. The anti-tip device has to be attached to the floor as shown in figure 3. The dimension for the bracket location from the floor is determined after the appliance feet have been adjusted to the proper installation height shown in the instructions and the appliance has been leveled. -
Page 15: Connection To The Gas Supply
DANGER: Electrical shock hazard! 3. Flexible gas connector must not be longer than 36 inches. Use extreme caution when drilling • holes into the wall or floor. There may be concealed electrical wires High Altitude Installation note: located behind the wall or under the This gas range is ETL-certified for safe floor. - Page 16 If not already present, install a gas shut- 6. Carefully tip range forward to insure off valve in an easily accessible location. that anti-tip bracket engages and Make sure all users know where and prevents tip-over. how to shut off the gas supply to the range.
- Page 17 Test for Gas Leaks air has been purged from the supply lines, the burner should light within four Leak testing is to be conducted by the (4) seconds. installer according to the instructions given in this section. Test Flame: High Setting. Turn burner on to HI.
- Page 18 Test Broil Burner Flame. While the packed with the orifices for gas burner is lit, inspect the flame. See conversion. flame figures below for proper flame CAUTION: Risk of explosion! characteristics. If the flame burns Before starting any work on the gas completely or mostly yellow, adjust the installation, please shut off the gas broil burner air shutter.
- Page 19 2. Remove the knob from the gas tap. Exchange injector for the broiler 3. Use an appropriately sized 1. Open broiler door. screwdriver to adjust the flow rate 2. Unscrew fastening screw of the adjustment screw. burner. For LPG (butane propane), turn the 3.
- Page 20 2. Unscrew the 2 screws (2) of the 1. Ignite the burner that is to be adjusted injector holder (1). and turn the knob to the high flame position. 3. Pull out the injector holder. 2. Close the oven door and wait for 10 to 15 minutes until the oven becomes ready for adjustment.
-
Page 21: Connection To The Power Supply
WARNING: Avoid fire hazard or electrical shock. Do not use an adaptor plug, an extension cord, or remove grounding prong from electrical power cord. Failure to follow this warning can cause serious injury, fire or death. This appliance is equipped with a 3- Butane/propane Natural gas prong grounding plug for your protection against shock hazard and should be... - Page 22 DANGER: Risk of electric shock, short circuit or fire by damage to the main power supply! The main power supply lead must not be clamped, bent or trapped or come into contact with hot parts of the appliance. If the main power supply is damaged, it The range is equipped with a 3-prong must be replaced by a qualified ground plug.
-
Page 23: Preparation
Preparation Wipe the surfaces of the appliance with Tips for Saving Energy a damp cloth or sponge and then with a The following information will help you to clean, dry cloth. use your appliance in an ecological way and to save energy: Initial Heating Use dark-colored or enamel-coated •... -
Page 24: How To Use Gas Burners
How to use the gas burners Do not place empty vessels and • General Information about Cooking saucepans on burners that are WARNING: Risk of fire from switched on. They could become overheated oil! damaged. When you are heating oil, do not leave it Operating a burner without a vessel •... - Page 25 Using the burners 3. Adjust the flame to the desired cooking power. 4. If there is no electricity, ignite the gas with the gas lighter. Turning off a gas burner Turn the knob to Off (top) position. Gas shut-off safety system As a counter-measure against blow-out due to fluid overflows at burners,...
-
Page 26: How To Operate The Oven
How to operate the oven General Information on Baking, You should calculate about 10 to 12 • minutes cooking time per inch Roasting and Broiling thickness of meat. DANGER: Risk of scalding by hot Let meat rest in the oven for about 10 steam! •... -
Page 27: How To Use The Gas Oven
seconds, the oven has not lit, stop How to Use the Gas Oven operating the device and open the compartment door. Wait at least 1 minute before attempting a further Oven ignition of the burner. control knob Switch the gas oven off The gas oven is operated by the oven At the end of cooking time, turn the oven control knob. -
Page 28: How To Operate The Broiler
Tips for baking pastry Switch on broiler 1. If the pastry is too dry: next time, 1. Open the oven door. a. Increase temperature some 50F° 2. Keeping the oven control knob and decrease the cooking time; depressed, turn it clockwise to the Broil symbol. -
Page 29: Table Of Broiling Times
Table of Broiling Times Food Preparation/setting Broiling time* Toasting of bread products ----- 3 - 10 min. Small cuts of meat, ----- 15 - 20 min. sausages, bacon, etc. Chops, ham steaks, chicken Chicken with wire rack in 20 - 25 min. pieces, etc. -
Page 30: Cleaning The Oven
4. While placing pan supports, take care The lenses are made of glass. Handle that burners are centered on pan carefully to avoid breakage. Broken supports. glass could cause an injury. Cleaning the control panel NOTICE: Position of lamp might vary from diagram. -
Page 31: Cleaning The Oven Door
Cleaning the oven door Don't use harsh abrasive cleaners or sharp metal scrapers for cleaning the oven door. They could scratch the surface and damage the glass. Removing the oven door 1. Open the oven door. 2. Open the clips at the hinge housing 1 Frame on the right and left sides of the door 2 Plastic part... - Page 32 Reassembling the oven door It is important to seat the lower corner of the middle glass panel into the lower The first step in reassembling the door plastic slot. is to reinstall the middle glass panel (2). When installing the innermost glass As illustrated in the figure below, place panel (1), make sure that the printed the beveled corner of the glass panel so...
-
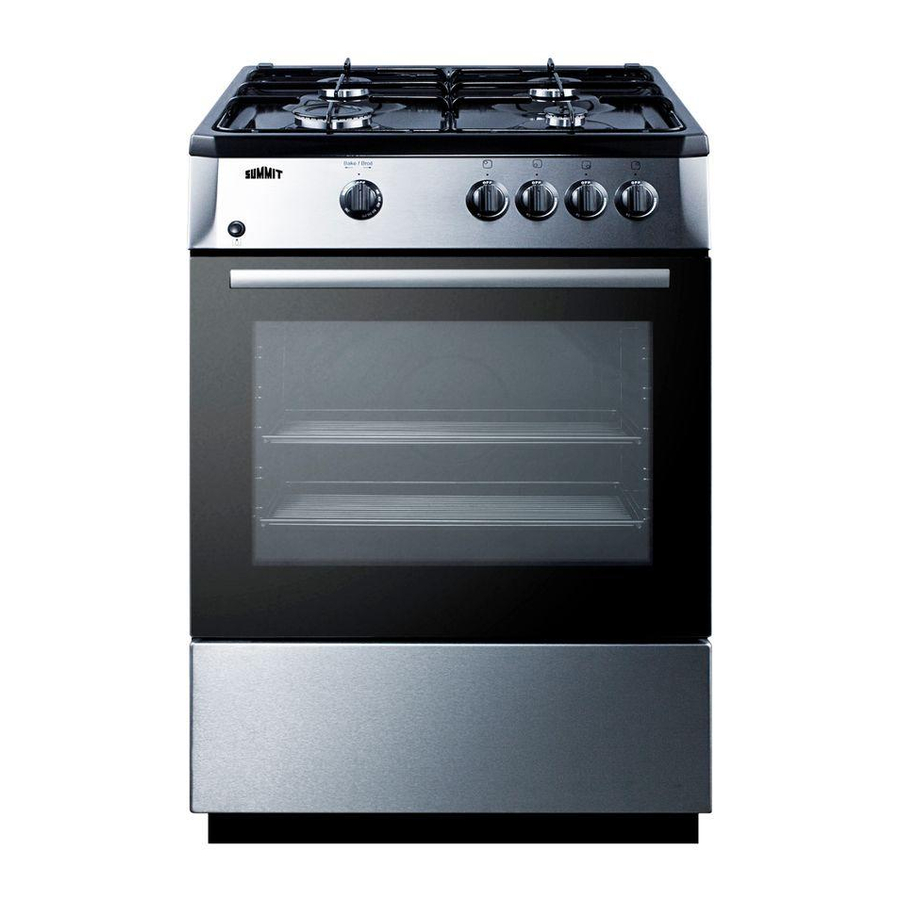
Page 33: General Information
General Information Location of Parts 1 Control panel 4 Broiler/drip pan 2 Oven door 5 Wire shelf 3 Handle 6 Cooktop Control panel 1 Lamp button 4 Front left Rapid burner 2 Bake/Broil knob 5 Front right Auxiliary burner 3 Rear left Normal burner 6 Rear right Normal burner... -
Page 34: Technical Data
Technical Data 35600 BTU/h Accessories supplied with unit Wire shelf and drip tray Important: The wire shelf can be used for roasting This appliance can be used with LP gas and as a support for baking, roasting and natural gas. It is shipped from the and casserole dishes. -
Page 35: Gas Pressure Table
Proper positioning of shelves on wall racks It is important to position the broiler and/or drip pan on the wall racks correctly. Slide the broiler or drip pan completely between the 2 rails on each side and make sure it is stable before putting a dish on it. -
Page 36: Troubleshooting
Troubleshooting Normal operating conditions DANGER: Smoke and odors may be emitted for Risk of electric shock, short circuit • a couple of hours during first or fire from unprofessional repairs! operation of the oven. Repairs on the appliance must be It is normal that steam escapes carried out by an approved service •... -
Page 37: Limited Warranty
Limited Warranty • • • • • • • DISCLAIMER OF IMPLIED WARRANTIES; LIMITATION OF REMEDIES Felix Storch, Inc. Phone: (718) 893-3900 Summit Appliance Division Fax: (718 )842-3093 770 Garrison Avenue Web Site: Bronx, NY 10474 www.summitappliance.com...
Need help?
Do you have a question about the PRO24G and is the answer not in the manual?
Questions and answers