Table of Contents
Advertisement
Quick Links
- 1 Description
- 2 Step 1. Inserting or Replacing the Battery
- 3 Step-By-Step Instructions for Using the Phonak Pilotone Remote Control
- 4 Step 3. Flexcontrol / Volume Change
- 5 Step 2. Locking & Unlocking the Remote Control
- 6 Step 4. Program Change Button
- 7 Step 6. Understanding the Status Light
- Download this manual
Advertisement
Table of Contents

Related Manuals for Phonak PilotOne


Summary of Contents for Phonak PilotOne
- Page 1 Remote Control User Guide...
-
Page 2: Table Of Contents
Contents 1. Welcome 2. Important information: Please read before operating your Phonak PilotOne remote control for the first time Hazard warnings Information on product safety 3. Description 4. Step-by-step instructions for using the Phonak PilotOne remote control Step 1. Inserting or replacing the battery Step 2. - Page 3 5. Troubleshooting 6. Service and warranty 7. Declaration of conformity 8. Information and explanation of symbols...
-
Page 5: Welcome
1. Welcome Congratulations on the purchase of this premium Swiss quality product. Your new Phonak PilotOne remote control was developed by Phonak, one of the world‘s leading companies in hearing technology. Your user-friendly remote control gives you access to the most important functions of your hearing system. It guarantees easy management of your hearing programs, listening comfort and volume at any time. -
Page 6: Important Information
2.1 Hazard warnings Keep this remote control out of reach of children under 3 years. Use only a PilotOne that has been specially pro- grammed for your hearing systems by your hearing care professional. Changes or modifications to the PilotOne that were not explicitly approved by Phonak are not permitted. - Page 7 External devices may only be connected if they have been tested in accordance with corresponding IECXXXXX standards. Only use accessories approved by Phonak AG. The mini-USB port is to be used for programming purpose only by your hearing care professional.
-
Page 8: Information On Product Safety
Protect it from excessive shock and vibration. Clean PilotOne using a damp cloth. Never use household cleaning products (washing powder, soap, etc.) or alcohol to clean PilotOne. Never use a microwave or other heating devices to dry PilotOne. Always use a high quality, long-life alkaline battery as replacement and dispose of the old one in an environmentally-friendly way. - Page 9 60 cm (24”) away from the interfering device to ensure proper operation. X-ray radiation, CT or MRI scans may destroy or adversely affect the correct functioning of the PilotOne remote control. Do not use your PilotOne remote control in areas where electronic equipment is prohibited.
-
Page 10: Description
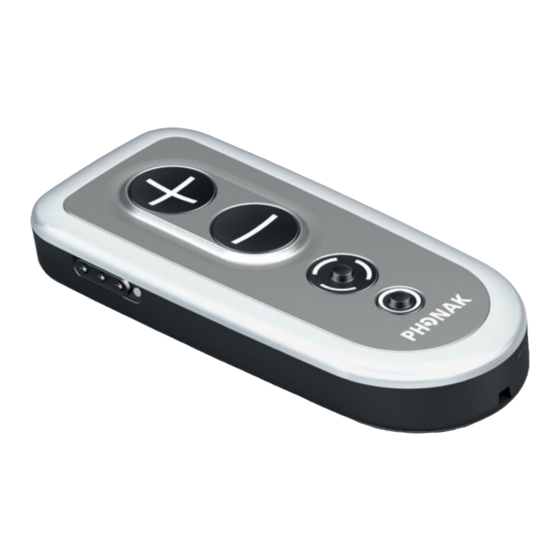
3. Description a FlexControl / Volume b PilotOne buttons lock c Program change d “Home”-Button e Eyelet for keyring lanyard f Battery door g PilotOne status light... -
Page 11: Step-By-Step Instructions For Using The Phonak Pilotone Remote Control
4. Step-by-step instructions for using the Phonak PilotOne remote control Step 1. Inserting or replacing the battery Fig. 1a Fig. 1b Fig. 1c Slide the battery cover in the direction of the arrow to remove it (Fig. 1a). If necessary remove the old battery first. Insert 1 new battery with the correct +/–... -
Page 12: Step 2. Locking & Unlocking The Remote Control
4. Using the Phonak PilotOne Step 2. Locking & unlocking the remote control Your PilotOne is equipped with a lock function to prevent unwanted button press. For storage and transportation you may lock the remote control. Slide lock as shown to lock or unlock the remote control... -
Page 13: Step 4. Program Change Button
This innovative solution from Phonak is available on selected hearing systems and configurable by the hearing care professional. Please ask your hearing care professional for more information. Press “+” to increase Press “–” to decrease Step 4. Program change button Use the program change button to switch listening programs. -
Page 14: Step 6. Understanding The Status Light
J When unlocking ( ), the status light is lit for one second indicating that PilotOne is ready to use J As long as a button is pressed the status light is lit until the button is released again... - Page 15 Automatic Manual program 1 Manual program 2, etc. Mute All of the above light indications are either green or yellow color depending on the PilotOne battery status Green: Battery ok Yellow: 20% left. Replace the battery...
-
Page 16: Troubleshooting
J Make sure your hearing system is switched on and worn correctly J Hold the PilotOne no further than arms’ length. Its surface should be oriented towards your face during operation J Ask your hearing care professional to re-program... - Page 17 Operating distance 1 meter / 40’’ Keyring lanyard attachment (Fig. 5) Fig. 5...
-
Page 18: Service And Warranty
Damage caused by third parties or non-author- ized service centers renders the Phonak warranty null and void. This warranty does not include any services performed by a hearing care professional in their office. -
Page 19: Declaration Of Conformity
7. Declaration of conformity Hereby Phonak AG declares that this Phonak PilotOne is in compliance with the essential requirements of the Medical Device Directive 93/42/EEC & the Radio and Telecommunications Terminal Equipment Directive 1999/5/EC. The full text of the Declaration of Conformity can be obtained from the addresses below. - Page 20 2) this device must accept any interference received, including interference that may cause undesired operation. Changes or modifications made to this PilotOne not expressly approved by Phonak may void the FCC authorization to operate this device. Australia N15398 New Zealand...
-
Page 21: Information And Explanation Of Symbols
8. Information and explanation of symbols With the CE symbol, Phonak AG confirms that this Phonak product – XXXX including accessories – meets the requirements of the Medical Devices Directive 93/42/EEC as well as the R&TTE Directive 1999/5/EC on radio and telecommunications transmitters. - Page 22 8. Information and explanation of symbols This symbol indicates that it is important for the user to read and take into account the relevant information in these user guides. This symbol indicates that it is import- ant for the user to pay attention to the relevant warning notices in these user guides.
- Page 23 Transport During transport or storage, the and storage temperature should not exceed the conditions limit values of –20°/60° Celsius and relative humidity of 90% for a long period of time. The air pressure between 500 and 1100 hPa is appropriate. The symbol with the crossed-out garbage bin is to make you aware that this device may not be thrown...
- Page 24 Manufacturer: Phonak AG Laubisrütistrasse 28 CH-8712 Stäfa Switzerland EU Representative: Phonak GmbH Max-Eyth-Strasse 20 D-70736 Fellbach-Oeffingen Germany www.phonak.com...
Need help?
Do you have a question about the PilotOne and is the answer not in the manual?
Questions and answers