Huawei EchoLife HG520 User Manual
Home gateway
Hide thumbs
Also See for EchoLife HG520:
- User manual (101 pages) ,
- User manual (75 pages) ,
- Quick manual (8 pages)
Table of Contents
Advertisement
Quick Links
Advertisement
Table of Contents

Related Manuals for Huawei EchoLife HG520


Summary of Contents for Huawei EchoLife HG520
- Page 1 EchoLife HG520 Home Gateway User Manual...
- Page 2 HUAWEI EchoLife HG520 Home Gateway User Manual V100R001 Huawei Technologies Proprietary...
- Page 3 Please feel free to contact our local office or company headquarters. Huawei Technologies Co., Ltd. Address: Administration Building, Huawei Technologies Co., Ltd., Bantian, Longgang District, Shenzhen, P. R. China Postal Code: 518129 Website: http://www.huawei.com Email: support@huawei.com...
- Page 4 Copyright © 2005 Huawei Technologies Co., Ltd. All Rights Reserved No part of this manual may be reproduced or transmitted in any form or by any means without prior written consent of Huawei Technologies Co., Ltd. Trademarks , HUAWEI are trademarks of Huawei Technologies Co., Ltd.
-
Page 5: About This Manual
This manual applies to HG520 V100R001. Related Manuals The related manuals are listed in the following table. Manual Content EchoLife HG520 Home It is used for assisting you in data Gateway User Manual configurations and typical applications. EchoLife HG520 Home... -
Page 6: Intended Audience
Chapter 9 Device Info presents the device info of the HG520 . Chapter 10 Technical Specifications presents the technical specification of the HG520. Chapter 11 Appendix includes the abbreviations and acronyms used in this manual. Intended Audience The manual is intended for the following readers: Huawei Technologies Proprietary... - Page 7 < > example, click the <OK> button. Window names, menu items, data table and field names are inside square brackets. For example, pop up the [New User] window. Multi-level menus are separated by forward slashes. For example, [File/Create/Folder]. Huawei Technologies Proprietary...
- Page 8 Note, Comment, Tip, Knowhow, Thought: Means a complementary description. IV. Environmental Protection This product has been designed to comply with the requirements on environmental protection. For the proper storage, use and disposal of this product, national laws and regulations must be observed. Huawei Technologies Proprietary...
-
Page 9: Table Of Contents
User Manual Table of Contents EchoLife HG520 Home Gateway Table of Contents Chapter 1 System Overview ............1 1.1 System Features ..............1 1.2 System Requirements............2 Chapter 2 Hardware Description............. 3 2.1 Front Panel................3 2.2 Rear Panel ................4 2.3 Connecting the Hardware ............. - Page 10 User Manual Table of Contents EchoLife HG520 Home Gateway 5.3.3 DMZ Host Configuration........... 39 5.4 Configuring Security............40 5.4.1 Outgoing IP Filtering Configuration ......40 5.4.2 Incoming IP Filtering Configuration ......42 5.4.3 Parental Control Configuration ......... 44 5.5 Configuring Quality of Service ..........46 5.6 Configuring Routing ............
- Page 11 User Manual Table of Contents EchoLife HG520 Home Gateway Chapter 7 Diagnostics..............73 Chapter 8 Management ..............74 8.1 Settings ................74 8.2 Viewing System Log ............78 8.3 Configuring SNMP Agent............ 81 8.4 Configuring Internet Time ........... 81 8.5 Configuring Access Control ..........82 8.6 Updating Software...............
-
Page 12: Chapter 1 System Overview
Chapter 1 System Overview EchoLife HG520 Home Gateway Chapter 1 System Overview Welcome to purchase the EchoLife HG520 ADSL AP router. With the HG520, you can access the Internet. This User Manual will show you how to install and set up the HG520. -
Page 13: System Requirements
User Manual Chapter 1 System Overview EchoLife HG520 Home Gateway 1.2 System Requirements In order to use the HG520 ADSL AP router, you need to have the following: ADSL service up and running on your telephone line, with at least one public Internet address for your LAN. -
Page 14: Chapter 2 Hardware Description
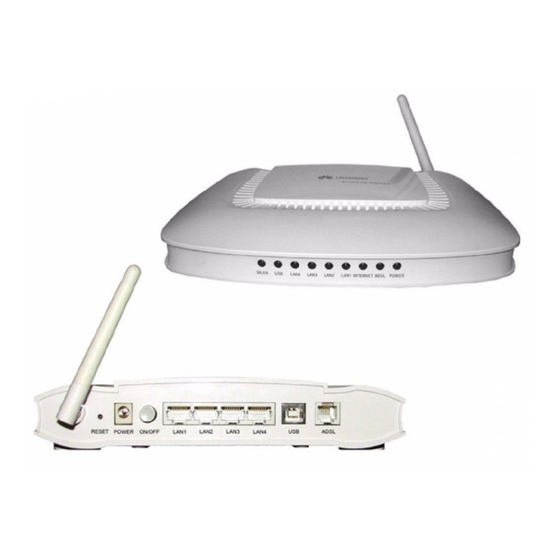
Item Quantity HG520 ADSL AP router Power adapter Ethernet cable Phone cable Splitter Product certificate, Qualitication Card HUAWEI EchoLife HG520 Quick Start 2.1 Front Panel The front panel provides LEDs that indicate the status of the HG520. Huawei Technologies Proprietary... -
Page 15: Rear Panel
User Manual Chapter 2 Hardware Description EchoLife HG520 Home Gateway Table 2-1 lists the LED indicators Label Color Function On: The device is powered on Green Off: The device is powered off On: The LAN link established and active Off: No LAN link... -
Page 16: Connecting The Hardware
User Manual Chapter 2 Hardware Description EchoLife HG520 Home Gateway Table 2-2 lists ports function Interface Function Power Button Switches the device on and off Power Jack Connects to the power adapter cable Press the reset button for 2 seconds and the HG520 will be restarted (rebooted). - Page 17 User Manual Chapter 2 Hardware Description EchoLife HG520 Home Gateway Caution: Before cable connection, turn off your computer(s), LAN hub/switch (if applicable), and the HG520. I. Connect the ADSL cable Connect one end of the phone cable to the RJ-11 connector on the rear panel of HG520.
- Page 18 User Manual Chapter 2 Hardware Description EchoLife HG520 Home Gateway IV. Turn on the HG520 and power up computers and LAN devices Press the Power switch on the rear panel of the device . Turn on and boot your computer(s) and any LAN devices such as hubs or switches.
-
Page 19: Chapter 3 Preparing Configuration
User Manual Chapter 3 Preparing Configuration EchoLife HG520 Home Gateway Chapter 3 Preparing Configuration 3.1 Setup Connect HG520 computer with cross-over/ straight-through Ethernet cable. Power on HG520. The default IP address of HG520 is 192.168.1.1. 3.2 Establishing the Connection Enter the IP address (default: 192.168.1.1) of HG520 in the address line of Web Browser The dialog box displayed, as shown in “Figure 3-1”. - Page 20 User Manual Chapter 3 Preparing Configuration EchoLife HG520 Home Gateway Figure 3-1 Authentication Please enter the management username/password into the fields (the default username/password is admin/admin). Click on the <OK> button. If the authentication is valid, the home page “Device Info - Summary”...
- Page 21 User Manual Chapter 3 Preparing Configuration EchoLife HG520 Home Gateway Figure 3-2 HG520 Home Page Huawei Technologies Proprietary...
-
Page 22: Chapter 4 Quick Setup
User Manual Chapter 4 Quick Setup EchoLife HG520 Home Gateway Chapter 4 Quick Setup The system administrator can configure HG520 remotely or locally through a Web Browser. Network configuration needs to be planned and decided before the configuration procedure is started. - Page 23 User Manual Chapter 4 Quick Setup EchoLife HG520 Home Gateway I. ATM PVC Configuration Figure 4-1 Quick Setup – ATM PVC Configuration Enter the VPI/VCI values. The actual parameter is provided by your ISPs, and you can contact them to get the detailed information.
- Page 24 User Manual Chapter 4 Quick Setup EchoLife HG520 Home Gateway II. Connection Type and Encapsulation Mode Configuration Figure 4-2 Quick Setup – Connection Type and Encapsulation Mode Select “PPP over Ethernet (PPPoE)”, “Encapsulation Mode”. The actual parameter is provided by your ISPs, and you can contact them to get the detailed information.
- Page 25 User Manual Chapter 4 Quick Setup EchoLife HG520 Home Gateway III. PPP Username and Password Configuration Figure 4-3 Quick Setup – PPP Username and Password Enter “PPP Username”, “PPP Password”, and select “Authentication Method” (AUTO/PAP/CHAP). The actual parameter is provided by your ISPs, and you can contact them to get the detailed information.
- Page 26 User Manual Chapter 4 Quick Setup EchoLife HG520 Home Gateway Note: HG520 activates PPPoE connection automatically when user wants to access Internet and there is no active PPPoE connection. The users are able to assign some specific ATM PVC(s) to run PPPoE, if HG520 has multiple ATM PVC connections.
- Page 27 User Manual Chapter 4 Quick Setup EchoLife HG520 Home Gateway V. Device Setup Configuration Figure 4-5 Quick Setup – Device Setup Enter IP (LAN IP) and Subnet Mask. Select to Disable/Enable DHCP Server, use DHCP Server Relay, and configure related settings for that mode.
- Page 28 User Manual Chapter 4 Quick Setup EchoLife HG520 Home Gateway Note: Network Address Translation (NAT) function is default enabled and is not showing on the page to prevent it from being disabled. Click on <Next> to go to next step.
- Page 29 User Manual Chapter 4 Quick Setup EchoLife HG520 Home Gateway Configure SSID,“SSID” is the network name shared among all devices in a wireless network. It is case-sensitive and must not exceed 32 alphanumeric characters. Click on <Next> to go to next step.
-
Page 30: Configuring Ipoa
User Manual Chapter 4 Quick Setup EchoLife HG520 Home Gateway 4.2 Configuring IPoA Click on <Quick Setup> in the left frame, and follow the steps below to create an IPoA (Routed) connection. I. ATM PVC Configuration Figure 4-8 Quick Setup – ATM PVC Configuration Enter the VPI/VCI values. - Page 31 User Manual Chapter 4 Quick Setup EchoLife HG520 Home Gateway II. Connection Type Configuration Figure 4-9 Quick Setup – Connection Type and Encapsulation Mode Select “IP over ATM (IPoA)”, and the “Encapsulation Mode” (Please contact you ISP for the information).
- Page 32 User Manual Chapter 4 Quick Setup EchoLife HG520 Home Gateway III. WAN IP Settings Configuration Figure 4-10 Quick Setup– WAN IP Settings Set WAN IP/Subnet Mask, default gateway, and DNS server settings. The actual parameter is provided by your ISPs, and you can contact them to get the detailed information.
- Page 33 User Manual Chapter 4 Quick Setup EchoLife HG520 Home Gateway IV. NAT, IGMP Multicast, and WAN Service Configuration Figure 4-11 Quick Setup – IPoA – NAT, IGMP Multicast, and WAN service. Check to Enable/Disable NAT and Firewall functions. Check to Enable/Disable IGMP Multicast, and WAN Service.
- Page 34 User Manual Chapter 4 Quick Setup EchoLife HG520 Home Gateway V. Device Setup Figure 4-12 Quick Setup – Device Setup Enter IP (LAN IP) Address and Subnet Mask to HG520. Select to Disable/Enable DHCP Server, use DHCP Server Relay, and configure related settings for that mode.
- Page 35 User Manual Chapter 4 Quick Setup EchoLife HG520 Home Gateway VI. Wireless Setup Figure 4-13 Quick Setup – Wireless Setup Check “Enable Wireless” to enable wireless radio or uncheck to disable. Configure SSID,“SSID” is the network name shared among all devices in a wireless network. It is case-sensitive and must not exceed 32 alphanumeric characters.
-
Page 36: Configuring Bridge
User Manual Chapter 4 Quick Setup EchoLife HG520 Home Gateway VII. WAN Setup – Summary Figure 4-14 Quick Setup – WAN Setup – Summary The last page gives a summary of previous steps. Make sure that the settings match the settings provided by ISP, and then click on “Save/Reboot”... - Page 37 User Manual Chapter 4 Quick Setup EchoLife HG520 Home Gateway I. ATM PVC Configuration Figure 4-15 Quick Setup – ATM PVC Configuration Enter the VPI/VCI values. Please contact you ISPs for the information. Click on <Next> to go to next step.
- Page 38 User Manual Chapter 4 Quick Setup EchoLife HG520 Home Gateway II. Connection Type Configuration Figure 4-16 Quick Setup – Connection Type and Encapsulation Mode Select “Bridging”, and the “Encapsulation Mode”. The actual parameter is provided by your ISPs, and you can contact them to get the detailed information.
- Page 39 User Manual Chapter 4 Quick Setup EchoLife HG520 Home Gateway III. WAN Service Configuration Figure 4-17 Quick Setup – WAN Service Give a service name and check the box to enable this WAN service. Click on <Next> to go to next step.
- Page 40 User Manual Chapter 4 Quick Setup EchoLife HG520 Home Gateway IV. Device Setup Figure 4-18 Quick Setup – Device Setup Enter LAN IP Address and Subnet Mask. Click on <Next> to go to next step. Huawei Technologies Proprietary...
- Page 41 User Manual Chapter 4 Quick Setup EchoLife HG520 Home Gateway V. Wireless Setup Figure 4-19 Quick Setup – Wireless Setup Check “Enable Wireless” to enable wireless radio or uncheck to disable. Configure SSID,“SSID” is the network name shared among all devices in a wireless network. It is case-sensitive and must not exceed 32 alphanumeric characters.
- Page 42 User Manual Chapter 4 Quick Setup EchoLife HG520 Home Gateway VI. WAN Setup – Summary Figure 4-20 Quick Setup – WAN Setup – Summary The last page gives a summary of previous steps. Make sure that the settings match the settings provided by ISP, and then click on <Save/Reboot>...
-
Page 43: Configuring Mer
User Manual Chapter 4 Quick Setup EchoLife HG520 Home Gateway 4.4 Configuring MER Figure 4-21 Quick Setup – Connection Type and Encapsulation Mode Configuration of MER is similar to IPoA. Select “MAC Encapsulation Routing (MER)” in “Connection Type”. For other configuration, please refer to IPoA settings “4.2 Configuring IPoA”. - Page 44 User Manual Chapter 4 Quick Setup EchoLife HG520 Home Gateway Figure 4-22 Quick Setup – Connection Type and Encapsulation Mode Huawei Technologies Proprietary...
-
Page 45: Chapter 5 Advanced Setup
User Manual Chapter 5 Advanced Setup EchoLife HG520 Home Gateway Chapter 5 Advanced Setup Advanced Setup allows system administrator to configure the following topics: Security Quality of Service Routing Port Mapping Huawei Technologies Proprietary... -
Page 46: Configuring Wan
User Manual Chapter 5 Advanced Setup EchoLife HG520 Home Gateway 5.1 Configuring WAN Figure 5-1 Advanced Setup – WAN This page shows the current existing WAN interfaces in the system. User can choose <Add>, <Edit> or <Remove> to configure WAN interfaces. For details about Add and Edit procedure, please refer to “Chapter 4 Quick Setup”. -
Page 47: Configuring Nat
User Manual Chapter 5 Advanced Setup EchoLife HG520 Home Gateway 5.3 Configuring NAT Three functions are supported in NAT: Virtual Servers,Port Triggering, and DMZ Host. 5.3.1 Virtual Servers Configuration Figure 5-2 Advanced Setup – NAT Virtual Server allows you to direct incoming traffic from WAN side (identified by Protocol and External port) to the Internal server with private IP address on the LAN side. - Page 48 User Manual Chapter 5 Advanced Setup EchoLife HG520 Home Gateway Click on <Add> to enter configuration page to add your own rule(s). Some commonly used servers (Web, FTP, Mail, and so on) are pre-defined in HG520. User can simply select the desired server from the pull-down menu and assign the IP address of the local PC.
-
Page 49: Port Triggering Configuration
User Manual Chapter 5 Advanced Setup EchoLife HG520 Home Gateway 5.3.2 Port Triggering Configuration Some applications require that specific ports in the Router's firewall be opened for access by the remote parties. Port Trigger dynamically opens the “Open Ports” in the firewall when an application on the LAN initiates a TCP/UDP connection to a remote party using the “Triggering Ports”. -
Page 50: Dmz Host Configuration
User Manual Chapter 5 Advanced Setup EchoLife HG520 Home Gateway games, video conferencing, remote access applications and others require that specific ports in the Router's firewall be opened for access by the applications. You can configure the port settings from this screen by selecting an existing application or creating your own (Custom application) and click <Save/Apply>... -
Page 51: Configuring Security
User Manual Chapter 5 Advanced Setup EchoLife HG520 Home Gateway Enter the computer's IP address and click <Apply> to activate the DMZ host. Clear the IP address field and click <Apply> to inactivate the DMZ host. Figure 5-6 Advanced Setup – NAT – DMZ Host 5.4 Configuring Security... - Page 52 User Manual Chapter 5 Advanced Setup EchoLife HG520 Home Gateway The screen allows you to create a filter rule to identify outgoing IP traffic by specifying a new filter name and at least one of the conditions below. All of the specified conditions in this filter rule must be satisfied for the rule to take effect.
-
Page 53: Incoming Ip Filtering Configuration
User Manual Chapter 5 Advanced Setup EchoLife HG520 Home Gateway Figure 5-8 . Advanced Setup – Firewall – Add new Outgoing IP Filter 5.4.2 Incoming IP Filtering Configuration By default, all incoming IP traffic from the WAN is blocked when the firewall is enabled. - Page 54 User Manual Chapter 5 Advanced Setup EchoLife HG520 Home Gateway Figure 5-9 Advanced Setup – Security – Outgoing IP Filter Click <Add> to configure outgoing IP filters, up to 32 entries can be configured. To remove, check the item and click <Remove>.
-
Page 55: Parental Control Configuration
User Manual Chapter 5 Advanced Setup EchoLife HG520 Home Gateway Figure 5-10 Advanced Setup – Security – Add new outgoing IP Filter 5.4.3 Parental Control Configuration Parental Control allows user to create time of day restriction to a special LAN device connected to the Router. - Page 56 User Manual Chapter 5 Advanced Setup EchoLife HG520 Home Gateway Figure 5-11 Advanced Setup – Firewall – Parental Control The MAC Address of the “Browser” automatically displays the MAC address of the LAN device, click the <Other MAC Address> button and enter the MAC address of the other LAN device.
-
Page 57: Configuring Quality Of Service
User Manual Chapter 5 Advanced Setup EchoLife HG520 Home Gateway Figure 5-12 Advanced Setup – Firewall – Add new Parental Control 5.5 Configuring Quality of Service Quality of Service (QoS) (including IP Precedence, IP TOS and IEEE 802.1P) refers to a combination of mechanisms that jointly provide a specific quality level to application traffic crossing a network or multiple, disparate networks. - Page 58 User Manual Chapter 5 Advanced Setup EchoLife HG520 Home Gateway Figure 5-13 Advanced Setup – Quality of Service Click on <Add> to create a class to identify the IP traffic by specifying at least one condition below. Huawei Technologies Proprietary...
-
Page 59: Configuring Routing
User Manual Chapter 5 Advanced Setup EchoLife HG520 Home Gateway Figure 5-14 Advanced Setup – Add new QoS rule If multiple conditions are specified, all of them take effect. Click <Save/Apply> button to save it. 5.6 Configuring Routing There are three routing information related settings. -
Page 60: Default Gateway Configuration
User Manual Chapter 5 Advanced Setup EchoLife HG520 Home Gateway 5.6.1 Default Gateway Configuration Figure 5-15 Advanced Setup – Routing – Default Gateway If “Enable Automatic Assigned Default Gateway” checkbox is selected, HG520 will accept the first received default gateway assignment from one of the PPPoA, PPPoE or MER/DHCP enabled PVC(s). -
Page 61: Static Route Configuration
User Manual Chapter 5 Advanced Setup EchoLife HG520 Home Gateway Note: If changing the “Enable Automatic Assigned Default Gateway” from unselected to selected, you must reboot HG520 to activate the automatic assigned default gateway. 5.6.2 Static Route Configuration Click on <Add> to create a new Static Route up to 32 entries can be configured. -
Page 62: Rip Configuration
User Manual Chapter 5 Advanced Setup EchoLife HG520 Home Gateway Figure 5-17 Advanced Setup – Routing – Add new Static Route 5.6.3 RIP Configuration The Routing Information Protocol (RIP) is designed for exchanging routing information within a small to medium-size network. - Page 63 User Manual Chapter 5 Advanced Setup EchoLife HG520 Home Gateway Figure 5-18 Advanced Setup – Routing – RIP To configure an individual interface, select the desired RIP version and operation: RIP Version 1: Class-based IP network. RIP Version 2: Classless IP network.
-
Page 64: Configuring Dns
User Manual Chapter 5 Advanced Setup EchoLife HG520 Home Gateway 5.7 Configuring DNS 5.7.1 DNS Server Configuration Figure 5-19 Advanced Setup – DNS Server If “Enable Automatic Assigned DNS” checkbox is selected, HG520 will accept the first received DNS assignment from one of the PPPoA, PPPoE or MER/DHCP enabled PVC(s) during the connection establishment. -
Page 65: Dynamic Dns Configuration
User Manual Chapter 5 Advanced Setup EchoLife HG520 Home Gateway Note: If changing from unselected “Enable Automatic Assigned DNS” to selected, you must reboot HG520 to get the automatic assigned DNS addresses. 5.7.2 Dynamic DNS Configuration The Dynamic DNS service allows you to alias a dynamic IP address to a static hostname in any of the domains. - Page 66 User Manual Chapter 5 Advanced Setup EchoLife HG520 Home Gateway Figure 5-20 Advanced Setup – DNS – Dynamic DNS Select your Dynamic DNS service provider from ‘D-DNS provider’, and enter your registration information. Click <Save/Apply> to save the configuration. Huawei Technologies Proprietary...
-
Page 67: Configuring Dsl
User Manual Chapter 5 Advanced Setup EchoLife HG520 Home Gateway Figure 5-21 Advanced Setup – DNS – Add Dynamic DNS 5.8 Configuring DSL This page allows you configure DSL related settings including Modulations, Phone Line Pair, and Capability. Due to the characteristics of DSL, any change to default settings is not recommended. -
Page 68: Configuring Port Mapping
User Manual Chapter 5 Advanced Setup EchoLife HG520 Home Gateway Figure 5-22 Advanced Setup – DSL 5.9 Configuring Port Mapping Port Mapping supports multiple ports to PVC and bridging groups. Each group will perform as an independent network. To support this feature, you must create mapping groups with appropriate LAN and WAN interfaces using the <Add>... - Page 69 User Manual Chapter 5 Advanced Setup EchoLife HG520 Home Gateway Figure 5-23 Advanced Setup – Port Mapping To create a new mapping group: Enter the Group name and select interfaces from the available interface list and add it to the grouped interface list using the arrow buttons to create the required mapping of the ports.
- Page 70 User Manual Chapter 5 Advanced Setup EchoLife HG520 Home Gateway Figure 5-24 Advanced Setup – Configuration Huawei Technologies Proprietary...
-
Page 71: Chapter 6 Wireless Setup
User Manual Chapter 6 Wireless Setup EchoLife HG520 Home Gateway Chapter 6 Wireless Setup 6.1 Configuring Basic Features This page allows you to configure basic features of the wireless LAN interface. Figure 6-1 Wireless Setup – Basic You can enable or disable the wireless LAN interface, hide... -
Page 72: Configuring Security
User Manual Chapter 6 Wireless Setup EchoLife HG520 Home Gateway Click <Save/Apply> to save the configurations. 6.2 Configuring Security Four types of wireless security are provided: Shared (WEP) 802.1X WPA/WPA2 WPA/WPA2-PSK 6.2.1 WEP Configuration Wired Equivalent Privacy (WEP) provides security by encrypting data over radio waves when data is transmitted from one end point to another. - Page 73 User Manual Chapter 6 Wireless Setup EchoLife HG520 Home Gateway Figure 6-2 Wireless Setup – Security – WEP To enable WEP, select the following items step by step: Network Authentication: Shared Data Encryption: Enabled Encryption Strength: 128-bit (recommended for better security) or 64-bit Click <Set Encryption Key>...
-
Page 74: Configuration
User Manual Chapter 6 Wireless Setup EchoLife HG520 Home Gateway Figure 6-3 Wireless Setup – Security – WEP Enter 13 ASCII characters or 26 hexadecimal digits for 128-bit encryption keys. Enter 5 ASCII characters or 10 hexadecimal digits for 64-bit encryption keys. -
Page 75: Wpa/Wpa2 Configuration
User Manual Chapter 6 Wireless Setup EchoLife HG520 Home Gateway Figure 6-4 Wireless Setup – Security – 802.1X enable 802.1X, select “802.1X” “Network Authentication”. Enter your RADIUS server IP address, port number (default: 1812), and key. Follow “6.2.1 WEP” to configure your WEP key Click<Save/Apply>... -
Page 76: Wpa/Wpa2-Psk Configuration
User Manual Chapter 6 Wireless Setup EchoLife HG520 Home Gateway WPA Group Rekey Interval: in seconds. Default: 0 (no re-keying). RADIUS Server IP Address/Port/Key: must match your RADIUS server. WPA Encryption:TKIP(select AES or TKIP+AES for WPA2). Check your wireless network adapter security capability before you decide which one to use. -
Page 77: Configuring Mac Filter
User Manual Chapter 6 Wireless Setup EchoLife HG520 Home Gateway Figure 6-6 Wireless Setup – Security – WPA-PSK To enable WPA-PSK, select “WPA-PSK” in “Network Authentication”. Enter 8 to 63 ASCII codes or 64 hexadecimal (0-9, A-F) digits in “WPA Pre-Shared Key”. - Page 78 User Manual Chapter 6 Wireless Setup EchoLife HG520 Home Gateway Figure 6-7 Wireless Setup – MAC Filter When you select “Allow” in “MAC Restrict Mode”, only data from devices with matching MAC addresses in filter table can access HG520. If you select “Deny” in “MAC Restrict Mode”, every device can access HG520 except those which have matching MAC addresses in the filter table.
-
Page 79: Configuring Wireless Bridge
User Manual Chapter 6 Wireless Setup EchoLife HG520 Home Gateway 6.4 Configuring Wireless Bridge Wireless Bridge (also known as Wireless Distribution System) can bridge data between two APs, which is particularly useful while wired cabling is not available. Note: Only APs in same channel can be bridged. -
Page 80: Configuring Advanced Setting
User Manual Chapter 6 Wireless Setup EchoLife HG520 Home Gateway AP Mode: Wireless Bridge- listens and answers other APs onlyAccess Point- Wireless Bridge also with AP functionality. Bridge Restrict: Disabled- any AP will be granted access Enabled- only selected APs (Max. 4) with specified MAC address will... - Page 81 User Manual Chapter 6 Wireless Setup EchoLife HG520 Home Gateway specifies the maximum packet size before data is fragmented into multiple packets. If you experience a high packet error rate, you may slightly lower the Fragmentation value. Setting the Fragmentation too low may result in poor network performance.
-
Page 82: Viewing Station Info
User Manual Chapter 6 Wireless Setup EchoLife HG520 Home Gateway interval of the beacon. A beacon is a packet broadcast by HG520 to synchronize the wireless network. Default: 100. 54g Mode: There are 3 selections. Select 54g Auto for the widest compatibility. - Page 83 User Manual Chapter 6 Wireless Setup EchoLife HG520 Home Gateway Figure 6-10 Wireless Setup – Station Info Huawei Technologies Proprietary...
-
Page 84: Chapter 7 Diagnostics
User Manual Chapter 7 Diagnostics EchoLife HG520 Home Gateway Chapter 7 Diagnostics This page allows users to test the Ethernet port connection, DSL port connection, and connection to the Internet Service Provider. If a test displays a fail status, click <Return Diagnostic Tests> at the bottom of the page to make sure the fail status is consistent. -
Page 85: Chapter 8 Management
User Manual Chapter 8 Management EchoLife HG520 Home Gateway Chapter 8 Management 8.1 Settings System Administrator can do the HG520 settings backup, update, and restore default here. The settings can be saved from HG520 to computer. The saved setting file can also be loaded from computer to HG520. - Page 86 User Manual Chapter 8 Management EchoLife HG520 Home Gateway Figure 8-1 Management – Settings – Backup Settings Click on <Save> and select the destination of the backup file (backupsettings.cfg) in your local computer. Click on <Save> again to save your backup file.
- Page 87 User Manual Chapter 8 Management EchoLife HG520 Home Gateway Figure 8-2 Management – Settings – File Download To update the configuration, click on <Browse> and a Choose-File-window will pop up. Locate the saved file and click on <Update Settings>. HG520 will modify its settings based on the update file.
- Page 88 User Manual Chapter 8 Management EchoLife HG520 Home Gateway Figure 8-3 Management – Settings – Update To restore the router to its factory default settings, click on <Restore Default Settings>. Huawei Technologies Proprietary...
-
Page 89: Viewing System Log
User Manual Chapter 8 Management EchoLife HG520 Home Gateway Figure 8-4 Management – Settings – Restore Default 8.2 Viewing System Log This allows System Administrator to view the System Log and configure the System Log options. Huawei Technologies Proprietary... - Page 90 User Manual Chapter 8 Management EchoLife HG520 Home Gateway Figure 8-5 Management – System Log Click on <Configure System Log to configure the log options. There are 8 events of “Log Level” and “Display Level”: Emergency, Alert, Critical, Error, Warning, Notice, Informational, and Debugging.
- Page 91 User Manual Chapter 8 Management EchoLife HG520 Home Gateway If the selected mode is “Remote” or “Both”, events will be sent to the specified IP address and UDP port of the remote syslog server. If the selected mode is “Local” or “Both”, events will be recorded in the local memory.
-
Page 92: Configuring Snmp Agent
User Manual Chapter 8 Management EchoLife HG520 Home Gateway 8.3 Configuring SNMP Agent System Administrator could enable or disable the embedded SNMP Agent here. SNMP Agent will allow a management application to retrieve HG520 statistics and status. Figure 8-7 Management – SNMP Agent 8.4 Configuring Internet Time... -
Page 93: Configuring Access Control
User Manual Chapter 8 Management EchoLife HG520 Home Gateway Figure 8-8 Management – Internet Time Check “Automatically synchronize with Internet time servers”, to enable this function. Select First and Second NTP time server from the pull down menu. Or select “Other” and define your preferred NTP server. - Page 94 User Manual Chapter 8 Management EchoLife HG520 Home Gateway Figure 8-9 Management – Access Control - Service If the IP Address Access Control mode is enabled, permits access to local management services from IP addresses contained in the Access Control List.
- Page 95 User Manual Chapter 8 Management EchoLife HG520 Home Gateway Figure 8-10 Management – Access Control – IP Addresses Access to your router is controlled through three user accounts: admin, support, and user. admin: has unrestricted access to change and view HG520 configuration.
-
Page 96: Updating Software
User Manual Chapter 8 Management EchoLife HG520 Home Gateway Figure 8-11 Management – Access Control – Passwords 8.6 Updating Software The new software can be updated from the Local computer connected to HG520 through Ethernet cable. Click on <Browse> to locate the new software image file in the computer. -
Page 97: Auto Update
HG520 can auto update by check the auto update server with version description file name. Auto Update Server IP Address or Domain Name: the IP address or domain of server, get it from Huawei web site or use the default. Update Time Interval (Second): 0 to disable, other number indicates the period time of HG520 checking the update server. - Page 98 User Manual Chapter 8 Management EchoLife HG520 Home Gateway Click on <Save/Apply> to enable the setting. Note: Please make sure the wan setting to keep the connection of Internet. When HG520 finds new software it will automatically update and reboot.
-
Page 99: Save/Reboot
User Manual Chapter 8 Management EchoLife HG520 Home Gateway 8.8 Save/Reboot Click <Reboot Router> to reboot HG520. HG520 will automatically save the configuration before reboot, so that modified settings will take effect after reboot. Figure 8-14 Management – Save and Reboot... -
Page 100: Chapter 9 Device Info
User Manual Chapter 9 Device Info EchoLife HG520 Home Gateway Chapter 9 Device Info 9.1 Summary This page displays HG520’s hardware/software information and DSL connection status. Figure 9-1 Device Info – Summary 9.2 WAN This page displays HG520’s WAN interface information and connection status. -
Page 101: Statistics
User Manual EchoLife HG520 Home Gateway Chapter 9 Device Info Figure 9-2 Device Info – WAN 9.3 Statistics 9.3.1 LAN/WAN This page displays packets transmitted and received status of HG520’s LAN/WAN interfaces. Huawei Technologies Proprietary... -
Page 102: Atm
User Manual Chapter 9 Device Info EchoLife HG520 Home Gateway Figure 9-3 Device Info – Statistics – WAN 9.3.2 ATM This page displays the statistics of HG520’s ATM interface (including AAL5). Huawei Technologies Proprietary... -
Page 103: Adsl
User Manual Chapter 9 Device Info EchoLife HG520 Home Gateway Figure 9-4 Device Info – Statistics – ATM 9.3.3 ADSL This page displays HG520’s ADSL connection information and status, such as rate, SNR, ES (Error Second) and so on. Huawei Technologies Proprietary... - Page 104 User Manual Chapter 9 Device Info EchoLife HG520 Home Gateway Figure 9-5 Device Info – Statistics – ADSL Huawei Technologies Proprietary...
-
Page 105: Route
User Manual Chapter 9 Device Info EchoLife HG520 Home Gateway 9.4 Route This page displays HG520’s routing table. Figure 9-6 Device Info – Route 9.5 ARP This page displays HG520’s ARP table. Huawei Technologies Proprietary... - Page 106 User Manual Chapter 9 Device Info EchoLife HG520 Home Gateway Figure 9-7 Device Info – ARP Huawei Technologies Proprietary...
-
Page 107: Chapter 10 Technical Specifications
User Manual Chapter 10 Technical Specifications EchoLife HG520 Home Gateway Chapter 10 Technical Specifications I. Bridging Protocols Ethernet to ADSL self-learning Transparent Bridging (IEEE802.1d) Support up to 128 MAC learning addresses II. Security Stateful Packet Inspection Firewall Access Control List... - Page 108 User Manual Chapter 10 Technical Specifications EchoLife HG520 Home Gateway Per-PVC packet level QoS Support UBR, VBR and CBR traffic shaping OAM F4/F5 loopback support (I.610) V. Network Management Web-Based configuration and status monitoring Remote/Local firmware upgrade through HTTP, FTP and...
- Page 109 User Manual Chapter 10 Technical Specifications EchoLife HG520 Home Gateway Data Rate: 802.11b: 1 Mbit/s, 2 Mbit/s, 5.5 Mbit/s, 6 Mbit/s, 9 Mbit/s, 11 Mbit/s, 12 Mbit/s, 18 Mbit/s, 24 Mbit/s, 36 Mbit/s, 48 Mbit/s, 54Mbit/s with auto-fallback VII. Environment Operating temperature range: 0 °C - 40 °C (32 °F-104 °F)
-
Page 110: Chapter 11 Abbreviations
User Manual Chapter 11 Abbreviations EchoLife HG520 Home Gateway Chapter 11 Abbreviations ADSL Asymmetric Digital Subscriber Line Asynchronous Transfer Mode DHCP Dynamic Host Configuration Protocol Domain Name Server DSLAM Digital Subscriber Line Access Multiplex HTML Hypertext Markup Language Internet Protocols... - Page 111 User Manual Chapter 11 Abbreviations EchoLife HG520 Home Gateway Point to Point Protocol PPPoA PPP over ATM PPPoE PPP over Ethernet Permanent Virtual Connection Routing Information Protocol SNMP Simple Network Management Protocol Transfer Control Protocol Virtual Channel Identifier Virtual Path Identifier...
- Page 112 Huawei Technologies Co., Ltd. Administration Building, Huawei Technologies Co., Ltd., Bantian, Longgang District, Shenzhen, P. R. China Postal Code: 518129 Website: http://www.huawei.com...
Need help?
Do you have a question about the EchoLife HG520 and is the answer not in the manual?
Questions and answers