Huawei EchoLife HG520 Quick Manual
Home gateway
Hide thumbs
Also See for EchoLife HG520:
- User manual (112 pages) ,
- User manual (101 pages) ,
- User manual (75 pages)
Table of Contents
Advertisement
Quick Links
Copyright © 2005 Huawei Technologies Co., Ltd.
All Rights Reserved
No part of this manual may be reproduced or transmitted in any
form or by any means without prior written consent of Huawei
Technologies Co., Ltd.
Trademarks
, HUAWEI are trademarks of Huawei Technologies Co.,
Ltd.
All other trademarks and trade names mentioned in this
manual are the property of their respective holders.
Notice
The information in this manual is subject to change without
notice. Every effort has been made in the preparation of this manual
to ensure accuracy of the contents, but all statements, information,
and recommendations in this manual do not constitute the warranty
of any kind, express or implied.
Advertisement
Table of Contents

Related Manuals for Huawei EchoLife HG520


Summary of Contents for Huawei EchoLife HG520
- Page 1 Copyright © 2005 Huawei Technologies Co., Ltd. All Rights Reserved No part of this manual may be reproduced or transmitted in any form or by any means without prior written consent of Huawei Technologies Co., Ltd. Trademarks , HUAWEI are trademarks of Huawei Technologies Co., Ltd.
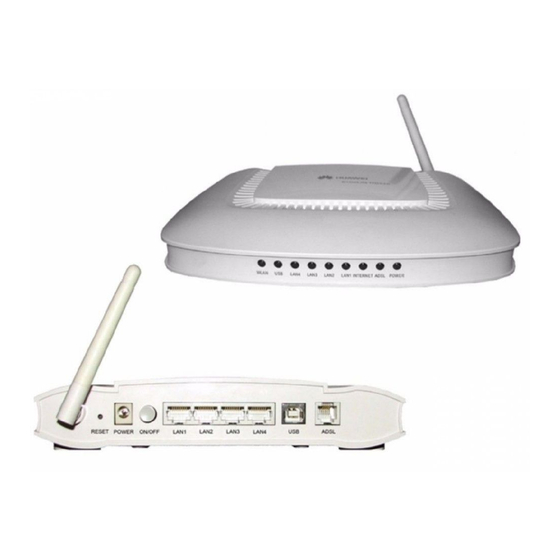
- Page 2 EchoLife HG520 Home Gateway Quick Guide Welcome to purchase the EchoLife HG520 Home Gateway device(the HG520 for short). With your HG520, you can access the Internet using your high-speed ADSL AP router. This manual shows how to install your HG520.
- Page 3 Label Color Function LAN1-4 Green On: The LAN link established and active Off: No LAN link Flashes during data transfer Green Flashes during the ADSL training mode On: ADSL link established and active Tx/Rx Green On: The device is active Flashes during data transfer through ADSL line WLAN...
- Page 4 Cleaning Before cleaning the HG520, cut off the power supply. Clean it using a piece of soft cloth. Do not use liquid or gas solution. Power supply • Use the power adapter delivered with the HG520. • The voltage of the power supply shall meet the requirement of the input voltage of the power adapter.
- Page 5 Follow the steps listed below to install it. Stage Description See in Connect the ADSL line. Step1 Connect the Ethernet cable. Step2 Attach the power connector. Step3 Turn on the HG520 and power up your system Step4 Step1 Connect the ADSL line Method one: Plug one end of the twisted-pair ADSL cable into the ADSL port on the rear panel of HG520 and insert the other end into the wall socket.
- Page 6 Note: Although you use the same type of cable, ADSL and PHONE ports are not interchangeable. Do not route the ADSL connection through the PHONE port. Setp2 Connect the Ethernet cable Attach one end of a provided network cable to a regular hub port and the other to the Ethernet port on the HG520.
- Page 7 Failure Instruction and then click <Refresh> to reinstall. • Otherwise you may try the NIC in another slot. As a last resort, you have to replace the NIC. Fail to Take the most common access mode as an access the example, in which a dial-up application is Internet installed on your computer...
Need help?
Do you have a question about the EchoLife HG520 and is the answer not in the manual?
Questions and answers