
Related Manuals for Gemini GEM-RP8


Summary of Contents for Gemini GEM-RP8
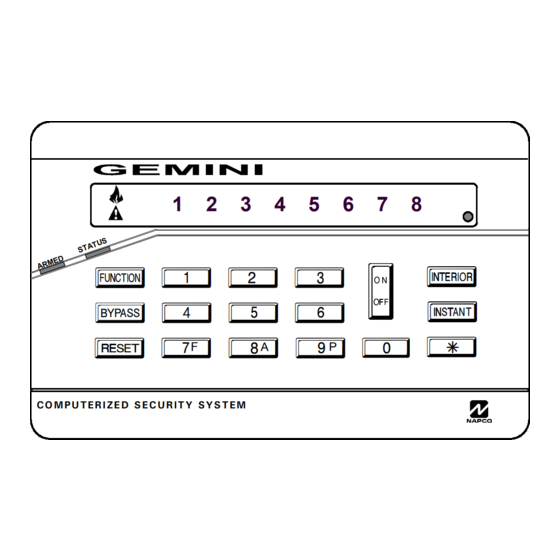
- Page 1 B 4 5 6 C 7 8 9 0 C O M P U TE R I Z E D S E C U R IT Y S Y S T E M © NAPCO 2003 GEM-RP8 KEYPAD DESIGN PATS. PENDING OI219E 7/03...
- Page 2 Please carefully review the information contained in this manual, so that you and all potential users of the system familiarize yourselves with its operation, and can therefore take full advantage of GEMINI’s many convenient features and amenities.
-
Page 3: Table Of Contents
TABLE OF CONTENTS KEYPAD CONTROLS & INDICATORS ...4 ARMING: SETTING THE ALARM WHEN LEAVING ...5 ARMING: PROTECTING YOURSELF AT HOME ...6 EMERGENCY CONDITIONS ...7 TURNING OFF THE ALARM (DISARMING) WHEN RETURNING ...8 FIRE PROTECTION ...9 FUNCTION MENU ...11 SYSTEM TROUBLES ...12 PROGRAMMING (OPTIONAL) ...14 GLOSSARY ...15 LIMITED WARRANTY ...16... -
Page 4: Keypad Controls & Indicators
K E Y P AD C O N T R O L S & I N D I C AT O R S Fire Alarm Light will flash and the Keypad sounder will beep when system is in a Fire Alarm Condition (See Silencing a fire Alarm, Page 8) Trouble Light will light and the Keypad... -
Page 5: Bypassing Zones
A R M I N G : S E T T I N G T H E A L AR M W H E N L E AV I N G Arming Your System When Leaving Before arming your system, make sure the green Status light is ON. This indicates that all of your protective zones are secure. -
Page 6: Instant Mode
A R M I N G : P R O T E C T I N G Y O U R S E L F AT H O M E Protecting Yourself While at Home Before arming your system, make sure the green Status light is ON. This indicates that all of your protective zones are secure. -
Page 7: Emergency Conditions
Emergency Buttons 7 8 9 G Fire Emergency The three sets of emergency buttons, if programmed, are always active whether the system is armed Enabled? or disarmed. Discuss these Buttons with your installer. The emergency signal will only be activated when the two respective buttons are pressed at the same time. -
Page 8: Silencing An Alarm
T U R N I N G O F F T H E AL AR M ( D I S AR M I N G ) W H E N R E T U R N I N G Disarming Your System when Returning 1 Enter your premises through the Entry/Exit door. -
Page 9: Important! - Read Carefully
Preparing a Fire Escape Plan Even with the most advanced fire alarm system, adequate protection requires an escape plan. To prepare your plan, draw floor plans of your building (space is provided on the next page). Show two exits-a front or back door and a window from each room. - Page 10 F I R E P R O T E C T I O N Floorplan Draw a plan of your premises below.
-
Page 11: Function Menu
By pressing followed by the the appropriate key, (do not press simultaneously) these special functions and features can be enabled: Easy Arm (when system is disarmed) The Easy Arm feature allows the system to be armed by pressing followed by arming of the system by someone who is not a regular system user. -
Page 12: System Troubles
The Control Panel is constantly monitoring its own components, as well as all critical services, such as AC power and the telephone line, to insure that it is always ready to provide the protection for which it was designed. When a system trouble does occur, it will caution you by lighting the TROUBLE H light and beeping the keypad buzzer. - Page 13 Keypad Beeps or Zone light System Trouble Condition Flashes 2 Beeps Fire Trouble 2 Beeps Wireless Receiver Trouble 2 Beeps Wireless Receiver Jam A problem has been detected with a wireless receiver. 3 Beeps Wireless Transmitter Low Battery 4 Beeps Wireless Transmitter Supervisory Failure 5 Beeps...
-
Page 14: Programming (Optional)
Your Installer has assigned a User 1 Code which can be used to not only Arm and Disarm the system, but also to enter the User Program Mode, where you can program other user codes. The following explains how you will use this code to program or erase additional user codes. -
Page 15: Glossary
Ambush Code - In the event that you are forced by an intruder to disarm your system, this special code can be used d i s a r m t h e s y s t e m , simultaneously send a silent alarm to Central Station. -
Page 16: Limited Warranty
NAPCO SECURITY SYSTEMS, INC. (NAPCO) warrants its products to be free from manufacturing defects in materials and workmanship for thirty-six months following the date of manufacture. NAPCO will, within said period, at its option, repair or replace any product failing to operate correctly without charge to the original purchaser or user.
Need help?
Do you have a question about the GEM-RP8 and is the answer not in the manual?
Questions and answers