Table of Contents
Advertisement
Advertisement
Table of Contents

Related Manuals for Honda GX240


Summary of Contents for Honda GX240
- Page 3 This manual covers the operation and maintenance of GX240 GX340 engines and is based on GX240 engine. The QAE type is equipped for both electric and manual starting; other types are equipped for manual starting only. All information in this publication is based on the latest product infor- mation available at the time of printing.
-
Page 4: Table Of Contents
CONTENTS CONTENTS ..............1. ENGINE SAFETY ..........2. COMPONENT IDENTIFICATION 3. BATTERY CONNECTIONS (QAE type) ........4. REMOTE CONTROL LINKAGE ..........5. PRE-OPERATION CHECK ............6. STARTING THE ENGINE ............7. OPERATION ............... 8. STOPPING THE ENGINE ............9. MAINTENANCE ... -
Page 5: Engine Safety
1. ENGINE SAFETY Honda engines are designed to give safe and dependable service if oper- ated according to instructions. Read and understand this Owner’s Manual before operating the engine. Failure to do so could result in per- sonal injury or equipment damage. - Page 6 Read these labels before you operate the engine. GASOLINE WARNING LABEL...
-
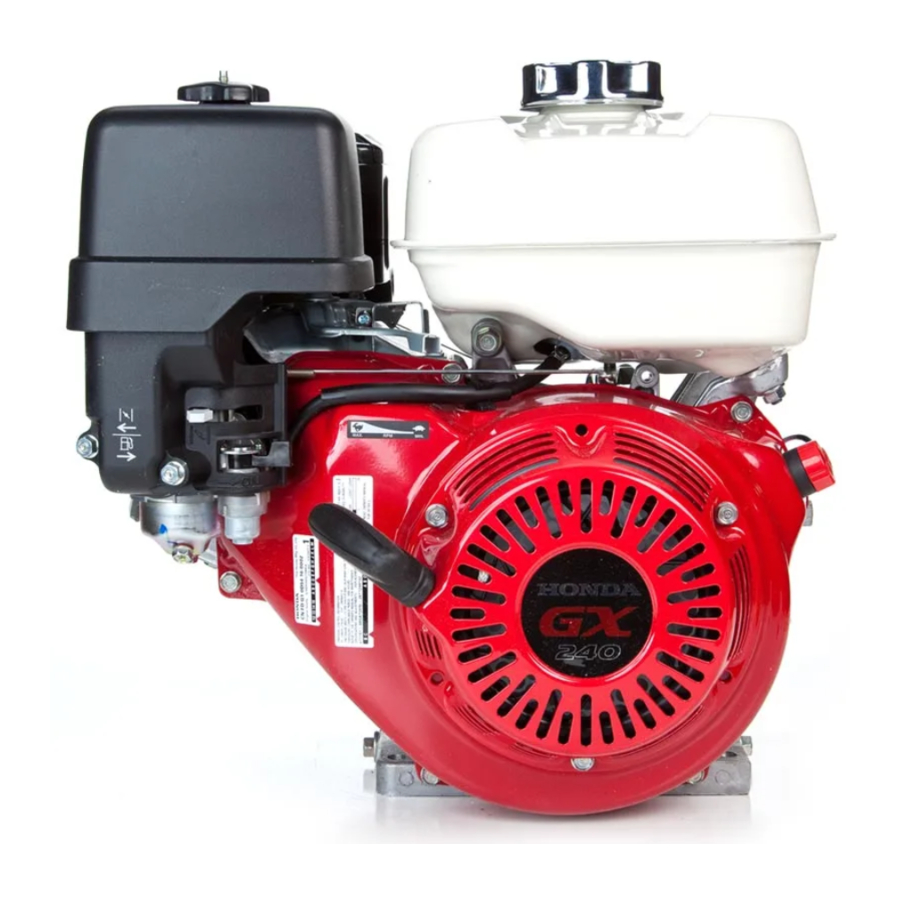
Page 7: Component Identification
‘. 2. COMPONENT IDENTIFICATION MUFFLER AIR CLEANER SPARK PLUG ENGINE SWITCH CIRCUIT BREAKER CHOKE LE THROTTLE LEVER RECOIL STARTER FUEL Vn/LVE START:R GRIP FUEL FILLER CAP FUEL ELECTRIC STARTER (QAE type) SERIAL NUMBER AN0 ENGINE TYPE OIL FILLER CAP... -
Page 8: Battery Connections (Qae Type)
3. BATTERY CONNlfCTIONS (QAE type) Use a 12 volt battery with an ampere-hour rating of at least 18 AH. Connect the battery positive (+I cable to the starter solenoid terminal, as shown. Connect the battery negative (-1 cable to an engine mounting bolt, frame bolt, or other good engine ground connection. -
Page 9: Remote Control Linkage
4. REMOTE CONTROL LINKAGE (for thrcjttle and choke cables) The throttle and choke control levers are provided with holes for optional cable attachment. The following illustrations show installation examples for a solid wire cable and for a braided wire cable. If using a braided wire cable, add a return spring as shown. -
Page 10: Pre-Operation Check
Be sure to check the engine on a level surface with the engine stopped. Use Honda 4-stroke oil, or an equi- valent high-detergent, premium- quality motor oil certified to meet or exceed U.S. - Page 11 2. REDUCTION GEAR OIL (GX240 only) <l/2 reduction with automatic centrifugal clutch> 1. Remove the oil filler cap and wipe the dipstick clean. 2. Insert the dipstick into the filler neck, but do not screw it in. 3. If the level is low, fill to the upper level mark with the same oil that is...
- Page 12 3. AIR CLEANER CAUTION: Never run the engine without the air cleaner. Rapid engine wear will result from contaminants, such as dust and dirt, being drawn through the carburetor and into the engine. <Dual element type> Check the air cleaner elements to be sure they are clean and in good con- dition.
- Page 13 <Single element type> Check the air cleaner element to be sure it is clean and in good condition. Clean or replace the element if nec- essary (p.24). ELEMENT <Oil bath type> 1. Check the air cleaner element to be sure it is clean and in good con- dition.
- Page 14 Honda’s Limited Warranty. Occasionally you may experience light spark knock while operating under heavy loads. This is no cause for concern, it simply means your engine is operating efficiently.
- Page 15 ALCOHOL If you decide to use a gasoline containing alcohol (gasohol), be sure it’s oc- tane rating is at least as high as that recommended by Honda. There are two types of “gasohol”: one containing ethanol, and the other containing methanol.
-
Page 16: Starting The Engine
6. STARTING THE ENGINE 1. Turn the fuel valve to the ON posi- tion. 2. Move choke lever CLOSE position. NOTE: Do not use the choke if the engine is warm or the air temperature is high. 3. Move the throttle lever slightly to the left. - Page 17 4. Start the engine. With recoil starter: Turn the engine switch to the ON position. (other than ClAE type) lQAE type) Pull the starter grip lightly until resistance is felt, then pull briskly. CAUTION: Do not allow the starter grip to snap back against the engine.
-
Page 18: Operation
7. OPERATION 1. As the engine warms up, gradually move the choke lever to th,e OPEN position. 2. Position the throttle lever for the desired engine speed. -=-‘I -----...-... - Page 19 Oil Alert System The Oil Alert system is designed to prevent engine damage caused by an insufficient amount of oil in the crankcase. Before the oil level in the crankcase can fall below a safe limit, the Oil Alert system will automatical- ly shut down the engine (the engine switch will remain in the ON position).
- Page 20 6,000 feet above sea level, have these carburetor modifications performed by a dealership displaying Honda Power .Equipment Engines sign. Even with suitable carburetor jetting, engine horsepower will decrease ap- proximately 3.5% for each 1,000 foot increase in altitude.
-
Page 21: Stopping The Engine
8. STOPPING THE ENGINE To stop the engine in an emergency, turn the engine switch to the OFF position. Under normal conditions, use the following procedure: 1. Move the throttle lever fully to the right. 2. Turn the engine switch to the OFF position. -
Page 22: Maintenance
Fuel line necessary) NOTE: (1) Service more frequently when used in dusty areas. (2) These items should be serviced by an authorized Honda dealer, unless the owner has the proper tools and is mechanically proficient. See the Honda Shop Manual. - Page 23 1. Oil change Drain the oil while the engine is still warm to assure rapid and complete draining. 1. Remove the oil filler cap and drain plug to drain the oil. 2. Install the drain plug, and tighten it securely. 3.
- Page 24 2. Air cleaner service dirty air cleaner will restrict air flow to the carburetor. To prevent car- buretor malfunction, service the air cleaner regularly. Service more fre- quently when operating the engine in extremely dusty areas. .Never use gasoline or low flash point solvents for cleaning air cleaner element.
- Page 25 <Cyclone type> 1. Remove the wing nut and the air cleaner cover. Remove the ele- ments and separate them. Care- fully check both elements holes or tears and replace if dam- aged. SPECIAL PAN SCREW 2. Foam element: Wash the element in a solution of household deter-...
- Page 26 5. Fill the air cleaner case to the level mark with the same oil that is recom- mended for the engine (see engine oil recommendations on page 8). 6. Reinstall the element and the cover. OIL CAPACITY: GX240 :60 cc (2.03 US oz, 1.69 Imp oz) GX340 80 cc (2.70 US oz.
- Page 27 3. Sediment cup cleaning Gasoline is extremely flammable and is explosive under certain condi- tions. Do not smoke or allow flames or sparks in the area. After installing the sediment cup, check for leaks, and make sure the area is dry before starting the engine.
- Page 28 Clean the sp,ark plug with a wire brush if it is to be reused. Measure the plug,gap with a feeler gauge. The gap should be 0.7-0.8 mm (0.028-0.03.1 in) for the GX240, and 1 .O- 1 .l mm (0.039- ->...
- Page 29 4. Check that the spark plug washer is in good condition, and thread the spark plug in by hand to prevent cross-threading. 5. After the spark plug is seated, tighten with a spark plug wrench to com- press the washer. NOTE: If installing a new spark plug, tighten l/2 turn after the spark plug seats to compress the washer.lf reinstalling...
- Page 30 5. Spark arrester maintenance (optional part) The muffler be comes very hot during operation and remains w!mi for a while after stopping the engine. Be careful not to touch the muffler while it is hot. Allow it to cool before proceeding.
- Page 31 2. With the engine idling, turn the pilot screw in or out to the setting that rpm. The correct setting will usually produces the highest idle Dual-element, SingleTelement and Oil Bath Air Filter: GX240-2 l/2; GX340-2 turns out cyclone Air Filter: GX240-2 turns out; GX340-2 l/2 turns out.
-
Page 32: Transporting/Storage
10. TRANSPORTING/STORAGE To avoid severe burns or fire hazards, let the engine cool before trans- porting it or storing it indoors. When transporting the engine, turn the fuel valve to the OFF position and keep the engine level to prevent fuel spillage. -
Page 33: Troubleshooting
11. TROUBLESH.OOTING Engine will not start, using recoil starter: 1. Is the engine switch ON? ’ 2. Does the oil alert lamp flash when the starter is operated? 3. Is the fuel valve ON? 4. Is there fuel in the fuel tank? 5. -
Page 34: Specifications
12. SPECFUC GX240. GX340 “0” TYPE- DUAL-ELEMENT, SINGLE-ELEMENT AND OIL BATH AIR CLEANER DIMENSIONS GX240 GX340 WEIGHT Power equipment GC04 GC05 description code 385x420x410mm 415x450x435mm Length x Width x Height (15.2 x 16.5 x 16.1 (16.3 x 17.7 x 17.1 Dry weight 23.5... - Page 36 GX240 (Other than QAE Type)
- Page 37 1lNl-l 1lEI-W M/la 1103 9NIDUVH3 alON3loS kl31tw1s H31lMS NOIlVNIaW03 icoa lOtllN03 MS NOllWNlSW03...
- Page 38 (GX340 Other than QAE Type)
-
Page 39: Warranty Service
Your purchase of a Honda engine is greatly appreciated by both your dealer and American Honda Motor Co., Inc. We want to assist you in every way possible to assure your complete satisfaction with your purchase. - Page 40 If you are dissatisfied with the decision made by the dealership's management, contact the Honda Regional Engine Distributor for your area (www.honda-engines.com/dea.htm). If you are still dissatisfied after speaking with the Regional Engine Distributor, you may contact the Honda Office as shown.
- Page 41 MEMO...
- Page 42 MEMO...
- Page 43 MEMO...
Need help?
Do you have a question about the GX240 and is the answer not in the manual?
Questions and answers