
Related Manuals for iOptron ZEQ25GT


Summary of Contents for iOptron ZEQ25GT
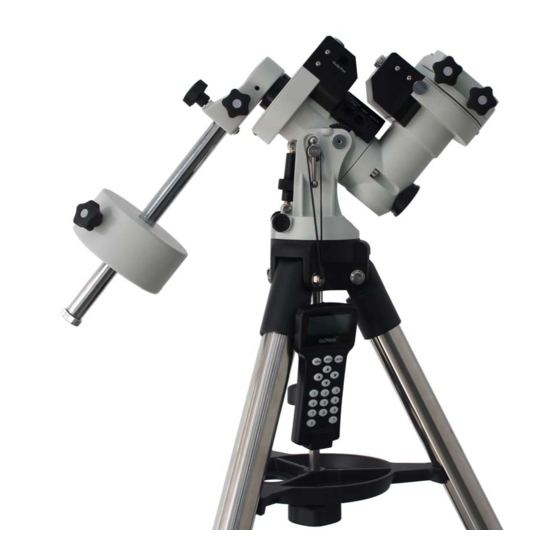
- Page 1 ® iOptron ZEQ25GT Balanced GoTo Equatorial Mount ® With Go2Nova 8408 Hand Controller Instruction Manual Product #7100, #7101 and #7102...
-
Page 2: Table Of Contents
2.4. Go2Nova 8408 Hand Controller ......................7 2.4.1. Key Description..........................8 2.4.2. The LCD Screen ..........................8 3. ZEQ25GT Mount Assembly ........................10 3.1. Introduction ............................10 3.2. ZEQ25 Mount Assembly........................10 4. Getting Started.............................. 20 4.1. Setup the Mount and Polar Alignment ....................20 4.2. - Page 3 Looking at or near the Sun will cause instant and irreversible damage to your eye. Children should always have adult supervision while observing. Ver. 1.2 iOptron reserves the rights to revise this instruction without notice. Actual color/contents/design/function may differ from those described in this instruction.
-
Page 4: Zeq25Gt Overview
1. ZEQ25GT Overview Welcome to a new type of EQ mount! The iOptron “Z” design mount puts the payload weight at the center of gravity allowing for greater natural stability. This also means the mount is extremely light compared to its payload—a nice benefit when setting up at a remote site. -
Page 5: Zeq25 Terms
There are two shipping boxes for a regular tripod version. One box contains a ZEQ mount, hand controller, one 10.4 lbs (4.7kg) counterweight, counterweight shaft, tripod spreader and accessories. The other box contains a tripod. • ® iOptron ZEQ25GT telescope mount (with built-in GPS) • ® Go2Nova 8408 Hand Controller •... -
Page 6: Assembly Terms
2.2. Assembly Terms Main board Main board DEC Drive Unit DEC Drive Unit R.A. Drive Unit R.A. Drive Unit Polar Axis Cover Polar Axis Cover Dovetail Saddle Dovetail Saddle Front CW position screw Front CW position screw CW mounting nose CW mounting nose CW Locking Screw CW Locking Screw... -
Page 7: Zeq25 Ports
Dec: For connecting to DEC drive unit • Power DC 12V: DC power plug • iOptron Port: For connecting to other iOptron accessories, such as a laser pointer or a planetary dome control. • HBX (Hand Box): For connecting to an 8408 Hand Controller •... -
Page 8: Key Description
HBX (Handbox) port: connect the HC to a ZEQ25 mount using a 6 pin 4 wire (6P4C) RJ11 plug. • Serial port: connect the HC to a Computer via a RS232 to 4 pin 4 wire (4P4C) RJ9 cable (iOptron item# 8412). The pin out of the serial port is shown in Figure 4. - Page 9 Magnitude Target Name Declination Right Ascension Altitude Azimuth N/S Hemisphere Mount Status Current Time Slew Speed Figure 6. 8408 HC LCD Information Screen 1. Target Name/Mount Position: displays the name of the target that telescope is currently pointed to or the current mount position.
-
Page 10: Zeq25Gt Mount Assembly
3. ZEQ25GT Mount Assembly 3.1. Introduction You have just purchased a telescope mount that is capable of taking you to a new level of astronomy. No matter which telescope or optical tube assembly (OTA) you select to install on the mount, the overall performance will be greatly enhanced. - Page 11 WARNING: Please DO NOT rock the counterweight shaft rigorously. You’ll degrade the performance of the spring loaded gear meshing system, or even damage it. WARNING: The new Gear Switch will allow you to have most precise weight balance. This also means the mount or OTA will swing FREELY when the Gear Switch is disengaged.
- Page 12 Center Rod Knob Alignment Peg Accessory Tray Tray Locking Knob Figure 8. Set up tripod STEP 3. Attach the ZEQ25 Mount Retract both Azimuth Adj. Knobs to allow enough clearance inside the chamber. Position the mount on the tripod head with the Alignment Peg in between the 2 Azimuth Adj.
- Page 13 (1) Remove CW Shaft Locking Screw from the CW Mounting Nose. (2) Insert CW shaft into the CW Mounting Nose as indicated in 2nd photo below. (3) Lock it using CW Shaft Locking Screw from the other side of the CW Mounting Nose. Tighten the Front CW Positioning Screw which is located in front of the CW Mounting Nose.
- Page 14 Rotate the DEC axis to horizontal position. Adjust the CW position to balance the mount in R.A. axis (Figure 14a) and move the OTA position to balance the mount along DEC axis (Figure 14b). Figure 14. Balance along R.A. axis (a) and DEC axis (b) CAUTION: The balance process MUST be done with Gear Switch at OPEN position! Otherwise it might damage the worm system.
- Page 15 “behind” and “ahead of”. When the number is correct, press ENTER and go back to the previous screen. For other parts of the world you can find your “time zone” information from iOptron website (http://www.ioptron.com/support.cfm?module=faq#). DO NOT COUNT DAYLIGHT SAVING TIME. Fraction...
- Page 16 It is always a good idea to do your home work to get the GPS coordinates before traveling to a new observation site. The site coordinates information can be found from Support section in iOptron website, under Controller Set-up (http://www.ioptron.com/support.cfm?module=faq#). By entering the city name or address, you can find its latitude and longitude.
- Page 17 If a ZEQ25GT mount equipped with an iOptron’s AccuAligning polar scope, you can do a fast and accurate polar axis alignment with iOptron’s Quick Polar Alignment procedure. Polar Scope LED Figure 18. Polar Scope LED Figure 17. Polar Scope As indicated in Figure 17, the Polar Scope Dial has been divided into 12 hours along the angular direction with half-hour tics.
- Page 18 NOTE: If you are located in southern hemisphere, Sigma Octantis will be chosen for Polar Alignment. For example, on May 20, 2010, 20:00:00 in Sydney, Australia (Lat S33º51’36” and Long E151º12’40”), 600 min ahead of UT, the Sigma Octantis Position is 1hr21.8m and 64.4m. BrightStar Polar Alignment For those who do not have a polar scope, take off the Polar Axis Cover and Polar Scope Cover.
- Page 19 Figure 20. Zero position...
-
Page 20: Getting Started
4. Getting Started ® In order to experience the full GOTO capability of GOTONOVA technology it is very important to set up the mount correctly before observation. 4.1. Setup the Mount and Polar Alignment Assemble your ZEQ25 mount according to Section 3.2. Turn the mount power switch on. When the GPS receiver is connected to satellites, LCD will display GPS OK. -
Page 21: Star Identifying Function
4.5. Star Identifying Function The 8408 hand controller has a star identifying function. After Polar Alignment and Set Up Time and Site, slew the telescope to an bright star, manually or using GOTO. Press ? (Help) button to identify the star name telescope is pointing to, as well as nearby bright stars if there are any. 4.6. -
Page 22: Complete Functions Of Go2Nova 8408 Hand Controller
® 5. Complete Functions of Go2Nova 8408 Hand Controller 5.1. Slew to an Object Press the MENU button. From the main menu select “Select and Slew.” Select an object that you would like to observe and press the ENTER key. ®... -
Page 23: User Objects
5.1.7. User Objects It can store up to 60 used entered objects, including comets. 5.1.8. Enter R.A. DEC Here you can go to a target by entering its R.A. and DEC numbers. 5.2. Sync to Target This operation will match the telescope's current coordinates to Target Right Ascension and Declination. -
Page 24: Meridian Treatment
5.3.6. Set Polar Light Use this function to adjust the light intensity of ZEQ25GT illuminated polar scope. If you have an illuminated-reticule eyepiece and has the same socket size, you may use this option to adjust its light intensity. -
Page 25: Upgrade Ra & Dec
5.4.4. Multi-Star Alignment With iOptron’s multi-star alignment, you can choose two, three, or as many stars as you want to reduce the mount alignment offset. Press MENU button and select “Align”. Select “Multi-Star Align” in the align menu. A list of alignment stars that are above the horizon is computed based on your local time and location. -
Page 26: Pole Star Position
If you’ve done with the two star alignment, press the BACK button to finish the alignment. Press ENTER key to select third star for further alignment. 5.4.5. Pole Star Position This shows Polaris position in northern hemisphere or Sigma Octantis position in southern hemisphere, which is used for Quick Polar Alignment. -
Page 27: Set Guide Rate
Press ENTER to bring up user objects setting screen. Add a New Record Browse Records Delete One Record Delete All Records Select “Add a New Record”. A screen will display asking to Enter R.A. DEC: Enter R.A. DEC R.A.: 00h00m00s DEC: +00d00m00s You may enter the R.A. -
Page 28: Maintenance And Servicing
6. Maintenance and Servicing 6.1. Maintenance The ZEQ25GT is designed to be maintenance free. Do not overload the mount. Do not drop the mount, this will damage the mount or degrade the GOTO tracking accuracy permanently. Use a wet cloth to clean the mount and hand controller. -
Page 29: Appendix A. Technical Specifications
Appendix A. Technical Specifications Mount “Z Balanced” Equatorial Mount Payload 27 lb (12.3kg), exclude counterweight Mount weight 10.4 lb (4.7kg) Payload/Mount weight 2.60 Right Ascension worm wheel Φ88mm, 144 teeth aluminum Declination worm wheel Φ88mm, 144 teeth aluminum Right Ascension axis shaft Φ35mm steel Declination axis shaft Φ35mm steel... -
Page 30: Appendix B. Go2Nova
® Appendix B. Go2Nova 8408 HC MENU STRUCTURE MENU Select and Slew Select and Slew Solar System Solar System Mercury Mercury Venus Venus Mars Mars Jupiter Jupiter Saturn Saturn Uranus Uranus Neptune Neptune Moon Moon Deep Sky Objects Deep Sky Objects Named Object Named Object Messier Catalog... - Page 31 Track Below horizon Set Polar Light Firmware Information Firmware Information GPS Status GPS Status Upgrade RA and DEC Upgrade RA and DEC Align Align Polar Align Polar Align SolarSys Align SolarSys Align One Star Align One Star Align Multi-Star Align Multi-Star Align Pole Star Position Pole Star Position...
-
Page 32: Appendix C. Firmware Upgrade
Appendix C. Firmware Upgrade The firmware in the 8408 hand controller and motor control boards can be upgraded by the customer. Please check iOptron’s website, www.iOptron.com, under Support Directory/ZEQ Mounts, select ZEQ25GT with 8408 Hand Controller, for detail. -
Page 33: Appendix D. Computer Control An Zeq25Gt Mount
Appendix D. Computer Control an ZEQ25GT Mount The ZEQ25GT mount can be connected to a computer using supplied RS232 cable. A RS232 to USB adapter (not supplied) is needed if your computer does not have a serial port, like most of the laptops on the market today. -
Page 34: Appendix E. Go2Nova Star List
® Appendix E. Go2Nova Star List Messier Catalog This table is licensed under the GNU Free Documentation License. It uses material from the Wikipedia article List of Messier objects... - Page 35 Named Star List 001 Acamar 050 Asellus Australis 099 Kaus Media 148 Rastaba 002 Achernar 051 Asellus Borealis 100 Keid 149 Regulus 003 Acrux 052 Aspidiske 101 Kitalpha 150 Rigel 004 Acubens 053 Atik 102 Kochab 151 Rigel Kentaurus 005 Adhafera 054 Atlas 103 Kornephoros 152 Ruchbah...
- Page 36 Modern Constellations Constellation Abbreviation Constellation Abbreviation Andromeda Lacerta Antlia Apus Leo Minor Aquarius Lepus Aquila Libra Lupus Aries Lynx Auriga Lyra Boötes Mensa Caelum Microscopium Camelopardalis Monoceros Cancer Musca Canes Venatici Norma Canis Major Octans Canis Minor Ophiuchus Capricornus Orion Carina Pavo Cassiopeia...
- Page 37 Deep Sky Object List ID No. OBJECT NGC # Messier# A(Abell) U(UGC) ID No. OBJECT NGC # Messier# A(Abell) U(UGC) Andromeda Galaxy Hind's Variable Nebula 1555 Barnards Galaxy 6822 Hubble's Variable Nebula 2261 Beehive Cluster 2632 Integral Sign Galaxy 3697 Blackeye Galaxy 4926 Jewel Box Cluster...
- Page 38 Double Star List No. Object Const Sep. Magitude Comm. Name No. Object Const Sep. Magitude Comm. Name 2.3 / 5.1 37734 Almaak 36 Eta 12.9 3.5 / 7.5 21732 Achird 35.9 4.4 / 8.6 54033 37 Iot 4.7/7.0/8.2 12298 12.8 3.7 / 11 125235 Alshain...
- Page 39 No. Object Const Sep. Magitude Comm. Name No. Object Const Sep. Magitude Comm. Name 71 Bet 34.4 3.1 / 5.1 87301 Albireo 106 Del 3.1 / 8.2 84951 Sarin 72 Omi 1 3.8 / 6.7 49337 107 Mu 3.4 / 9.8 85397 73 52 4.2 / 9.4...
- Page 40 No. Object Const Sep. Magitude Comm. Name No. Object Const Sep. Magitude Comm. Name 141 Eps 2 5.2 / 5.5 67315 Double dbl2 176 Zet 5.6 / 6.5 109739 142 Alp 20.5 5.0 / 10 212472 177 Kap 4.5 / 4.7 174199 143 Zet 4.3 / 10...
-
Page 41: Ioptron Two Year Telescope, Mount, And Controller Warranty
As a condition to the obligation of iOptron to repair or replace such product, the product must be returned to iOptron together with proof-of-purchase satisfactory to iOptron.
Need help?
Do you have a question about the ZEQ25GT and is the answer not in the manual?
Questions and answers