
Related Manuals for Goodmans GTVC14N14DVD


Summary of Contents for Goodmans GTVC14N14DVD
- Page 1 GTVC14N14DVD 14" (34cm) COLOUR TELEVISION WITH DVD PLAYER OPERATION MANUAL H E LP L INE P H O NE NUMB ER 087 08 7 300 80...
-
Page 2: Installation
CAUTION: TO REDUCE THE RISK OF ELECTRIC SHOCK. DO NOT REMOVE COVER (OR BACK). NO USER SERVICEABLE PARTS INSIDE. REFER SERVICING TO QUALIFIED SERVICE PERSON- NEL. The graphic symbols on the back cover of the set mean the following: The lightning flash with arrowhead symbol within an equilateral triangle is intended to alert the user to the presence of uninsulated "dangerous voltage"... -
Page 3: Laser Safety
CAUTION Never tamper with any components inside your set, or any other adjustment controls not mentioned in this manual. All television receivers are high voltage instruments. Your PICTURE TUBE is highly evacuated. If broken, glass fragments will be violently expelled. Scratching, shipping or undue pressure is dangerous and should be avoided. - Page 4 This product incorporates copyright protection technology that is protected by U.S.patents and other intellectual property rights. Use of this copyright protection technology must be authorized by Macrovision, and is intended for home and other limited viewing uses only unless otherwise authorized by Macrovision. Reverse engineering or disassembly is prohibited.
-
Page 5: Important Safeguards
IMPORTANT SAFEGUARDS PREFITTED MAINS PLUGS For you convenience a mains plug has been fitted to this appliance. For your safety please observe the following information. 1. Should the fuse in the plug fall remove the plug from the wall socket and replace the fuse with a 3 Amp ASTA approved to BS 1362 fuse. -
Page 6: Location Of Control
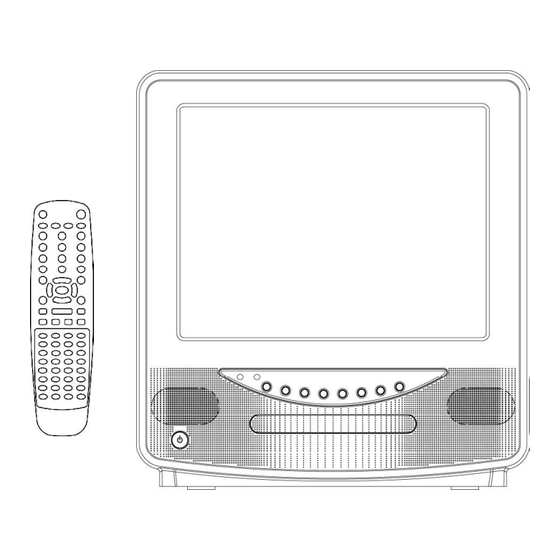
LOCATION OF CONTROL 1. Speaker 2. Power Button 3. Power Indicator 4. Remote Sensor 5. Channel Buttons TV/AV/DVD Button 7. Open Button 8. Play Button 9. Stop Button 10. Volume Buttons 11. DVD Door 12. Front Audio (R) Input (AV2) 13. -
Page 7: Location Of Controls
LOCATION OF CONTROLS Open/Close Button Sleep button PP Button Numeric Buttons P+ Buttons Program button Menu Button Volume - Button Display Button 10. Play Buttons 11. Stop Button 12. Fast Forward Button 13. Fast Backward Button 14. Direction Buttons( Up Down Left Right... -
Page 8: Operating The Television Receiver
OPERATING THE TELEVISION RECEIVER Connect your TV aerial to the aerial input socket located on the back of the TV. Push the Main Power Switch, Power Indicator will be illuminated. After a few seconds the TV screen will light up. Should white dots appear on the screen the TV will require tuning into the available TV stations in your area. -
Page 9: Operating The Television
OPERATING THE TELEVISION SEARCH(Manual) TUNE 1) Press the “P+/P-” button to select the PROGRAM. AUTO SEARCH then press the “V+/V-”button or numeric button to SEARCH select the desired Program number. BAND VHF-L FINE TUNE COLOUR AUTO 2) Press the “P+/P-”button to select the BAND. then SOUND press the “V+/V-”... - Page 10 OPERATING THE TELEVISION 2. PICTURE • Press the MENU button to select the PICTURE mode PICTURE as show in FIG.6. BRIGHTNESS • Press the “P+/P-” button to select the BRIGHTNESS/ COLOUR COLOUR/CONTRAST/SHARPNESS/HUE CONTRAST SHARPNESS • Press the “V+/V-” button to adjust the desired level, The steps can be adjust from 0~63.
- Page 11 OPERATING THE TELEVISION RECEIVER 5. PROG.EXCHANGE After stored TV stations by AUTO SEARCH or MANUAL SEARCH, the position of TV program can be exchange by the following method: • Press the MENU button five times to select the PROG.EXCHANG mode as shown in FIG.9 •...
-
Page 12: Operating With Remote Control
OPERATING WITH REMOTE CONTROL TO SELECT TV STATION USING THE PROGRAM NUMBERS: • Program Number Up and Down Press the " P+ " or " P- " button to select a higher or lower program number. • 0 - 9 Digital Button To select TV stations using program numbers 0 - 9, selecting program number will be shown in the right corner of the top of screen in green colour. -
Page 13: Auto Power Off Function
SLEEP Button • Press the SLEEP button to select a predetermined time the TV will turn off,the sleep time can be set to count down from 15 to 240 minutes. RECALL Button • Press the RECALL button,on screen will show the program number, press again to cancel. TV/AV Button •... -
Page 14: Operation With Remote Control
OPERATION WITH REMOTE CONTROL TELETEXT FUNCTION CONTROL Teletext - is an information system that displays text on your TV screen. Using the Teletext information system you can select a page of information on a subject that is available in its list of contents (index). - Page 15 OPERATION WITH REMOTE CONTROL TELETEXT FUNCTION CONTROL Cancel Button ( x ) (System) To switch between Teletext and TV programme. • Press button " x " the TV programme appears. • Press once again to return to the Teletext page. Conceal Button ( ? ) Sometimes a Teletext page contains concealed information, for example, in a quiz or puzzle.
-
Page 16: Dvd Player Operation
DVD PLAYER OPERATION Basic Operation 1. Switch the unit out of standby by pressing the STANDBY button then press the “TV/AV/ DVD” button on the unit or press the DVD MODE direct key on the remote handset to turn DVD mode to "... -
Page 17: Language Setup Menu
LANGUAGE SETUP MENU In STOP mode press the SETUP button and highlight language setup then press ENTER button to confirm. OSD(On Screen Display) 1. Press direction button to highlight the OSD and press ENTER button, then press the direction button to select the desired OSD language. •... -
Page 18: Screen Setup Menu
4. AUDIO 1. Press direction / button to highlight the AUDIO and press the ENTER button,then press the direction button to select the desired AUDIO language. • English • Spanish • French • Portuguese • German • Italian 5. SUBTITLE 1. -
Page 19: Audio Setup Menu
AUDIO SETUP MENU In stop mode press SETUP button and highlight AUDIO setup then press ENTER button to confirm. TO select the desired item by use the direction button. DIGITAL OUT : SPDIF / PCM SPDIF / RAW CUSTOM SETUP MENU In stop mode press SETUP button and highlight CUSTOM setup then press ENTER button to confirm. -
Page 20: Other Functions
3. ANGLE MARK: W hen playing a DVD, on which there have been scenes recorded from different angles, it is possible to view the scene from these different angles by pressing the Angle button on the remote control. This is only possible if ANGLE MARK is set to “ON”. 4. - Page 21 Slow The Slow Forward is only available for DVD. There are 5 steps of slow motion speed; 1/2, 1/4, 1/8, 1/16,1/32. Press SLOW button to cycle playback speeds. Note : Press Play Key to resume normal playback speed. Repeat Mode This function is available for DVD and CD audio but with different effects.
- Page 22 Search The user can access a specific location or a specific track by keying in the target time or the track number. 1. Press the SEARCH Button to enter to search mode . 2. Use the DIRECTION buttons to enter the desired “Title”, or “Chapter” data then press the ENTER button to jump to the required location.
- Page 23 Display Pressing this button will show the time and status information on the screen. Pressing a second time will present additional information on the current settings. Press a third time to cancel. Resume Play This function is in playback mode, when the STOP Button is pressed once, the player will enter the Resume Play mode.
- Page 24 Picture CD Load a picture CD into the tray. This unit will only identify the disk and display files in the jpg format. If the disc type can be identified, the player will start showing the pictures one by one (Slide Show Mode).
-
Page 25: Specification
SPECIFICATION TV SECTION Receiving Channels CH 2 - 4 CH 5 - 12 CH 21- 69 Tuner Type 250 Channel ,VS TUNING DVD SECTION Laser Wave length 655nm Laser power : Class 1 Signal System PAL / NTSC output Digital audio output Coaxial digital output;...
Need help?
Do you have a question about the GTVC14N14DVD and is the answer not in the manual?
Questions and answers