Advertisement
Table of Contents
Advertisement
Table of Contents

Related Manuals for Grundig Sonoclock 760 DCF


Summary of Contents for Grundig Sonoclock 760 DCF
-
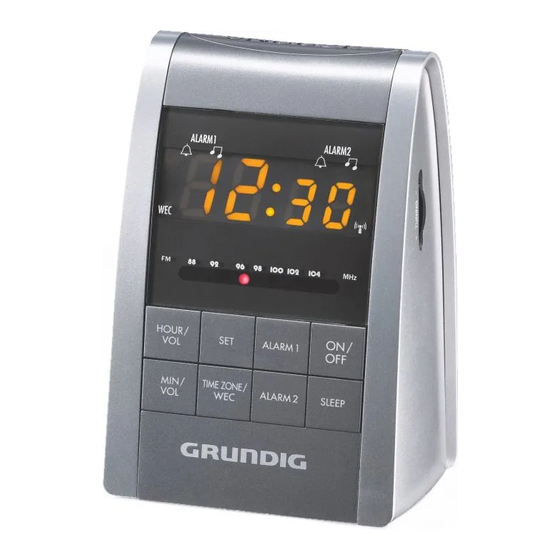
Page 1: Clock Radio
CLOCK RADIO Sonoclock 760 DCF... - Page 2 ___________________________________________________________...
- Page 3 ___________________________________________________________...
- Page 4 ___________________________________________________________...
- Page 5 6 - 20 DEUTSCH 21 - 35 ENGLISH 36 - 50 FRANÇAIS 51 - 65 ITALIANO 66 - 80 PORTUGUÊS 81 - 95 ESPAÑOL 96 - 110 NEDERLANDS 111 - 125 POLSKI 126 - 140 DANSK 141 - 155 SVENSKA 156 - 170 SUOMI 171 - 185...
- Page 6 SAFETY _________________________________________________ This device is designed for the playback of audio signals. Any other use is expressly prohibited. Make sure the device is protected from dripping or splashing water. Do not place any vessels such as vases on the device. These may be knocked over and spill fluid on the electrical components, thus presenting a safety risk.
- Page 7 OVERVIEW ____________________________________________ Fold out page 2 so that you have the illustrations in front of you. Controls on the top Interrupts the alarm function; displays the day of the week; SNOOZE displays the remaining snooze time. Controls on the front •...
- Page 8 OVERVIEW ____________________________________________ Switches the radio on and off; ends the alarm for this day; ON/OFF deactivates the sleep timer. Activates the sleep time setting. SLEEP Controls on the sides Headphone jack, to connect headphones or earphones with a jack plug (ø 3.5 mm), on the left hand side of the device.
- Page 9 OVERVIEW ____________________________________________ Displays e ALARM 1 LED. Displays that the alarm is activated with a signal tone • or radio for alarm time 1. e ALARM 2 LED. Displays that the alarm is activated with a signal • tone or radio for alarm time 2. 10:00 Displays the time, the alarm times, the sleep timer time and the day of the week for the alarm interruption.
-
Page 10: Inserting The Back-Up Battery
POWER SUPPLY ______________________________________ Mains operation Note: Check that the mains voltage on the type plate (on the bottom of the device) corresponds to your local mains supply. If this is not the case, contact your specialist dealer. Plug the power cord into the wall socket (230 V~, 50 Hz). Caution: The device is connected to the mains with the power plug. -
Page 11: Radio-Controlled Clock
SETTINGS ______________________________________________ Radio-controlled clock With your built-in radio-controlled clock, you are in possession of an absolutely precise alarm and meeting clock which is automatically set to the radio-transmitted time signals of the most precise clock in the world: the atomic clock of the Physikalisch-Technischen Bundesanstalt (PTB – the German national metrology institute). - Page 12 SETTINGS __________________________________ Setting time and day of the week If the device has been switched on for the first time – if no time signal has been received – »:« flashes in the display as a sign that the time has to be set. The same applies after a power failure or if the device has been disconnected from the mains supply and no back-up battery has been inserted.
-
Page 13: Setting The Time Zone
SETTINGS ______________________________________________ Setting the time zone If you use the device outside of the Central European Time Zone (CET), you can correct the time by +/– 2 hours. Press »TIME ZONE/WEC« again and keep pressed for approximately 2 seconds. – Display: »00«, »:« flashes. Set the time zone with »HOUR/VOL«... - Page 14 SETTINGS ______________________________________________ Setting alarm time 2 Press »SET« three times. • – Display: the last alarm time set, »e ALARM 2 « and »:« flash alternately. Press »HOUR/VOL« briefly to set the hours step-by-step or hold down to run through the hours continuously. Press »MIN/VOL«...
-
Page 15: Switching On And Off
OPERATION ___________________________________________ Switching on and off Press »ON/OFF« to switch on the device from standby mode. Press »ON/OFF« to switch the device to standby mode. Radio mode For the best possible FM (VHF) reception, it is sufficient to align the wire antenna accordingly. - Page 16 OPERATION ___________________________________________ Alarm with radio station Press »ON/OFF« to switch on the device. Select the radio station using the »TUNING« dial (right hand side). Adjust the alarm volume by pressing »HOUR/VOL« or »MIN/VOL«. Set the radio station you want as an alarm signal (» «), and press »ALARM 1«...
- Page 17 OPERATION ___________________________________________ Cancelling the alarm for the day Press »ON/OFF« while the alarm is sounding. – The alarm signal (radio station or signal tone) stops, the alarm remains at the set time for the next day. Deactivating and activating alarm standby To deactivate the alarm, press »ALARM 1«...
-
Page 18: Timer Mode
OPERATION ___________________________________________ Deactivating the alarm interruption for a weekday Press »TIME ZONE/WEC«. • – Display: the LED »WEC « disappears. – The set day of the week is saved. Timer mode The device has a sleep timer, which switches it off in radio mode at a preset time. -
Page 19: Environmental Note
INFORMATION _______________________________________ Environmental note This product has been made from high-quality parts and materials which can be re-used and recycled. Therefore, do not throw the product away with normal household waste at the end of its life. Take it to a collection point for recy- cling electrical and electronic devices. -
Page 20: Technical Data
INFORMATION _______________________________________ Technical data This device is noise-suppressed according to the applicable EU directives. This product fulfils the European directives 2004/108/EC, 2006/95/EC. This device conforms to the safety regulation VDE 0860 and therefore to the international safety regulation IEC 65. 230 Volt, 50/60 Hz Power supply: <... - Page 21 Grundig Multimedia B.V. Atrium, Strawinskylaan 3105 NL-1077 ZX Amsterdam http://www.grundig.com • •...
Need help?
Do you have a question about the Sonoclock 760 DCF and is the answer not in the manual?
Questions and answers