
Related Manuals for CME VX 5


Summary of Contents for CME VX 5
- Page 1 Intelligent MIDI Master Keyboard User’s manual ————————————————— Model: VX5/6/7/8 Read “Precautions” on page 5 before use Please read this manual carefully before use. Please keep this manual for reference.
- Page 2 Thank you for choosing CME VX —Intelligent MIDI Master Keyboard Please keep all the important information here Attach your invoice or receipt here ~~~~~~~~~~~~~~~~~~~~~~~ for reference Purchase date Serial (on the back of the keyboard) Dealer’s name and addr. Dealer’s tel.
-
Page 3: Special Message Section
ENVIRONMENTAL ISSUES: handle maximum current needed by this product. Please consult a local electrician CME strives to produce products that are both when possible. user safe and environmentally friendly. We sincerely believe that our products and the... - Page 4 1. IMPORTANT NOTICE: DO NOT MODIFY THIS UNIT! This product, when installed as indicated in the instructions contained in this manual, meets FCC requirements. Modifications not expressly approved by CME may void your authority, granted by the FCC, to use the product.
- Page 5 PRECAUTIONS IMPORTANT Always follow the basic precautions listed below to avoid the possibility of serious injury or even death from electrical shock, damages, fire or other hazards. These precautions include, but are not limited to, the follows: 1. Read and understand all the instructions. 2.
- Page 6 VX8 is equipped with professional Graded Hammer Action velocity sensitive keyboard with aftertouch 9 motorized faders 12 pads 17 knobs Ribbon control 32-bit high-speed CPU MIDI and digital Audio function Scale and temperament function U-CTRL mode by CME, to use with your music software for total control USB plug&play...
-
Page 7: Table Of Contents
Content General view ...........................9 Front panel ........................9 Rear panel .......................12 Installation guide........................13 Power supply......................13 Power on order ......................13 Connections ..........................14 Playing a demo song ......................15 Basic operation ........................15 Turning on..........................16 Normally turning on ....................16 Driver installation....................16 Turning on with initilizaing..................16 MASTER mode........................17 MASTER mode data list ..................17 BANK access ......................19... - Page 8 13.5 Local control ......................43 13.6 Pedal type........................44 13.7 MIDI filter.......................44 13.8 Reset........................45 EXPANSION........................46 U-CTRL ..........................47 Update..........................48 Appendix ........................49 17.1 Assignable controllers list ..................49 17.2 GM voice list......................53 17.3 Scale list ........................54 17.4 Notes list .........................59 17.5 Temperament list .....................60 17.6 Velocity curve list....................61 17.7 After touch curve list....................62...
-
Page 9: General View
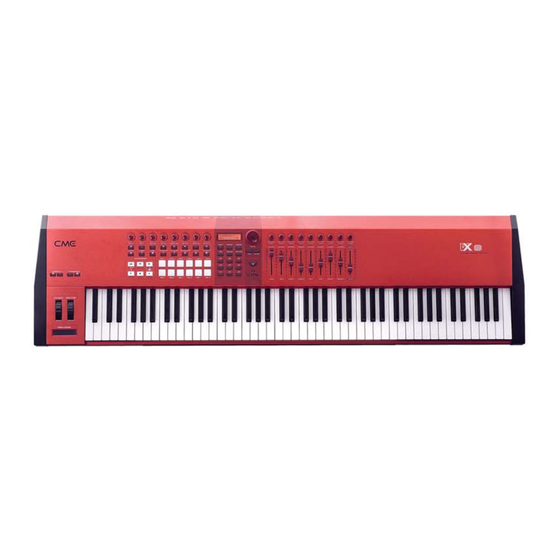
1 General view 1.1 Front panel The keyboard There are 4 models in the VX series: VX5-49keys, VX6-61keys, VX7-76keys, VX8-88 keys. All the keyboards in the VX series are equipped with velocity response and aftertouch. Velocity response means when you play the keyboard, it will respond to the initial force used to strike the keys. - Page 10 The pads (PAD 1-12): They are velocity sensitive, you can define them to trigger drum notes, or use them as control buttons, or use them to play songs. The FUNCTION buttons: They are used to control all the functions of the instrument and used for scene select.
- Page 11 The U-CTRL button: Press it for the software remote control mode, compatible with the Mackie Control templates. 11. The encoder knobs (ENCODER 1-9): Those knobs have no start or end points, and the functions can be user-defined. 12. The motorized faders: They can move according to the incoming MIDI data, and the functions can be user-defined.
-
Page 12: Rear Panel
1.2 Rear panel 01. MIDI IN port x1 02. MIDI OUT ports x4 03. Breath control (BC) jack: 1/8" TRS x1, compatible with YAMAHA BC3. 04. Pedal jacks: 1/4" TRS x2, each one can be used for volume or sustain pedal. 05.... -
Page 13: Installation Guide
Only the AC adaptor that goes with the VX should be used. If you cannot find the VX AC adaptor or the adaptor does not work, please contact local CME dealers. The VX AC adaptor varies from country to country. If you take your VX from one country to another, please make sure your AC adaptor compliant with the local power supply. -
Page 14: Connections
3 Connections Before you make these connections, please turn off all devices to avoid possible damage. Please refer to the fig. below to make connections:... -
Page 15: Playing A Demo Song
4 Playing a demo song Connect the VX MIDI OUT1 to the sound module MIDI IN, or connect VX to your computer via USB and select a GM compatible software sound module. Press the 【STYLE SEQ】button for style sequece mode. Press the【PLAY】button to play the song. -
Page 16: Turning On
6 Turning on 6.1 Normally turning on When you turn on the instrument, all the motorized faders will move to run a self-test and reset in turn. At the same time, all the pads will light on and off. Do NOT hold or stop the motorized motors while they are moving. This may cause great damage to the instrument and may cause electrical shock and fire! 6.2 Driver installation... -
Page 17: Master Mode
7 MASTER mode Notes for the MASTER mode: The MASTER mode is the main mode for users connecting a sound module or computer for real time performance. All the parts status in this mode will be saved even if you turned off the instrument. Please refer to the below list to see the parts functions: 7.1 MASTER mode data list Part name... - Page 18 Seq transport (STOP) Controller CC-118 Seq transport (PLAY) Controller CC-119 Remote control LOCATE 1 Controller CC-112 Remote control LOCATE 2 Controller CC-113 PAD 1 Note Tom-Low PAD 2 Note Tom-Mid PAD 3 Note Tom-Mid PAD 4 Note Tom-High PAD 5 Note Cymbal PAD 6...
-
Page 19: Bank Access
7.4 Tanspose and octave You can shift the keyboard pitch in semi-notes by using the Transpose function. You can shift the keyboard pitch in octaves by using the Octave function. The default keyboard ranges of VX 5/6/7/8 are listed below:... -
Page 20: Knobs And Faders
When you press [Transpose] or [Octave], you will see the information as below: When you change the Tranpose or Octave value, the corresponding button will light on. The octave shift range is -04~00~+04 octaves. Pressing the two octave buttons at the same time will reset the octave shift to 0, and the button will light off. -
Page 21: Remote Control Buttons
If you play more than one pad at the same time, only the information of the last pad will be shown. Note means the note name assigned to the pad, and the range is 000~127; refer to the appendix <Note list>. 7.7 SEQ control buttons When you press a SEQ button, it will send MIDI data to a specific port and channel. -
Page 22: Assigning
8 Assigning Notes for the ASSIGN function: You can use the ASSIGN function to re-define all the parts of the instrument. The ASSIGN button is available in the MASTER mode. You can use the function shortcut button F1~F8 for fast operation. 8.1 Assignable data list Assignable data type Page... -
Page 23: Assigning Keyboard And Wheels
8.2 Assigning keyboard and wheels Keyboard: → You can set the MIDI port and channel to send data. Pitch Bend Wheel: ← → Set the CC #. ← → Set the value range. ← → Set the MIDI port and channel Modulation Wheel: ←... -
Page 24: Assigning Pedals
8.3 Assigning pedals Sustain Pedal: → Set the CC #. ← → Set the value range. ← → Set the MIDI port and channel. Expression Pedal: ← → Set the CC #. ← → Set the value range. ← Set the MIDI port and channel. 8.4 Assigning aftertouch, ribbon, BC Aftertouch:... -
Page 25: Assigning Func. Buttons And Seq. Buttons
→ Set the CC #. ← → Set the value range. ← → Set the MIDI port and channel. Ribbon Control: ← → Set the CC #. ← → Set the value range. ← → Set the MIDI port and channel. BC(Breath Control): ←... - Page 26 Set the CC #. ← → Set the value range: The first value is the data sent when button pressed; the second value is the data sent when button released. Off means sending no data. ← Set the MIDI port and channel. If the type on page 4-1 is set to “Note”: →...
-
Page 27: Assigning Potentiometer Buttons
← Set the MIDI port and channel. If the type on page 4-1 is set to “Note”: ← → The next page will be: ← → Set the note #. ← → Set the trigger data: The first value is the trigger info. when button pressed; the second value is the trigger info. -
Page 28: Assigning Pads
8.7 Assigning pads Pads: → Select one from the 12 pads. Type can be note or control. If type is “Note”, the next page will be: ← → Set the note #. ← → Set the velocity range. ← Set the MIDI port and channel. If type is “Control”: →... -
Page 29: Assigning Encoder Buttons
8.8 Assigning encoder buttons Encoder knobs: → Select one from the 9 encoder knobs. Set the CC #. ← → Set the value range. ← Set the MIDI port and channel. If there is no channel data in the MIDI message, you cannot set the channel #. 8.9 Assigning faders Faders(Sliders): →... -
Page 30: Zone
9 ZONE Notes for the ZONE function: When the zone function is on, the keyboard can be divided into as many as 4 zones, and each zone’s data will be sent to a different MIDI OUT, so you can control and play 4 MIDI devices at the same time. -
Page 31: Automation
10 AUTOMATION Notes for the AUTOMATION function: You can use this function to record and play back the fader 1-9 movement, so you can make the faders move automatically. Faders 1-9 are map to tracks 1-9, each time you can record the movement of one fader, and you can play all the faders movement later. -
Page 32: Style Seq
11 STYLE SEQ Notes for the STYLE SEQ mode: In the STYLE SEQ mode you can use pads to play songs and play with the song. When the STYLE SEQ mode is on, the MASTER mode will be OFF. 11.1 STYLE SEQ data list Part name Panel ID Data type... - Page 33 Remote control LOCATE 2 PAD 1 Song phrase1 PAD 2 Song phrase2 PAD 3 Song phrase3 PAD 4 Song phrase4 PAD 5 Song phrase5 PAD 6 Song phrase6 PAD 7 Song phrase7 PAD 8 Song phrase8 PAD 9 Song phrase9 PAD 10 Song phrase10 PAD 11...
-
Page 34: Song Select
11.2 Song select Use the F1 button to select a song and set related parameters: Song: Song name and number. Tempo: Song tempo. 4/4: Time signature. 11.3 Setting a performance part Use the F2 button to set the part parameters including channel, voice(program), bank MSB, bank LSB: →... -
Page 35: Melody On/Off
11.4 Melody on/off Use the F3 button to turn ON/OFF the melody part. Melody: ON/OFF works on channel 8. 11.5 Setting the pads hold Use the F4 button to set the pads hold ON/OFF When the pads hold is ON, pressing and holding a pad results in continuous play;... -
Page 36: Motorized Fades Mode
11.6 Motorized fades mode Use the F5 button to set the motorized faders mode(Slidemode): SlideMode: You can set the SlideMode to either READ or WRITE. 11.7 Song play mode Use the F6 button to set the song play mode: Mode: The song play mode can be set to any one of the following: 【Off】It is the normal song play mode. -
Page 37: Changing Faders Channels
11.8 Changing faders channels Use the F7 button to change the motorized faders channels: The fader’s channels can be changed to 1-8 or 9-16. 11.9 Panic Use the F8 buttons for the PANIC function: When you press the button, the instrument will send reset data to all ports to stop continuous long tones and make all devices work properly. - Page 38 File format: standard MIDI file format 0. File size: Within 64KB per song. PAD STYLE ID: In the beginning position 000 add Marker ”cme style” The settings section at the song start: this settings section begins at position 000 with the Marker ”SetStart”, then fill in all the parts heading data, after that it ends with the Marker ”SetEnd”.
- Page 39 You can play a MIDI file that is not in PAD STYLE format in VX, but you cannot use the pads for loop select. With the VX Brain program, you can transfer song data from computer to the instrument via USB. To get the newest VX Brain program, please visit http://www.cme-pro.com...
-
Page 40: Performance
12 PERFORMANCE Notes for the PERFORMANCE mode: In the Performance mode, you can call for some unique functions to make your performance more expressive. You can select a function in the performance mode, and then apply it in the MASTER or STYLE SEQ mode. -
Page 41: Utility
13 UTILITY Notes for the UTILITY mode: Press the 【UTILITY】button for this mode. You can set or adjust the parts in this mode. All the changes made in this mode are global, affecting the instrument overall. UTILITY mode function list Function Function type shortcut... -
Page 42: After Touch
Refer to the appendix <Velocity curve list>. 13.2 After touch Press the F2 button to set Aftertouch: Press and hold a key then change the pressure to send aftertouch data. You can try different aftertouch types to find your favorite one. Refer to the appendix <Aftertouch list>. -
Page 43: Adjusting Breath Control
13.4 Adjusting breath control Press the F4 button to adjust Breath Control: When the breath controller is connected, use this function to adjust (calibrate) it. By turning the gain and fine tune knobs in the breath controller, set the BC basic value to 000, and set the data range to 000-127. -
Page 44: Pedal Type
13.6 Pedal type Press the F6 button to set the Pedal Type. The pedal type of pedal1/2 can be Switch or continuous. Pedal Polarity : ← : Here you can switch the podal polarity. 13.7 MIDI filter Press the F7 button to set the MIDI Filter: →... -
Page 45: Reset
Select a reset message then press YES or ENTER to send it to all ports. The available reset messages are listed below: All Notes Off Reset All Controllers All Sound Off GM On CME On GM2 On XG On GS On MMC Reset System Reset... -
Page 46: Expansion
14 EXPANSION About the EXPANSION mode: Press the EXPANSION】button for this mode. Expansion You will see related information when an expansion board is connected to the instrument. For more VX expansion board information, please visit www.cme-pro.com... -
Page 47: Ctrl
15 U-CTRL Notes for the U-CTRL mode: You can control popular computer software in the U-CTRL mode. In this mode, Pads and knobs will send out preset control data along with the SHIFT button. To use the U-CTRL mode: Press the U-CTRL button on the front panel, and the buttron will light on. Launch your computer software, and follow the software’s manual to load the MackieControl template. -
Page 48: Update
STOP STOP STOP PLAY PLAY PLAY 16 Update About the UPDATE function: With the VX Brain program, you can update the program and data of the instrument via USB connection. To get the newest VX Brain program, please visit www.cme-pro.com... -
Page 49: Appendix
17 Appendix 17.1 Assignable controller list Contrller name Abbr Remark Bank MSB Bank Select Modulate Modulation wheel Breath Breath control Undefined Undefine Foot Foot controller PtmtTime Portamento time Data MSB Data Entry Volume Channel Volume Balance Balance Undefined Undefine Express Expression Controller Undefined Undefine... - Page 50 Undefined Undefine Undefined Undefine Undefined Undefine Undefined Undefine Undefined Undefine Undefined Undefine Undefined Undefine Undefined Undefine Undefined Undefine Undefined Undefine Undefined Undefine Undefined Undefine Undefined Undefine Undefined Undefine Undefined Undefine Undefined Undefine Undefined Undefine Undefined Undefine Pdl-sust Sustain pedal Portamnt Portamento on/off Pdl-stnt Sustenuto on/off...
- Page 51 Master Balance Mast Bal Not for pads or buttons Master Tuning Mast Tun Not for pads or buttons CME ON CME ON Only for pads, knobs and pedals GM ON GM ON Only for pads, knobs and pedals XG ON...
- Page 52 GM2 ON GM2 ON Only for pads, knobs and pedals Tempo Tempo Only for encoders ProgramChange ProgChan Not for wheels Song Position Pointer S PPoint Song Select(Song #) S Selectr Tune request Tune req Not for pads, buttons or wheels Timing clock TimClock Not for pads, buttons or wheels...
-
Page 53: Gm Voice List
17.2 GM voice list Voice# Name Voice# Name Voice# Name Voice# Name GrandPno Aco.Bass SprnoSax Rain BritePno FngrBass Alto Sax SoundTrk El.Grand PickBass TenorSax Crystal HnkyTonk Fretless Bari.Sax Atmosphr E.Piano1 SlapBas1 Oboe Bright E.Piano2 SlapBas2 Eng.Horn Goblins Harpsi. SynBass1 Bassoon Echoes Clavi SynBass2... -
Page 54: Scale List
17.3 Scale list Scale Pitch name Note number: Major Scale Pentatonic Major Scale Blues Major Scale Minor Scale Melodic Minor Scale Harmonic Minor Scale Pentatonic Minor Scale Blues Minor Scale Augmented Scale Be-Bop Scale Whole-Half Scale Half-Whole Scale Whole Tone Scale Augmented fifth Scale Algerian Scale Arabian Scale... -
Page 59: Notes List
17.4 Note list Note # Name Note # Name Note # Name Note # Name C#-2 D#-2 F#-2 G#-2 A#-2 C#-1 D#-1 F#-1 G#-1 A#-1... -
Page 60: Temperament List
17.5 Temperament list Type EQUAL △ △ △ △ △ △ △ △ △ △ △ △ ARABIC △ △ △ △ ▲ △ △ △ △ △ △ ▲ ARABIC △ ▲ △ △ △ △ △ △ △ △... -
Page 61: Velocity Curve List
17.6 Velocity curve list Normal Soft 1 Soft 2 Hard 1 Hard 2 Expand Compress Fixup 1 Fixup 2 Fixup 3... -
Page 62: Aftertouch Curve List
17.7 Aftertouch curve list Normal Soft 1 Soft 2 Hard 1 Hard 2 Expand Compress Fixup 1 Fixup 2 Fixup 3... -
Page 63: Midi Route
17.8 MIDI route The keyboard data and all the contral part data will be sent to USB PORT 1, MIDI OUT PORT 1~4, and all the data to MIDI PORT 1 will also be copied to the expansion board MIDI IN(by the local control setting). In the U-CTRL mode, knob and fader data will be sent to USB PORT 2 exclusively. -
Page 64: Troubleshooting
18 Troubleshooting Trouble with possible reasons and solution After turning on the power switch, the instrument is not powered on Make sure you have connected the instrument to its AC adaptor with the proper AC supply. Make sure the power connector is firmly connected to the power outlet. No sound when playing the instrument Check the volume settings of the tone generator and speaker system Check the MIDI connection and the audio cable... -
Page 65: Specifications
AC Power Adaptor included AC Power Adaptor requirement: 16V 2.6A DC Dimensions (W x D x H) and Weight VX 5: 859 x 348 x 113mm, 9.62kg VX 6: 1022 x 348 x 113mm, 11.30kg VX 7: 1232 x 348 x 113mm, 13.38kg VX 8: 1408 x 372 x 150mm, 26.94kg... -
Page 66: Midi Implementation Chart
Messages ○: Yes X: No CME is continually improving its products, and every attempt is made to ensure the information in the user’s manual is current and accurate. CME cannot be responsible for possible discrepancies between the manual and the real product. - Page 67 2007-03 Central Music Co. Tel: +86-10-8580 1115 Fax: +86-10-8580 1114 Web: www.cme-pro.com E-mail for support: support@cme-pro.com...
Need help?
Do you have a question about the VX 5 and is the answer not in the manual?
Questions and answers