Ipevo Point 2 View User Manual
Hide thumbs
Also See for Point 2 View:
- Quick start manual ,
- Quick start manual (2 pages) ,
- Quick start manual (2 pages)
Table of Contents
Advertisement
Advertisement
Table of Contents

Related Manuals for Ipevo Point 2 View


Summary of Contents for Ipevo Point 2 View
- Page 1 Point 2 View User Manual www.ipevo.com...
-
Page 2: Table Of Contents
System requirements........................4 Installing P2V Software....................4 Connecting your Point 2 View....................... 4 Reviewing key parts of the Point 2 View Hardware..............5 Reviewing key parts of the P2V Software..............6 Navigating the P2V Software interface................... 7 Camera mode: For viewing video and taking snapshots..............7 Review mode: For reviewing and navigating taken snapshots............ - Page 3 7 Using Point 2 View in Other Applications........23 Step 1: Preparing Point 2 View......................23 Step 2: Preparing the application...................... 24 Step 3: Selecting Point 2 View as the webcam................... 24 8 Useful Tips.................. 25 Accessing the Help information......................25 Viewing version information......................
-
Page 4: Getting Started
The stand provides broad flexibility while remaining stable and secure. • Your Point 2 View is shaped like a pen and has a natural feel in your hand. Hold the Point 2 View and move it anywhere you like, letting the camera capture your personal Point of View - you’re the... -
Page 5: Installing The P2V Software
Connecting your Point 2 View 1. Connect Point 2 View to a USB port on your computer using the webcam’s built-in USB connector. 2. Open your P2V Software, if it’s not already running. It opens in Camera mode by default. You will see the video image being transmitted by Point 2 View. -
Page 6: Reviewing Key Parts Of The Point 2 View Hardware
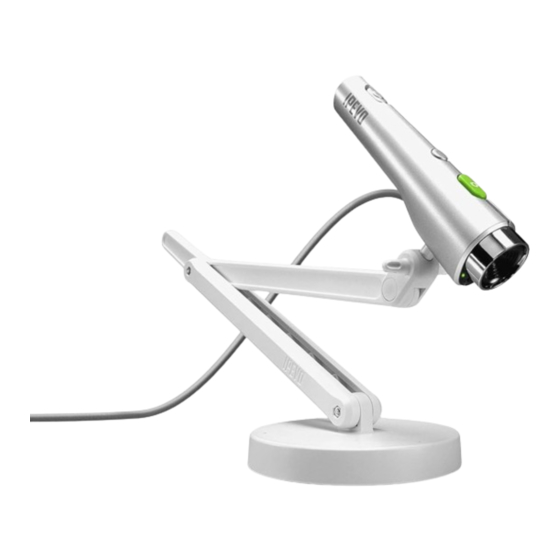
1 Getting Started Reviewing key parts of the Point 2 View Hardware The manual controls on Point 2 View let you bring Point 2 View into focus and take snapshots. The three-jointed stand and the monitor clip provide both flexibility and stability. -
Page 7: Reviewing Key Parts Of The P2V Software
1 Getting Started Reviewing key parts of the P2V Software P2V Software’s easy-to-use, intuitive interface makes it easy to view and manage videos and snapshots. The main screen gives you three modes to work in: • Camera mode shows you the video the webcam is capturing. •... -
Page 8: Navigating The P2V Software Interface
Camera mode: For viewing video and taking snapshots. Camera mode is the default view on the main screen in Point 2 View Software. Here you can monitor and adjust the video images, control the focus, and take snapshots. When you want to review your snapshots or share a video image in presentations, switch to the other modes by clicking the Mode tab. -
Page 9: Using Basic Features
Bringing Point 2 View into focus You can bring Point 2 View into focus by pressing the Focus key on Point 2 View, or by clicking the Focus button in P2V Software. The functionality is the same in either case and is especially useful when you have selected Single AF (Autofocus) mode, but it also works in Continuous AF mode. -
Page 10: Disabling The "Beep" Sound (Optional)
Follow these steps to bring Point 2 View into focus. 1. Press the Focus key on Point 2 View or click the Focus button in P2V Software. 2. A red focus frame appears at the center of the display, indicating focusing has begun. A single “beep”... -
Page 11: Taking Snapshots
Taking snapshots of a video image is simple and straightforward. First, make sure that P2V Software is running. Then choose the most convenient way to take a snapshot: • Press the Snapshot key on Point 2 View, or • Click the Snapshot button in P2V Software, or •... -
Page 12: Modifying Or Disabling Instant Preview (Optional)
• The 10-second mode is useful for taking group shots with your family and friends. • The 3-second mode is particularly useful when taking a snapshot with Point 2 View; it allows a buffer time for Point 2 View to stabilize, making for a crisper picture. -
Page 13: Positioning Point 2 View
Viewing objects and the macro capability You can move your Point 2 View on its stand to view an object, or arrange the stand and then attach the Point 2 View. The stand has three joints and a swivel. Once you arrange it however you choose, it remains stable in that position until you change it. -
Page 14: Sharing Documents
Sharing documents It’s easy to use Point 2 View to share documents. Just follow these steps: 1. Place your Point 2 View stand at the side of the document (so that it does not block the document or your view). -
Page 15: Working With Video Images
Controlling exposure In Camera mode, open the Exposure menu and select the exposure level. It’s useful to experiment with exposure using day and night lighting levels so you know what to expect when using Point 2 View in your environment. -
Page 16: Flipping Images (The Mirror Function)
3 Working with Video Images Flipping images (the Mirror function) You can flip an image vertically or horizontally. In Camera mode, open the Mirror menu and choose functions. Flipping can be useful to help position an image for better viewing. Original Horizontal flip Vertical flip... -
Page 17: Changing Window Size
3 Working with Video Images Changing window size To change the size of the viewing window, grab the bottom right corner of the window and drag it. Zoom ratio and video resolution do not change when the window size changes. TIPS: •... -
Page 18: Working With Photos
4 Working with Photos With Point 2 View, it’s easy to take and review snapshots (see Using Basic Features, page 8). P2V Software’s Review mode also offers simple, useful editing functions so you don’t have to rely on other applications for routine tasks. You can zoom into a snapshot; rotate, copy or delete a photo; or access the Photo Library folder, into which all photos are automatically saved. -
Page 19: Opening Photo Library Folder
• Click the folder icon below the photo in the main window. Folder icon The File Manager activates, showing the photo library folder and its contents. TIP: The photos you take in Point 2 View are JPEG files; they can be opened and manipulated in any graphics editing program. -
Page 20: Viewing In Full Screen
5 Viewing in Full Screen The Full Screen mode expands the video images into a full-screen presentation. This mode is particularly useful for presenting to an audience. Entering Full Screen mode 1. Make sure you are in Camera mode with a video image showing on the screen. 2. -
Page 21: Advanced Features
6 Advanced Features The advanced features are located in the Settings window. To open the Settings window: • (Windows) Click the Settings icon in the menu bar. • (Macintosh) Select P2V > Preferences... menu. Adjusting the video images You can fine-tune the video image quality using the Image Adjustment function. 1. -
Page 22: Changing The Photo File Name Format
Prefixes the file name with user-defined words, followed by 4-digit serial number. Example: IPEVO_0001.jpg ( = The first photo taken with IPEVO as the user-defined word) Starting P2V Software automatically when your computer starts (Windows) If you are using a Windows operating system, P2V Software automatically opens when you turn your computer on, by default. -
Page 23: Selecting Language
6 Advanced Features Selecting language You can select English (default) or Traditional Chinese as the menu language. Windows: Select the language from Settings window > System tab > Language. Macintosh: In Macintosh, language selection has to be done in the system level. Follow these steps. 1. -
Page 24: Using Point 2 View In Other Applications
You can use Point 2 View as a generic webcam in other applications for video calling, streaming, etc. As an example, we will illustrate how to use Point 2 View for video calls in Skype, a popular web call/ chat software. -
Page 25: Step 2: Preparing The Application
3. Select the Video settings tab. Step 3: Selecting Point 2 View as the webcam 1. In the Skype configuration window, Video settings tab, select Point 2 View as the webcam. (Point 2 View might be labeled as a generic USB webcam) 2. -
Page 26: Useful Tips
8 Useful Tips Accessing the Help information Clicking the Help link opens the IPEVO Support website, where you can check your version and update your P2V Software if needed. You can also download the most recent version of the User Manual. -
Page 27: Closing P2V Software
• (Macintosh) Click the Close button at the top left corner of the window, or press Command + W shortcut keys. To close the Point 2 View Software: • (Windows) Right-click the bottom taskbar icon and select Close. • (Macintosh) Select P2V > Quit P2V menu or press Command + Q shortcut keys. -
Page 28: Appendix
9 Appendix FAQ and Troubleshooting • P lease visit the product support page on www.ipevo.com for all the latest FAQ and up-to-date product information. • I f there are problems with connections between Point 2 View and P2V Software, please reconnect Point 2 View and restart P2V Software, then try again. User Manual version information Version Date Details V1.2 February 20 , 2012 Image updates. Safety information For your safety and the best performance of your Point 2 View webcam: • Keep your Point 2 View from touching heat sources such as radiators and stoves. • Do not immerse your Point 2 View in liquids, and protect it from moisture. • Supervise children using Point 2 View. This device complies with Part 15 of the FCC Rules. Operation is subject to the following two conditions: (1) this device may not cause harmful interference, and (2) this device must accept any interference received, including interference that may cause undesired operation. Acknowledgement • “ Windows” is a registered trademark of Microsoft Corporation, registered in the US and other countries.
Need help?
Do you have a question about the Point 2 View and is the answer not in the manual?
Questions and answers