
Related Manuals for Aquatica Digital 20062


Summary of Contents for Aquatica Digital 20062
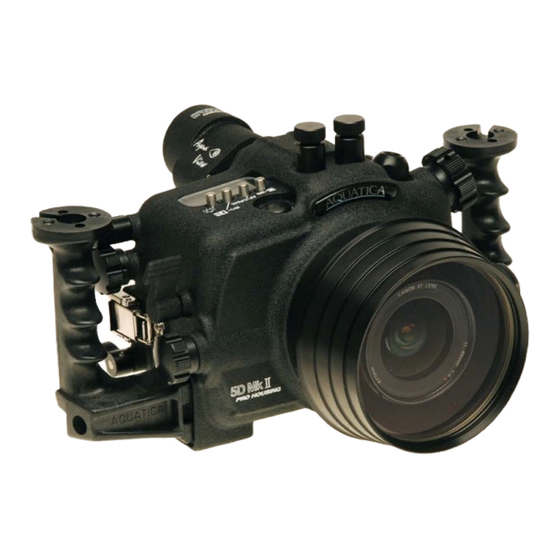
- Page 1 OPERATING MANUAL FOR THE AQUATICA PRO DIGITAL HOUSING FOR THE CANON 5D Mk II PRODUCT # 20062...
-
Page 2: Safety Precautions
Canon 5D Mk II DSLR. This manual assumes that the User is already familiar with the Canon 5D Mk II camera. If not, please read the Canon instruction manual before attempting to use the housing. - Page 3 Shutter Release lever Main Dial access knob LCD Panel Illuminator lever ISO / Flash exposure compensation button AF / Drive selector button Metering / WB selector button Main Bulkhead Connector Secondary Bulkhead Connector Hydrophone Focus/Zoom Control knob Focus/Zoom Control pinion gear Lateral Accessory Bulkhead port Lens Release knob Lens Release knob lever...
-
Page 4: Controls In Detail
ISO / FLASH EXPOSURE COMPENSATION: Press to select ISO speed or to select exposure correction of the flash* * (please note this is only in the event a Canon flash in a housing would be used) AF/ DRIVESELECTOR BUTTON: press to select either AF Mode or the DRIVE modes METERING PATTERN / WHITE BALANCE MODE BUTTON: Press to select the appropriate metering mode and/or White Balance mode. - Page 5 CONTROLS IN DETAIL, CONTINUED MODE DIAL ACCESS KNOB: Rotate to select the proper shooting mode, C1, C2 and C3 can pre programmed with personal parameter and care should be taken to understand the various combination available AF POINT SELECTOR / MAGNIFIER BUTTON: Push to select the AF pattern desired or to magnify the image on the rear LCD, Spot, Center Weighted or Matrix metering options.
-
Page 6: Preparation Of The Housing
FEATURES The Aquatica Pro Digital housing serie is issued from the world’s most technologically advanced underwater housing lineage, ergonomically designed to place all the essential camera controls under your finger tips and features the following: A port locking mechanism to prevent accidental rotation of the port or extension mounted on the housing A Lens Lock Release control that will activate the lens release button of camera from the outside of the housing. -
Page 7: Preparation Of The Ports
PREPARATION OF THE PORTS 1. Select the correct port: Depending on whether you’ve decided to shoot macro or wide angle photography, you will be installing either a flat Macro Port (product # 18426 or 18428), or a Dome Port (Product # 18405, 18407 or 18409). See lens chart for the suggest port and accessories. Macro Port Extension Rings: If you intend to use a Macro lens you will require an additional extension ring. -
Page 8: Camera Preparation And Installation
CAMERA PREPARATION AND INSTALLATION Important Note: prior to installing the camera in the housing, remove the camera strap, “D” Clips and/or any object that might obstruct installation or get in the way of that attach the strap should be removed or tucked away Make sure the ON / OFF (key # 32) is in the ON position and that the lens lock lever is in the proper position Remove the saddle from the housing and carefully place the camera on it and ensure the camera is properly installed and aligned as follows:... -
Page 9: Lens Installation
LENS INSTALLATION With the camera inside the housing, install the lens prepared with the gears through the port opening in the front of the housing. Ensure that the lens mounted gears are properly installed and aligned. Rotate the focus / zoom control knob to ensure that the gears are properly meshed, do not grind and that their rotation is smooth. -
Page 10: Mounting And Attaching Flashes
Also advisable is to put a light coat of O-ring lubricant on the threads of this connector. Your Canon Digital camera design does not allow flashes to be connected directly to the camera and be used in eTTL in- less they are original Canon flashes in third party housing with the required connector and cords. -
Page 11: Taking A Picture
Canon 5D Mk II manual is recommended to pull the maximum out of theses... -
Page 12: Using The Housing
USING THE HOUSING Whenever changing ports or O-rings, it is highly advisable to perform a simple seal test without the camera inside. Strapping a weight to the housing and lowering the unit to a depth of 30 to 50 feet of water for at least 10 minutes will assure you that the seating of the new port or o-ring is proper. - Page 13 Of the Latches: The two latches of the AQUATICA Pro Digital are designed to have a locking action to prevent accidental opening.Always ensure that the locking mechanism is secure. Watch for the build-up of corrosion or salt residue around the latches. This will appear as a white material.
- Page 16 RECOMMENDED AQUATICA ACCESSORIES 18407 9.25” GLASS DOME 18405 8” ACRYLIC DOME 18426 FLAT MACRO PORT 20054 AQUA VIEW FINDER 18409 6” ACRYLIC DOME EXTENSION RINGS 18790 PORT REAR CAP 19216 HARD TRANSPORT CASE 18789 HOUSING BODY CAP FOR AQUA VIEW FINDER 19300 BASIC REMOTE CONTROL 18480 8”...
-
Page 17: Warranty
WARRANTY PLEASE READ CAREFULLY One year Limited Warranty. Thank you for purchasing an AQUATICA manufactured product! Your AQUATICA housing is handcrafted by a small group of specially trained individuals - each of whom takes the most pride and satisfaction in offering you the best underwater camera housings in the world.