Table of Contents
Advertisement
R R F F X X M M o o d d e e l l s s
R R F F X X 8 8 3 3 4 4 0 0
R R F F X X 8 8 3 3 5 5 0 0
R R D D S S M M O O d d e e l l s s
R R F F X X 8 8 3 3 4 4 0 0 R R D D S S
R R F F X X 8 8 3 3 5 5 0 0 R R D D S S
FRONT (R-) SPEAKER INPUT
FRONT (R+) SPEAKER INPUT
REAR (L-) SPEAKER INPUT
REAR (L+) SPEAKER INPUT
REAR (R-) SPEAKER INPUT
REAR (R+) SPEAKER INPUT
AUX INPUT RED(R)
AUX INPUT WHITE(L)
POWER ANTENNA(300mA MAX)
POWER REMOTE(500mA MAX)
IGNITION(SWITCHED)(INPUT)
CHASSIS GROUND
BATTERY +12V
BOX
INSTALLATION & OPERATION
GRAY/BLACK
GRAY
GREEN/BLACK
GREEN
PURPLE/BLACK
PURPLE
RED
WHITE
BLUE/RED
LT,BLUE
RED
CHOKE & FUSE
BLACK
YELLOW
NO
DESCRIPTION
1
LINE OUT REAR (L+) (WHITE)
2
LINE OUT REAR (R+) (RED)
3
LINE OUT REAR (GND) (BLACK)
4
SUM OUT (L+) (WHITE)
5
SUM OUT (GND) (BLACK)
6
VIDEO 1 (+) (WHITE)
7
VIDEO OUT (+) (WHITE)
8
AUX-IN 2 (GND) (BLACK)
9
VIDEO OUT (GND) (BLACK)
10
REAR SEAT OUT (R+) (RED)
SOURCE UNITS
+
-
+
-
+
-
+
1
2
3
4
5
6
7
8
9
10
11
12
13
14
15
16
17
18
19
20
WIRE SIDE VIEW
NO
DESCRIPTION
11
LINE OUT FRONT (R+
12
LINE OUT FRONT (L+
13
LINE OUT FRONT (GN
14
SUM OUT (R+) (RED)
15
VIDEO 2 (GND) (BLAC
16
VIDEO 2 (+) (RED)
17
AUX-IN 2 (R+) (RED)
18
AUX-IN 2 (L+) (WHITE
19
REAR SEAT OUT (GN
20
REAR SEAT OUT (L+)
Advertisement
Table of Contents

Subscribe to Our Youtube Channel
Related Manuals for Rockford Fosgate RFX8340


Summary of Contents for Rockford Fosgate RFX8340
- Page 1 FRONT (R-) SPEAKER INPUT GRAY/BLACK FRONT (R+) SPEAKER INPUT GRAY R R F F X X M M o o d d e e l l s s REAR (L-) SPEAKER INPUT GREEN/BLACK REAR (L+) SPEAKER INPUT R R F F X X 8 8 3 3 4 4 0 0 GREEN REAR (R-) SPEAKER INPUT PURPLE/BLACK...
- Page 2 Institute (RTTI). Please read your warranty and retain your receipt and original carton for possible future use. To add the finishing touch to your new Rockford Fosgate image order your Rockford accessories, which include everything from T-shirts and jackets to hats and sunglasses.
-
Page 3: Specifications
(58mm x 188mm x 183.7mm) Nosepiece Dimensions (without trim-ring) 1-27/32"(H) x 6-3/4"(W) x 13/16"(D) (46.5mm x 171.5mm x 20.2mm) Weight RFX8340 / RFX8340RDS 3.85lbs (1.74kg) RFX8350 / RFX8350RDS 4.00lbs (1.81kg) *Feature available on RFX8320 & RFX8330 only – 1 –... - Page 4 FM Tuner Tuning Range Americas 87.5 ~ 107.9MHz (200kHz spacing) Eur/Aus 87.5 ~ 108MHz (50kHz spacing) Frequency Response 30Hz – 12kHz Usable Sensitivity 10dB (S/N 30dB) IF Rejection 90dB Image Rejection 50dB Signal-to-Noise Ratio 60dB Distortion < 0.5% Channel Separation 25dB @ 1kHz Suppression 35dB...
-
Page 5: Table Of Contents
Installation Section of this manual. Other information can be located by using the Table of Contents. We, at Rockford Fosgate, have worked very hard to make sure all the information in this manual is current. But, as we are constantly finding new ways to improve our product, this information is subject to change without notice. -
Page 6: Introduction
NTRODUCTION Rockford Fosgate optimizes vicious features in the RFX source units for use in high performance car audio & car video systems. A great tuner, a high performance CD player, and controls pioneered by Rockford Fosgate give you total control of your audio system! The following sections contain information on the features, installa- tion, and operation for the RFX &... -
Page 7: Precautions
RECAUTIONS Source Unit & Optional CD Changer Operating Temperature Be sure the temperature inside the vehicle is between +65 C –10° C and +65° C (+14° F and +149°F). DO NOT play a disc if the temperature is higher or lower than –10 C the operating range. - Page 8 Compact Discs Disc Handling and Care DO NOT touch the playing side (opposite of label side) of the disc. When handling the disc, only the outer edges or center hole of the disc should be touched. DO NOT affix any sticker or label to the disc. DO NOT apply vinyl record spray, anti-static agent, acetone, or any other volatile chemicals to the disc.
-
Page 9: Quick Look" Features Matrix
QUICK LOOK FEATURES RFX8340 RFX8340RDS RFX8350 RFX8350RDS Control/Lighting/Appearance Fold-Down Detachable Faceplate ISO Din Mounting w/ Removable Trim Panel Multi Function Volume Knob Any Button Wake-Up Time of Day Clock Programmable Default Display Negative Image LCD Display Multi-Color Multi-Color Multi-Color Multi-Color Illumination “ON”... - Page 10 QUICK LOOK FEATURES RFX8340 RFX8340RDS RFX8350 RFX8350RDS Next/Previous Track Programmable Eject Mute Off Insert Disc Power Up/Play Pause/Resume Play Programmable Disc Titles Star Circuitry* (Patent No. 4527265) Pre Amp/Power Amp Source Tone Memory Switchable Loudness Electronic Volume, Tone, Balance Internal Audio Amplifier (watts)
-
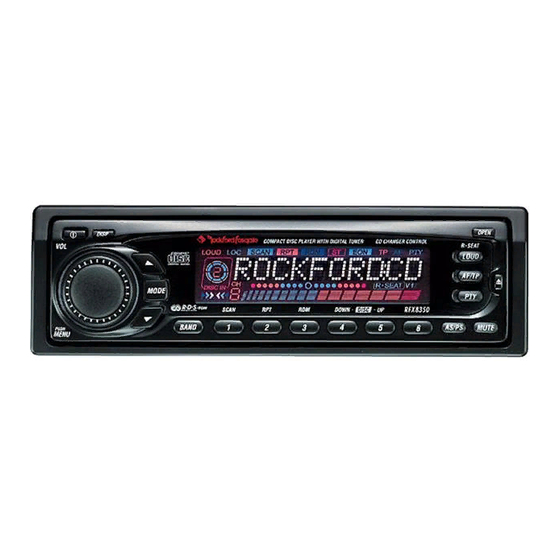
Page 11: Source Unit Design Features
Source Unit Design RFX8340 & RFX8350 RFX8340RDS & RFX8350RDS RFX8350 RFX8350 OPEN OPEN DISP DISP COMPACT DISC PLAYER WITH DIGITAL TUNER CD CHANGER CONTROLLER COMPACT DISC PLAYER WITH DIGITAL TUNER CD CHANGER CONTROLLER RADIO DATA SYSTEM R SEAT R SEAT... - Page 12 18. MUTE – Mutes the audio in TUNER/AUX modes and pauses the disc in CDP/CDX mode. *Features available on RFX8340 & RFX8350 only **Features available on RFX8340RDS & RFX8350RDS only – 10 –...
- Page 13 MP3 Changer model RFXMP3.8 and CD changer model RFX8810. The MP3 & CD Changer are not backward compatible with older RFX models. Rockford Fosgate rec- ommends connecting only the appropriate RFX models together. Rockford Fosgate does not assume responsibility when using other manufacturers’...
-
Page 14: Ir Remote Design Features
9. DISP – Switches the source unit between the clock and the currently selected mode (TUNER/CDP/CDX/AUX1/AUX2**). 10. DISC ACC – Directly accesses the desired CD/MMC in the optional CD/MP3 changer. *Features available on RFX8340 & RFX8340RDS only **Features available on RFX8350 & RFX8350RDS only – 12 –... - Page 15 19. 0-9 BUTTONS – Selects presets 1-6 in TUNER mode, selects tracks in CDP & CDX mode, and selects Discs/MultiMedia Cards in CDX(MP3) mode. *Features available on RFX8340 & RFX8350 only **Features available on RFX8340RDS & RFX8350RDS only – 13 –...
-
Page 16: Installation Considerations
NSTALLATION ONSIDERATIONS The following is a list of tools needed for installing the Source Unit: Volt/Ohm Meter #2 Phillips screwdriver Wire strippers Battery post wrench Wire crimpers Soldering iron Wire cutters Solder 1/8" diameter heatshrink tubing Heat gun This section focuses on some of the vehicle considerations for installing your new Source Unit. -
Page 17: Source Unit Mounting Locations
OURCE OUNTING OCATIONS The mounting position of your source unit will have a great effect on the performance of your in-dash CD Player. The source unit can be installed in a wide range of operating locations. However, care should be taken to ensure optimum performance. Engine Compartment Mounting the source unit in the engine compartment will void your warranty. -
Page 18: Wiring The System
IRING THE YSTEM NOTICE: If you do not feel comfortable with wiring your new source unit, please see your local Authorized Rockford Fosgate Dealer for installation. • For safety, disconnect the negative lead from the battery prior to beginning the installation. - Page 19 8. Connect the AUX RCA Jacks to the external audio source (this inserts the audio before the volume control on the source unit). The maximum un-clipped input voltage this circuit can accept is 4.0V RMS. 9. *Connect the AUX Video1 and Video2 Jacks to the output of the external video source(s).
-
Page 20: Installation
OURCE NSTALLATION Source Unit Mounting Angle • Mount the Source Unit as close to horizontal as possible for optimum CD Player performance • Mounting Angles up to ±20˚ from horizontal can be accommodated Using the Installation Sleeve - Standard Mount •... - Page 21 Installing the Source Unit – Standard Mount Backstrap 6mm Screw Antenna CAUTION: Installation sleeve should be installed using the appropriate tabs (refer to previous page) • Install Source Unit by sliding unit into installation sleeve until it clicks into place •...
-
Page 22: Reset Button
Un-Installing the Source Unit – Standard Mount • Disconnect Backstrap from rear of radio (if used) • Insert Release Keys into left and right sides of source unit to disengage locks • Remove Source Unit from installation sleeve with release keys Reset Button RESET RFX8350... -
Page 23: Basic Operation
ASIC PERATION RFX8350 OPEN DISP COMPACT DISC PLAYER WITH DIGITAL TUNER CD CHANGER CONTROLLER R SEAT LOUD COMPACT DIGITAL AUDIO MODE LO/DX SCAN DOWN DISC PUSH BAND MUTE MENU ETACHABLE ACEPLATE The faceplate is detachable as an anti-theft deterrent system. Remove the Faceplate 1. -
Page 24: Lcd Display
RFX8350 OPEN DISP COMPACT DISC PLAYER WITH DIGITAL TUNER CD CHANGER CONTROLLER R SEAT LOUD COMPACT DIGITAL AUDIO MODE LO/DX SCAN DOWN DISC PUSH BAND MUTE MENU OWER Operation 1. Press the PWR button to turn on the radio (Fig. 1) 2. - Page 25 RFX8350 OPEN DISP COMPACT DISC PLAYER WITH DIGITAL TUNER CD CHANGER CONTROLLER R SEAT LOUD COMPACT DIGITAL AUDIO MODE LO/DX SCAN DOWN DISC PUSH BAND MUTE MENU ONTROLS Operation 1. Press the MENU knob to cycle through BASS>TREBLE>BALANCE>FADER >SUM>VOLUME modes (Fig. 1) 2.
- Page 26 RFX8350 OPEN DISP COMPACT DISC PLAYER WITH DIGITAL TUNER CD CHANGER CONTROLLER R SEAT LOUD COMPACT DIGITAL AUDIO MODE LO/DX SCAN DOWN DISC PUSH BAND MUTE MENU LOCK PERATION Setting the Clock Hours (press & hold) 1. Press and hold the DISP button for 1 second DISP until the hour digits flash (Fig.
- Page 27 RFX8350 OPEN DISP COMPACT DISC PLAYER WITH DIGITAL TUNER CD CHANGER CONTROLLER R SEAT LOUD COMPACT DIGITAL AUDIO MODE LO/DX SCAN DOWN DISC PUSH BAND MUTE MENU EFAULT ECALL ISPLAY Display Recall temporarily displays the clock, radio sta- DISP tion, station title, CD track/time or disc title or aux on the LCD for 5 seconds.
- Page 28 RFX8350 OPEN DISP COMPACT DISC PLAYER WITH DIGITAL TUNER CD CHANGER CONTROLLER R SEAT LOUD COMPACT DIGITAL AUDIO MODE LO/DX SCAN DOWN DISC PUSH BAND MUTE MENU OUDNESS ONTROL The Loudness control enables the bass response of the audio output to be boosted at high/low levels Operation 1.
- Page 29 RFX8350 OPEN DISP COMPACT DISC PLAYER WITH DIGITAL TUNER CD CHANGER CONTROLLER R SEAT LOUD COMPACT DIGITAL AUDIO MODE LO/DX SCAN DOWN DISC PUSH BAND MUTE MENU NITIAL OLUME EVEL (press & hold) Operation 1. Press and hold the MENU button for 1 second to enter the options menu (Fig.
- Page 30 Title RFX8350 OPEN DISP COMPACT DISC PLAYER WITH DIGITAL TUNER CD CHANGER CONTROLLER R SEAT LOUD COMPACT DIGITAL AUDIO MODE LO/DX SCAN DOWN DISC PUSH BAND MUTE MENU /MP3/AUX T TATION ITLE EMORY The name of the radio station or CD can be stored in memory using up to 10 characters as a title.
-
Page 31: Tuner Operation
UNER PERATION RFX8350 OPEN DISP COMPACT DISC PLAYER WITH DIGITAL TUNER CD CHANGER CONTROLLER R SEAT LOUD COMPACT DIGITAL AUDIO MODE LO/DX SCAN DOWN DISC PUSH BAND MUTE MENU UTTON UNER UNCTION Operation (press & hold) 1. Press the MODE button to select TUNER mode MODE (Fig. - Page 32 RFX8340/RFX8350 RFX8340RDS/RFX8350RDS RFX8350 RFX8350 OPEN DISP OPEN DISP COMPACT DISC PLAYER WITH DIGITAL TUNER CD CHANGER CONTROLLER RADIO DATA SYSTEM R SEAT COMPACT DISC PLAYER WITH DIGITAL TUNER CD CHANGER CONTROLLER R SEAT LOUD COMPACT LOUD COMPACT DIGITAL AUDIO DIGITAL AUDIO...
- Page 33 RFX8350 OPEN DISP COMPACT DISC PLAYER WITH DIGITAL TUNER CD CHANGER CONTROLLER R SEAT LOUD COMPACT DIGITAL AUDIO MODE LO/DX SCAN DOWN DISC PUSH BAND MUTE MENU UTTON UNER UNCTION PTIONS Operation 1. Press and hold the MENU knob for 1 second to enter TUNER OPTIONS mode (Fig.
- Page 34 1. While in Tuner Mode, press the LO/DX button to LO/DX switch between the two modes. Display Local 1. The LCD will display “LOCAL” or “DX” for 5 seconds, then revert to the previous menu. *Features available on RFX8340 & RFX8350 only – 32 –...
- Page 35 RFX8350 OPEN DISP COMPACT DISC PLAYER WITH DIGITAL TUNER CD CHANGER CONTROLLER RADIO DATA SYSTEM R SEAT LOUD COMPACT DIGITAL AUDIO AF/TP MODE SCAN DOWN DISC PUSH BAND AS/PS MUTE MENU AF/TP M TP (Traffic Program) Mode will automatically switch to receive a TRAFFIC ANNOUNCEMENT AF/TP regardless of the current operating mode (ie: CDP/CDX/AUX, etc..).
- Page 36 RFX8350 OPEN DISP COMPACT DISC PLAYER WITH DIGITAL TUNER CD CHANGER CONTROLLER RADIO DATA SYSTEM R SEAT LOUD COMPACT DIGITAL AUDIO AF/TP MODE SCAN DOWN DISC PUSH BAND AS/PS MUTE MENU PTY M PTY (Program Type) can search for radio stations via MUSIC MODE or SPEECH MODE networks.
-
Page 37: Cd Player / Cd Changer / Mp3 Operation
CD Player Operation RFX8350 OPEN DISP COMPACT DISC PLAYER WITH DIGITAL TUNER CD CHANGER CONTROLLER R SEAT LOUD COMPACT DIGITAL AUDIO MODE LO/DX SCAN DOWN DISC PUSH BAND MUTE MENU CD P LAYER CD Player Mode 1. Press the MODE button until CDP PLAY is dis- MODE played (Fig. -
Page 38: Track Selection
RFX8350 OPEN DISP COMPACT DISC PLAYER WITH DIGITAL TUNER CD CHANGER CONTROLLER R SEAT LOUD COMPACT DIGITAL AUDIO MODE LO/DX SCAN DOWN DISC PUSH BAND MUTE MENU CDP/CDX T RACK ELECTION Track Selection 1. Press the UP ARROW to select the next track on MODE the disc (FIG. - Page 39 RFX8350 OPEN DISP COMPACT DISC PLAYER WITH DIGITAL TUNER CD CHANGER CONTROLLER R SEAT LOUD COMPACT DIGITAL AUDIO MODE LO/DX SCAN DOWN DISC PUSH BAND MUTE MENU CDP/CDX T RACK ORWARD EVERSE Fast Forward/Reverse (press & hold) 1. Press and hold the UP ARROW to fast forward the track (FIG.
- Page 40 RFX8350 OPEN DISP COMPACT DISC PLAYER WITH DIGITAL TUNER CD CHANGER CONTROLLER R SEAT LOUD COMPACT DIGITAL AUDIO MODE LO/DX SCAN DOWN DISC PUSH BAND MUTE MENU CDP/CDX T RACK Track Scan plays the intro to each track for 10 sec- onds before moving to the next track on the cur- rently playing disc Track Scan...
- Page 41 RFX8350 OPEN DISP COMPACT DISC PLAYER WITH DIGITAL TUNER CD CHANGER CONTROLLER R SEAT LOUD COMPACT DIGITAL AUDIO MODE LO/DX SCAN DOWN DISC PUSH BAND MUTE MENU CDP/CDX T RACK EPEAT Track repeat plays the currently playing track over again Track Repeat 1.
- Page 42 RFX8350 OPEN DISP COMPACT DISC PLAYER WITH DIGITAL TUNER CD CHANGER CONTROLLER R SEAT LOUD COMPACT DIGITAL AUDIO MODE LO/DX SCAN DOWN DISC PUSH BAND MUTE MENU CDP/CDX T RACK ANDOM Track random selects and plays tracks at random from the currently playing disc Track Random 1.
- Page 43 RFX8350 OPEN DISP COMPACT DISC PLAYER WITH DIGITAL TUNER CD CHANGER CONTROLLER R SEAT LOUD COMPACT DIGITAL AUDIO MODE LO/DX SCAN DOWN DISC PUSH BAND MUTE MENU CDP/CDX P AUSE Pause CD MUTE 1. Press the MUTE button to pause the CD and reduce the volume to minimum (Fig.
- Page 44 RFX8350 OPEN DISP COMPACT DISC PLAYER WITH DIGITAL TUNER CD CHANGER CONTROLLER R SEAT LOUD COMPACT DIGITAL AUDIO MODE LO/DX SCAN DOWN DISC PUSH BAND MUTE MENU JECT Disc Eject 1. Press the OPEN button to fold-down the face- OPEN plate (Fig.
-
Page 45: Cd / Mp3 Changer Operation
CD Changer Operation (Shown here is the RFX8810 Optional Accessory) CD C OADING THE HANGER Loading Disc to the Magazine 1. Pull out the desired disc tray number from the magazine 2. Place the disc into the magazine label side up 3. -
Page 46: Cd Changer Mode
RFX8350 OPEN DISP COMPACT DISC PLAYER WITH DIGITAL TUNER CD CHANGER CONTROLLER R SEAT LOUD COMPACT DIGITAL AUDIO MODE LO/DX SCAN DOWN DISC PUSH BAND MUTE MENU CD C HANGER CD Changer Mode 1. Press the MODE button until CDX PLAY is MODE displayed (Fig. - Page 47 RFX8350 OPEN DISP COMPACT DISC PLAYER WITH DIGITAL TUNER CD CHANGER CONTROLLER R SEAT LOUD COMPACT DIGITAL AUDIO MODE LO/DX SCAN DOWN DISC PUSH BAND MUTE MENU CDX D ELECTION Disc Selection DOWN DISC 1. Press the DISC DOWN (Preset #4) button to select the next disc in the magazine (Fig.
- Page 48 CDX E JECT ESET Magazine Eject 1. Press the EJECT button to release the magazine disc from the CD changer 2. The source unit will revert to TUNER mode NOTE: A disc may be ejected during any mode or if the radio power/ignition is off LCD Display 1.
-
Page 49: Rear Seat Operation
UDIO PERATION RFX8350 OPEN DISP COMPACT DISC PLAYER WITH DIGITAL TUNER CD CHANGER CONTROLLER R SEAT LOUD COMPACT DIGITAL AUDIO MODE LO/DX SCAN DOWN DISC PUSH BAND MUTE MENU UDIO Rear Seat Audio Mode (press & hold) 1. Press and hold the LOUD button for 1 second until “R•SEAT”... -
Page 50: Audilliary Audio Operation
UXILIARY PERATION RFX8350 OPEN DISP COMPACT DISC PLAYER WITH DIGITAL TUNER CD CHANGER CONTROLLER R SEAT LOUD COMPACT DIGITAL AUDIO MODE LO/DX SCAN DOWN DISC PUSH BAND MUTE MENU AUX A UDIO The Auxiliary Audio Mode accepts audio inputs from devices such as DVD, VCR or a Video Game. -
Page 51: Auxilliary Video Operation
RFX8350 OPEN DISP COMPACT DISC PLAYER WITH DIGITAL TUNER CD CHANGER CONTROLLER R SEAT LOUD COMPACT DIGITAL AUDIO MODE LO/DX SCAN DOWN DISC PUSH BAND MUTE MENU AUX V IDEO The Auxiliary Video Mode accepts 2 different sources of video inputs such as DVD, VCR or a Video Game. The source unit can switch between both video sources and can feed an array of outboard monitors. -
Page 52: Ir Remote Operation
IR R EMOTE PERATION OWER 1. Press the PWR button to turn on the radio 2. Press the PWR button a second time to turn off the radio LCD Display When the radio is off (in sleep mode) the clock will be displayed PERATING 1. - Page 53 OLUME Volume Up/Down 1. Press the VOL(+) button to increase the volume 2. Press the VOL(-) button to decrease the volume NOTE: The VOL button is also used to increase or decrease the Bass, Treble, Balance, Fader & Sum. See Tone Controls in this section for further information.
- Page 54 RACK Seek (TUNER Mode) 1. Press the SEEK UP button to automatically jump the tuner to the next strongest radio station 2. Press the SEEK DN button to automatically jump the tuner to the last strongest radio station 3. Press the SEEK UP/DN again to stop the tuner on the current radio station 101.5 Track Selection (CDP/CDX Mode)
- Page 55 Tune (TUNER Mode) 1. Press the TUNE UP button to manually tune the radio station up the band 2. Press the TUNE DN button to manually tune the radio station down the band 101.5 Disc Selection (CDX Mode) 1. Press the TUNE UP button to select the next disc in the magazine 2.
- Page 56 AUSE Tuner Mute 1. Press the MUTE button to reduce the volume to minimum 2. Press the MUTE button a second time to revert the audio to the previous level MUTE LCD Display The LCD will display MUTE until the function is canceled Pause CD (CDP/CDX Mode) 1.
- Page 57 ONTROLS 1. Press the SEL button to cycle through BASS> TREBLE>BALANCE>FADER>SUM>VOLUME 2. Press the VOL+ button to increase function 3. Press the VOL+ button to decrease function Function Display Range Default Volume 0 to 50 SUM** Bass -8 to +8 Treble -8 to +8 Balance...
- Page 58 UNER Selecting the Tuner Band 1. Press the BAND button to cycle through the tuner bank: FM1>FM2>FM3>AM1>AM2 2. Release the BAND button the select the desired tuner bank – 56 –...
- Page 59 ISPLAY ECALL Display Recall temporarily displays the clock, radio station, station title, CD track/time, disc title or AUX1/AUX2 on the LCD for 5 seconds. Display Recall (TUNER) 1. While in TUNER mode, press the DISP button to cycle through CLOCK>RADIO STATION> STATION TITLE PM 12:01 2.
- Page 60 IRECT RESET CCESS Direct Preset Access 1. Press the number (1-2-3-4-5-6) to access the desired tuner preset 2. The CD player or CD changer will immediately load the selected track and begin playing 101.5 LCD Display 1. The LCD will display the tuner bank and the tuner frequency being accessed for 5 seconds 2.
- Page 61 RACK Track scan plays the intro to each track for 10 sec- onds before moving to the next track on the currently playing disc Track Scan 1. Press the SCAN (Preset #1) button to begin track scan mode 2. Track scan will continue to scan until the mode is cancelled 00:10 Track Scan Cancel...
-
Page 62: Track Repeat
RACK EPEAT Track Repeat plays the currently playing track over again from the beginning Track Repeat 1. Press the RPT (Preset #2) button to begin track repeat mode 2. Track repeat will continue to repeat the current track until the mode is cancelled 04:59 00:01 Track Repeat Cancel... - Page 63 RACK ANDOM Track random selects and plays tracks at random from the currently playing disc Track Random 1. Press the RDM (Preset #3) button to begin track random mode 2. Track random will continue to select and play tracks at random until the mode is cancelled 00:01 00:01 Track Random Cancel...
- Page 64 IRECT CCESS Direct Disc Access allows any disc in the maga- zine to be immediately selected and played. This method is faster than manually cycling through each disc in the magazine. Direct Disc Access 1. While in CDX mode, press the DISC ACC but- ton to select Direct Disc Access mode 2.
- Page 65 IRECT RACK CCESS Direct Track Access allows any track to be immedi- ately selected and played. This method is faster than manually cycling through each track on the disc. Direct Track Access 1. While in CDP/CDX mode, press the TRACK ACC button to select Direct Track Access mode 2.
- Page 66 TORE RESET AUTO STORE (press & hold) 1.Press and hold the AS/PS button to automatically select the strongest radio stations and store them in the tuner banks. 2. Auto Store will store radio stations individually in the desired tuner bank (FM1/FM2/FM3/AM1/ AM2).
-
Page 67: Troubleshooting
Disconnect antenna and test mittent or damaged with known working antenna. If tuner works, check installation and repair antenna wiring as necessary Antenna is wrong type Consult your local Authorized for AM/FM frequencies Rockford Fosgate Dealer for proper antenna selection – 65 –... - Page 68 SYMPTOM DIAGNOSIS REMEDY Disc will not load Voltage applied to Red Check battery, fuses and into Source Unit and Yellow wires is not connections and repair or replace between 10.8 and 16 as necessary. If voltage is above (also see error codes) volts or there is no +16 volts, have the electrical voltage present...
- Page 69 SYMPTOM DIAGNOSIS REMEDY ERROR 7 Excessive dirt or dust Clean disc to remove dirt or dust on disc as necessary (Servo Error) Disc is warped Put in a different disc! cracked or severely damaged Excessive scratches Put in a different disc! on disk ERROR 9 Disc is warped...
- Page 70 SYMPTOM DIAGNOSIS REMEDY Engine Noise Source unit is not Check connections and repair grounded properly wiring as necessary Noise is radiating into Check connections, run the RCA RCA signal cable cables on a different route away from sources of high current Bad component in the Check connections, bypass addi- signal chain...
- Page 71 CD C HANGER ROUBLESHOOTING SYMPTOM DIAGNOSIS REMEDY Error 1 Disc unit can’t detect Press the eject button and pull out magazine the magazine. Press the reset (Initialize Error) button Magazine tray Check tray load/unload area load/unload problem Magazine sensor is Have a service center check the defective magazine sensing switch...
- Page 72 SYMPTOM DIAGNOSIS REMEDY Error 7 The laser pick-up is Repair the laser pick-up defective (Focus Error) Disc is warped, Put in a new disc cracked or damaged Error 9 Disc is warped, Eject damaged disc from source cracked or severely unit and play only non-damaged (TOC Error) damaged.
- Page 73 Changer Disc is jammed in Disc load/unload Press “Reset” button on CD the CD Changer problem Changer. If CD Changer still does not operate, see your Local Authorized Rockford Fosgate Dealer IR R EMOTE ROUBLESHOOTING SYMPTOM DIAGNOSIS REMEDY IR Remote has...
-
Page 74: Warranty Information
This warranty covers only the original purchaser of Rockford product pur- chased from an Authorized Rockford Fosgate Dealer in the United States. In order to receive service, the purchaser must provide Rockford with a copy of the receipt stating the customer name, dealer name, product purchased and date of purchase. - Page 75 OTES – 73 –...
- Page 76 OTES – 74 –...
- Page 77 OTES – 75 –...
- Page 78 PRINTED IN CHINA Rockford Fosgate Rockford Corporation 546 South Rockford Drive Tempe, Arizona 85281 U.S.A. In U.S.A., (480) 967-3565 In Europe, Fax (49) 8503-934014 In Japan, Fax (81) 559-79-1265 www.rockfordfosgate.com E.W.R. 4/2000 For 2000 Models...
Need help?
Do you have a question about the RFX8340 and is the answer not in the manual?
Questions and answers