Table of Contents
Advertisement
Advertisement
Table of Contents

Related Manuals for Harman Kardon AVR 2700


Summary of Contents for Harman Kardon AVR 2700
- Page 1 AVR 3700, AVR 370 AVR 2700, AVR 270 Audio/video receiver Owner’s Manual...
-
Page 2: Table Of Contents
Table of Contents INTRODUCTION SET UP THE REMOTE CONTROL SUPPLIED ACCESSORIES INSTALL THE BATTERIES IN THE REMOTE CONTROL IMPORTANT SAFETY INFORMATION PROGRAM THE REMOTE TO CONTROL YOUR SOURCE DEVICES AND TV PLACE THE RECEIVER SET UP THE AVR FRONT-PANEL CONTROLS TURN ON THE AVR REAR-PANEL CONNECTORS USING THE ON-SCREEN MENU SYSTEM... -
Page 3: Introduction
Thank you for choosing this Harman Kardon product! Verify Line Voltage Before Use For more than fifty years, the Harman Kardon mission has been to share a passion for music The AVR 3700 and AVR 2700 have been designed for use with 120-volt AC current. -
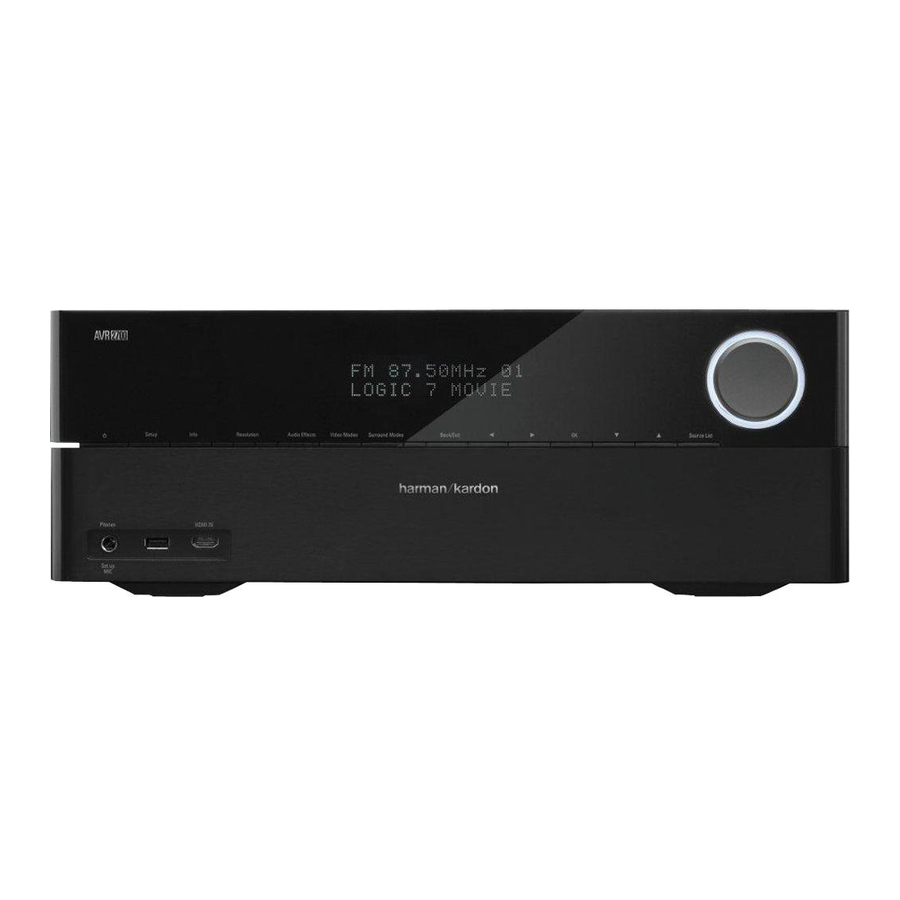
Page 4: Front-Panel Controls
Front-Panel Controls Front-Panel Controls Power Info Button Button Power Setup Message Volume Indicator Button Sensor Display Knob Resolution Video Back/Exit Source List Port Button Modes Button Button Button Button Headphone Jack/ HDMI ® Front Audio Surround Left/Right Up/Down EzSet/EQ Input Connector Effects Modes Buttons... - Page 5 Resolution button: Press this button to access the AVR’s video output resolution setting: 480p (AVR 3700/AVR 2700), 576p (AVR 370/AVR 270), 720p, 1080i, 1080p or 1080p/24Hz. Use the Up/Down and OK buttons to change the setting.
-
Page 6: Rear-Panel Connectors
Rear-Panel Connectors Rear-Panel Connectors Wi-Fi Antenna Connector Analog Video (AVR 3700/AVR 370) Connectors Network Radio Antenna HDMI Input HDMI Output Connector Connectors Connectors Connectors Analog Audio Speaker Digital Audio AC Input IR and Trigger Connectors Connectors Connectors Vents Connector Connectors Pre-Out Connectors RS-232 Main Power... - Page 7 Rear-Panel Connectors Rear-Panel Connectors, continued Subwoofer connector: Connect this jack to a powered subwoofer with a line-level input. See Connect Your Subwoofer, on page 17, for more information. NOTE: The AVR 3700 and AVR 370 have two subwoofer connectors. Radio Antenna connectors: Connect the supplied AM and FM antennas to their respective terminals for radio reception.
-
Page 8: System Remote Control Functions
System Remote Control Functions System Remote Control Functions IR Transmitter AVR Power On/Off Device Power Buttons On/Off Buttons Source Selector Buttons Audio Effects Surround Modes Button Button Video Modes Button Number Buttons Last Channel Activity Button Button Back/Exit Menu Button Button Up/Down/Left/Right Buttons... - Page 9 System Remote Control Functions System Remote Control Functions, continued Menu button: This button is used within the tuner menus and an iPod connected to the AVR’s front-panel USB port, and is also used to display the main menu on some source devices.
-
Page 10: Zone 2 Remote Control Functions
Zone 2 Remote Control Functions (AVR 3700/AVR 370 only) Zone 2 Remote Control Functions (AVR 3700/AVR 370 only) IR Transmitter Lens Power Off Mute Button Button Source Selector Buttons Sleep Button AVR Button Back/Exit Menu Button Button Up/Down/Left/Right Buttons OK Button Volume Up/Down Buttons Transport Control... - Page 11 Harman Kardon source device connected to one of the AVR’s Remote IR Out connectors. See Connect IR Equipment, on page 22, for more information.
-
Page 12: Introduction To Home Theater
Introduction to Home Theater Surround Modes Introduction to Home Theater There are different theories as to the best way to present surround sound and to This introductory section will help you to familiarize yourself with some basic concepts distribute each audio channel’s sounds to the surround-sound system’s speakers. unique to multichannel surround-sound receivers, which will make it easier for you to set A variety of algorithms have been developed in an effort to recreate the way we hear up and operate your AVR. -
Page 13: Place Your Speakers
Place Your Speakers Place Your Speakers NOTE: In a 7.1-channel system, you must choose to use either surround back speakers or front height speakers – you cannot use both simultaneously. Determine the locations for your system’s speakers according to their manufacturer’s Placing the Left, Center and Right Speakers directions and the layout of your listening room. -
Page 14: Types Of Home Theater System Connections
Types of Home Theater System Connections Types of Home Theater System Connections Always connect the colored (+) terminal on the AVR to the (+) terminal on the speaker (usually red), and the black (–) terminal on the AVR to the (–) terminal on the speaker (usually black). -
Page 15: Video Connections
Types of Home Theater System Connections Digital Audio Connections – Coaxial Video Connections Coaxial digital audio jacks are usually color-coded in orange. Although they look like Many source devices output both audio and video signals (e.g., Blu-ray Disc, DVD standard RCA-type analog jacks, you should not connect coaxial digital audio outputs to player, cable television box, HDTV tuner, satellite box, VCR, DVR). -
Page 16: Radio Connections
Types of Home Theater System Connections Radio Connections RS-232 Connector Your AVR uses separate terminals for the included FM and AM antennas. The FM antenna Your AVR’s RS-232 serial port may be connected to an external control system to allow uses a 75-ohm F-connector. -
Page 17: Making Connections
XX, for information about activating the two subwoofer outputs. Consult your Making connections with the receiver plugged in and turned on could damage subwoofer’s user manual for specific information about making connections to it. the speakers. AVR 3700/ AVR 2700/ AVR 370/AVR 370C AVR 270/ Connect Your Speakers AVR 270C... -
Page 18: Connect Your Audio And Video Source Devices
Making Connections Connect Your Audio and Video Source Devices However, you can connect your source devices as you wish and re-assign any of the input connections to any of the Source Buttons listed in the table according to where you Source devices are components where a playback signal originates, e.g. - Page 19 Making Connections Connect Your HDMI Devices Connect Your Composite Video Devices If any of your source devices have HDMI connectors, using them will provide the best Use composite video connectors for video source devices that don’t have HDMI or possible video and audio performance quality. Since the HDMI cable carries both digital component video connectors.
-
Page 20: Connect To Usb And Ios Devices
Making Connections Connect Your Analog Audio Devices Connect Your Video Recorder Use the AVR’s analog audio connectors for source devices that don’t have HDMI or digital Connect an analog video recorder’s video input connector to the AVR’s Composite Monitor audio connectors. NOTE: If you’re installing a multizone system, make analog audio Out connector. -
Page 21: Connect To Your Home Network
Making Connections Connect to Your Home Network Install a Multizone System Use a Cat. 5 or Cat. 5E cable (not supplied) to connect the AVR’s Network connector to your home network to enjoy Internet radio and content from DLNA-compatible devices IMPORTANT SAFETY NOTE: Installing a multizone system typically requires that are connected to the network. -
Page 22: Connect Ir Equipment (Avr 3650/Avr 365 Only)
IR receiver, such as the optional Harman Kardon HE 1000, to the AVR’s the remote room. A long run of stereo audio cable would increase the chance of signal IR In jack. -
Page 23: Connect The Trigger Output
Making Connections, To control more than one source device through the AVR’s IR Remote Out connector, Connect to AC Power connect all sources in “daisy chain” fashion, connecting each device’s IR output to the Connect the supplied AC power cord to the AVR’s AC Input connector and then to a next device’s IR input, starting with the AVR. -
Page 24: Set Up The Remote Control
Set Up the Remote Control 4. Aim the remote at the source device and use the remote’s Number buttons to enter a Set Up the Remote Control code number from Step 1, above. a) If the device turns off, press the Source Selector button again to save the code. The Install the Batteries in the Remote Control Source Selector button will flash, and the remote will exit the Programming mode. - Page 25 Set Up the Remote Control Learning (AVR 3700/AVR 370 only) If you have the device’s original remote control, you may “teach” its individual button codes into the following “destination” buttons on the AVR 3700/AVR 370 remote: Device Power On/Off buttons, Number buttons, Last button, Back/Exit button, Menu button, Up/Down/Left/Right buttons, OK button, Disc Menu button, A/B/C/D buttons, Channel Up/Down buttons, Volume Up/Down buttons, Mute button, Transport Control buttons.
-
Page 26: Set Up The Avr
AVR and unplug it. Check all speaker wires for a short-circuit (“+” and “–“ wires touching). If none is found, bring the unit to an authorized Harman Kardon service center for inspection and repair before using it again. -
Page 27: Set Up Your Sources
Set Up the AVR 5. Press the remote control’s AVR button. The AVR’s on-screen display (OSD) Main Menu Set Up Your Sources screen will appear on the TV. The Setup Source menu lets you assign the correct physical audio and video connections to each source and lets you set many audio and video playback features for each source. -
Page 28: Set Up The Network
If you connected your TV to the AVR’s Composite Video Monitor Out connector, you must set the resolution to “480i” (AVR 3700/AVR 2700) or to “576p” (AVR 370/AVR as for 3D viewing. In this case, you may find it more convenient to use the 3D 270) to view any content. - Page 29 Set Up the AVR Wired Network Setup The following options appear in the Wireless Setup menu: If your network uses an automatic IP address, you should not have to perform any Search AP: Select this option to display and select the wireless network you wish network setup procedures for a wired network connection.
-
Page 30: Operating Your Avr
Both Modeler and Leveler modules are active; Medium AVR 2700 and AVR 270 receivers that are connected to the same network as the device Leveler module has a value of 3 that has the app installed. With this easy-to-use app you can turn the AVR on or off, select Both Modeler and Leveler modules are active;... -
Page 31: Selecting A Source
Operating Your AVR Selecting a Source Listening to FM and AM Radio There are three different ways to select a source: Select the Radio source. A screen similar to the one in the illustration below will appear. Press the front-panel Source List button. Use the Up/Down buttons to scroll through the sources, and press the OK button to select the source being displayed. -
Page 32: Listening To An Ipod/Iphone/Ipad Device
Operating Your AVR Playing files on a USB device Listening to an iPod/iPhone/iPad Device 1. Insert the USB drive into the AVR’s front-panel USB port. When an iPod, iPhone or iPad device is connected to the AVR’s front-panel USB port, you may play audio files through your high-quality audio system, operate the iPod, iPad or IMPORTANT: Do not connect a personal computer or peripheral to the USB port. -
Page 33: Listening To Vtuner (Internet Radio)
Operating Your AVR If a video monitor is connected to the AVR and the system is not in iPod manual mode, Listening to vTuner (Internet Radio) an iPod screen will appear and display the play mode icon, song title, artist and album. A Your AVR’s Network connection brings you a world of MP3- and WMA-format streams via graphic bar indicates the current play position within the track. -
Page 34: Selecting A Surround Mode
Operating Your AVR To share media on PCs: Stereo: When you want two-channel playback, select the number of speakers you want to use for playback: 1. Open Windows Media Player. “2 CH Stereo” uses two speakers. 2. Open the Library menu and select Media Sharing. The Media Sharing window will appear. -
Page 35: Advanced Functions
Advanced Functions Advanced Functions The second number indicates whether any surround channels are present: “0” indicates that no surround information is present. “1” indicates that a matrixed surround signal is present. “2” indicates discrete left and right surround channels. “3” is used with DTS-ES Much of the adjusting and configuration your AVR requires is handled automatically, with bitstreams to represent the presence of the discrete surround back channel, in addition little intervention required on your part. -
Page 36: Video Processing
Advanced Functions Audio Effects Button Treble/Bass: These settings boost or cut the treble or bass frequencies by up to 10dB. Use the Left/Right buttons to change the setting. The default setting is 0dB, at the center To adjust other audio settings, such as the tone controls, press the Audio Effects of the bar. - Page 37 Advanced Functions How to Adjust the Custom Picture Settings Sharpness Adjustment Set the Video Mode to Custom to display the picture settings. Contrary to intuition, the picture will appear sharper and clearer with the sharpness backed off from the maximum setting. Reduce the Sharpness setting on your television, Video Modes –...
-
Page 38: Manual Speaker Setup
Manual Speaker Setup Step Three – Manual Speaker Setup Menu Manual Speaker Setup Now you are ready to program the receiver. Sit in your usual listening position, and make Your AVR is flexible and may be configured to work with most speakers and to compensate the room as quiet as possible. -
Page 39: Speaker Setup
Manual Speaker Setup Any changes will be reflected in the total Number Of Speakers displayed at the top of Sub Mode the screen. Move the cursor to the Sub Mode line. This setting depends upon the Crossover setting you selected for the front left and right speakers. The Assigned AMP setting includes four options: If you set the front speakers to a numeric crossover frequency, the subwoofer Surround Back: Select the Surr. - Page 40 Manual Speaker Setup Step Four – Setting Channel Output Levels Manually Reset Levels: To reset all levels to their factory defaults of 0dB, scroll down to this line at the bottom of the menu and press the OK button. For a conventional stereo receiver, a simple balance control adjusts the stereo imaging by varying the relative loudness of the left and right channels.
-
Page 41: Listening In Zone 2
Manual Speaker Setup Listening in Zone 2 With the multizone system in use, you may enjoy an exciting 5.1-channel home theater presentation in the main listening area, while others listen to the same program or an entirely different source in another room. See Install a Multizone System, on page 21, for installation information. -
Page 42: System Settings
System Settings CEC Power Control: This setting links the power on/off functions of the AVR to those of a System Settings TV connected to its HDMI Monitor Out connector. When Power Control is set to On, turning the TV’s power off will automatically put the AVR into the Standby mode; turning the TV’s The AVR’s System Settings menu lets you customize in what way many of the AVR’s power on will automatically turn the AVR on. -
Page 43: Settings Lock
Upgrade Software: If a software upgrade is released for your AVR, installation instructions will be available in the Product Support section of the Web site or from Harman Kardon customer service. At that time, you may access this submenu to install the upgrade software. -
Page 44: Advanced Remote Control Programming
If the receiver does not function correctly after a processor reset, contact an authorized For power on, press the AVR or Device Power On button. Harman Kardon service center for assistance. Authorized service centers may be located For power off, press the AVR or Device Power Off button. -
Page 45: Troubleshooting
Troubleshooting Symptom Cause Solution Unit does not function when Main Power switch is turned on power outlet Front-panel Message display lights, but there’s no sound or picture No sound from any speaker; PROTECT message appears on Message display circuit connections for crossed wires problems No sound from center or surround speakers surround-channel information from nonencoded... -
Page 46: Specifications
AVR 3700/AVR 370: 125W per channel, two channels driven @ 6/8 ohms, 20Hz – 20kHz, <0.07% THD Usable sensitivity (loop): 500μV AVR 2700/AVR 270: 105W per channel, two channels Distortion (1kHz, 50% mod): 1.0% driven @ 6/8 ohms, 20Hz – 20kHz, <0.07% THD Selectivity (±10kHz):... -
Page 47: Appendix
Analog 1 or 2 HDMI 1 Blu-ray Disc, HD-DVD player Media Server, including Media Server HDMI 4 Analog 1 or 2 HDMI 4 Harman Kardon DMC 1000 Optical 1 Analog 1 or 2 None Video-game console Game HDMI 3 Analog 1 or 2... - Page 48 Appendix Table A3 – Speaker/Channel Setting Defaults All Digital and Two-Chan nel Your Settings Your Settings Analog Audio Input Connectors Position 1 Position 2 Left/Right Speakers Center Speaker Left/Right Surround Speakers Left/Right Surround Back Speakers Subwoofer 1 Subwoofer 2 Left/Right Speakers Crossover Frequency 100Hz Center Speaker Crossover Frequency 100Hz...
- Page 49 Appendix Table A5 – Source Settings Cable/ Media Disc Radio Network Game iPod Server Device Type iPod/iPhone Surround Modes Video Input Audio Input Resolution to Display Adjust Lip Sync Change Name Zone 2 Audio Dolby Volume Table A6 – Audio Effects Settings Media Default Cable/Sat Disc...
- Page 50 Appendix Table A7 – Video Modes Settings Cable/ Media Default Disc Radio Network Game iPod Server Video Mode Brightness* Contrast* Color* Sharpness* Noise Reduction** MPEG Noise Reduction** Cross Color Suppressor** Film Mode Detect** * Note: These settings are available only when the Video Mode is set to Custom. ** Note: These settings are displayed only when Advanced Video Settings is selected.
- Page 51 CEC Power Control TV Control Network Settings Automatic Volume Units Volume Default Volume Default Level –25dB Unit of Measure Feet (AVR 3700/AVR 2700): Meters (AVR 370/AVR 270) Language English Dolby Volume Calibration RS232 Control Menu Transparency Medium Volume/Status Messages 3 Seconds...
- Page 52 Appendix Table A12 – Surround Modes Surround Mode Description Incoming Bitstream or Signal Dolby Digital Provides up to five separate main audio channels and a dedicated low-frequency effects (LFE) channel. 2/1/.0 or .1, 2/2/.0 or .1, 3/2/.0 or .1 connection Dolby Digital EX An expansion of Dolby Digital 5.1 that adds a surround back channel that may be played through one or two surround back speakers.
- Page 53 Appendix Table A12 – Surround Modes – continued Surround Mode Description Incoming Bitstream or Signal Dolby Pro Logic IIx This mode is similar to Dolby Pro Logic II Movie, with an added surround back Music channel. Dolby Pro Logic IIx This mode is similar to Dolby Pro Logic II Music, including the availability of center Music width, dimension and panorama adjustments.
- Page 54 Appendix Table A12 – Surround Modes – continued Surround Mode Description Incoming Bitstream or Signal DTS Neo:6 DTS Neo:6 analog processing is available with DTS and DTS 96/24 signals and See below Mode Group two-channel analog or PCM signals to create a 3-, 5- or 6-channel presentation. DTS Neo:6 Depending on the number of speakers in your system, select 3-, 5- or 6-channel Cinema...
- Page 55 Appendix Refer to the numbered buttons when using the Function List in Table A13. Remote Control Function List Reference...
- Page 56 Appendix Table A13 – Remote Control Function List Radio Media Server DMC1000 Button Name Blu-ray/DVD USB/iPod NETWORK/vTUNER AVR Power On AVR Power On AVR Power On AVR Power On AVR Power On AVR Power On AVR Power On AVR Power On AVR Power On AVR Power Off AVR Power Off...
- Page 57 Appendix Table A13 – Remote Control Function List – continued Button Name Cable/SAT Game HDTV TIVO AVR Power On AVR Power On AVR Power On AVR Power On AVR Power On AVR Power On AVR Power On AVR Power On AVR Power Off AVR Power Off AVR Power Off...
- Page 58 128 132 145 029 087 121 123 128 133 145 159 163 SHARP 077 128 132 GRUNDIG SIEMENS HALL MARK SIGNATURE HARMAN KARDON SONY 028 031 117 130 136 194 212 SOUNDESIGN 045 128 HITACHI 123 128 132 144 147 SYLVANIA...
- Page 59 TEKNIKA EMERSON 313 340 342 410 412 THOMAS 340 FISHER TIVO See Table A24 FUNAI 376 395 424 TOSHIBA 412 455 HARMAN KARDON 302 303 318 349 TOTEVISION HITACHI 340 348 UNITECH JC PENNEY 318 345 VECTOR RESEARCH JENSEN VIDEO CONCEPTS...
- Page 60 055 095 WARDS FUNAI YAMAHA 019 031 053 061 135 169 YORK HAITAI 099 214 HARMAN KARDON 001 002 025 054 190 Table A18 – Remote Control Product Codes: DVD HITACHI DVD Manufacturer/Brand Setup Code Number INKEL APEX DIGITAL JC PENNEY...
- Page 61 Appendix Table A19 – Remote Control Product Codes: SAT Table A20 – Remote Control Product Codes: Game SAT Manufacturer/Brand Setup Code Number GAME Manufacturer/Brand Setup Code Number BIRDVIEW Microsoft (XBOX, XBOX 360) 001 003 CHANNEL MASTER 320 321 325 361 NYKO (PS3) CHAPARRAL 315 316 451...
- Page 62 Table A22 – Remote Control Product Codes: Media Server Manufacturer/Brand Setup Code Number APPLE 008 009 BEYOND ESCIENT (FIREBALL) 004 005 006 007 HARMAN KARDON 001 002 LOGITECH MICROSOFT NAIM REQUEST SONOS Table A23 – Remote Control Product Codes: AUX-Cable/SAT...
- Page 63 8500 Balboa Boulevard, Northridge, CA 91329 USA © 2012 HARMAN International Industries, Incorporated. All rights reserved. Harman Kardon and Logic 7 are trademarks of HARMAN International Industries, Incorporated, registered in the United States and/or other countries. EzSet/EQ is a trademark of HARMAN International Industries, Incorporated.
Need help?
Do you have a question about the AVR 2700 and is the answer not in the manual?
Questions and answers