Breville Infuser BES840XL Instruction Booklet
Hide thumbs
Also See for Infuser BES840XL:
- Instruction book (38 pages) ,
- Instruction booklet (37 pages)

Related Manuals for Breville Infuser BES840XL


Summary of Contents for Breville Infuser BES840XL
- Page 1 DTP1112-005954 CTP05 Size:148x210mm Color:K+PMS518C 21/12/2011 the Infuser ™ Instruction Booklet - Livret d’instructions BES840XL...
- Page 2 CONGRATULATIONS on the purchase of your new Breville Espresso Machine...
-
Page 3: Table Of Contents
CONTENTS Breville recommends safety first Know your Breville Espresso Machine Operating your Breville Espresso Machine Coffee making tips & preparation Care & cleaning Troubleshooting Coffees to try French... -
Page 4: Important Safeguards
BREVILLE RECOMMENDS SAFETY FIRST At Breville we are very safety conscious. We design and manufacture consumer products with the safety of you, our valued customer, foremost in mind. In addition we ask that you exercise a degree of care when using any electrical appliance and adhere to the following precautions. -
Page 5: Short Cord Instructions
SHORT CORD INSTRUCTIONS by persons (including children) with reduced physical, sensory or mental Your Breville appliance is fitted with a short capabilities, or lack of experience or power supply cord as a safety precaution to knowledge, unless they have been given... -
Page 6: Know Your Breville Espresso Machine
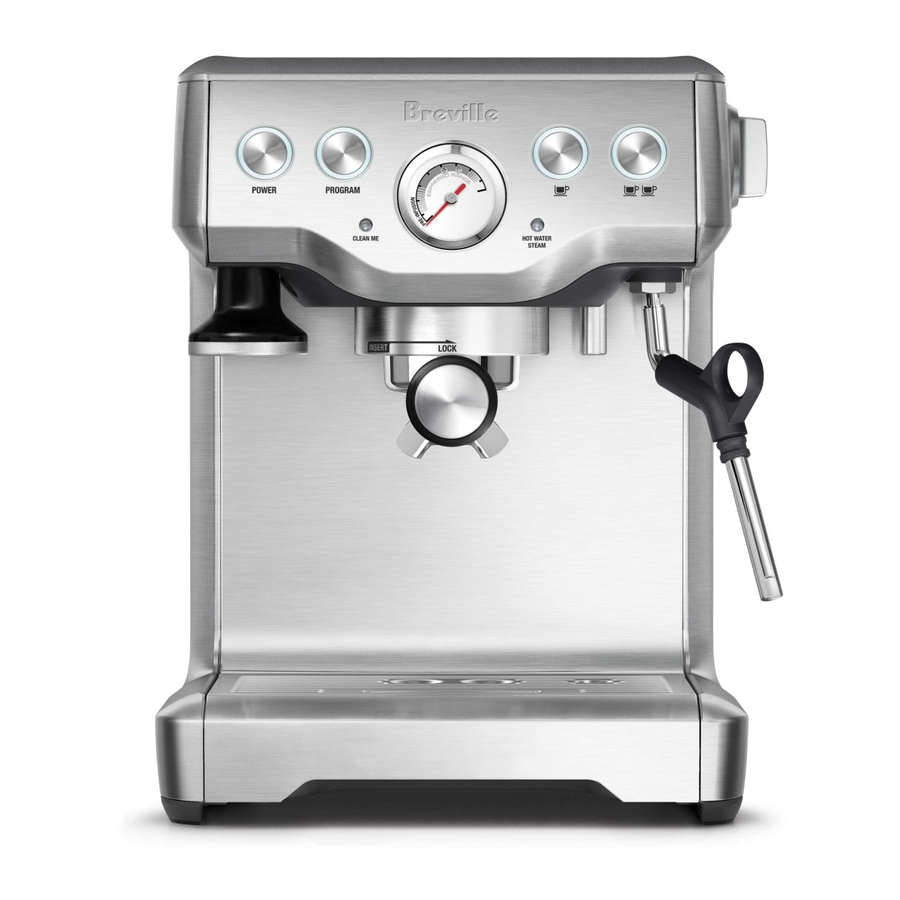
KNOW your Breville Espresso Machine... - Page 7 KNOW YOUR BREVILLE ESPRESSO MACHINE PID TEMPERATURE CONTROL LOW PRESSURE PRE-INFUSION Electronic PID temperature control for Applies low water pressure at the start of increased temperature stability. the extraction to gently expand grinds for an even extraction. AUTO PURGE ESPRESSO PRESSURE GAUGE...
- Page 8 KNOW YOUR BREVILLE ESPRESSO MACHINE All parts that come into contact with coffee and water are BPA Free. Power button 360˚ swivel action steam wand Button light flashes while machine is Adjusts to the perfect position for heating. texturing. Integrated & removable 54mm tamper...
- Page 9 KNOW YOUR BREVILLE ESPRESSO MACHINE Espresso pressure gauge Dual Wall filter baskets (1 cup & 2 cup) Use with pre-ground Monitors espresso extraction pressure. coffee. Program button Re-programs the preset 1 CUP and Allen key 2 CUP shot volumes. Single Wall filter baskets Cup warming tray (1 cup &...
-
Page 10: Operating Your Breville Espresso Machine
OPERATING your Breville Espresso Machine... - Page 11 Do not use abrasive cleansers, pads or cloths which can scratch the surface. To purchase water filters contact Do not clean any of the parts or Breville Consumer Service on accessories in the dishwasher. 1-866-273-8455 (USA) or 1-855-683-3535 (Canada). REPLACEMENT DUE Soak water filter for 5 mins Rinse water filter &...
- Page 12 OPERATING FIRST USE Rotate the STEAM/HOT WATER dial to the HOT WATER position and run for 10 seconds. Initial Start Up Repeat this cycle until the water tank • Ensure the water filter is securely fitted is empty. inside the water tank. •...
- Page 13 OPERATING Preset Shot Volume - 2 CUP button Re-Programming Shot Volume - 2 CUP Button Press the 2 CUP button once to extract a double shot of espresso at the preset To begin programming, press the volume (approx. 2oz / 60ml). The PROGRAM button once.
- Page 14 OPERATING Manual Shot Volume ESPRESSO PRESSURE GAUGE Manually control low pressure Low Pressure Pre-Infusion pre-infusion time and shot volume without re-programming the preset shot volume. The gauge needle will be positioned in the pre-infusion zone at the start of the Press and hold the 1 CUP or 2 CUP button.
- Page 15 OPERATING HOT WATER Under Extracted Zone The gauge needle, when positioned in the • Turn the STEAM/HOT WATER dial to lower zone during extraction, indicates the the hot water position. espresso has been extracted with • Hot water will pour from the hot water insufficient pressure.
- Page 16 OPERATING AUTO PURGE SLEEP & AUTO OFF MODE For extracting espresso immediately after The machine automatically switches to using the steam function, this machine SLEEP MODE after 1 hour. During this time, features an auto purge function. the POWER button light will flash slowly. After 3 hours, the machine will switch to The auto purge function ensures the ground AUTO OFF MODE.
-
Page 17: Coffee Making Tips & Preparation
COFFEE MAKING TIPS & PREPARATION... - Page 18 PAGE HEADER..COFFEE MAKING TIPS & PREPARATION PRE-HEATING Dual Wall Filter Baskets Use Dual Wall filter baskets if using Heating your cup or glass pre-ground coffee. A warm cup will help maintain the coffee’s Dual Wall filter baskets regulate the optimal temperature.
- Page 19 PAGE HEADER..COFFEE MAKING TIPS & PREPARATION COFFEE DOSE AND TAMPING • Wipe filter basket with a dry cloth. • Fill the filter basket with freshly ground coffee. The provided filter baskets are designed for: 1 CUP basket = approx. 8-10g. This is approx.
-
Page 20: Texturing Milk
PAGE HEADER..COFFEE MAKING TIPS & PREPARATION • If the espresso starts to drip but doesn’t • Before inserting the steam wand into the milk, pause the steam by returning flow after approximately 15 seconds, the STEAM/HOT WATER dial back to then you have either over dosed the filter the STANDBY position. - Page 21 COFFEE MAKING TIPS & PREPARATION HINTS & TIPS NOTE • Use freshly roasted coffee beans, After 5 minutes of continuous with a `roasted on’ date and use within steaming, the machine will 2 weeks of `roasted on’ date. automatically disable the steam function.
-
Page 22: Care & Cleaning
CARE & CLEANING... -
Page 23: Cleaning Cycle
NOTE scale build-up in and on many of the inner To purchase water filters contact functioning components. Replacing the Breville Consumer Service on water filter every two months will reduce 1-866-273-8455 (USA) or the need to decalcify the machine. 1-855-683-3535 (Canada). -
Page 24: Decalcifying
CARE & CLEANING The cleaning cycle will commence Set the STEAM/HOT WATER dial to and last for approximately the steam position and allow steam 5 minutes. During this time, water to run through the steam wand for will intermittently pour from the approximately 2 minutes. - Page 25 CARE & CLEANING CLEANING THE STEAM WAND • Periodically purge the machine. Place an empty filter basket and portfilter into the • Immediately after texturing milk, turn group head. Press and hold the 1 CUP steam on to purge out any residual milk button and run a short flow of water to from the steam wand then wipe the wand rinse out any residual coffee.
- Page 26 Key to tighten until the screw is flush with the shower screen. Re-insert the drip tray and rear water tank. Contact Breville Consumer Service or visit www.breville.com for replacement silicone seals or for advice. Once loosened, carefully remove and retain the screw, stainless steel shower screen and black dispersion plate.
-
Page 27: Troubleshooting
TROUBLESHOOTING... - Page 28 PAGE HEADER..TROUBLESHOOTING PROBLEM POSSIBLE CAUSES WHAT TO DO Machine does not • STEAM/HOT WATER Turn the STEAM/HOT dial is not in the WATER dial to the STANDBY heat up. STANDBY position. position. Machine will STEAM/HOT WATER commence heating. light flashes when the machine is turned •...
- Page 29 PAGE HEADER..TROUBLESHOOTING PROBLEM POSSIBLE CAUSES WHAT TO DO • The filter basket may be Use the pin on the end of blocked. the provided cleaning tool to unblock the hole(s). If the hole(s) remain blocked, dissolve a cleaning tablet in hot water and soak filter basket and portafilter in solution for approx.
- Page 30 PAGE HEADER..TROUBLESHOOTING PROBLEM POSSIBLE CAUSES WHAT TO DO No steam • Machine has not reached Allow time for the machine to operating temperature. reach operating temperature. The STEAM/HOT WATER light will flash to indicate the machine is heating to create steam.
- Page 31 PAGE HEADER..TROUBLESHOOTING PROBLEM POSSIBLE CAUSES WHAT TO DO • Coffee tamped too Tamp between 30-40lbs or No crema. lightly. 15-20kg of pressure. • Coffee is ground too Use slightly finer grind. coarsely. • Coffee beans or If grinding fresh whole coffee pre-ground coffee beans, buy freshly roasted are stale.
- Page 32 • The safety thermal-cut Turn the machine Off and out may have activated allow to cool for about 30-60 ceases to operate due to the pump minutes. overheating. If problem persists, call Breville Consumer Service on: 1-866-273-8455 (USA) 1-855-683-3535 (Canada).
- Page 33 NOTES...
-
Page 34: Coffees To Try
COFFEES TO TRY... - Page 35 COFFEES TO TRY CAPPUCCINO A single shot of espresso with textured milk, garnished with drinking chocolate. ESPRESSO Intense and aromatic, it is also known as a short black and is served in a small cup or glass. LATTÉ A latté consists of a single espresso with textured milk and approx.
- Page 36 FÉLICITATIONS pour l’achat de votre nouvelle Machine à espresso de Breville...
- Page 37 TABLE DES MATIÈRES Breville vous recommande la sécurité avant tout Faites la connaissance de votre Machine à espresso de Breville Fonctionnement de votre Machine à espresso de Breville Trucs & préparation du café Entretien et nettoyage Guide de dépannage Suggestions de cafés...
- Page 38 BREVILLE VOUS RECOMMANDE LA SÉCURITÉ AVANT TOUT Chez Breville, la sécurité occupe une place de choix. Nous concevons et fabriquons des produits de consommation sans jamais perdre de vue la sécurité de notre précieuse clientèle. De plus, nous vous demandons d’être très vigilant lorsque vous utilisez un appareil électrique et de respecter les mesures de sécurité...
- Page 39 BREVILLE VOUS RECOMMANDE LA SÉCURITÉ AVANT TOUT IMPORTANTES MESURES • Cet appareil est équipé d’un cordon d’alimentation muni d’un fil et d’une DE SÉCURITÉ POUR TOUT fiche reliés à la terre. Il doit être APPAREIL ÉLECTRIQUE branché dans une prise à trois alvéoles correctement reliée la terre.
- Page 40 PAGE HEADER..BREVILLE VOUS RECOMMANDE LA SÉCURITÉ AVANT TOUT COURT CORDON PROPOSITION 65 DE LA D’ALIMENTATION CALIFORNIE: Votre appareil Breville est muni d’un cordon (Applicable aux résidents de la d’alimentation court et très sécuritaire Californie seulement). qui prévient les blessures corporelles Cet appareil contient des produits ou dommages résultant du fait de tirer,...
- Page 41 FAITES LA CONNAISSANCE de votre Machine à espresso...
- Page 42 FAITES LA CONNAISSANCE DE VOTRE MACHINE À ESPRESSO CONTRÔLE DE TEMPÉRATURE PID PRÉINFUSION À BASSE PRESSION Contrôle de température électronique PID Une basse pression est appliquée en tout pour une stabilité de température accrue. début d’extraction pour gonfler délicatement la mouture et procurer une extraction uniforme.
- Page 43 FAITES LA CONNAISSANCE DE VOTRE MACHINE À ESPRESSO Toutes les pièces qui sont en contact avec le café et l’eau sont sans BPA. Touche de démarrage Buse vapeur pivotant sur 360° Le contour clignote quand la machine se S’ajuste à la position idéale pour réchauffe.
- Page 44 FAITES LA CONNAISSANCE DE VOTRE MACHINE À ESPRESSO Manomètre à espresso Pastilles de nettoyage Contrôle la pression d’extraction de Paniers-filtres à double paroi l’espresso. (1 tasse & 2 tasses) Utiliser avec Touche de programmation du café prémoulu Reprogramme les formats préréglés Clé...
- Page 45 FONCTONNEMENT de votre Machine à espresso...
- Page 46 Pour vous procurer des filtres à eau, ou chiffons abrasifs qui peuvent contactez le Service à la clientèle de endommager la surface. Ne mettez Breville au 1-866-273-8455 (É.-U.) aucune pièce ou accessoire dans le ou 1-855-683-3535 (Canada). lave-vaisselle. REPLACEMENT DUE Faites tremper le filtre Rincez le filtre &...
- Page 47 FONCTIONNEMENT DE VOTRE MACHINE À ESPRESSO PREMIÈRE UTILISATION Enfoncez la touche 2 TASSES pour faire couler l’eau chaude dans la tête Démarrage initial d’infusion. • Assurez-vous que le filtre à eau est bien Tournez le cadran de VAPEUR/EAU fixé à l’intérieur du réservoir. CHAUDE à...
- Page 48 FONCTIONNEMENT DE VOTRE MACHINE À ESPRESSO Enfoncez la touche 1 TASSE pour NOTE commercer l’extraction de l’espresso. La quantité d’espresso extraite peut Enfoncez à nouveau la touche 1 varier selon la grosseur et la quantité TASSE quand le volume désiré aura de mouture.
- Page 49 FONCTIONNEMENT DE VOTRE MACHINE À ESPRESSO Volume manuel MANOMÈTRE À ESPRESSO Contrôle manuellement la durée de Préinfusion à basse pression préinfusion à basse pression et le volume, sans reprogrammer le volume préréglé. L’aiguille du manomètre sera dans la zone de préinfusion au début de l’extraction, Pressez et tenez enfoncée les touches indiquant que la machine est en mode de 1 TASSE ou 2 TASSES.
- Page 50 FONCTIONNEMENT DE VOTRE MACHINE À ESPRESSO EAU CHAUDE Zone de sous-extraction L’aiguille du manomètre, lorsque • Tournez le cadran de VAPEUR/EAU positionnée dans la zone inférieure durant CHAUDE à la position d’eau chaude. l’extraction, indique que l’espresso a été • L’eau chaude s’écoulant de la sortie d’eau extrait sans suffisamment de pression.
- Page 51 FONCTIONNEMENT DE VOTRE MACHINE À ESPRESSO VIDANGE AUTOMATIQUE MODE VEILLE ET ARRÊT AUTOMATIQUE Pour extraire l’espresso immédiatement après avoir utilisé la fonction de vapeur, La machine commute automatiquement en cette machine est munie d’une fonction de mode veille (SLEEP MODE) après 1 heure. vidange automatique.
- Page 52 TRUCS ET PRÉPARATION DU CAFÉ...
- Page 53 TRUCS & PRÉPARATION DU CAFÉ PRÉCHAUFFAGE Paniers-filtres à double paroi Utilisez des paniers-filtres à double paroi Réchauffer la tasse ou le verre si vous utilisez du café prémoulu. Une tasse chaude permet de maintenir la Les paniers-filtres à double paroi température optimale du café.
- Page 54 TRUCS & PRÉPARATION DU CAFÉ DOSAGE ET TASSAGE DU CAFÉ • Essuyez le panier-filtre avec un chiffon sec. • Remplissez le panier-filtre avec du café fraîchement moulu. Les paniers-filtres fournis sont conçus pour: panier de 1 TASSE = 8-10 g environ. Cela représente environ 2 portions rases de la cuillère fournie.
- Page 55 PAGE HEADER..TRUCS & PRÉPARATION DU CAFÉ • À titre de référence, si l’espresso NOTE commence à couler avant environ Lorsque la machine produit de la 5 secondes, c’est que la quantité de vapeur, un son de pompage se fait mouture est insuffisante dans le entendre.
- Page 56 PAGE HEADER..TRUCS & PRÉPARATION DU CAFÉ • Retirez le pichet, démarrez TRUC immédiatement la vapeur pour rincer tout résidu de lait de la buse vapeur, puis Après les fonctions de vapeur et d’eau essuyez la buse vapeur avec un chiffon chaude, l’eau est automatiquement humide.
- Page 57 ENTRETIEN & NETTOYAGE...
- Page 58 Si vous remplacez le contactez le Service à la clientèle de filtre à eau tous les deux mois, vous réduirez Breville au 1-866-273-8455 (É.-U.) ainsi le besoin de détartrer la machine. ou 1-855-683-3535 (Canada). Si vous habitez une région où l’eau est dure, nous vous recommandons de changer le filtre à...
- Page 59 PAGE HEADER..ENTRETIEN & NETTOYAGE Le cycle de nettoyage débutera et Tournez le cadran VAPEUR/EAU durera environ 5 minutes. Pendant CHAUDE à la position vapeur et ce temps, l’eau s’écoulera par laissez la vapeur sortir de la buse intermittence de la tête d’infusion. pour environ 2 minutes.
- Page 60 PAGE HEADER..ENTRETIEN & NETTOYAGE • Si la buse vapeur demeure bloquée, NETTOYER LE PLATEAU retirez l’embout à l’aide de la clé D’ÉGOUTTEMENT ET LE TIROIR intégrée à l’outil de nettoyage et faites-le DE RANGEMENT tremper dans l’eau chaude. Utilisez la •...
- Page 61 égale à l’écran diffuseur. Replacez le plateau d’égouttement et le réservoir arrière. Contactez le Service à la clientèle de Breville ou visitez www.breville.com pour remplacer les joints de silicone ou pour des conseils. Une fois la vis desserrée, retirez et conservez soigneusement la vis, l’écran...
- Page 62 GUIDE DE DÉPANNAGE...
- Page 63 GUIDE DE DÉPANNAGE PROBLÈME CAUSES POSSIBLES QUE FAIRE La machine ne se réchauffe • Le cadran VAPEUR/ Tournez le cadran EAU CHAUDE n’est VAPEUR/EAU CHAUDE pas. pas en position en position STANDBY. La Le voyant VAPEUR/EAU STANDBY (attente). machine commencera à se CHAUDE chaude clignote réchauffer.
- Page 64 GUIDE DE DÉPANNAGE PROBLÈME CAUSES POSSIBLES QUE FAIRE L’espresso ne fait que • Le café est moulu trop Utilisez une mouture finement. légèrement plus grossière. s’égoutter des goulottes du porte-filtre. • Trop de café dans le Diminuez le dosage. Il panier-filtre.
- Page 65 GUIDE DE DÉPANNAGE PROBLÈME CAUSES POSSIBLES QUE FAIRE L’espresso s’écoule trop • Le café est moulu trop Utilisez une mouture grossièrement. légèrement plus fine. rapidement. • Il n’y a pas assez Augmentez le dosage. Il de mouture dans le est à noter que le rebord panier-filtre.
- Page 66 GUIDE DE DÉPANNAGE PROBLÈME CAUSES POSSIBLES QUE FAIRE Pas de vapeur. • La machine n’a pas Laissez la machine atteint la température atteindre la température de fonctionnement. de fonctionnement. Le voyant VAPEUR/EAU CHAUDE clignotera pour indiquer que la machine se réchauffe pour générer de la vapeur.
- Page 67 GUIDE DE DÉPANNAGE PROBLÈME CAUSES POSSIBLES QUE FAIRE Pas de crema. • Le café est tassé trop Tassez avec 30-40 lb ou légèrement. 15-20 kg de pression. • Le café est moulu trop Utilisez de la mouture grossièrement. légèrement plus fine. •...
- Page 68 30-60 minutes. été activé à cause de la surchauffe de la Si le problème persiste, pompe. contactez le Service à la clientèle de Breville au : 1-866-273-8455 (É.-U.) 1-855-683-3535 (Canada).
- Page 69 NOTES...
- Page 70 SUGGESTIONS DE CAFÉS...
- Page 71 COFFEES TO TRY CAPPUCCINO Un espresso simple avec ajout de lait mousseux et garni de poudre de chocolat. ESPRESSO Intense et aromatisé, aussi connu comme espresso court ou noir, et servi dans une demi-tasse ou un verre. LATTÉ Espresso simple auquel on a ajouté du lait mousseux et environ 10 mm de mousse.
- Page 72 Email: askus@brevilleusa.com Email: askus@breville.ca www.breville.com Breville is a registered trademark of Breville Pty. Ltd. A.B.N. 98 000 092 928. Copyright Breville Pty. Ltd. 2012. Due to continued product improvement, the products illustrated/photographed in this booklet may vary slightly from the actual product.