
Related Manuals for Fisher-Price RAINFOREST M6711


Summary of Contents for Fisher-Price RAINFOREST M6711
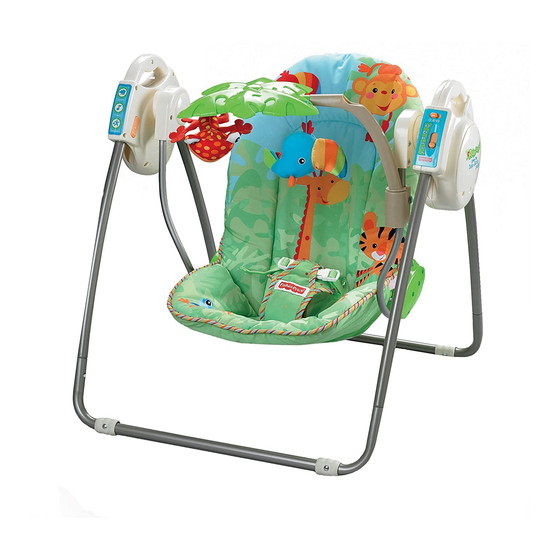
- Page 1 M6711 WARNING IMPORTANT! KEEP INSTRUCTIONS FOR FUTURE REFERENCE. www.fisher-price.co.uk...
-
Page 2: Consumer Information
• W eight Limit: 9 kg (20 lbs). IMPORTANT! The maximum weight limit for this product is 9 kg (20 lbs). If your child weighs less than 9 kg (20 lbs), but is really active and appears to be able to climb out of the swing, immediately discontinue its use. • P roduct features and decoration may vary from photo. ©2009 Mattel, Inc. All Rights Reserved. ® and ™ designate U.S. trademarks of Mattel, Inc.. PRINTED IN CHINA Fisher-Price, Inc., a subsidiary of Mattel, Inc., East Aurora, New York 14052, U.S.A. M6711b-0726... - Page 3 Parts Assembly IMPORTANT! Before assembly and each use, inspect this IMPORTANT! Please remove all parts from the package product for damaged hardware, loose joints, missing parts or and identify them before assembly. Some parts may be sharp edges. DO NOT use if any parts are missing or bro- packed in the pad. ken. Contact Mattel for replacement parts and instructions if needed. Never substitute parts. Back Leg Front Leg 2 Swing Frames Hint: To allow the product to swing properly, the swing arm-to-frame (with power switch) connection is designed to be loose. • S lide the front and back legs on the swing frame out until Toy Bar they “click” into place.
- Page 4 Assembly PULL UP PULL UP Base Tube Base Tube • W hile standing on the base tube, pull the front legs up. The • W hile standing on the base tube, pull the back legs up. front legs should remain secured to the base tube. If you The back legs should remain secured to the base tube. can remove the front legs, you have not assembled them If you can remove the back legs, you have not assembled correctly to the base tube. Re-read and repeat assembly them correctly to the base tube. Re-read and repeat step 2. assembly step 4. Seat Hubs Seat Frame Press Buttons on Back Legs Base Tube Frame Hubs • W hile pressing the buttons on each back leg, insert the back legs into the remaining base tube.
- Page 5 Assembly Pad Lower Pocket Seat Hub Seat Hub Seat Bottom Tube • I nsert a screw through the outside of each seat hub. Tighten the screws. • F it the pad lower pocket onto the seat bottom tube, as shown. Pad Upper Toy Bar Pocket Seat Back Tube Slots Waist Belt Socket • I nsert and “snap” the peg on the toybar into the socket on the swing arm. Pull the toy bar up to be sure it is secure. • F it the toy strings up through the slots in the toy bar leaf. Assembly is now complete. • F it the pad upper pocket over the seat back tube.
-
Page 6: Battery Installation
Battery Installation Battery Safety Information In exceptional circumstances, batteries may leak fluids that can cause a chemical burn injury or ruin your Hint: We recommend using alkaline batteries for product. To avoid battery leakage: longer battery life. • D o not mix old and new batteries or batteries of different types alkaline, standard (carbon-zinc) or rechargeable (nickel-cadmium). • I nsert batteries as indicated inside the battery compartment. 1,5V x 4 • R emove batteries during long periods of non-use. Always “C”... -
Page 7: Securing Your Child
Securing Your Child WARNING Waist Belt To prevent serious injury from falls and being strangled in the restraint system: • Always use the restraint system. • Not recommended for children who Buckle can sit up by themselves (6 months approximately, until 9 Kg/20 lbs). Restraint Pad •... - Page 8 Swinging and Music Storage Music Switch Power Switch • P lace your child in the seat and secure properly. Hint: After turning on power, this product may not swing unless there is a child in the seat. • S lide the power switch to any of five speed settings. • G ive the seat a light push to start the swinging motion. Adjust the power switch to the desired swing motion setting. Hint: As with most battery-powered swings, a heavier child will reduce the amount of swinging motion on all settings.
Need help?
Do you have a question about the RAINFOREST M6711 and is the answer not in the manual?
Questions and answers