Table of Contents
Advertisement
Quick Links
Advertisement
Table of Contents

Related Manuals for Creative PC-CAM 900


Summary of Contents for Creative PC-CAM 900
- Page 1 User’s Guide...
- Page 2 Creative PC-CAM 900 Information in this document is subject to change without notice and does not represent a commitment on the part of Creative Technology Ltd. No part of this manual may be reproduced or transmitted in any form or by any means, electronic or mechanical, including photocopying and recording, for any purpose without the written permission of Creative Technology Ltd.
- Page 3 Contents...
-
Page 4: Table Of Contents
Disconnecting your camera properly ..................2-8 Windows XP, Windows 2000 and Windows Me ............ 2-8 Windows 98 SE ........................2-9 3 Using Creative PC-CAM 900 as a Digital Camera Turning on your Camera ........................3-1 Taking a Photo ............................3-1 Previewing a Photo ........................ - Page 5 Verifying the installation in Windows XP and 2000 ..........4-5 Verifying the installation in Windows Me and 98/98 SE ........... 4-5 5 Using Creative PC-CAM 900 as a Web Camera Starting PC-CAM Center ........................5-1 Capturing Images and Video ......................... 5-2 Taking a Photo ..........................
- Page 6 ArcSoft PhotoImpression ........................6-1 ArcSoft VideoImpression ........................6-1 ArcSoft Panorama Maker ........................6-1 ArcSoft Multimedia Email ........................6-2 Appendixes A Technical Specifications Dimensions ..........................A-1 Weight ............................ A-1 Power ............................A-1 Sensor ............................A-1 LCD Display .......................... A-1 Video Resolution ......................... A-1 Picture Resolution - Still mode ..................
- Page 7 Software compatibility ......................A-3 B Troubleshooting Problem Installing Software ........................B-1 Problems Using Creative PC-CAM 900 .................... B-1 Problems in Windows XP ........................B-3 C Note on USB Compatibility...
-
Page 8: Introduction
Introduction... -
Page 9: Before You Begin
Introduction Creative PC-CAM 900 is a digital video camera that gives you everything you need to capture 24-bit still images and video in 16.7 million colors. Not only that, it also allows you to communicate face-to-face with others on the Internet! -
Page 10: Readme File
The README file on the CD-ROM contains information not available at the time of README file printing. Read the file before you begin installing Creative PC-CAM 900. ® ® ® ❑ 233 MHz Intel Pentium II or higher IBM compatible PC Minimum System ❑... -
Page 11: Document Conventions
Document Conventions Tip. This tells you about short cuts or hints relating to a feature. Note. This highlights additional or important information about a feature. Caution! This highlights proper usage of your product. Use this information to avoid risky situations. Warning! This warns you of possible hazards to yourself or your product, that may result in injury or damage. -
Page 12: Handling Your Camera
Handling Your Camera ❍ Do not subject to ❍ Do not incinerate or excessive force or expose to excessive impact. heat. ❍ Keep away from ❍ Keep away from strong magnetic excessive moisture. fields. ❍ Do not store or use in areas exceeding 45°... -
Page 13: About Your Camera
About Your Camera... -
Page 14: About Creative Pc-Cam 900
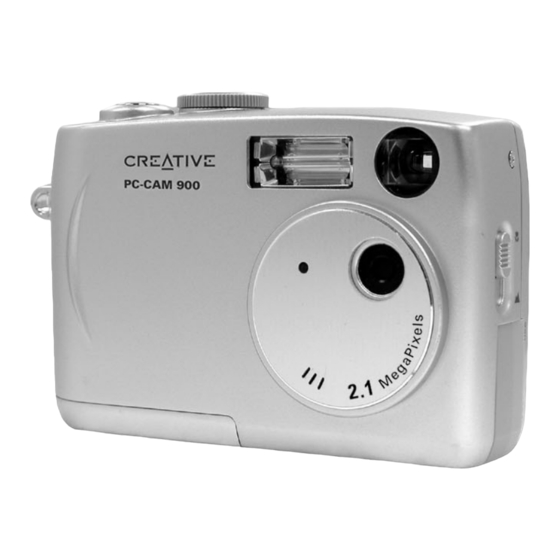
About Your Camera About Creative Figure 2-1 and Figure 2-2 highlight the features of Creative PC-CAM 900. PC-CAM 900 Snap Mode Flash Strap lug Optical button Selector viewfinder dial connector TV out connector Self-Timer Microphone Camera Normal / Macro focus... - Page 15 LED indicator Power Mode button Selector dial Optical Multi- viewfinder Selector button Liquid Crystal Integrated Display (LCD) speaker Display Set/Flash/ Menu button Thumbnail button button Back View Figure 2-2: Creative PC-CAM 900 bottom and back views About Your Camera 2-2...
-
Page 16: About The Mode Selector Dial
With your camera’s Mode Selector dial, you can access many features of your About the Mode Creative PC-CAM 900: Selector dial • Web Cam mode — transfer photos and audio/video recordings with PC-CAM Center, or use your camera as a webcam. -
Page 17: Using The Multi-Selector Button
Set/Flash/Thumbnail button to select an option. button Up Key For more details on using the Multi-Selector button with your Onscreen Display menu, see "Using Creative PC- Left Key Right Key CAM 900 as a Digital Camera" on page 3-1. Set/Flash/Thumbnail Down Key button... - Page 18 Description ❍ In all modes except Playback, Menu: move to Exposure, White Left Balance, Settings or Format options ❍ Auto or Manual Photo modes: enable or disable Self-Timer Multi Snap and Self-Timer modes cannot be enabled ❍ In all modes except Playback, Menu: move to Exposure, White at the same time.
-
Page 19: Inserting An Sd Memory Card (Optional)
You can purchase a Secure Digital (SD) memory card to extend the image storage Inserting an SD capacity of your camera. Memory Card To install your SD card: (optional) Be sure that your camera is turned off. Push and slide open the battery compartment door. Insert the SD card as shown. -
Page 20: Turning On Your Camera
Turning on Push and slide open the battery Battery compartment door. compartment Your Camera door Insert the batteries according to the battery polarity (+ and -) symbols indicated (see Figure 2-6). • Be sure to insert the Close the battery compartment door. batteries in the correct direction. -
Page 21: Usage Precautions
Usage Before switching modes, disconnecting your camera from your computer or turning your camera off, note the color of the LED indicator. Wait until the LED indicator Precautions turns green before attempting any other action with the camera. Before disconnecting your camera from your computer, use the Windows Eject or Disconnecting your Safely Remove Hardware icon on the Taskbar to safely disconnect your... -
Page 22: Windows 98 Se
Wait at least 10 seconds after all file Windows 98 SE transfers are completed, or until the LED indicator turns green. In Windows Explorer, right-click the Removable Disk icon and click Eject. Unplug your camera after 10 seconds. Figure 2-10: Disconnecting your camera in Windows 98 SE About Your Camera 2-9... -
Page 23: Using Creative Pc-Cam 900 As A Digital Camera
Using Creative PC-CAM 900 as a Digital Camera... -
Page 24: Turning On Your Camera
Using Creative PC-CAM 900 as a Digital Camera To use Creative PC-CAM 900 as a portable digital camera, simply disconnect it from the computer. Use your camera’s default settings in Auto Photo mode to take photos. For finer control, adjust exposure and white balance settings in Manual Photo mode, see "Configuring Your Camera"... -
Page 25: Previewing A Photo
• Auto flash — the flash is used automatically when required • Forced flash — the flash is always used • No flash — the flash is disabled Using Creative PC-CAM 900 as a Digital Camera 3-2... -
Page 26: Recording Audio Or Video
LCD screen. Press the Snap button to start playback. To stop playback, press the Left key. To pause playback, press the Right key To continue playback, press the Right key again. Using Creative PC-CAM 900 as a Digital Camera 3-3... -
Page 27: Deleting A Photo Or Recording
The photo or recording is protected from accidental erasure. photos and recordings, regardless of protection, you can format your camera’s memory. See "Format" on page 3-8 for more information. Using Creative PC-CAM 900 as a Digital Camera 3-4... -
Page 28: Configuring Your Camera
Press the Right key on your Multi Selector until the White Balance icon highlighted. Use the Up or Down keys to select a white balance setting. Press the Set/Flash/Thumbnail button to save the setting. Using Creative PC-CAM 900 as a Digital Camera 3-5... -
Page 29: General Camera Settings
Select a default image resolution for Up or Down keys Image Size photo-taking. High resolution photos ❍ take up more space in your camera. Set the default OSD display Up or Down keys Language ❍ language Using Creative PC-CAM 900 as a Digital Camera 3-6... - Page 30 Self-Timer timer. Choose a delay between 2 ❍ and 10 seconds. Select the NTSC or PAL video Up or Down keys Video System system, for video playback on a TV ❍ Using Creative PC-CAM 900 as a Digital Camera 3-7...
-
Page 31: Format
This method of Press the Right key on your Multi Selector button until the Format icon formatting erases highlighted. protected photos or Select NO to cancel the formatting. recordings. Otherwise, select YES. Using Creative PC-CAM 900 as a Digital Camera 3-8... -
Page 32: Installing Creative Pc-Cam 900
Installing Creative PC-CAM 900... - Page 33 Installing Creative PC-CAM 900 This chapter tells you how to quickly install Creative PC-CAM 900 and the software that comes with it. Use the installation procedures for your operating system. Installing Creative PC- CAM 900 Do not connect Creative PC-CAM 900 to your computer before installing the In Windows XP / drivers.
- Page 34 For Windows XP only USB connector The Found New Hardware message box appears on Figure 4-2: Connecting Creative PC-CAM 900 to your your Windows taskbar, computer telling you that Windows has detected your camera as a USB Mass Storage Device.
- Page 35 Mode Selector dial to Web Cam mode. Windows loads camera and video drivers for your Creative PC-CAM 900. 11. When the Found New Hardware Wizard dialog boxes appear, select the Install the software automatically (Recommended) option, and click the Next button.
- Page 36 If you are prompted to insert the Windows 98/98 SE Installation CD, replace the Creative PC-CAM 900 Installation CD with the appropriate CD. If you did not receive a Windows 98 SE installation CD with your computer but received a...
-
Page 37: Verifying The Installation In Windows Xp And 2000
Click the Device Manager button. A window appears. Click the plus (+) sign next to the Imaging Device icon. The entries “Creative PC-CAM 900 (Still)” and “Creative PC-CAM 900 (Video)” should appear. Be sure that your camera’s Mode Selector dial is turned to Web Cam mode. -
Page 38: Using Creative Pc-Cam 900 As A Web Camera
Using Creative PC-CAM 900 as a Web Camera... -
Page 39: Starting Pc-Cam Center
Using Creative PC-CAM 900 as a Web Camera This chapter tells you how to quickly set up Creative PC-CAM 900 as a Web Camera using the PC-CAM Center software. For detailed information about the application’s features and settings, refer to its Help file. (See “Starting PC-CAM Center Help” on page 5-5.) -
Page 40: Capturing Images And Video
In the Save video in box, select a destination album for your video. To start recording a video, click the Record video button The button starts blinking to indicate that recording is now in progress. Using Creative PC-CAM 900 as a Web Camera 5-2... -
Page 41: Viewing A Photo
Double-click the thumbnail of the photo displayed in the Thumbnails window. The photo is displayed in the PC-CAM Center Viewing window. If you are not satisfied with the result, you can select a higher resolution, and then capture the image again. Using Creative PC-CAM 900 as a Web Camera 5-3... -
Page 42: Viewing A Video
The Transfer dialog box appears. Click the Photo, Video or Voice tab. The tab page for the chosen media appears. Click the album you want to transfer the files to. Click the OK button. Using Creative PC-CAM 900 as a Web Camera 5-4... -
Page 43: Reactivating The Camera
Center Help To start the Help file: Click the PC-Cam Center logo at the top left corner of PC-CAM Center’s main window. On the PC-CAM Center menu, click Help. Using Creative PC-CAM 900 as a Web Camera 5-5... -
Page 44: Creative Pc-Cam 900 Applications
Creative PC-CAM 900 Applications... -
Page 45: Pc-Cam Center
For usage instructions, see "Using Creative PC-CAM 900 as a Web Camera" on page 5-1. Want to put a live snapshot of your office, coffee pot, or even your fishtank on your WebCam Web page? Creative WebCam Monitor is the application to look at. -
Page 46: Arcsoft Multimedia Email
ArcSoft Multimedia Email is a unique program that enables home and business ArcSoft Windows users to create and send digital postcards featuring their own photos, Multimedia audio messages, text, music and digital video clips. Email Creative PC-CAM 900 Applications 6-2... -
Page 47: Appendixes
Appendixes... -
Page 48: A Technical Specifications
Technical Specifications... -
Page 49: Dimensions
Technical Specifications 97 mm (W) x 63 mm (H) x 28 mm (D) Dimensions Approx. 110g (without batteries) Weight AAA size x 4 batteries (alkaline or NiMH) or USB (connected to PC) Power Progressive Scan 2.1 Megapixels CMOS Sensor 1.5" Color LCD LCD Display ❑... -
Page 50: Focus Range
❑ Focus range Normal (100 cm to inifinity) ❑ Macro (20 cm) f = 8.47 mm Focal length F/2.8 Aperture Adjustable 2 to 10 second delay Self-timer ❑ Video formats RGB24 ❑ I420 ❑ JPEG (DPOF compliant) File formats ❑ ❑... -
Page 51: Software Compatibility
TWAIN, Video for Windows, WDM Mini Driver for DirectShow and STI (Still Image) Software driver that runs in Windows 98, Windows 98 SE, Windows 2000, Windows Me and compatibility Windows XP Windows Image Acquisition (WIA) driver runs in Windows XP and Windows Me only. Technical Specifications A-3... - Page 52 Troubleshooting...
-
Page 53: Problem Installing Software
If you have a technical problem with this product, you may wish to consult our self- help tool “Knowledgebase” for online troubleshooting and solutions. Go to www.creative.com and select your region. The setup program for Creative PC-CAM 900 does not run automatically Problem after you insert the installation CD into the drive. - Page 54 The image is too bright. The amount of light entering the camera has exceeded the exposure control limit. There may be a very bright object in the camera’s view. Avoid pointing the camera at very bright objects (for example, sunlight, lights, or highly reflective surfaces).
-
Page 55: Problems In Windows Xp
You may see this message when installing a driver. If you do, you may choose to click the Continue Anyway button. Creative has tested the driver on Windows XP, and it does not impair or destablize your computer. - Page 56 Note on USB Compatibility...
- Page 57 If the setup program warns you that your motherboard’s USB port is incompatible you can visit the with Creative PC-CAM 900, or if the camera does not work on your system and you product search page at the official USB Web suspect that the problem may be related to your PC’s USB port, the following is a...
Need help?
Do you have a question about the PC-CAM 900 and is the answer not in the manual?
Questions and answers