Table of Contents
Advertisement
Quick Links
Advertisement
Table of Contents

Subscribe to Our Youtube Channel
Related Manuals for Creative PC-CAM 920 Slim


Summary of Contents for Creative PC-CAM 920 Slim
-
Page 2: Table Of Contents
Contents Step 2 : Installing Hardware......11 Important Safety Instructions Step 3 : Inserting the batteries......12 Step 4 : Setting the date and time.....13 Basic Safety Precautions... - Page 3 To use your camera as a WebCam ....26 Appendix A: Technical Specifications Lens...........27 Sensor..........27 Focal range...
-
Page 4: Important Safety Instructions
Locations subject to strong magnetic fields. benefit generated by the photography, is not the Places with extreme temperatures, rain or responsibility of Creative Technology Ltd. and no snow. compensation will be provided. • Do not open the battery cover when the camera is turned on. -
Page 5: Copyright
Copyright • Copyright ownership should be respected at all times, and where applicable, permission should be sought when the use of this camera may violate copyright law. • Where there is a "No Photography" restriction, this camera should not be used to record any live performance, or be used for exhibition, even for personal purposes. -
Page 6: Before You Begin
Before You Begin Minimum System Package Contents Requirements When using your camera, use a better computer system for optimal performance. For PC computers ® ® • Microsoft Windows XP, Windows 2000, Windows Installation CD Pouch Wrist 2 x AAA Millennium Edition (Me) or Windows 98 Second strap alkaline Edition (SE) -
Page 7: Chapter 1: About Your Camera
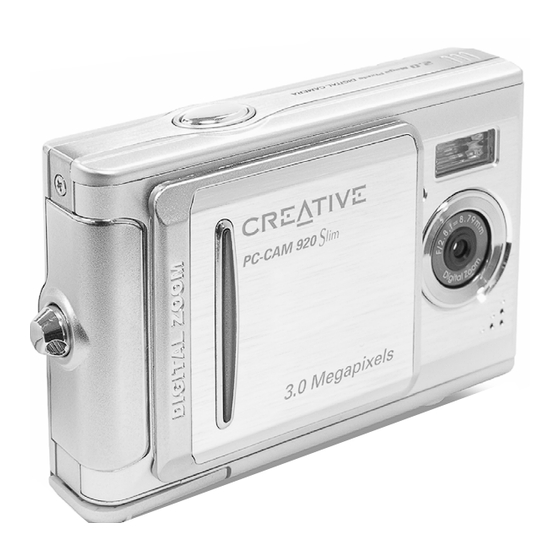
1. About Your Camera Front View (1) Shutter button (2) Flash light (3) Lens (4) Lens cover/Power switch (5) Strap holder (6) Battery cover (7) Memory card slot (8) Tripod socket... -
Page 8: Rear View
Rear View Macro LED Busy LED Mode display button Mode button Set button Function keys Standard/Macro mode switch USB cover USB port (10) LCD screen... -
Page 9: About Your Camera's Controls
About Your Camera’s Controls Mode display button LEDs To change the LCD screen display, press the Mode display button. The LCD screen displays available are: The LEDs located on your camera are described in • Standard Display detail below: • Full Display •... -
Page 10: Set Button
SET button LCD screen icons To select a menu option, press the Set button. In Record mode, the Set button is also the Flash button. Function keys Use the Function keys to select menu options. Standard/Macro switch To select Standard or Macro mode in Record and Movie mode, move the Standard/Macro switch upwards or downwards as shown below. -
Page 11: Shutter Button
To turn off the camera, gently slide the lens Shutter button cover to the right. Your camera has a 2-step shutter function. Notes: To automatically focus on your subject, press and hold • When the camera is turned on, the Busy LED blinks the Shutter button down halfway. -
Page 12: Chapter 2: Installing Your Camera
2. Installing Your Camera Step 1: Installing drivers and Step 2: Installing hardware software Slide the lens cover to the left to turn on your DO NOT connect the camera to your computer camera. yet! Press and hold the Mode button until the Mode menu appears on the LCD screen. -
Page 13: Step 3: Inserting The Batteries
Step 3: Inserting the batteries Notes: Disconnect and turn off your camera. • If the remaining battery power icon on the LCD Gently slide open the battery cover. screen displays one bar, your camera’s flash light is disabled. For more information on your LCD screen’s icons, see “LCD screen icons”... -
Page 14: Step 4: Setting The Date And Time
Step 4: Setting the date and time Press and hold the Mode button until the Mode Use the Function keys to adjust the date, and menu appears on the LCD screen. then press the Mode display button. The Use the Function keys to select the Setup following LCD screen appears. -
Page 15: Step 5: Inserting A Memory Card (Optional)
Step 5: Inserting a memory card (optional) • To avoid permanent damage, do not remove the memory card when your camera is turned on. Make sure that your camera is turned off. • Do not force the memory card into the memory card Insert a memory card (available separately) into slot. -
Page 16: Step 6: Attaching The Neck Strap
Step 6: Attaching the neck strap (optional) Insert the thin end of the neck strap into your Pull the neck strap tightly. camera’s strap holder. Make a loop with the other end of the neck strap. -
Page 17: Chapter 3: Using The Modes
3. Using the Modes Play Mode To delete a photo In Play mode, you can delete photos, view photos as a slideshow and print photos. In Play mode, the icons In Play mode, use the Function keys to go to below are displayed on your LCD. -
Page 18: To Delete All Photos
To delete all photos To view all photos as a slideshow In Play mode, press the Set button. The In Play mode, press the Set button. The following LCD screen appears. following LCD screen appears. Use the Function key to select Delete Use the Function key to select Auto Play All and press the Set button. -
Page 19: To Print Photos Using Digital Print Order Format (Dpof) Settings
To print photos using Digital Print Order Format (DPOF) Settings With DPOF, you can print all or one photo, with or without the date. Use the Function keys to select On and if you do Note: not want the date to appear on your printed •... - Page 20 To print all photos Make sure that your camera is connected to your Use the Function keys to select On and if you do computer’s USB port and that your printer is not want the date to appear on your printed functioning properly.
-
Page 21: Setup Mode
Setup Mode To set the image resolution In Setup mode, you can adjust your camera’s image resolution, white balance, exposure value, language, In Setup mode, use the Function key to date, time and light frequency. You can also use Setup select Resolution. -
Page 22: To Adjust The White Balance
To adjust the white balance To adjust the exposure value In Setup mode, use the Function key to In Setup mode, use the Function key to select White Balance. select Exposure Value. Press the Set button. The following LCD screen Press the Set button. -
Page 23: To Set The Date And Time
To set the date and time To adjust the light frequency In Setup mode, use the Function key to In Setup mode, use the Function key to select SYSTEM OPT. select SYSTEM OPT. Use the Function key to select Use the Function key to select Date/Time. -
Page 24: To Restore The Default Settings
To restore the default settings In Setup mode, use the Function key to select OPTION. Use the Function key to select Default. Press the Set button. The following screenshot appears. Use the Function keys to select OK. Press the Set button. -
Page 25: Movie Mode
Movie Mode To record a video Use Movie mode to record a video. In Movie mode, Press and hold the Mode button until the Mode the icons below are displayed on your LCD. menu appears on the LCD screen. Use the Function keys to select the Movie Mode icon. -
Page 26: Record Mode
Record Mode (11) Remaining battery power (12) Zoom indicator Use Record mode to take photos. In Record mode, (13) Flash light status the icons below are displayed on your LCD. To take a photo Press and hold the Mode button until the Mode menu appears on the LCD screen. -
Page 27: Pc Mode
PC Mode Note: Use PC mode to switch between using your camera as • Make sure that you have inserted a memory card a removable hard disk drive (Mass Storage Device) or into your camera before selecting MASS STORAGE webcam. and if you intend to transfer photos from your memory card to your computer. -
Page 28: Lens
A. Technical Specifications Size • 93 mm (L) x 56 mm (H) x 38 mm (W) Shutter speed • 1/4 seconds ~ 1/2000 seconds Weight • Approximately 120 g (without the batteries) Storage • 16 MB Internal Flash Memory Power •... -
Page 29: Pc-Cam Mode
PC-CAM mode • QVGA (320 x 240 pixels) • VGA (640 x 480 pixels) Flash mode • Auto • Off Port compatibility • Universal Serial Bus (USB) 1.1 Videos • Records videos for 60 seconds continuously, with QVGA (320 x 240 pixels) format •...
Need help?
Do you have a question about the PC-CAM 920 Slim and is the answer not in the manual?
Questions and answers