Table of Contents
Advertisement
Discovery
™
Wall Oven
Models: DYO130B, DYO130FS, DYO130S, DYOV130B
Important Safety Instructions ........................................................1
Getting to Know Your Oven .............................................................3
Setting Up Your Oven ..........................................................................6
Operating Your Oven - The Basics ..............................................9
Operating Your Oven - Deluxe Features .............................. 17
Additional Features ........................................................................... 33
Cooking Tips .......................................................................................... 34
Parts and Accessories ..................................................................... 35
Care and Cleaning .............................................................................. 36
Before You Call for Service ........................................................... 41
Warranty and Service ....................................................................... 43
IQ
T a b l e o f C o n t e n t s
Use and Care Manual
Advertisement
Table of Contents

Subscribe to Our Youtube Channel
Related Manuals for Dacor DYO130


Summary of Contents for Dacor DYO130
-
Page 1: Table Of Contents
Use and Care Manual Discovery ™ Wall Oven Models: DYO130B, DYO130FS, DYO130S, DYOV130B T a b l e o f C o n t e n t s Important Safety Instructions ............1 Getting to Know Your Oven .............3 Setting Up Your Oven ................6 Operating Your Oven - The Basics ..........9 Operating Your Oven - Deluxe Features ...... - Page 2 © Copyright 2013 Dacor Inc. All rights reserved.
-
Page 3: Important Safety Instructions
WARNING - NEVER cover any slots, holes or passages in the the appliance without updating this manual. oven bottom or cover an entire rack with materials such as Visit www.dacor.com to download the latest version of this aluminum foil. Doing so blocks air flow through the oven causing manual. -
Page 4: General Safety Precautions
Important Safety Instructions General Safety Precautions To reduce the risk of fire, electric shock, serious injury or death when using your oven, follow basic safety precautions, including the following: warning warning • If you receive a damaged product, immediately contact your • Do not wear loose or hanging apparel while using the oven. -
Page 5: Getting To Know Your Oven
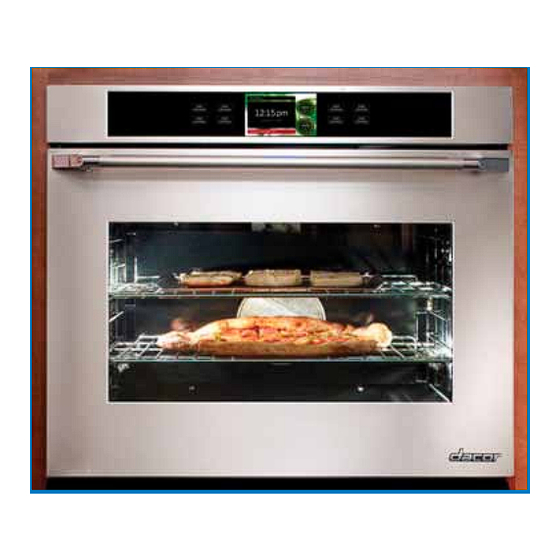
Getting to Know Your Oven Control Panel Layout Touch display The touch display allows you to navigate and select the various features and func- tions of your oven. It can be set to dim after 5 minutes of non-use (see Energy Saving Mode, page 7). -
Page 6: Included Accessories
Getting to Know Your Oven Parts of the Oven Control panel Your oven’s control panel consists of touch keys and a touch display. Use the control panel to control all the oven’s features (sometimes called modes). Air intake/ The oven draws air in through the intake slots to cool its internal parts. The air comes exhaust slots out through the exhaust slot at the bottom of the oven. - Page 7 Getting to Know Your Oven 12:15 pm At bottom of door...
-
Page 8: Setting Up Your Oven
Setting Up Your Oven ◊ Select date format - Touch to select the pre- Control Panel/Display Settings ferred date format shown on the display. • Touch Oven Preferences on the oven home screen. 3. Touch BACK on the control panel to save. •... - Page 9 Setting Up Your Oven Unit Settings (Temperature Scale) 3. Touch HOME on the control panel to return to the oven home screen. You can select the temperature scale (Fahrenheit or Cel- Oven Tone Settings sius) the oven uses to display the cooking temperature. The oven is preset at the factory to Fahrenheit.
-
Page 10: Oven Settings
From the Oven Preferences menu, touch About to view: • The Android operating system revision • The Dacor software version • The oven serial number • The oven model number 4. Touch HOME to return to the oven home screen. -
Page 11: Operating Your Oven - The Basics
See the table • Dacor recommends turning the oven on for one hour below. You have the choice (in most cooking modes) of at 500°F (260°C) to burn off any residual oils used cooking at the preset cooking temperature or selecting a during the manufacturing process. -
Page 12: Oven Racks
If you must reposition a rack when the oven is hot, food. It is great for heavier foods and the optional Dacor use pot holders. baking stone. - Page 13 Operating Your Oven - The Basics Starting Your Oven - Main Menu Starting Your Oven - Quick Start 1. Adjust the racks to the appropriate level. The quick start feature allows you to start cooking quickly. Using the main menu (see next section), allows you more 2.
-
Page 14: Changing The Temperature
Operating Your Oven - The Basics 5. If you want to change the preset cooking tempera- 8. To turn off the oven, touch CANCEL · SECURE on the ture, touch temp. control panel. Changing the Temperature To change to a different temperature while the oven is on: 1. - Page 15 Operating Your Oven - The Basics Changing the Oven Cooking Mode 5. The temperature adjustment bar will appear. Touch and slide the pointer back and forth to select the To change to a different cooking mode while the oven is desired cooking temperature.
- Page 16 Operating Your Oven - The Basics For multiple rack baking... Understanding the Various Oven • Typically, when baking on two racks with your oven, Modes use rack positions #3 and #5 (counting from the bottom up). When baking on three racks, use rack Your Oven's Two Pure Convection positions #2, #4 and #6.
-
Page 17: Convection Bake
Use this suggested rack positions for various foods. For cook- mode for single rack convection baking. The ing on multiple racks, Dacor recommends using one of combination of the convection fan and bottom heat source the convection modes. -
Page 18: Convection Roast
Operating Your Oven - The Basics • Broil food on the first side for a little more than half of Understanding the Various Oven the recommended time, then season and turn. Season the second side just before removing the food from Modes (cont.) the oven. -
Page 19: Operating Your Oven - Deluxe Features
Operating Your Oven - The Basics • When using the roast mode, do not use pans with tall • Remove meats from the oven when the thermometer sides. They interfere with the circulation of heated air registers 5 to 10°F (3 to 6°C) below the desired tem- over the food. - Page 20 Operating Your Oven - Deluxe Features 4. Touch START. Timers 5. The display will return to the oven home screen and the timer count will be displayed. warning The timers on your oven do not turn the oven on or off. They are only for timing purposes.
-
Page 21: Defrosting Tips
Operating Your Oven - Deluxe Features 6. The temperature adjustment bar will appear. Touch Defrosting and slide the pointer back and forth to select the desired defrost temperature. Touch the arrows on The oven uses the convection element and fan for this either end of the adjustment bar to make minor process. - Page 22 Operating Your Oven - Deluxe Features The temperature adjustment bar will appear. Touch Dehydrating and slide the pointer back and forth to select the desired dehydrate temperature. Touch the arrows on The oven uses the convection element and fan for this either end of the bar to make minor adjustments.
- Page 23 Operating Your Oven - Deluxe Features Solving Discoloration Problems Proofing To prevent darkening during dehydration and storage, you You can use your oven to proof yeasted should steam blanch apples, apricots, peaches, nectar- doughs. The oven uses bake element for this ines, pears or foods that will oxidize.
- Page 24 Operating Your Oven - Deluxe Features About Keep Warm Mode Delay Start/Cook Time Features • When you set the oven to stop cooking using Cook If you want to set the oven to automatically turn itself on Time, the oven will go into Keep Warm mode at the and off at a later time, you can use the Delay Start/Cook end of the cook time you have set.
- Page 25 Operating Your Oven - Deluxe Features 3. Select the desired cooking mode, sub-mode and 5. Set the Cook Time: temperature according to the Starting Your Oven - ◊ Touch cook time. Main Menu section on page 11, but before touch- ing Start, perform steps 4 and/or 5 below.
-
Page 26: Using The Meat Probe
Operating Your Oven - Deluxe Features 3. Touch Oven Menu. Using the Meat Probe When you cook foods like roasts and poultry, the internal temperature is the best way to tell when the food is properly cooked. Your oven’s meat probe is an easy way to take the guess- work out of roasting. -
Page 27: Probe Cooking
Operating Your Oven - Deluxe Features To change the meat probe temperature 8. Allow the oven to preheat before placing the food in the oven. during cooking... 9. Once the oven has preheated (Insert Food appears), 1. Touch the probe icon. put the meat in the oven using pot holders. - Page 28 Operating Your Oven - Deluxe Features Changing the cooking mode during meat 5. Touch and slide the pointer on the probe temperature adjustment bar back and forth to select the desired probe cooking (cont.) "cook to" (target) temperature. 2. The main cooking menu will appear. Touch the new desired cooking mode (and sub-mode).
- Page 29 After you select the type of meat, you can choose to cook Your oven is equipped with the convenience of using the meat probe or to cook by weight. the Dacor Guided Cooking System. The Dacor • To use the meat probe, touch and slide the pointer...
- Page 30 Operating Your Oven - Deluxe Features Important Tips for Using Dacor Guide 4. Touch temp and select the cooking temperature if you want. You may also set cook time, (meat) probe and • For best results, follow the helpful instructions on the Delay Start.
- Page 31 Operating Your Oven - Deluxe Features How to use the oven settings you have To delete a mode that you have previously saved saved: 1. Adjust the racks to the appropriate level. 1. Touch Oven Menu. 2. Touch Oven Menu. 2.
- Page 32 Operating Your Oven - Deluxe Features 5. Touch Edit Mode. My Modes (cont.) To Change the name of a mode that you have previously saved: 1. Touch Oven Menu. 6. Touch the white area containing the current name. 2. Touch My Modes. 7.
-
Page 33: Sabbath Mode
Operating Your Oven - Deluxe Features 3. Touch Sabbath Convection or Sabbath Bake. Sabbath Mode 4. If you want to change the preset cooking tempera- The Sabbath mode on your oven complies with ture, touch temp. Jewish laws for use on the Sabbath and Holy Days. - Page 34 Operating Your Oven - Deluxe Features Things to Know about Sabbath Mode • When the oven is cooking, touching the up (∧) and down (∨) arrows (see picture), tells the oven to raise the temperature by 25°F (14°C). In compliance with Jewish law, the bake elements will be adjusted ran- domly when these keys are touched and no changes will be seen on the display.
-
Page 35: Additional Features
• Dacor IQ Cooking App - Takes you to the oven home • Accessing and browsing web sites on the internet. screen. This app starts automatically when the oven is •... -
Page 36: Cooking Tips
When you are cooking a food item that is very heavy, Dacor cookie sheets (optional), with their low profiles, use a Dacor GlideRack oven rack. You can pull it out will give you the best results. further than a conventional rack, making it easier to check the food, stir or add ingredients. -
Page 37: Parts And Accessories
** Use this number for ordering additional racks, not covered under warranty. *** Dacor full size cookie sheets maximize oven rack baking capabilities by utilizing the total usable rack space. To order parts or accessories, contact your Dacor dealer or visit www.everythingdacor.com. -
Page 38: Care And Cleaning
Care and Cleaning How to Use the Self-Clean Feature warning important • Clean only the parts of the oven listed in this manual. Clean them only in the manner specified. • The oven lights do not operate while the oven is in Self Clean • To avoid dangerous fumes or damage to your oven’s mode to protect them from damage. - Page 39 Care and Cleaning Self-cleaning Tips 8. Touch START · CONTINUE on the control panel (to the right of the touch • If any soil remains in the oven after the Self Clean display). cycle is done, you may repeat the cycle if you want. The control panel automatically locks the oven door •...
-
Page 40: Cleaning The Exterior
Care and Cleaning The display shows the Green Clean cycle status: Green Clean (cont.) ◊ Cleaning indicates that Green Clean is in process. 4. Close the oven door and touch Oven Menu. ◊ Door is Locked indicates that the door is latched. 5. -
Page 41: Stainless Steel Surfaces
Glass (Interior and Exterior) Use a mild glass cleaner to remove finger prints on glass surfaces. You can also clean glass surfaces with Dacor Cooktop Cleaning Creme. Use it according to the direc- Clips tions on the package. -
Page 42: Broil Pan
To replace the light bulbs... 1. Replace the light bulb only with Dacor part number 100429. See page 35 for ordering information. 2. Turn off power to the oven at the circuit breaker panel or fuse box. -
Page 43: Before You Call For Service
Normal screen is missing from Android operating system is show- Touch Dacor Cooking or HOME to return to display. ing. oven home screen. Oven will not heat. - Page 44 Adjust volume controls. See Oven Tone Set- tings on page 7. Normal screen is missing from Android operating system is show- Touch "Dacor Cooking" or touch HOME key to display. ing. return to oven home screen. Timers do not work.
-
Page 45: Warranty And Service
Dacor’s Customer Service Center is available 6:00 . – 5:00 . Pacific Time For warranty repairs or questions and for Dacor Distinctive Service (DDS) in the US and Canada Phone: (800) 793-0093, extension 2822 For non-warranty repairs or questions in the US and Canada... -
Page 46: What Is Not Covered
Should you experience a service issue beyond the standard war- in painted parts, kitchen lighting, product placement, and ranty period, please contact us. Dacor reviews each issue and other factors; this warranty does not apply to color varia- customer concern to provide the best possible solution based on tion. - Page 48 Dacor.com Part No. 107601 Rev. A Dacor ● 14425 Clark Avenue, City of Industry, CA 91745 ● Phone: (800) 793-0093 ● Fax: (626) 403-3130 ● www.dacor.com...
Need help?
Do you have a question about the DYO130 and is the answer not in the manual?
Questions and answers