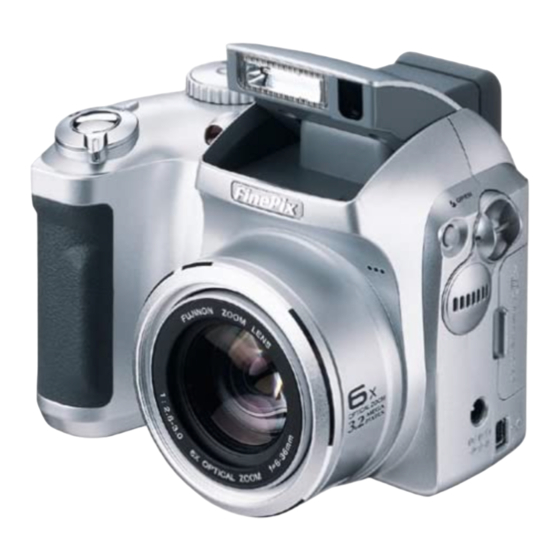
FujiFilm FinePix 3800 Owner's Manual
3.2 megapixels 6x optical zoom
Hide thumbs
Also See for FinePix 3800:
- Catalog (11 pages) ,
- Specifications (3 pages) ,
- Owner's manual (69 pages)
Table of Contents
Advertisement
This manual will show you how to use your FUJIFILM DIGITAL CAMERA
FinePix 3800 correctly. Please follow the instructions carefully.
3.2
Getting Ready
Basic Photography
Advanced Features
Photography
Advanced Features
Playback
Settings
Software Installation
7
Camera Connection
8
Using FinePixViewer
BL00199-200 ( 1 )
Advertisement
Table of Contents

Related Manuals for FujiFilm FinePix 3800


Summary of Contents for FujiFilm FinePix 3800
- Page 1 This manual will show you how to use your FUJIFILM DIGITAL CAMERA FinePix 3800 correctly. Please follow the instructions carefully. Getting Ready Basic Photography Advanced Features Photography Advanced Features Playback Settings Software Installation Camera Connection Using FinePixViewer BL00199-200 ( 1 )
-
Page 2: Warning
Warning To prevent fire or shock hazard, do not expose the unit to rain or moisture. CAUTION: TO REDUCE THE RISK OF ELECTRIC SHOCK. DO NOT REMOVE COVER (OR BACK). NO USER-SERVICEABLE PARTS INSIDE. REFER SERVICING TO QUALIFIED SERVICE PERSONNEL. The graphical symbols are located on the bottom of the case. -
Page 3: For Customers In Canada
Notes on the Grant: To comply with Part 15 of the FCC rules, this product must be used with a Fujifilm-specified ferrite-core USB cable and DC supply cord. For customers in Canada CAUTION This Class B digital apparatus complies with Canadian ICES - 003. -
Page 4: Table Of Contents
Contents Warning ... 2 Preface ... 6 Camera Features and Accessories ... 7 Nomenclature ... 8 1 Getting Ready PREFACE ... 11 Attach the lens cap, strap and adapter ring ... 11 Attaching the Lens Cap ... 12 LOADING THE BATTERY AND xD-Picture Card ... 14 SWITCHING ON AND OFF ... - Page 5 4 Advanced Features Playback PLAYING BACK MOVIES (VIDEO) ... 59 w PLAYBACK MENU ERASING SINGLE • ALL FRAMES/FORMAT ... 61 PROTECTING IMAGES FRAME/ALL ... 65 HOW TO SPECIFY PRINT OPTIONS (DPOF) ... 69 DPOF SET FRAME ... 70 RECORDING VOICE MEMOS ... 74 PLAYING BACK VOICE MEMOS ...
-
Page 6: Preface
Card and other company or product names are trademarks or registered trademarks of the respective companies. ■ Exif Print (Exif ver. 2.2) Exif Print Format is a newly revised digital camera file format that contains a variety of shooting information for optimal printing. -
Page 7: Camera Features And Accessories
(using the Interface Set provided with sound) h Accepts tele and wide conversion lenses. (Flash cannot be used when a conversion lens is mounted.) h Conforms to the new standard for digital camera file ✽ system ✽ Design rule for Camera File system... -
Page 8: Nomenclature
Nomenclature Power switch Photography mode Playback mode (P.38) Power-OFF (P.17) Shutter button Self-timer lamp Flash (P.33) Flash control sensor Lens ✽ Refer to the pages in parentheses for information on using the camera features. Mode dial (P.22) Speaker Manual (P.44) Scene Position (P.45) AUTO... - Page 9 Viewfinder(EVF) (P.23) EVF /LCD (monitor selector) button (P.23) Indicator lamp (P.27) LCD monitor (P.23) Tripod mount Macro) button (P.37) Tele zoom) button Flash) button (P.33) Wide zoom) button Strap mount MENU/ OK button BACK button DISP button (P.31,39) Battery cover (P.15)
- Page 10 Nomenclature (Sample display) Example of Screen Text Display: Still photography mode Macro Flash Photography mode White balance Zoom bar Example of Screen Text Display: Playback mode Playback mode Voice captioning Date 60 3M・F !AF 123−9999 1/ 1/2002 Self -Timer EV(Exposure compensation) Number of remaining shots Quality mode(Number of recorded pixels for images)
-
Page 11: Getting Ready
PREFACE Getting Ready Attach the lens cap, strap and adapter ring Pull the lens cap cord through the strap mount. ● Attach the lens cap cord to avoid losing the lens cap. Attach the strap to the strap mounts on the camera. -
Page 12: Attaching The Lens Cap
PREFACE Screw the adapter ring in the direction of the arrow to mount it on the camera. Mounting the adapter ring on the camera protects the lens and allows you to attach the optional conversion lens. The adapter ring should be mounted on the camera at all times to protect the lens. - Page 13 ◆ Conversion Lens Guide Wide Conversion Lens WL-FX9 Changes the focal length by a factor of 0.79× (wide-angle: equivalent to 30 mm) without altering the F-stop value of the lens. h Wide conversion lens specifications Magnification : 0.79× Lens configuration : 3 lenses in 3 groups Shooting range : Approx.
-
Page 14: Loading The Battery And Xd-Picture Card
◆ Outer casing ● Operation of this camera is only guaranteed when it is used with FUJIFILM xD-Picture Card. ● Because xD-Picture Cards are small, they can be accidentally swallowed by small children. Be sure to store xD-Picture Cards out of the reach of small children. -
Page 15: Replacing The Batteries
1Slide the battery cover out and lift it open. 2Insert the batteries correctly as indicated by the polarity icons. 3Close the battery cover. ● Do not apply excessive force to the battery cover. Do not open the battery cover while the camera is still switched on as this could corrupt the image files on the xD-Picture Card or damage the xD-Picture Card itself. - Page 16 LOADING THE BATTERY AND xD-Picture Card 1Open the slot cover. 2Firmly push the xD-Picture Card fully into the xD-Picture Card slot. 3Close the slot cover. ● If you open the battery cover while the camera is still switched on, the camera is automatically switched off to protect the xD-Picture Card.
-
Page 17: Switching On And Off
SWITCHING ON AND OFF Turn the Power switch to turn the camera on and off. q : Photography mode w : Playback mode OFF: Power-OFF When you switch the camera on, the indicator lamp lights (green). DATE/TIME NOT SET SET NO When you first switch the camera on, the date is cleared. -
Page 18: Setting The Date And Time
SETTING THE DATE AND TIME DATE/TIME DATE/TIME YYYY.MM.DD 2002 01 01 12:00 AM AM 1 Use “d” and “c” to select Year, Month, Day, Hour or Minute. 2 Press “a” or “b” to set the number. ● If you hold down “a” or “b”, the numbers change continuously. - Page 19 DATE/TIME DATE/TIME MM/DD/YYYY 06/19/2002 8 59 AM AM Press “a” or “b” to switch between “YYYY.MM. DD” (year.month.day) and “MM/DD/YYYY” (month/day/year). DATE/TIME DATE/TIME MM/DD/YYYY 06/19/2002 8 59 AM AM Once you have set the date and time, press the “MENU/OK” button. Pressing the “MENU/OK” button switches the camera to Photography or Playback mode.
-
Page 20: Changing The Date And Time
SETTING THE DATE AND TIME Changing the date and time SET−UP SET−UP POSTVIEW ON POSTVIEW POWER SAVE OFF USB MODE USB MODE DSC DATE/TIME SET 1 Press the “MENU/OK” button. 2 Use “d” or “c” to select “ then use “a” or “b” to select “SET–UP”. 3 Press the “MENU/OK”... -
Page 21: Selecting The Language
SELECTING THE LANGUAGE OPTION OPTION SET−UP LCD BRIGHTNESS LCD BRIGHTNESS 1Press the “MENU/OK” button. 2Press “d” or “c” to select “ then press “a” or “b” to select “SET–UP”. 3Press the “MENU/OK” button. 1Press “a” or “b” to select “LANGUAGE”. 2Press “d” or “c” to select “ENGLISH”. OPTION”... -
Page 22: Basic Photography
Basic TAKING PICTURES ( AUTO MODE ) Photography You’ve read the chapter on getting ready and the camera is now set up and ready to take pictures. The Basic Photography section explains the three basic steps of “taking pictures”, “viewing pictures”... - Page 23 Press the “ OPEN” button to make the flash pop up. ● If the photography mode is “ Flash mode. ● When the flash is popped up or you are using the flash to take pictures, you may see the image disappear and the screen go dark as the flash charges.
- Page 24 TAKING PICTURES ( AUTO MODE ) Loop the strap over your wrist, brace your elbows firmly against your body and hold the camera with both hands. Be careful to ensure that the lens, microphone and flash control sensor are not obscured by your hands or the camera strap.
- Page 25 Frame the shot so that the subject fills the entire AF (Auto Focus) frame. ● In some conditions it may be difficult to see your subject clearly on the LCD monitor (Such as in sunny weather outdoors). In such situations, use the viewfinder (EVF) to take the shot.
- Page 26 TAKING PICTURES ( AUTO MODE ) Click To take the picture, press the shutter button down fully without lifting your finger off it. The camera makes a soft clicking sound, and the data is then recorded. ● If you press the shutter button down fully in one motion, the shot is taken without the AF frame changing.
-
Page 27: Indicator Lamp Display
Subjects not suitable for autofocus Though the FinePix 3800 uses an accurate autofocus mechanism, it may have difficulty focusing or not be able to focus at all for the types of subject and situation listed below. In such cases, the image may be out of focus. -
Page 28: Number Of Available Frames
TAKING PICTURES ( AUTO MODE ) Number of available frames The number of available shots is displayed on the screen. ● See P.51 for information on changing the File size. ● At shipment, the default “ ” QUALITY settings is “1M”. ■... -
Page 29: Using Af/Ae Lock
AF/AE Lock On the FinePix 3800, when you press the shutter button down half way, the focus and exposure settings are fixed (AF/AE lock). If you want to focus on a subject that is off to one side of the image or if you want to set the exposure before you compose the final shot, lock the AF and AE settings and then compose and shoot your picture to get the best results. - Page 30 USING AF/AE LOCK Bebeep Keep holding the shutter button down halfway (AF/AE lock) and check that the AF frame on the screen shrinks and that the indicator lamp (green) stops flashing and stays lit. Click Continue to hold the shutter button down halfway (AF/AE lock).
-
Page 31: Framing Guideline Function
FRAMING GUIDELINE FUNCTION Text displayed Framing Guideline displayed No text displayed You can use the framing guidelines to take pictures in the “ ” mode. The screen display changes each time you press the “DISP” button. Press the “DISP” button until “Framing Guideline”... -
Page 32: Digital Zoom
DIGITAL ZOOM Press “a” to zoom in on your subject and “b” to zoom out. When the limit of optical zooming is reached, the digital zoom can then be used to zoom still further. Digital zoom focal distance (35 mm camera equivalent) –... -
Page 33: Flash
I FLASH To change the flash setting, pop the flash unit up. The flash mode setting does not change when you close the flash. hEffective flash range (in “ Wide-angle: Approx. 0.3 m to 3.5 m (1 ft. to 11.5 ft.) Telephoto : Approx. -
Page 34: Cauto Flash Mode
I FLASH Auto Flash Mode Use this mode for ordinary photography. The flash fires automatically as required by the shooting conditions. ◆ ◆ Red-Eye Effect When you use the flash to photograph people in low-light conditions, their eyes sometimes appear red in the picture. -
Page 35: Forced Flash
z Forced Flash Use this flash mode to photograph backlit scenes, such as a subject against a window or in the shade of a tree, or to obtain the correct colors when you are shooting under lighting such as fluorescent tubes. In this mode, the flash fires in bright as well as dark conditions. -
Page 36: Suppressed Flash
I FLASH Suppressed Flash Pressing the flash down switches the camera to Suppressed Flash mode. Use this mode for photography using indoor lighting, for shots taken through glass, and for photography in venues such as theaters or at indoor sporting events where the distance is too great for the flash to be effective. -
Page 37: Macro (Close-Up) Photography
MACRO ( CLOSE-UP ) PHOTOGRAPHY Selecting Macro mode allows you to take close- up shots. ● Effective Photography Range: Approx. 10 cm to 80 cm (3.9 in. to 2.6 ft.) ● Macro photography is automatically cancelled in the following situations: •... -
Page 38: Playback
When you set the Power switch to “ image shot is displayed. ● You can use this camera to play back still images recorded on an FinePix 3800 or still images (excluding some uncompressed images) recorded on any FUJIFILM digital camera that supports xD-Picture Cards. -
Page 39: Multi-Frame Playback
MULTI-FRAME PLAYBACK PLAYBACK Text displayed No text displayed Multi-frame playback In playback mode, the display shown on the screen switches each time you press the “DISP” button. Press the “DISP” button until the multi- frame playback screen (9 frames) appears. ●... -
Page 40: Playback Zoom
PLAYBACK ZOOM PLAYBACK This function is useful for things such as checking the focus of shots you have taken. Pressing “a” during single-frame playback switches you to the zoom screen. Single-frame Playback Switch to zoom View another frame 3M • F/N (2048 × 1536) Quality Maximum Zoom Scale ●... -
Page 41: Erasing Single Frame
ERASING SINGLE FRAME PLAYBACK ERASE ERASE FORMAT ALL FRAMES FRAME FRAME BACK BACK 1 Set the Power switch to “ ”. 2 Press the “MENU/OK” button to display the Menu on the screen. ● To revert to image playback without erasing the image, select “BACK”... - Page 42 ERASING SINGLE FRAME PLAYBACK 100−0005 FRAME ERASE OK? YES BACK NO Press “d” or “c” to view the frame (selected file) you want to erase. ● Press the “BACK” button to cancel erasing single frame . Pressing the “MENU/OK” button erases the frame (selected file) displayed.
-
Page 43: Advanced Features Photography
Advanced Features ADVANCED FEATURES PHOTOGRAPHY Photography The Advanced Features Photography section introduces a range of camera functions that you can access by setting the Power switch to “ ■ Photography Mode Specifications z FLASH (c/ /z/v/ e MACRO (ON/OFF) y Quality (Still image: 0.3M/1M/2M/3M • N/3M • F) (Movie: $/#) = SELF-TIMER (ON/OFF) SCENE POSITION (m/,/.///A) -
Page 44: Manual Mode
STILL IMAGE R Auto mode This is the simplest photography mode to use and is suitable for the widest range of shots. ■ Available menu options QUALITY SELF-TIMER OPTION MANUAL W Manual mode Manual mode lets you specify a range of different menu settings for taking pictures. -
Page 45: Escene Position
E SCENE POSITION STILL IMAGE The “ ” Scene Position setting allows you to select any of 5 modes to suit the scene you are shooting. See P.46 for details. ■ Available menu options QUALITY SELF-TIMER SCENE POSITION OPTION SCENE POSITION SCENE POSITION... -
Page 46: Night Scene
E SCENE POSITION q STILL IMAGE m Portrait Use this mode for shots of people. Portrait mode provides soft-tone images with natural skin colors. hWhen using the flash Auto Flash, Red-Eye Reduction, Forced Flash, Slow Synchro, Red-Eye Reduction + Slow Synchro Scene Use this mode for daytime shots of scenery. -
Page 47: Moviet Movie ( Video )
T MOVIE ( VIDEO ) MOVIE “ ” Movie mode allows you to shoot videos with sound. Depending on the “ Quality” number of recorded pixels setting (➡P.51), the maximum recording time for a single movie is either 200 seconds “ ”... - Page 48 T MOVIE ( VIDEO ) q MOVIE STANDBY Zoom bar In Movie mode, the lens is locked at the wide- angle setting and only the digital zoom can be used. You can use “a” (T TELE Zoom) and “b” (W WIDE Zoom) to zoom in and out. A “zoom bar”...
- Page 49 REC During shooting, a timer in the top-right corner of the screen counts down the remaining time. ● Once the remaining time runs out, movie recording automatically stops and the movie is stored on the xD-Picture Card. 59s Press the shutter button again during shooting to end the movie.
-
Page 50: Photography Menu Operation
PHOTOGRAPHY MENU OPERATION 1Press the “MENU/OK” button to display the menu. 2Use “d” and “c” to select the menu item and “a” and “b” to change the setting. 3Press the “MENU/OK” button to confirm the selection. When you validate the settings, the respective icons appear at the top of the screen (Example showing the camera in AUTO mode with the self timer set.). -
Page 51: Photography Menu
PHOTOGRAPHY MENU y SETTING QUALITY MODE ( NUMBER OF RECORDED PIXELS FOR IMAGES ) QUALITY QUALITY 3M・N 2M 40 1M 60 03M 120 Use the “ ” QUALITY setting to specify the number of recorded pixels. ✽ Displaying the menus (➡P.50) Quality (pixels) 3M ·... - Page 52 PHOTOGRAPHY MENU y SETTING QUALITY MODE ( NUMBER OF RECORDED PIXELS FOR IMAGES ) Still image ( R · E · W ) QUALITY QUALITY 3M・N 2M 1M 03M Any of 5 settings can be selected. Choose the setting that best suits your needs. <Examples>...
-
Page 53: Self-Timer Photography
= SELF-TIMER PHOTOGRAPHY PHOTOGRAPHY MENU SELF−TIMER SELF−TIMER ON OFF The self timer can be set in the “ “ ” modes. When you set the self-timer to “ON”, “ on the screen. In this mode, a timer runs for roughly 10 seconds before the shutter is released. - Page 54 = SELF-TIMER PHOTOGRAPHY PHOTOGRAPHY MENU The self timer lamp lights for 5 seconds and then starts blinking. 5 seconds later the camera makes a clicking noise and takes the picture. ● To stop the self-timer once it has started running, press the “BACK”...
-
Page 55: Ev (Exposure Compensation)
d EV ( EXPOSURE COMPENSATION ) PHOTOGRAPHY MENU EV EV +0.3 0 −0.3 −0.6 This mode can be selected in the “ mode. Use the Exposure compensation setting to obtain the optimum image brightness (exposure) when the subject is much brighter or darker than the background. -
Page 56: White Balance (Selecting The Light Source)
PHOTOGRAPHY MENU a WHITE BALANCE ( SELECTING THE LIGHT SOURCE ) WHITE BALANCE WHITE BALANCE AUTO This mode can be selected in the “ mode. Change the white balance setting when you want to take a picture with the white balance fixed for the surroundings and lighting when the picture is taken. -
Page 57: Flash (Flash Brightness Adjustment)
PHOTOGRAPHY MENU x FLASH ( FLASH BRIGHTNESS ADJUSTMENT ) FLASH FLASH +0.3 0 −0.3 −0.6 This mode can be selected in the “ photography mode. Flash brightness adjustment allows you to change only the amount of light emitted by the flash to suit the photography conditions or to achieve a desired effect. -
Page 58: N Aperture-Priority Auto
N APERTURE-PRIORITY AUTO PHOTOGRAPHY MENU A.PRIORITY A.PRIORITY F8.2 F4.8 F2.8 AUTO This mode can be selected in the “ mode. This is an automatic mode that allows you to set the aperture. You can use this mode to take shots with a blurred background (wide aperture) or with both foreground and background in sharp focus (narrow aperture). -
Page 59: Advanced Features Playback
Advanced PLAYING BACK MOVIES ( VIDEO ) Features Playback 123−0009 PLAY 6/18/2002 1Set the Power switch to “ ”. 2Use “d” or “c” to select the movie file. ● Movies cannot be played back using multi-frame playback. Use the “DISP” button to revert to normal playback. -
Page 60: Playing Back Movies
Playing back movie files i This camera may not be able to play back movie files (10 fps) that were recorded on a camera other than FinePix 3800. i To play back movie files on a computer, save the movie file on the xD-Picture Card to the compute’s hard disk and then play back the saved file. -
Page 61: Playback Menu
ERASING SINGLE PLAYBACK MENU 1Set the Power switch to “ ”. 2Press the “MENU/OK” button to view the menu screen. Note that mistakenly erased images cannot be recovered. You should copy important files that you do not want to be erased to your computer or another media. - Page 62 p ERASING SINGLE PLAYBACK MENU ERASE ERASE FORMAT ALL FRAMES FRAME FRAME BACK BACK 1Use “a ” or “b ” to select “FRAME”, “ALL FRAMES” or “FORMAT”. 2Press “MENU/OK” button to confirm your selection. ALL FRAMES/FORMAT • Format Erases all the files. Because formatting also erases protected files, check carefully before formatting a card and copy any files that you want to keep...
-
Page 63: All Frames
Frame 100−0005 FRAME ERASE OK? YES BACK NO 1Use “d” and “c” to select the file to be erased. 2Press the “MENU/OK” button to erase the currently displayed file. To erase another image, repeat steps 1 and 2. When you have finished erasing images, press the “BACK”... - Page 64 p ERASING SINGLE PLAYBACK MENU Format 100−0005 FORMAT FORMAT OK? ERASE ALL DATA YES BACK NO Pressing the “MENU/OK” button erases all the files and initializes the xD-Picture Card. Formatting erases protected files also. ● If the “ ∂ ”, “ ƒ ˙...
-
Page 65: Protecting Images Frame/All
PROTECTING IMAGES FRAME/ALL PLAYBACK MENU 1Set the Power switch to “ ”. 2Press the “MENU/OK” button to view the menu screen. Protection is a setting that prevents images from being accidentally erased. However, “FORMAT” erases all images, regardless of a “PROTECT ALL”... - Page 66 PROTECTING IMAGES FRAME/ALL PLAYBACK MENU PROTECT PROTECT UNPROTECT ALL UNPROTECT ALL PROTECT ALL PROTECT ALL FRAME SET/RESET FRAME SET/RESET 1Press “a” or “b” to select “UNPROTECT ALL”, “PROTECT ALL” or “FRAME SET/RESET”. 2Press “MENU/OK” button to confirm your selection. Unprotect all Removes the protection from all the files.
- Page 67 Frame set / Reset 100−0005 FRAME SET /RESET PROTECT OK? BACK 1 Press “d ” or “c ” to select the file to be protected. 2 Press the “MENU/OK” button to protect the file currently displayed. To protect another file, repeat steps 1 and 2. To finish protecting files, press the “BACK”...
- Page 68 PROTECTING IMAGES FRAME/ALL PLAYBACK MENU Protect all 100−0005 PROTECT ALL PROTECT ALL OK? IT MAY TAKE A WHILE BACK Press the “MENU/OK” button to protect all the files. ● To interrupt the procedure before it is completed, press the “BACK” button. Unprotect all 100−0005 UNPROTECT...
-
Page 69: How To Specify Print Options (Dpof)
Card. The recorded specifications include information on which frames are to be printed. This section gives a detailed description of how to order your prints with the FinePix 3800. On the FinePix 3800, you can specify only one print per image in the DPOF settings. -
Page 70: Dpof Set Frame
i DPOF SET FRAME PLAYBACK MENU 1Set the Power switch to “ 2Press the “MENU/OK” button to display the menu screen. ”. Use “d” or “c” to select “ DPOF DPOF OK DATE/OFF DATE/OFF ” DPOF. - Page 71 DPOF DPOF OK DATE/ON DATE/ON 1Press “a” or “b” to select “DDATE”. 2Use “d” and “c” to select “DATE ON” or “DATE OFF”. The selected setting is then valid for all frames with DPOF settings. DPOF DPOF OK DATE/ON DATE/ON 1Press “a”...
- Page 72 i DPOF SET FRAME PLAYBACK MENU 100−0005 DPOF TOTAL/000 YES YES NO FINISH BACK 1 Use “d” or “c” to display the frame for which you want to specify DPOF settings. 2 Press “a” or “b” to set “YES” for the frame to be printed and then press the “MENU/OK”...
- Page 73 100−0005 DPOF TOTAL/001 FINISH OK? BACK Pressing the “MENU/OK” button confirms the DPOF settings. Pressing the “BACK” button returns you to the settings screen Pressing the “MENU/OK” button confirms all the settings. ◆ Individual DPOF settings cannot be 100−0005 DPOF RESET DPOF OK?...
-
Page 74: Recording Voice Memos
r RECORDING VOICE MEMOS PLAYBACK MENU 1Set the Power switch to “ 2Use “d” and “c” to select the image (still image) to which you want to add a voice memo. ● You can also add voice memos to images (still images) shot on other cameras, provided they can be played back on this camera. - Page 75 VOICE MEMO REC STANDBY 30s START BACK CANCEL The “ ® ” message appears on the screen. Recording begins when you press the “MENU/OK” button. Face the microphone as you record the voice Microphone memo. Hold the camera roughly 20 cm (7.9 in.) away for the best results.
- Page 76 r RECORDING VOICE MEMOS PLAYBACK MENU VOICE MEMO FINISH REC BACK RESTART When you have recorded 30 seconds of comment, the “ ” message appears on ∑ the screen. To finish: Press the “MENU/OK” button. To re-record your comment: Press the “BACK” ◆...
-
Page 77: Playing Back Voice Memos
PLAYING BACK VOICE MEMOS PLAYBACK MENU 123−0008 PLAY 6/18/2002 1Set the Power switch to “ ”. 2Use “d” or “c” to select an image file that has a voice memo. ● You cannot play back voice memos using multi- frame playback. Use the “DISP” button to revert to normal playback. -
Page 78: Playing Back Voice Memos
PLAYING BACK VOICE MEMOS PLAYBACK MENU ■ Playing back voice memos Playback Pause/Resume Stop Fast forward/Rewind Rewind Control The voice memo automatically stops when playback ends. Pauses the voice memo during playback. Press this button again to resume playback. Stops playback. ✽... -
Page 79: Settings
g LCD BRIGHTNESS/VOLUME Settings BRIGHTNESS BRIGHTNESS トータル/000 BACK VOLUME VOLUME トータル/000 BACK When you select the “BRIGHTNESS” or “VOLUME” menu option, an adjustment bar appears on the LCD monitor or viewfinder (EVF). 1Use “d ” and “c ” to adjust the screen brightness or speaker volume. -
Page 80: Using Set-Up
g USING SET–UP OPTION OPTION SET−UP LCD BRIGHTNESS LCD BRIGHTNESS You can use “SET–UP” in any mode. 1Press the “MENU/OK” button to display the menu screen. 2Press “d” or “c” to select “ then press “a” or “b” to select “SET–UP”. 3Press the “MENU/OK” button. Still Photography Screen 1Press “a”... -
Page 81: List Of Settings
■ List of settings q Still Image mode — BRIGHTNESS (➡P.79) SET–UP ■ SET–UP Menu Options (Date/time setting, etc.) Settings Display POSTVIEW ON/OFF POWER SAVE ON/OFF USB MODE DSC/PC CAM DATE/TIME SOUND LOW/HIGH/OFF ENGLISH/FRANCAIS/ LANGUAGE DEUTSCH RESET ALL T Movie mode —... -
Page 82: Set-Up Power Save
POWER SAVE SET–UP SET−UP SET−UP POSTVIEW ON POSTVIEW POWER SAVE POWER SAVE OFF USB MODE USB MODE USB MODE USB MODE DSC DATE/TIME DATE/TIME SET hPower saving “OFF” (default setting) The camera does not use measures such as “sleep” to reduce power consumption. However, if the camera is not used for approximately 2 minutes, this function automatically switches the camera off. -
Page 83: Software Installation
6 Software Installation 6.1 The Software Components USB Mass Storage Allows a digital camera to be used as USB Mass Storage (removable disk drive, card reader). Connect the camera with “DSC” selected as the USB setting (➡P.96). Exif Launcher Launches the FinePixViewer software when a camera is connected. -
Page 84: Installation On A Windows Pc
6.2 Installation on a Windows PC 6.2.1 Load the CD-ROM into your PC Do not connect the camera to your PC until the software installation is completed. 1. Switch on your PC and start up Windows. ✽ If you have already switched on your PC, restart your PC at this point. -
Page 85: From Finepixviewer Installation To Restart
Launching the Installer Manually 1. Double-click the “My Computer” icon. ✽ Windows XP users should click “My Computer” in the “Start” menu. 2. Right-click “FINEPIX” (CD-ROM drive) in the “My Computer” window and select “Open”. 3. Double-click “SETUP” or “SETUP.exe” in the CD-ROM window. - Page 86 2. A confirmation message appears asking whether you want to continue with the installation. Click the [OK] button. 3. The software version is checked. If the window shown below appears, click the [OK] button to uninstall the software. 4. The USB drivers are installed. 5.
- Page 87 6. Install QuickTime as directed by the on- screen instructions. ✽ If you have already installed QuickTime version 5.0.2 or later, this installation is not performed. Click [Agree] button in the “Software License Agreement” window. If the “Connection speed” window appears, set the correct speed for your environment of connection and then click the [Next] button.
- Page 88 12. After you restart your PC, install DirectX as directed by the on-screen instructions and then restart your PC again. If the latest version of DirectX is already installed on your PC, this installation is not performed. 13. After you restart your PC, the “FinePixViewer installation completed”...
-
Page 89: Installation On A Mac Os 8.6 To 9.2
6.3 Installation on a Mac OS 8.6 to 9.2 6.3.1 Check the system software settings ■ Enable File Exchange Check whether File Exchange is active. To use an xD-Picture Card that is supported by the camera, the File Exchange utility supplied with Mac OS must be running. - Page 90 6. Select the installation destination for FinePixViewer and ImageMixer VCD for FinePix. 1 Click the [Open] button to open the installation destination folder. 2 Click the [Save] button. 7. Install QuickTime as directed by the on- screen instructions and then restart your Macintosh.
- Page 91 8. After you restart your Macintosh, the “FinePixViewer installation completed” message appears. FinePixViewer” to view the basic FinePixViewer functions. 9. To install Acrobat Reader, click “Install ✽ Acrobat Reader”. ✽ You should install Adobe Systems’ Acrobat Reader software to read the FinePixViewer User’s Guide (PDF).
-
Page 92: Installation On A Mac Os X
6.4 Installation on a Mac OS X 6.4.1 From FinePixViewer installation to restart Only FinePixViewer is installed on Mac OS X. NOTE AVI movies cannot be played back on version 10.0.4. 1. Switch your Macintosh on and start up Mac OS X. - Page 93 9. Select the Mac OS X startup disk as the installation destination and click the [Continue] button. 10. Click the [Install (upgrade)] button. 11. When you have completed the installation, click the [Restart] button.
-
Page 94: Camera Connection
Internet (➡P.99). ✽ Videoconferencing (“PictureHello”) is not supported on Macintosh computers. ✽ Connection is only possible with a FUJIFILM camera equipped with a “PC Camera” function. For more information on using the software, refer to “How to use FinePixViewer” in the HELP menu which was installed from the CD-ROM. -
Page 95: Using The Optional Ac Power Adapter
7.1 Using the optional AC Power adapter Always use a FUJIFILM AC Power Adapter AC-5V (➡P.114). Use the AC power adapter in situations when a loss of power will cause problems, such as during file downloading (via the USB connection). -
Page 96: Use At Dsc Mode
7.2 Use at DSC mode SET−UP SET−UP POSTVIEW POSTVIEW ON POWER SAVE USB MODE USB MODE DATE/TIME 1. Load an xD-Picture Card containing photographed images into your camera. 2. Slide the Power switch to the side to turn the camera on. 3. Set the “USB MODE” setting in the “SET– UP”... -
Page 97: Camera Operation
■ Camera Operation i When the camera and computer are exchanging data, the self timer lamp blinks and the indicator lamp blinks alternately green and orange. i “DSC” appears on the screen. i Power Save is disabled when the camera is connected to a USB port. - Page 98 Windows XP 1. The “Found New Hardware” help message appears in the bottom-right corner of your screen. This message will close when the settings are completed. No action is required. ✽ This step is not required for subsequent connections. 2. Specify the settings in the “AutoPlay” dialog box.
-
Page 99: Use At Pc-Cam Mode
7.3 Use at PC-CAM mode SET−UP SET−UP POSTVIEW POSTVIEW ON POWER SAVE OFF USB MODE USB MODE PC CAM DATE/TIME SET 1. Slide the Power switch to the side to turn the camera on. 2. Set the “USB MODE” setting in the “SET–UP” menu to “PC CAM” (➡P.80, 81). 3. -
Page 100: Camera Operation
■ Camera Operation i When the camera and computer are exchanging data, the self timer lamp blinks and the indicator lamp blinks alternately green and orange. i The lens is fixed at the wide-angle zoom setting. i “PC CAM” appears on the screen. i Power Save is disabled when the camera is connected to a USB port. - Page 101 2. Check PC operation. The installation procedure differs depending on the operating system running on your PC. ✽ This step is not required for subsequent connections. Windows 98/98 SE/Me The “New Hardware Found” wizard appears. The wizard will close when the settings are completed. No action is required.
-
Page 102: Disconnecting The Camera
7.4 Disconnecting the Camera 1. Quit all applications (FinePixViewer etc.) that are using the camera. 2. Check that the indicator lamp is lit green or that the self timer lamp is off (no data is being exchanged with the computer). For a DSC connection, proceed to step For a PC CAM connection, proceed to step ✽... - Page 103 3. The menu option shown below appears. Click on this option. ✽ Screen for Windows Me 4. The “Eject hardware” dialog box appears. Click the [OK] button or the close button. Macintosh Drag the “Removable drive” icon on the desktop to the Trash.
-
Page 104: Using Finepixviewer
8 Using FinePixViewer 8.1 Saving Images on Your Computer This section gives a brief overview of how to use FinePixViewer. Refer to these instructions while you are using FinePixViewer. 1. Connect the camera to your computer in DSC mode (➡P.96). 2. -
Page 105: Making A Finepix Cd Album
4. Check that the files are downloaded from the camera to your computer and that a folder with the photography date is created. Open the folder as shown below. To open a folder, click on the plus “ or arrow “ ”... -
Page 106: Using The Finepix Internet Service
8.3 Using the FinePix Internet Service NOTE Mac OS X users should refer to P.108. Using FinePixViewer also allows you to access the FinePix Internet Service via the Internet. ✽ A working Internet connection is required not only for FinePix Internet Service, but also online FAQ (FinePixViewer frequently asked and responses) and latest updates. - Page 107 To use the FinePix Internet services, users must first register. ✽ Follow the steps below to register. Users can be registered for free. 1. Launch FinePixViewer. 2. Click the [Register Now] button. 3. The “User’s Registration for Internet Services” dialog box opens. As shown at right, select [Register Here], then select the country or region where you are living and click the [OK] button.
- Page 108 5. Enter the required information in the user registration page. 1 Enter the name of your choice (nickname, etc.). 2 Enter a password of your choice using letters and/or numbers. Then enter the password again for confirmation. 3 Enter your name. 4 Enter your E-mail address.
- Page 109 3. Select “User’s registration” and click the [OK] button. ✽ If you are not already connected to the Internet, connect now. (A dial-up dialog box may be displayed.) ✽ Only select menu acquisition if you have already completed the user registration process and you have re-installed “FinePixViewer”, etc.
-
Page 110: Mastering Finepixviewer
8.5 Mastering FinePixViewer For more information on FinePixViewer functions not fully explained in this manual, refer to “How to Use FinePixViewer” in the Help menu for details. ■ To read “How to Use FinePixViewer”... You must install Adobe Systems’ Acrobat Reader. See P.91 for information on installing Acrobat Reader. -
Page 111: Uninstalling The Software
8.6 Uninstalling the Software Only perform this operation when you no longer require the installed software or when the software was not installed correctly. Windows 1. Switch on your PC. 2. Disconnect the camera (➡P.102, 103). 3. Quit all currently running applications. 4. - Page 112 Macintosh NOTE Only perform this operation when you no longer require the installed software or when the software was not installed correctly. Mac OS 8.6-9.2 ■ Uninstalling Mass Storage Driver and PC Camera Driver 1. Check that the camera is not connected to your Macintosh.
-
Page 113: System Expansion Options
System Expansion Options e By using the FinePix 3800 together with other optional FUJIFILM products, your system can be expanded to fill a wide range of uses. FinePix 3800 Digital Camera xD-Picture Card ( USB ) TV monitor ( commercially available) -
Page 114: Accessories Guide
Accessories Guide e The optional accessories (sold separately) can make taking pictures with the FinePix 3800 even easier. For information on how to attach and use the accessories, refer to the instructions provided with the accessory used. Visit the FUJIFILM web site for the latest information on camera accessories. - Page 115 ● SC-FX304 This is a special case made of polyester that protects the camera against soiling, dust and minor impacts when it is being carried. h DPC-R1 Image Memory Card Reader The DPC-R1 provides a quick and easy way to transfer images back and forth between your PC and an image memory card (xD-Picture Card and SmartMedia).
-
Page 116: Notes On Using Your Camera Correctly
■ Notes on Immersion in Water or Sand The FinePix 3800 is particularly adversely affected by water and sand. When you are at the beach or close to water, ensure that the camera is not exposed to water or sand. -
Page 117: Notes On The Power Supply
AA-size alkaline, Ni-MH (nickel-metal hydride) can be used with this camera. Do not use AA-size manganese, lithium batteries in your FinePix 3800 because the heat generated by the batteries could damage the camera or cause malfunctions. h The operating lives of alkaline batteries vary between... - Page 118 Notes on the Power Supply h Soil (such as fingerprints) on the battery terminals can markedly reduce the number of available shots. Carefully wipe the battery terminals clean with a soft dry cloth before loading the batteries. If any liquid at all leaks from the batteries, wipe the battery compartment thoroughly and then load new batteries.
-
Page 119: Notes On Using The Ac Power Adapter
Plug the connection cord plug securely into the DC input terminal of the FUJIFILM Digital camera. h Turn off the power switch of the FUJIFILM Digital camera before disconnecting the connection cord from the FUJIFILM Digital camera’s DC input terminal. To disconnect, take hold of the plug and pull it out (do not disconnect it by pulling on the cord). -
Page 120: Notes On The Xd-Picture Card
■ Protecting Your Data h Data may be lost or destroyed in the following situations. Please note that FUJIFILM assumes no responsibility for data that is lost or destroyed. 1. Removal of the memory card or turning the power off while the memory card is being accessed (i.e.,... -
Page 121: Specifications
The use of xD-Picture Cards is recommended with the FinePix 3800. The camera quality cannot be guaranteed when cards other than those manufactured by FUJIFILM are used. h The xD-Picture Card may feel warm when it is removed from the camera after extended periods of picture taking or image viewing. -
Page 122: Warning Displays
It may be necessary to format the xD-Picture Card. If the error message is still displayed, replace the xD-Picture Card. i Contact your FUJIFILM dealer. i Wipe the contact area on the xD-Picture Card with a soft dry cloth. It may be necessary to format the xD-Picture Card. - Page 123 Card. If the error message is still displayed, replace the xD- Picture Card. i Contact your FUJIFILM dealer. i Movies cannot be played back. Take the shot using a formatted xD-Picture Card. i Re-insert the xD-Picture Card or switch the camera off and then on again.
- Page 124 Warning Displays Warning Displayed Prints were specified for more than 1000 frames in the DPOF frame settings. Camera malfunction or fault. Explanation The maximum number of frames for which prints can be specified on the same xD-Picture Card is 999. Copy the images for which you want to order prints onto another xD-Picture Card and then specify the DPOF settings.
-
Page 125: Troubleshooting
Troubleshooting Troubleshooting No power. i The batteries are exhausted. i The AC power adapter plug has come out of the power outlet. i The batteries are loaded the wrong way round. Power cuts out during The batteries are exhausted. operation. Batteries runs out quickly. - Page 126 Troubleshooting Troubleshooting Can’t use the flash to take i The shutter button was pressed while the pictures. i The batteries are exhausted. i The Suppressed Flash mode is selected. Can only select “Suppressed Continuous shooting is selected. Flash” flash mode. The photographed image i The subject is too far away.
- Page 127 Can’t format the xD-Picture The xD-Picture Card is write-protected. Card. When the camera is connected i The special FinePix 3800 USB cable is not to a personal computer (PC), properly connected to the computer or the shot image appears on the camera.
-
Page 128: Specifications
Specifications System h Model: Digital Camera FinePix 3800 h Number of effective pixels: 3.2 million pixels h CCD sensor 1/2.7-inch square pixel CCD with RGB Filter Number of total pixels: 3.34 million pixels h Number of recorded pixels 2048 × 1536 pixels/1600 × 1200 pixels/1280 × 960 pixels/ 640 ×... - Page 129 Optional Accessories: See P.114, 115 ✽ These specifications are subject to change without notice. FUJIFILM shall not be held liable for damages resulting from errors in this Owner’s Manual. ✽ The LCD monitor on your digital camera is manufactured Using EVF using advanced high-precision technology.
-
Page 130: Explanation Of Terms
DPOF is a format used for recording information on a storage media (image memory card, etc.) that allows you to specify which of the frames shot using a digital camera are printed and how many prints are made of each image. -
Page 131: Safety Notes
Safety Notes h To ensure that you use your FinePix 3800 camera correctly, read these Safety Notes and your Owner’s Manual carefully beforehand. h After reading these Safety Notes, store them in a safe place. About the Icons The icons shown below are used in this document to... - Page 132 Do not use the camera when it has been dropped or the casing is damaged. This can cause a fire or electric shock. h Contact your FUJIFILM dealer. Never attempt to take pictures while in motion. Do not use the camera while you are walking or operating a moving car or other vehicle.
- Page 133 Build-up of dust in your camera can cause a fire or electric shock. h Contact your FUJIFILM dealer to request internal cleaning every 2 years. When an xD-Picture Card is removed, the card may fly completely out of the slot.
-
Page 134: Ec Declaration Of Conformity
Address : Heesenstrasse 31 40549 Dusseldorf, Germany declare that the product Product Name : FUJIFILM DIGITAL CAMERA FinePix 3800 Manufacture’s Name : Fuji Photo Film Co., Ltd. 26 - 30, Nishiazabu 2 - chome, Minato - ku, Manufacture’s Address :... - Page 135 End User License Agreement This End User License Agreement (“Agreement”) is an agreement between Fuji Photo Film Co., Ltd. (“FUJIFILM”) and you, which sets forth the terms and conditions of the license granted for you to use the software provided by FUJIFILM.
- Page 136 Printed on recycled paper. 26 - 30, Nishiazabu 2 - chome, Minato - ku, Tokyo 106 - 8620, Japan FGS - 204107 - FG Printed in Japan...
Need help?
Do you have a question about the FinePix 3800 and is the answer not in the manual?
Questions and answers