Table of Contents
Advertisement
Quick Links
Instruction Manual
Underwater Case
PT-034
For the digital camera
Stylus 750/740, µ 750/740
■ Thank you for buying the Underwater Case PT-034.
■ Please read this instruction manual carefully and use the product safely
and correctly.
■ Please keep this instruction manual for reference after reading it.
■ Wrong use may cause damage to the camera on the inside from water
leakage, and repair may not be possible.
■ Before use, perform an advance check as described in this manual.
Advertisement
Table of Contents

Subscribe to Our Youtube Channel
Related Manuals for Olympus PT-034


Summary of Contents for Olympus PT-034
- Page 1 PT-034 For the digital camera Stylus 750/740, µ 750/740 ■ Thank you for buying the Underwater Case PT-034. ■ Please read this instruction manual carefully and use the product safely and correctly. ■ Please keep this instruction manual for reference after reading it.
-
Page 2: Introduction
Unauthorized reproduction is strictly prohibited. ● OLYMPUS IMAGING CORP. shall not be responsible in any way for lost profits or any claims by third parties in case of any damage occurring from unsuitable use of this product. - Page 3 1. Do not disassemble or modify this product. This may cause water leakage or trouble. In case of disassembly or modification by persons other than those appointed by OLYMPUS IMAGING CORP. the guarantee shall not apply. 2. Do not place this product at locations with abnormally high or abnormally low temperatures or at locations with extreme temperature changes.
-
Page 4: Batteries
9. When sealing this product, take sufficient care that no foreign matter gets caught at the O-ring and the contact surfaces. Batteries ● Use only Olympus lithium ion rechargeable batteries (LI-42B) with the digital camera. ● Take care that the battery electrodes do not become wet. This may cause trouble or accidents. -
Page 5: For Prevention Of Water Leakage Accidents
For Prevention of Water Leakage Accidents When water leakage occurs while this product is being used, repair of the camera housed in this product may become impossible. Please observe the following cautions for use. 1. When sealing this product, make sure that no hairs, fibers, sand particles or other foreign matter stick not only to the O-ring, but also to the contact surface (flat part of the front cover). -
Page 6: Handling The Product
8. When the O-ring contact surface is pressed strongly from the outside of the Case, or when the Case is twisted, the waterproof function may be lost. Take care not to exert excessive force. 9. Please use the Case after performing the advance test and the final check. - Page 7 Any troubles in taking pictures or with the equipment resulting from the above actions shall be outside the guarantee. ● OLYMPUS IMAGING CORP. shall be in no way responsible for accidents involving immersion of a digital camera in water. ● OLYMPUS IMAGING CORP. shall not pay any compensation for...
-
Page 8: Table Of Contents
Contents Introduction ................E-1 Please read the following items before use ......E-1 For safe use ................E-1 Batteries ..................E-3 Setting the underwater shooting scene mode......E-3 For Prevention of Water Leakage Accidents......E-4 Handling the Product..............E-5 E-7-8 Contents ................1.Preparations ............Check the contents of the package...........E-9 Names of the parts ..............E-10 Install the strap. - Page 9 Remove the O-ring..............E-30 Remove any sand, dirt, etc.............E-30 Install the O-ring..............E-32 How to Apply Grease to the O-ring ..........E-32 Replace consumable products..........E-33 E-34 8.Appendix ................Q & A on the use of the PT-034 ..........E-34 Specifications ................E-39...
-
Page 10: Contents
Contact your dealer if accessories should be missing or damaged. Instruction manual Authorised distributors list/ (this manual) Authorised service centres list PT-034 Instruction Manual Underwater Case For the digital camera Stylus 750/740, µ 750/740 Mode d'emploi Caisson étanche Pour l'appareil photo numérique Stylus 750/740, µ 750/740 Bedienungsanleitung Unterwassergehäuse... -
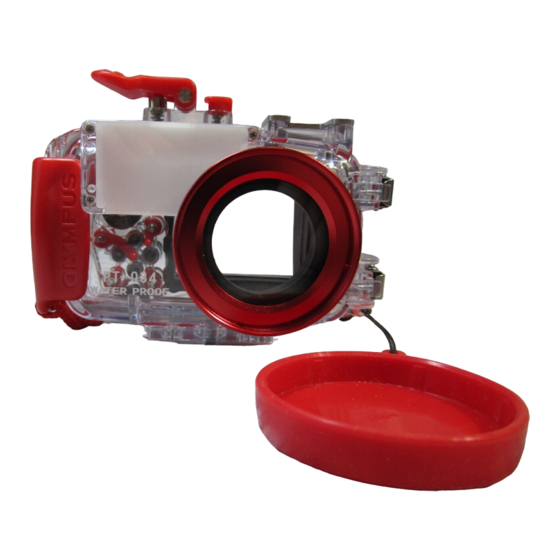
Page 11: Names Of The Parts
Names of the parts ❈ Palm grip LCD inner hood AF LOCK (Note 1)/ Diffuser and diffuser cover O-ring cross-cursor button ❈ (Note 1) The Down cross-cursor button Shutter lever Tripod seat functions as the AF LOCK button during ❈ POWER button Light shield hood shooting in the Underwater Wide-angle 1 or... -
Page 12: Install The Strap
Hand strap Hand strap ring CAUTION : Please install the strap correctly as shown above. OLYMPUS IMAGING CORP. shall bear no responsibility for damage etc. caused by dropping the Case because of incorrect installation of the strap. Master the basic operation. -
Page 13: How To Press The Shutter
How to Press the Shutter When pressing the shutter lever, press it gently, so that there will be no movement of the camera. Note: • For detailed operation of the shutter, refer to the instruction manual for the digital camera. Switching between and SCN modes The digital camera’s camera mode... -
Page 14: Advance Check Of The Case
Do not feel that this is troublesome, but perform this test. • If a leak is detected in normal handling during testing, do not use the Case and contact Olympus. E-13... -
Page 15: Install The Digital Camera
Case lids and may cause water leakage. • When removing the strap, handle the digital camera with sufficient care. OLYMPUS IMAGING CORP. shall not be responsible for damage caused by dropping the camera etc. -
Page 16: Prepare The Camera
Prepare the camera. Applicable Digital Cameras This product (PT-034) is designed exclusively for use with the Stylus 750/740 and µ750/740 digital cameras. Switch the camera ON Press the digital camera’s POWER button to switch it ON. When not operated for a certain period of time, the camera will enter the sleep mode to reduce power consumption. -
Page 17: Open The Case
Open the Case. Use the provided O-ring remover as described below. Insert the hook section below the buckle lock/unlock lever. Slowly pull the O-ring remover. If the O-ring remover is not available, push the buckle lock/unlock lever from the left and right with your thumb and index finger, and pull up the lever gently. -
Page 18: Insertion Of Silica Gel
Insertion of silica gel Before sealing the Case, insert the accessory silica gel bag for prevention of fogging between the bottom of the camera and the Case. Pay attention to the orientation. CAUTION : • Insert the silica gel all the way at the specified location and with the specified orientation. -
Page 19: Make Sure The Camera Is Loaded Properly
Make sure the camera is loaded properly. Check the following points before sealing the Case. Is the digital camera loaded properly? Is the camera’s image blur correction function set properly? Is silica gel inserted deep in the specified location? Is the O-ring attached properly to the opening on the Case? Is there any dirt or foreign matter on the O-ring or the O-ring contact surface on the front lid? Has maintenance of the waterproof function been performed? -
Page 20: Check The Operation Of The Loaded Camera
Check the operation of the loaded camera. After sealing the Case, check that the camera functions normally. 1. Push the POWER button on the Case and confirm that the camera turns ON/OFF. 2. Turn the mode switch on the Case and confirm that the camera mode switches properly. -
Page 21: Confirm The Shooting Scene And Shooting Mode
Confirm the shooting scene and shooting mode When using the Case, the current camera shooting scene and shooting mode can be confirmed on the camera’s LCD monitor. Shooting scene/Shooting mode E-20... -
Page 22: Installation And Removal Of The Lcd Hood
Installation and Removal of the LCD Hood Installation Strongly push the mounting projections of the LCD hood as shown in the figure into the guides above and below the LCD monitor window. Removal Remove the mounting projections of the LCD hood from the guides above and below the LCD monitor window by widening the LCD hood. -
Page 23: Mounting And Removing The Lens Cap
Mounting and Removing the Lens Cap Fit the lens cap onto the lens ring as shown in the figure. Be sure to remove the lens cap before shooting. Perform the final checks. Visual Inspection After sealing the Case, check the sealing part of front and rear lid visually to confirm that the O-ring is not twisted or out of the groove and that no foreign matter has been caught. -
Page 24: Final Test
As the inside can be seen, the inspection for become moist? entry of water also can be made securely! Now everything is Now everything is all right! all right. Have a nice dive! Note : The PT-034 is not provided with a balance weight. E-23... -
Page 25: Taking Pictures Under Water
4. Taking Pictures Under Water How to Use the Hand Strap Pass your hand through the accessory hand strap and adjust the length with the stop button. Take pictures carefully. Confirm the picture on the LCD monitor. This Case uses the LCD monitor to confirm the picture. Quietly press the shutter lever. -
Page 26: Underwater Shooting According To The Scene Type
5. Underwater Shooting According to the Scene Type The camera incorporates the following shooting scene modes. Select the one best suited to the underwater scene you are shooting. Underwater shooting modes (Examples) Underwater Wide-Angle 1 Suitable for shooting a scene that extends across a wide range such as a school of fish swimming through the water. -
Page 27: Selecting A Scene Mode
Selecting a scene mode Turn the Case’s mode dial to set the camera mode to the [SCN] mode. When the selection screen is displayed, press Set to the up/down cross-cursor button “SCENE.”. select Underwater Wide 1, Underwater Wide 2 or Underwater Macro, and then press the OK button to enter the selection. -
Page 28: Handling After Shooting
6. Handling After Shooting Wipe off any waterdrop. After completing the shooting and returning to land, wipe off any waterdrop sticking to the Case. Use air or a soft cloth not leaving any fibers to thoroughly wipe any waterdrop etc. from the joint between the front and rear lid, the shutter lever, the palm grips, and the buckles. -
Page 29: Take Out The Digital Camera
Take out the digital camera. Open the Case carefully and take the digital camera out. CAUTION : • Always place the opened Case with the O-ring side facing up. If the Case is placed with the O-ring side facing down, dirt or other foreign matter may get on the O-ring or the O-ring contact surface and may allow water penetration during the next dive. -
Page 30: Wash The Case With Pure Water
Wash the Case with pure water. After use, seal the Case again after taking out the camera and wash it sufficiently in pure water as soon as possible. After use in sea water, it is effective to immerse it for a fixed time in pure water to remove any salt. CAUTION : •... -
Page 31: Maintaining The Waterproof Function
7. Maintaining the Waterproof Function Whenever you open the rear lid of the Case, always be sure to perform the O-ring maintenance operation as described below. Remove the O-ring. Open the Case and remove the O-ring from the Case. Removal of the O-ring Insert the O-ring remover between the O-ring and the O-ring groove. - Page 32 Remove any foreign matter attached to the O-ring groove using a lint- free clean cloth or cotton swab. Also remove any sand or dirt attached to the O-ring contact surface on the front lid of the case. CAUTION : • Maintenance of the waterproof functions is required even before using this product underwater for the first time.
-
Page 33: Install The O-Ring
Install the O-ring. Confirm that no foreign matter is attached, apply a thin coat of the accessory grease to the O-ring, and fit the O-ring into the groove. At this time, confirm that the O-ring does not stick out from the groove. How to Apply Grease to the O-ring Apply the Make sure that your fingers and the O-... -
Page 34: Replace Consumable Products
Replace the O-ring even before a year has passed if it shows signs of damage, cracking or loss of elasticity. Note: • Please use original Olympus products for the silicone O-ring grease, the silica gel, and the O-ring. These consumable products also can be purchased at an Olympus service station. -
Page 35: Appendix
Q & A on the use of the PT-034 Q1 : What digital camera models can be used with this product? A1 : This product (PT-034) is designed exclusively for use with the Stylus 750/740 and µ750/740 digital cameras. Q2 : What cautions must be observed when loading the digital camera... - Page 36 (c) Places with volatile substances (d) Places with vibrations (3) In case of the following handling with a camera loaded into the Case, trouble or breakage may be caused for the Case and/or the loaded camera. Always avoid such handling. (a) Hitting other objects (b) Dropping (c) Placing heavy objects on top of the Case...
- Page 37 Case under direct sunlight. Exposure to high temperatures or direct sunlight may cause deformation, discoloration or breakage of the Case and deterioration of the O-ring. Wipe the inside of the Case with a soft cloth not causing any fibers. Remove the O-ring, wipe off any salt, sand, dust, etc., and also clean the O-ring groove and the O-ring contact surface in the same way and then dry them.
- Page 38 O-ring will be damaged or that its deterioration will be accelerated. (2) Use the original Olympus silicone O-ring grease (white cap). The grease attached to Cases up to PT-008 (red cap) and the grease of...
- Page 39 Case yourself. Repair, disassembly or modification by you or third parties not authorized by Olympus invalidates the guarantee. Q12: What are the model names of the accessories for the PT-034? A12: The following accessories are being sold. (1) O-ring for the PT-034 body (POL-029): This is a silicone rubber O-ring packing to be installed in the PT-034 body to make it waterproof.
-
Page 40: Specifications
Specifications Available models Olympus digital camera Stylus 750/740, µ 750/740 Pressure Depth of up to 40 m resistance Main materials Body: Transparent polycarbonate Buckles: Stainless steel Grip/Shutter lever: Red polycarbonate Lens window: FL glass Operation buttons: Stainless steel Nickel-plated brass... - Page 41 MEMO E-40...
- Page 42 MEMO E-41...
- Page 43 MEMO E-42...
Need help?
Do you have a question about the PT-034 and is the answer not in the manual?
Questions and answers