Billion BiPAC 2071 User Manual
Homeplug av 200 ethernet adapter & homeplug av 200 ethernet bridge with ac-pass through
Hide thumbs
Also See for BiPAC 2071:
- User manual (29 pages) ,
- White paper (11 pages) ,
- Quick start manual (9 pages)

Subscribe to Our Youtube Channel
Related Manuals for Billion BiPAC 2071


Summary of Contents for Billion BiPAC 2071
-
Page 1: User Manual
BiPAC 2071 HomePlug AV 200 Ethernet Adapter BiPAC 2072 HomePlug AV 200 Ethernet Bridge with AC-Pass Through User Manual... -
Page 2: Table Of Contents
Table of Contents Chapter 1 .................... 1 Introduction ................. 1 Specifications ................2 Features ..................3 Chapter 2 .................... 4 Device Overview ................. 4 Quick Start (Setup Powerline Network) ........5 Push Button usage ................5 Application Scenarios: ................5 Powerline Network Illustration .............7 Chapter 3 .................... -
Page 3: Chapter 1
Safety Warnings 1. Do not use the adapter in high humidity or high temperature environment. 2. Do not open or repair the case yourself. 3. Avoid using this product and all its accesories outdoor. 4. Place the adapter on a stable surface. 5. -
Page 4: Specifications
• PLC (Powerline Link/Act) LED • ETH (Ethernet Link/Act) LED Dimension BiPAC 2071: 112.35 X 77.70 X44.50 mmBiPAC 2072: 165 X 73 X 38.50 mm Power Saving Reduce power consumption by at least 60% during power saving mode. Operating Temperature /... -
Page 5: Features
6. Power supplier design inside. 7. Ideal for Residential Users. 8. Power Saving mode: When PC or other Ethenet devices are completely power off, Billion HomePlug device will automatically enter power saving mode which will help to reduce power consumption by at least 60%. -
Page 6: Chapter 2
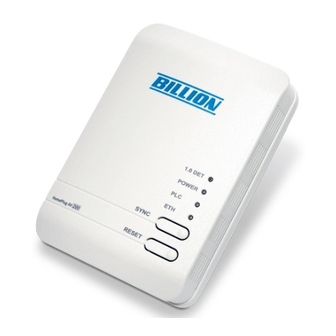
Chapter 2 Device Overview BiPAC 2072 BiPAC 2071 AC Outlet / AC Pass-thru 1.0 DET LED (only available in Power LED BiPAC 2072 model) PLC LED ETH LED Sync Button Reset Button Ethernet Port Power Plug The Description of each labeled part is described in the table below. -
Page 7: Quick Start (Setup Powerline Network)
Quick Start (Setup Powerline Network) Push Button usage There are 3 types of Sync Button trigger states: 1. Broadcast State: Enable BiPAC HomePlug AV device to provide information for another Bi- PAC HomePlug AV device to join its powerline network group (works even if it is the only device existing within the network group). - Page 8 2. Press the Sync Button of device B or C of the BC network group for 1~3 seconds to turn it into Broadcast State, you should find the Power LED blinks signifying it is in Broadcast state. 3. Press the Sync Button of device A for 1~3 seconds to turn it into Join State, you should find the Power LED blinks signifying it is in Join state.
-
Page 9: Powerline Network Illustration
Powerline Network Illustration Home / Office Setting... -
Page 10: Chapter 3
Chapter 3 Utility Installation 1. Place the BiPAC HomePlug AV Utility auto-installation CD into your CD-ROM/DVD-ROM drive and click on Utility for Easy Installation. 2. If you have not installed Microsoft .NET Framework 2.0, click on Install Microsoft .NET Frame- work 2.0 to install this program first before installing BiPAC HomePlug AV PLC Utility. -
Page 12: Microsoft .Net Framework 2.0 Installation
Microsoft .NET Framework 2.0 Installation 1. After clicking on Install Microsoft .NET Framework 2.0, the Net Framework 2.0 installation wizard will be displayed. 2. Click Next to proceed with the installation. 3. Check the Agreement acceptance box then press Install to start the installation. When the installation is complete, click Finish to exit. -
Page 14: Bipac Homeplug Av Utility Installation
BiPAC HomePlug AV Utility Installation 1. After clicking on Install the utility for Windows (32-bit / 64-bit), the installation wizard will ap- pear. Click Next. - Page 15 2. You may define the location of the installation folder using the Browser, however it is highly recommended that you use the default location. In addition, you can also choose to install Bi- PAC HomePlug AV PLC Utility only for yourself or for all the users who share your PC. When all necessary items are properly selected, press Next to proceed.
- Page 16 3. Press Next to confirm and start the installation.
- Page 17 4. While the utility installlation is in progress, the system will automatically prompt you to install the WinPcap program in a separate window pop-up. Install this program in order for the utility to work well. 5. When the WinPcap installation window pops up, click Next to proceed with the installation.
- Page 18 6. Click on Next to proceed to the next step. 7. Read through the license agreement then click on I Agree button to accept the agreement term and to continue the installation.
- Page 19 8. When the WinPcap installation is done, click on Finish to close the window.
- Page 20 9. When the WinPcap installation is done, you will have also completed the BiPAC HomePlug PLC Utility installation as well. You may now click on the close button of the Utility installation window to finish the process.
-
Page 21: Chapter 4
Chapter 4 Accessing BiPAC HomePlug AV Utility Once the BiPAC HomePlug AV PLC Utility Setup Wizard is installed, a shortcut will appear on the desktop. You can start the BiPAC HomePlug AV Utility by double clicking on the shortcut, or go through “start”→... -
Page 22: Bipac Homeplug Av Utility
BiPAC HomePlug AV Utility Billion BiPAC HomePlug AV Utility consists of 4 screens accessed through 4 panel tabs. The 4 panels are Main, Privacy, Diagnostics and About located on the top left corner of the program for configuration convenience. Main Tab The Main Tab screen lists all the powerline devices that are connected to the host computer when the utility is running. - Page 23 The Network type (Public or Private) is also displayed based on the network status of the local device. The scan status option is displayed on the top right corner above the Remote devices panel showing whether the Autoscan function is turned ON or OFF. The following information is displayed for all devices that appear in the lower panel: Device Name: Show the default device name.
- Page 24 Password Setup Instructions: This feature grants users the access level to change the Private Network Name of both the local & the remote HomePlug devices. Password is required if one is to change the Private Network Name of each devices within the powerline network in order for all devices to be able to communicate & synchronize with each other within the network.
- Page 25 Note: The password of each HomePlug device can be found at the back of the device. 3. If the password entered is not recognized or unacceptable, an error message box will pop up prompting user to change the password. Click OK then re-enter the password again. 4.
-
Page 26: Privacy Tab
Privacy Tab Privacy Tab allows user the convenience to manage the security of the private powerline network. In addition, user can also uitlize this feature to add a new HomePlug device to the private network instead of manually adding the device using its sync button. In order to add devices to the network through the utility GUI, Private Network Name of each device is required to be the same with the local device. -
Page 27: Diagnostic Tab
Diagnostic Tab The Diagnostics Tab screen shows System information and a history of all remote devices seen over a period of time. This screen is available for OEM/ODM Customization. The Upper panel shows technical data concerning software and hardware present on the host computer which were used for communication via HomePlug device on the Powerline network. - Page 28 The Lower panel contains a history of all remote devices seen on the computer over a certain period of time. All devices that were on the powerline network are listed here along with a few other parameters. Devices that are active on the current logical network will show a transfer rate in the Rate column;...
-
Page 29: Qos Tab
QoS Tab This function allows user the flexibility to manage the bandwidth usage for each HomePlug device. The higher the QoS priority the more bandwidth usage is allocated to that particular device. To set the QoS priority of each device: 1. -
Page 30: Firmware Download Tab
Firmware Download Tab This function gives users the convenience to download the free bundled Firmware Upgrade tool from Billion website. Thus, with this feature, users can always keep their PLC Utility updated with the latest firmware. To Download the Free Bundled Firmware Upgrade Tool 1. -
Page 31: About Tab
About Tab The About screen shows the software version and provides the HTML link to the Billion official website. Clicking on the web address field will open a web browser that link directly to the web site. Under the Preferences panel, user can check the AutoScan box to turn on the Auto Scan function... -
Page 32: Firmware Upgrade
Firmware Upgrade Firmware upgrade allows users to keep their HomePlug Utility application to the most updated feature. This firmware upgrade tool is designed to provide user the most user friendly application that makes firmware upgrade process easy and fast. Firmware Upgrade Instructions: 1. - Page 33 2. When the upgrade application initiates, it will prompt you to install Framework 2.0 if you have not had one installed to your computer. 3. But if you already have Framework 2.0 in your computer. You can directly click on the buttton.
- Page 34 5. If there is no device detected, a warning will pop up to signify for possible disconnection of your device or its cable. Click OK and then reconnect your devices and its cables. You may choose to restart the firmware upgrade application again for auto device detect or you may choose the LAN card that is connected to your HomePlug device manually.
- Page 35 6. To manually select the device to be upgraded, select the LAN card of the powerline network first. Then, select your device from the Selected Device drop down menu.
- Page 36 7. When the device has been selected, press the Firmware Upgrade button to start the upgrad- ing process. 8. When upgrading is finished, the new firmware version will be displayed in the Current Firm- ware column.
-
Page 37: Chapter 5: Troubleshooting
If your router is not functioning properly, please refer to the suggested solutions provided in this chapter. If your problems persist or the suggested solutions do not meet your needs, please kindly contact your service provider or Billion for support. Problems with the device... -
Page 38: Appendix: Product Support & Contact
Appendix: Product Support & Contact If you come across any problems please contact the dealer from where you purchased your prod- uct. Contact Billion Worldwide: http://www.billion.com MAC OS is a registered Trademark of Apple Computer, Inc. Windows 98, Windows NT, Windows 2000, Windows Me, Windows XP and Windows Vista are registered...
Need help?
Do you have a question about the BiPAC 2071 and is the answer not in the manual?
Questions and answers