Advertisement
Quick Links
Advertisement

Related Manuals for Philips WP3864


Summary of Contents for Philips WP3864
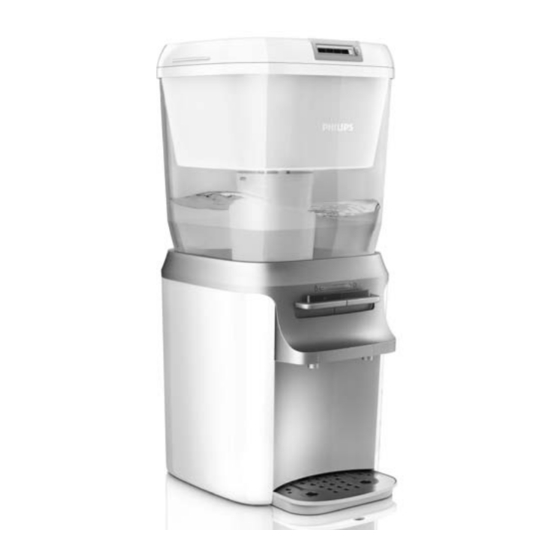
- Page 1 WP3864, WP3863, WP3862, WP3843...
- Page 5 English 6 繁體中文 30 简体中文 52...
- Page 6 English introduction Congratulations on your purchase and welcome to Philips! To fully benefit from the support that Philips offers, register your product at www.philips.com/welcome. The Philips PureGuard barrel purifier is equipped with the unique multiguard control system that reduces bacteria, chlorine, taste and odour, ensuring you of deliciously purer water.
- Page 7 Do not use the appliance if the plug, the mains cord or the appliance itself is damaged. If the mains cord is damaged, you must have it replaced by Philips, a service centre authorised by Philips or similarly qualified persons in order to avoid a hazard.
- Page 8 Do not attempt to repair the appliance yourself, otherwise the guarantee becomes invalid. Philips strongly advises you to clean this appliance every 3 months. If the appliance is not cleaned in time and according to the procedure described in chapter ‘Cleaning and maintenance’, this may lead to...
- Page 9 English hygiene This Philips water purifier gives you clean, safe drinking water that you can trust. However, if the water purifier is not used hygienically, it may pose a risk of disease to users because it could cause microbes to end up in the filtered water.
-
Page 10: Installation
Note: The inside of the Soft water booster changes colour when it becomes wet. This is normal. Place the raw water tank on the clean water tank. Always make sure the Soft water booster (WP3864 only) and the Long-life filter are attached to the raw water tank. Put the top cover on the raw water tank. Note: The rust & sediment pre-filter, its lock and its holder are already present... - Page 11 English Flushing the appliance Do not switch on the appliance with the power-on button at the back before the boiler inside the water dispenser is completely filled with water, i.e. when you see water being stored in the clean water tank. Press the lid release area to open the top cover lid. The display lights up. Use a large jug to fill the raw water tank completely. The raw water tank has a capacity of 7 litres. Note: The maximum indication line for the raw water tank is on the rust & sediment pre-filter holder. Close the lid. The water flows into the boiler inside the dispenser first. When the boiler is full, water starts to be stored in the clean water tank.
- Page 12 English Press down the hot water lever and the ambient water lever and let all the water in the clean water tank and in the boiler flow into the container. Be careful, the water is hot. Note: Unlock the child lock and press the hot water lever occasionally to let air escape from the boiler. Throw away this filtered water. Using the appliance Press the lid release area to open the top cover lid. The display lights up. Use a large jug to fill the raw water tank. Note: The maximum indication line for the raw water tank is on the rust & sediment pre-filter holder.
-
Page 13: Dispensing Hot Water
English Press down the ambient water lever. Release the ambient water lever as soon as the cup or jar contains the desired amount of water. Continous flow lock If you want to dispense a large amount of water, you can lock the ambient water lever so you do not have to push it down continuously. Press down the ambient water lever (1) and then press the continuous flow lock inwards (2). The appliance now dispenses ambient water continuously. To release the continuous flow lock, simply press down the ambient water lever. Dispensing hot water Note: If you do not use the hot water function, make sure the on/of button at the back of the appliance is set to the off-position (O) to save energy. - Page 14 English Unlock the child lock. To do so, push the child lock inwards and, at the same time, press down the hot water lever. Note: The child lock prevents small children from being able to dispense hot water, as hot water could cause scalding. Release the hot water lever as soon as the cup or jar contains the desired amount of water. Pure protect alert display Filter capacity indications The Pure protect alert display provides feedback on when you have to replace the Long-life filter.
- Page 15 English When 90% of the filter capacity has been used, the display shows 1 segment of the progress bar and the filter replacement symbol. Make sure you have a new Long-life filter available at this time. If you want, you can replace the Long-life filter with a new one and reset the display so that the filter capacity does not reach 0%.
- Page 16 The Long-life filter cannot be cleaned but has to be replaced (see chapter ‘Replacement’). The Soft water booster (WP3864 only) cannot be cleaned but has to be regenerated (see section ‘Regenerating the Soft water booster (WP3864 only)’ in this chapter) and ultimately replaced.
- Page 17 English Put your finger through the hole in the edge of the drip tray to push the drip tray cover off the fixing pegs. Then grab the rear side of the drip tray cover and lift it off the drip tray. Empty the drip tray into the sink. Put the drip tray cover back onto the drip tray and slide the drip tray back into the appliance. Unscrew the spouts from the dispensing unit. Turn the spouts upside down and rinse the silver sieves in the spouts under the tap. Note: Regular cleaning of the silver sieves is necessary to ensure a good flow of filtered water. Screw the spouts back into the dispensing unit. Cleaning the rust & sediment pre-filter Clean the rust & sediment pre-filter every 2 weeks. You can find 1 spare rust &...
- Page 18 English Take the holder out of the top cover. Remove the lock from the holder. Remove the rust & sediment pre-filter from the holder and rinse it with hot water. Put the rust & sediment pre-filter back into the holder. Put the lock back into the holder (‘click).
- Page 19 3 months with the fast and simple cleaning procedure described in this section. Make sure there is about 4 litres (a level slightly above the black line shown in the figure) of clean water in the clean water tank. If the appliance is not switched on, switch on the appliance and wait until the red heating-up light goes out. Note: Make sure the raw water tank is empty. Remove the drip tray and the drip tray cover from the appliance. Take the rust & sediment pre-filter holder out of the top cover. Then remove the top cover. WP3864 only: Pull the soft water booster out of the raw water tank. Lift the raw water tank. To remove the Long-life filter, turn it to the left (1) and pull it out of the raw water tank (2).
- Page 20 English Empty one sachet with dedicated cleaning agent supplied with the appliance into a container. Use the hot water lever to dispense 1 litre of hot water into the container. Note: If the cleaning agent does not dissolve properly by itself, stir the water until all the cleaning agent has dissolved. Before you continue, check if all filters have been removed. Remove the raw water tank. Make sure that the bottom of the raw water tank does not come into contact with dirty surfaces. If you want to put down the raw water tank, place it upside down. Tip: You can clean the raw water tank with water and a mild cleaning agent. After cleaning, rinse the raw water tank thoroughly with clean boiled water.
- Page 21 Clean the rust & sediment pre-filter, the raw water tank and the clean water tank with hot water. Note: If you want to clean the top of the dispenser, do not touch the hole in the centre, as this hole is in contact with filtered water. Wipe the top cover with a moist cloth. Do not immerse the top cover in water. Place the clean water tank on top of the water dispensing unit. Put the Soft water booster (WP3864 only) in the raw water tank and attach the Long-life filter to the raw water tank. Then put the raw water tank with its filters back onto the clean water tank. Place the top cover with the rust & sediment pre-filter back onto the raw water tank. Fill the raw water tank with water and let the water flow into the clean water tank and the boiler inside the dispensing unit.
- Page 22 Regenerating the soft water booster (WP3864 only) The Soft water booster needs to be regenerated regularly. Depending on the hardness of the water supply in the area where you live, Philips suggests the following regeneration intervals: First time...
- Page 23 English Put the Soft water booster in the bowl with the water/salt solution for at least 1 hour. Make sure the Soft water booster is completely submerged. Note: The minimum submersion period is 1 hour. You can always submerge the Soft water booster longer. Take the Soft water booster out of the bowl. Throw away the water/ salt solution and rinse the bowl. Fill the bowl with at least one litre of fresh ambient water again and put the Soft water booster in the bowl for 5 minutes. Make sure the Soft water booster is completely submerged. Remove the Soft water booster and reattach it to the raw water tank. Put the top cover back onto the appliance. storage If you want to store the appliance, you have to empty all the water out of it, including the water that is in the boiler.
- Page 24 English Remove the raw water tank and the clean water tank from the appliance. Put the water dispensing unit on its side and pull out the drainage plug in the bottom. Be careful, hot water may come out of the opening when you remove the drainage plug. Note: Some water can drip off the top of the dispensing unit. Place the water dispensing unit on a bucket or above the sink. Push down the hot water lever and dispense all water through the drainage hole and the hot water spout. Now all water has been removed from the boiler. Put the drainage plug back into the bottom of the water dispensing unit. Note: Make sure you insert the drainage plug properly, otherwise it is not possible to reassemble the drip tray and leakage may occur.
- Page 25 Replacing filters The Soft water booster has to be replaced every 6 months. New Soft water boosters are available from your Philips dealer or authorised Philips service centres under type number WP3963. The Long-life filter has to be replaced every 6 months or after having filtered 1000 litres of water.
-
Page 26: Troubleshooting
Philips consumer care hotline to make an appointment for home repair. Our service technicians will ensure that hygiene is preserved during repair and that, after repair, the Philips water purifier gives you safe drinking water that you can trust. Troubleshooting This chapter summarises the most common problems you may encounter with your water purifier. - Page 27 English Problem Cause Solution The red heating- You have not put Put the mains plug in an earthed wall socket and/or press up light does not the mains plug in an the on/off button. go on. earthed wall socket and/or you have not pressed the on/off button.
- Page 28 The appliance is Unplug the appliance immediately and take it to an clean water tank is malfunctioning. authorised Philips service centre. boiling. After I have The red light goes on, The boiler has a capacity of 1 litre of hot water, which...
- Page 29 Philips water purifiers. The rust and sediment pre-filter cannot be bought separately. One extra rust & sediment pre-filter in the provided in the package of the water purifier.
- Page 30 恭喜您購買本產品並歡迎加入飛利浦!請於 www.philips.com/welcome 註冊您的產品,以善用飛利浦提供的支援。 飛利浦 PureGuard 淨水器配備獨特多重淨化防護系統,可濾除細 菌、氯與異味,確保您能飲用美味純水。 鐵鏽與沉澱前層濾芯可避免灰塵和昆蟲進入系統內。水會透過長效 濾芯流入淨水箱。長效濾芯中的日本進口超濾膜能濾除 99.9999%* 的細菌,以及 99.95% 以上的囊胞**,活性碳則可減少易致癌的工 業污染物質、殺蟲劑和揮發性有機化合物 (VOC)***。長效濾芯能持 續使用達 1000 公升 (約 6 個月****),無須進行麻煩的清潔與保養。 限 WP3864:水質軟化器採用離子交換 (IEX) 技術,可降低水質硬 度,賦予供水更純淨的口感***。如果定期再生,水質軟化器最長能 維持 6 個月。 在水箱正上方,純淨保護系統顯示器能清楚顯示濾芯的壽命狀況。 先進的電子設備在濾芯飽和需要更換時自動提醒您。 本淨水機配備污染屏閉系統,可避免二次污染。出水管中的銀濾網 在送出過濾水的最後一道關卡給您多一重保護。 簡便快捷的清潔程序,一步到位洗淨所有部位 * 細菌相關的結果由獨立機構 BioVir Laboratories, Inc. USA (WQA 的認證實驗室) 測試而得。...
- Page 31 繁體中文 V 滴盤 W 電源線附插頭 X 通氣網 Y 電源開啟按鈕 Z 水質軟化器 (限 WP3864) 電池槽 (可裝入一顆 3 伏特 CR2032 鋰電池) 含可拆式電池槽蓋 重要事項 在使用本產品前,請先仔細閱讀本使用手冊,並保留說明以供日後 參考。 危險 請勿讓產品浸入水或其他液體中,也不要在水龍頭下沖洗。 警示 在連接本產品的電源之前,請確認本淨水器底部所標示的電壓與 當地的電壓是否相符。 當插頭、電線或產品本身受損時,請勿使用產品。 如果電線損壞,則必須交由飛利浦、飛利浦授權之服務中心,或 是具備相同資格的技師更換,以免發生危險。 基於安全考慮,在缺乏監督及適當指示之下,本產品不適用於孩 童及任何身體、知覺、或心理功能障礙者,或缺乏使用經驗及 知識者。 請勿讓孩童使用本產品或當成玩具。 本淨水器只能用來過濾屋內水龍頭的水,因為這些水是自來水且 事先經過處理。 如需使用本淨水器過濾可能受到微生物污染或水質不明的水,過 濾前後必須充分消毒。 請務必謹慎處理濾芯,因為濾芯的絲膜非常脆弱。請勿改裝濾...
- Page 32 繁體中文 產品頂部請勿放置任何物品。 除「清潔與維護」單元中提到的化學物質之外,請勿使用其他任 何化學物質來清潔淨水箱內部及生水箱外部。 只有滴盤蓋才能放入洗碗機內清洗或以滾水清洗。請勿將其他任 何組件放入洗碗機或以滾水清洗。 請勿改裝淨水器。 在水箱尚未完全裝滿前,請勿使用產品背部的電源開啟按鈕開 啟產品。 為避免淨水器受損,請遠離任何高熱物件。 當淨水箱中還有水時,請勿拿起或拆下淨水箱。否則水會全部從 箱中流出。 務必將產品交由飛利浦授權之服務中心檢查或修理。請勿嘗試自 己動手修理;否則產品保固將無效。 飛利浦強烈建議每 3 個月清洗一次產品。若產品未依照「清潔 與維護」單元中說明的程序按時清潔,可能會發生技術故障。 請勿使用硫酸、鹽酸、氨基磺酸和醋酸 (例如醋) 等以無機酸為 基底的除垢劑。這些除垢劑可能損害淨水器。 本系統經證實可去除囊胞,可用於消毒,去除水中可能包含的可 過濾囊胞。 衛生 本飛利浦淨水器能給您可信賴的純淨安全飲用水。但如果使用方式 不衛生,可能會使微生物出現在過濾後的水中,並讓淨水器產生讓 使用者罹患疾病的風險。 清潔水箱前,請務必洗手。 當您在清潔或碰觸會與未過濾水或過濾水接觸的表面時 (例如淨 水箱的內部及生水箱的注水口),請務必注意衛生。 請勿使用廚房抹布或海棉來清潔或吸乾生水箱及淨水箱的內部, 因為這些物品可能含有細菌。若要以合乎衛生的方式清潔水箱, 請遵循「清潔與維護」單元中的清潔指示。 清潔淨水箱內部及生水箱外部時,請務必使用乾淨、經過消毒的 抹布與清潔設備。 請務必透過煮沸或使用消毒劑的方式,對抹布及清潔設備進行消 毒。我們建議您將抹布或海棉在 10ml 家用漂白劑 (5% 的次氯 酸鈉溶液) 和...
- Page 33 繁體中文 安裝純淨保護系統顯示器電池 使用硬幣拆下頂蓋內側的電池槽蓋。 將產品隨附的 3 伏特 CR2032 鋰電池裝入電池槽。您可在配件 包中找到這顆電池。 CR2032 注意: 純淨保護系統顯示器以電池供電,而非使用電源。 將外蓋放回電池槽,並用硬幣旋緊。 安裝 將本產品放置在穩固、平坦的水平面上使用。 將淨水箱放在給水裝置上方。 取下長效濾芯的保護蓋。 注意: 請小心,不要拆下長效濾芯的密封環。 注意: 長效濾芯的些許碳微粒可能流入生水箱中,此為正常現象, 沒有任何健康風險。只要清洗生水箱,就能去除碳微粒。 將長效濾芯的頂端裝進生水箱底部 (1),然後向右旋轉固定 (2)。 限 WP3864:將水質軟化器推入生水箱 (會聽見「喀噠」一 聲)。 注意: 水質軟化器在拆封時會有潮濕水氣。這是正常現象,因為水 質軟化器必須保持潮濕才能確保發揮效用。 注意: 水質軟化器內部可能會在浸濕時改變顏色。這是正常現象。 6 將生水箱放在淨水箱上。 請務必確定水質軟化器 (限 WP3864) 及長效濾芯已裝入生水箱。 將生水箱上的頂蓋打開。...
- Page 34 繁體中文 注意: 在您拆開產品包裝時,鐵鏽與沉澱前層濾芯、其鎖和其固定 座已經附於頂蓋上。 沖洗產品 在淨水器內的鍋爐完全充滿水之前 (亦即您看到水儲存於淨水箱內 時),請勿使用背面的電源按鈕開啟淨水器電源。 按下開蓋區,打開頂蓋。 顯示器會亮起。 使用大水壺將生水箱完全裝滿。 生水箱的容量為 7 公升。 注意: 生水箱的最高容量刻度線位於鐵鏽與沉澱前層濾芯固定座 上。 蓋上蓋子。 水會先流入淨水器的鍋爐內。鍋爐裝滿水後,水會開始儲存到 淨水箱。 注意: 打開兒童鎖,按壓熱水桿,讓來自鍋爐的空氣散出。 請您稍微等候,直到水儲存於淨水箱後,才能繼續下一個步驟。 將電源插頭接上接地電源插座 (1) 然後按下產品背部的開/關按 鈕 (2) 開啟產品。 綠色電源指示燈以及紅色加熱指示燈會亮起,代表鍋爐內的水正 在加熱。 6 請等到紅色的加熱燈熄滅,才能繼續下一個步驟。 在出水口下方放一個大型容器 (例如水桶)。...
- Page 35 繁體中文 8 壓下熱水桿及溫水桿,讓淨水箱及鍋爐中的所有水流入容器中。 小心,水溫很高。 注意: 打開兒童鎖,按壓熱水桿,讓來自鍋爐的空氣散出。 將這些過濾水倒掉。 使用此產品 按下開蓋區,打開頂蓋。 顯示器會亮起。 使用大水壺將生水箱裝滿。 注意: 生水箱的最高容量刻度線位於鐵鏽與沉澱前層濾芯固定座 上。 注意: 計量器的計算基礎是假定您在水箱全空時加水,而且注入約 5 公升的水。 蓋上蓋子。 等水流入淨水箱。 起初,您並不會看到水注入淨水箱,因為過濾水會先注入給水裝置 的鍋爐中。 提供室溫水 將杯子或水壺放在溫水出水口下方。...
- Page 36 繁體中文 壓下溫水桿。 當杯子或水壺已裝入所需水量時,放開溫水桿。 持續水流鎖 若您想取得大量的水,可將溫水桿鎖定,這樣就不必一直壓著溫水 桿。 壓下溫水桿 (1) 然後將持續水流鎖向內壓 (2)。 產品會開始持續流出溫水。 若要鬆開持續水流鎖,請直接壓下溫水桿。 提供熱水 注意: 若您不使用熱水功能,請確定產品背面的開/關按鈕設定到關 閉位置 (O) 以節省電源。 將電源插頭接上接地電源插座,然後按下產品背部的開/關按 鈕,開啟產品。 注意: 只有當淨水箱儲存的水足夠時,您才可切換後方的開/關按 鈕。 紅色加熱指示燈及綠色電源指示燈會亮起。 當紅色加熱指示燈熄滅時,表示水已達到正確溫度,產品即已 準備好 4 杯 (一杯 200ml) 的熱水。綠色電源指示燈則會持續亮 起。 注意: 在您送出第一杯水之後,紅燈會再度亮起,此時產品中仍有 3 杯水量的熱水 (因為鍋爐容量大)。 將杯子或水壺放在熱水出水口下方。...
- Page 37 繁體中文 解除兒童鎖。若要解除兒童鎖,請將兒童鎖朝內推,同時壓下熱 水桿。 注意: 兒童鎖可防止幼兒倒出熱水,避免造成燙傷。 當杯子或水壺已裝入所需水量時,放開熱水桿。 純淨保護系統顯示器 濾芯容量指示 純淨保護系統顯示器會提供何時必須更換長效濾芯的訊息。 第一次使用長效濾芯時,顯示器會顯示進度列的全部 4 段。 純淨保護系統顯示器會記錄長效濾芯的使用量。已使用 25% 的 濾芯容量時,顯示器會顯示進度列中的 3 段。 已使用 50% 的濾芯容量時,顯示器會顯示進度列中的 2 段。 已使用 75% 的濾芯容量時,顯示器會顯示進度列中的 1 段。...
- Page 38 繁體中文 已使用 90% 的濾芯容量時,顯示器會顯示進度列中的 1 段以及 濾芯更換符號。此時請確認您擁有新的長效濾芯。您可決定以 新的長效濾芯取代舊的,並重設顯示器,即可避免濾芯容量到 達 0%。 注意: 若要重設純淨保護系統顯示器,請按住顯示啟動/重設按鈕 3 秒鐘。若顯示器重設成功,會閃爍 3 次。然後濾芯更換符號會消 失,再次顯示進度列中的所有區段。 濾芯容量到達 0% 時,會閃爍濾芯更換符號與兩個箭頭。發生 此狀況時,您必須立即更換長效濾芯。更換此濾芯之後,請重設 顯示器。 注意: 若要重設純淨保護系統顯示器,請按住顯示啟動/重設按鈕 3 秒鐘。若顯示器重設成功,會閃爍 3 次。然後濾芯更換符號會消 失,再次顯示進度列中的所有區段。 純淨保護系統顯示器的運作方式 純淨保護系統顯示器配備計量器,計算您過濾的水量。計量器的計 算基礎是假定您在水箱全空時加水,而且注入約 5 公升的水。計量 器為提供額外的健康保護,也會計算長效濾芯的已使用天數。進度 列的長度會隨著時間增加而變短。開始使用 163 天之後,會顯示濾 芯更換符號。濾芯使用總計達 182 天時*,會顯示兩個閃爍的箭頭。 * 依據 4 人家庭、每日用水量 4 至 6 公升計算。長效濾芯可使用達 6 個月,最大壽命...
- Page 39 繁體中文 純淨保護系統顯示器的電池快用完時,顯示器上的電池符號會 閃爍。 顯示器上顯示電池符號時,您必須使用新的 3 伏特 CR2032 鋰 電池更換舊電池。請參閱「更換」單元中的「更換純淨保護系統 顯示器的電池」章節。 清潔與維護 只有產品外部,以及鐵鏽與沉澱前層濾芯可以使用熱水清洗。長效 濾芯不能清洗,必須更換 (請參閱「更換」單元)。水質軟化器 (限 WP3864) 不能清洗,但是可以再生 (請參閱本單元的「將水質軟化 器再生 (限 WP3864)」小節),並且最終必須更換。 請勿使用鋼絲絨、清潔劑、有研磨成分的洗潔劑或稀釋劑、酒精、 汽油或丙酮類的侵蝕性液體清洗淨水器外部。這些物質可能會使淨 水器的材質產生裂痕、褪色或變形。請勿將淨水器的任何組件 (滴盤 蓋除外) 放入洗碗機或以滾水清洗。 請勿使用廚房海綿或抹布來清潔或擦乾水箱內側,因為這些物品可 能含有細菌。若要以衛生的方式清潔水箱,請遵循下列清潔指示。 請勿將頂蓋浸入水或其他液體中,以免損壞純淨保護系統。 清潔產品外部 按下產品背部的開/關按鈕將產品關閉 (1) 並將電源插頭從接地 電源插座拔下 (2)。 用濕布擦拭產品外部表面。 將滴盤自產品拉出。...
- Page 40 繁體中文 將手指穿過滴盤邊緣的孔,將滴盤蓋自固定釘推開。然後握住滴 盤蓋的後端將其舉起,從滴盤上取下。 將滴盤中的液體清空倒進水槽。 6 將滴盤蓋放回滴盤上,然後將滴盤推回產品內。 從給水裝置的位置將出水口轉下。 8 將出水口上下顛倒放置,並在水龍頭下以清水沖洗出水口內的銀 質濾網。 注意: 為確保過濾水能順利流出,有必要定期清洗銀質濾網。 將出水口轉回給水裝置上。 清潔鐵鏽與沉澱前層濾芯 每 2 週應清潔一次鐵鏽與沉澱前層濾芯。 您可以在配件包中找到 1 個備用的鐵鏽與沉澱前層濾芯。 按下開蓋區,打開頂蓋。...
- Page 41 繁體中文 將固定座從頂蓋取出。 將鎖從固定座中取出。 將鐵鏽與沉澱前層濾芯自固定座取下,並以熱水沖洗。 將鐵鏽與沉澱前層濾芯放回固定座。 6 將鎖放回固定座 (會聽見「喀噠」一聲)。...
- Page 42 繁體中文 將固定座放回頂蓋中。 產品內部清潔與除垢的快速簡單清潔程序 每 3 個月必須使用本章節所描述的快速簡單清潔程序來清潔產品內 部及除垢。 請確認淨水箱內有大約 4 公升的淨水 (水位稍微高於圖中所示黑 線)。 如果產品電源沒有開啟,請開啟電源,並等待紅色的加熱燈熄 滅。 注意: 請確定生水箱是空的。 將滴盤和滴盤蓋從產品上取下。 將鐵鏽與沉澱前層濾芯固定座自頂蓋取出,然後取下頂蓋。 限 WP3864:將水質軟化器自生水箱取出。 6 提起生水箱。若要取下長效濾芯,將濾芯向左旋轉 (1) 然後自生 水箱拉出 (2)。...
- Page 43 繁體中文 將一整包產品隨附的專用清潔劑倒入容器內。 8 使用熱水桿將 1 公升的熱水注入一容器內。 注意: 若清潔劑沒有自行完全溶解,請攪拌到清潔劑完全溶解為 止。 在您繼續之前,請檢查是否已取出所有濾芯。 取出生水箱。 請確定生水箱的底部未接觸到骯髒的表面。若要放下生水箱,請上 下顛倒放置。 提示: 您可使用清水和溫和清潔劑來清洗生水箱。清洗之後,請以 乾淨的沸水徹底清洗生水箱。 將清潔溶液倒入淨水箱中。 清洗溶液流入給水裝置內的鍋爐中。 清洗溶液可以清潔淨水箱及給水裝置內部並去除水垢。 在出水口下方放一個大型容器 (例如水桶)。壓下熱水桿直到流出 約 1 公升的水。接著壓下溫水桿,直到流出約 1 公升的水。最 後,等到紅色加熱指示燈熄滅後,將熱溫水桿同時壓下讓所有剩 餘的溶液流出。 為確保兩個出水口都清洗過,請務必同時利用兩個壓桿讓水流出。 使用完畢後,請將產品關閉,並將插頭從牆上插座拔下。...
- Page 44 繁體中文 取出淨水箱,將給水裝置側放,再將底部的導流塞拉開。 請注意,當您取下導流塞時,可能會有熱水從開口流出。 注意: 給水裝置頂端可能會滴水。 將給水裝置放在水桶上,或水槽上方。 1 6 壓下熱水桿,讓所有的水經由排水孔和熱水出水口流出。 現在所有的水都已經自鍋爐流出。 將導流塞裝回給水裝置的底部。 注意: 請確定導流塞安裝正確,否則將無法重新裝上滴盤而造成漏 水。 1 8 以熱水清洗鐵鏽與沉澱前層濾芯、生水箱及淨水箱。 注意: 若您想要清洗給水裝置的頂部,請勿接觸中央的孔洞,該孔 會與過濾水接觸。 以濕布擦拭頂蓋。 請勿將頂蓋浸泡在水中。 將淨水箱放在給水裝置上方。將水質軟化器 (限 WP3864) 放入 生水箱,並將長效濾芯裝進生水箱。接著,將生水箱及其濾芯放 回淨水箱上。將頂蓋及鐵鏽與沉澱前層濾芯放回生水箱上。 在生水箱中裝水,並讓水流入給水裝置內的淨水箱與鍋爐。 將從室溫水和熱水出水口流出的前段一公升過濾水倒掉,以免喝 到殘留的輕微異味。 注意: 打開兒童鎖,按壓熱水桿,讓來自鍋爐的空氣散出。...
- Page 45 繁體中文 將水質軟化器再生 (限 WP3864) 水質軟化器必須定期再生。依據您居住地區的水質硬度,飛利浦建 議下列再生間隔: 第一次 第一次之後 北京、瀋陽、天津 4 週 2 週 武漢、南京、重慶、上海、成 8 週 4 週 都、廣州、杭州 青島、深圳 12 週 6 週 其他省份 8 週 4 週 水質軟化器必須每 6 個月更換一次,請參閱「更換」單元。 請確定生水箱是空的。 取下頂蓋。 將水質軟化器自生水箱取出。 拿一個可以放入水質軟化器的大型碗盆。以清水沖洗該碗盆以確 保碗盆清潔。先不要將水質軟化器放入碗盆。 在碗盆中裝入溫水。在碗盆中,每裝入一公升的水,就加入 100 公克食鹽。攪拌溶液,直到所有食鹽都溶解。 若您使用中式湯匙,每公升的水需加入 6 湯匙鹽。...
- Page 46 繁體中文 6 將水質軟化器放入有水/鹽溶液的碗盆中,至少放置 1 小時。請 確定整個水質軟化器都浸泡在溶液中。 注意: 最短浸泡時間是 1 小時。您也可以讓水質軟化器泡更久一 點。 將水質軟化器自碗盆取出。將水/鹽溶液倒掉,然後清洗碗盆。 8 再將碗盆裝入至少一公升的溫水,將水質軟化器放在碗盆中 5 分鐘。請確定整個水質軟化器都浸泡在水中。 取出水質軟化器,並將水質軟化器放回生水箱。 將頂蓋裝回產品上。 收納 若您想收納產品,必須將產品內所有的水清空,包括鍋爐內的水。 請遵循下述程序以完成這項工作。 關閉產品電源並拔掉插頭。...
- Page 47 繁體中文 將生水箱及淨水箱自產品取下。 將給水裝置側放,並拉開底部的導流塞。 請注意,當您取下導流塞時,可能會有熱水從開口流出。 注意: 給水裝置頂端可能會滴水。 將給水裝置放在水桶上,或水槽上方。 壓下熱水桿,讓所有的水經由排水孔和熱水出水口流出。 現在所有的水都已經自鍋爐流出。 6 將導流塞裝回給水裝置的底部。 注意: 請確定導流塞安裝正確,否則將無法重新裝上滴盤而造成漏 水。 將產品重新組裝,並收納在安全、乾燥的空間。 收納長效濾芯和鐵鏽與沉澱前層濾芯 已開封的長效濾芯及鐵鏽與沉澱前層濾芯無法收納。若您有一段時 間不打算使用這些濾芯,請丟棄。...
- Page 48 繁體中文 收納水質軟化器 (限 WP3864) 若您想將水質軟化器收納在產品以外的地方,您必須將水質軟化器 放入裝滿水的碗盆中。請確定整個水質軟化器完全浸在水裡。 請勿讓水質軟化器乾掉。 更換 更換濾芯 水質軟化器必須每 6 個月更換一次。新的水質軟化器可向飛利 浦經銷商或飛利浦授權服務中心購買,型號為 WP3963。 長效濾芯必須每 6 個月或每過濾 1000 公升的水後更換一次。當 濾芯需要更換時,純淨保護系統顯示器會顯示濾芯更換符號。新 的長效濾芯可向飛利浦經銷商或飛利浦授權服務中心購買,型號 為 WP3962。 當鐵鏽與沉澱前層濾芯無法清潔妥當時,請更換前層濾芯。產品 有隨附一個額外的鐵鏽與沈澱物前層濾芯。 更換濾芯時,僅能使用飛利浦原廠濾芯。 如需更多資訊,請瀏覽我們的網站:www.philips.com/aqua,或聯 絡您當地的飛利浦客戶服務中心 (中國服務專線:4008 800 008)。 更換純淨保護系統顯示器電池 電池在正常使用狀況下能維持 2 年。 當顯示器上閃爍電池符號時,請更換電池。 使用硬幣拆下頂蓋內側的電池槽蓋。 自電池槽取出非充電式電池。 在電池槽中裝入新的 3 伏特 CR2032 鋰電池。 將外蓋放回電池槽,並用硬幣旋緊。 環境保護 本產品使用壽命結束時請勿與一般家庭廢棄物一併丟棄。請將該...
- Page 49 繁體中文 保固與服務 飛利浦優質生活事業部提供您購買後 2 年保固。如需詳細保固條 件,請參閱盒內隨附的個別保證書。如果您有關於產品的問題,您 也可至 www.philips.com/aqua,向我們的線上支援諮詢,或撥打飛 利浦客戶服務專線 (電話號碼 4008 800 008)。我們以最大努力進行 高品質產品的設計、開發與測試。但若您的產品不幸必須維修,請 撥打飛利浦客戶服務專線,預約到府維修。在維修期間,我們的服 務技術人員會確保維持衛生,且確保在維修之後,飛利浦淨水器將 給您可信賴的純淨安全飲用水。 故障排除 本章概述使用本淨水器最常遇到的問題。詳情請參閱相關章節之說 明。如果問題無法解決,請與您所在國家的飛利浦消費者服務中心 聯繫。 問題 原因 解決方法 我沒看到任何水 為延長長效濾芯的使 請確定長效濾芯內的孔是通的。如果孔塞住了,請 從長效濾芯中流 用壽命,濾芯內的孔 使用牙籤戳開。 出。 很小。而濾芯的孔可 能塞住了。 顯示器上閃爍著 您已使用長效濾芯過 請更換長效濾芯。在您更換好長效濾芯後,請按住 濾芯更換符號。 濾超過 1000 公升的...
- Page 50 繁體中文 問題 原因 解決方法 水從產品漏出。 產品內注入太多水。 裝入生水箱的水量請勿超過鐵鏽與沉澱前層濾芯固 定座的最高容量刻度線。 您未將導流塞正確裝 將導流塞正確裝回給水裝置底部 (請參閱「收納」 入給水裝置的底部。 單元)。 我無法打開蓋 您試圖拉起而非按 按下開蓋區,打開蓋子。 子。 下。 出水口流出過濾 出水口內的濾網堵 清洗出水口內的濾網。請參閱「清潔與維護」單元 水的水量減少。 塞。 內的「產品外部」章節。 長效濾芯流出過 濾芯發生阻塞,可能 請更換長效濾芯。在您更換好長效濾芯後,請按住 濾水的水量減 即將到達使用壽命。 顯示啟動/重設按鈕 3 秒以重設進度列。濾芯更換符 少。 號會在顯示器閃爍 3 次後消失,顯示器會再度顯示 進度列的全部 4 段。 我看到黑色微粒 長效濾芯的些許碳微...
- Page 51 繁體中文 問題 原因 解決方法 我不知道去哪裡 一般來說,您購買淨水器的商店,或是出售飛利浦 買替換濾芯 淨水器的各大零售中心,都可以買到替換濾芯。鐵 鏽與沉澱前層濾芯不能單獨購買。淨水器套組中會 隨附一組額外的鐵鏽與沉澱前層濾芯。濾芯使用壽 命到期後,您可以重新購買長效濾芯,每個長效濾 芯都隨附 2 組鐵鏽與沉澱前層濾芯。您可以打電話 詢問貴國的客戶服務中心,查詢您住家附近出售替 換濾芯的商店。長效濾芯的型號為 WP3962。水質 軟化器的型號為 WP 3963。 重新設定鍋爐 關閉 (1) 並拔除產品插頭 (2)。 將生水箱裝滿。確定淨水箱內至少有 4 升的水可使用。 壓下熱水桿,以送出少許熱水。 接著請等待至少 5 分鐘 (未給水的狀態下)。 再度將電源插頭插入接地的電源插座。再按一下開/關按鈕,重 新開啟產品電源。...
- Page 52 支持,请在 www.philips.com/welcome 上注册您的产品。 飞利浦 PureGuard 净水桶配备有独特的 Multiguard 多重净化控制 系统,可减少细菌、氯和异味,以确保您能饮用到纯净可口的水。 可水洗的铁锈及沉淀物预过滤网可防止灰尘和昆虫进入系统。水通 过长效滤芯流入干净的水箱。长效滤芯内部,采用日本 HF 中空纤 维微孔过滤膜,可去除 99.9999%* 的细菌和 99.95%** 以上的胞 囊;同时活性碳则可降低多种可能有致癌*** 风险的工业污染物、杀 虫剂和挥发性有机物 (VOC)。长效滤芯可连续过滤多达 1000 升水 (大约 6 个月****),期间不需要任何清洗和保养。 仅限于 WP3864:水质软化器使用离子交换 (IEX) 技术来降低水的 硬度,给水带来更纯正的口感***。定期翻新可令此滤芯持续使用长 达 6 个月。 水箱顶部前端的纯净保护系统显示屏清楚显示了滤芯的使用寿命。 当滤芯使用寿命快满并需要更换时,先进电子部件将自动向您发出 警示。 净水器配备污染屏闭系统,有效防止二次污染。出水管中的银滤网 可在您放出过滤水之前,为您提供最后一道安全保障。 通过快速简单的清洁方法,您可以轻松达致所有难以触及的区域,...
- Page 53 简体中文 R 带银滤网的热水出水管 s 带银滤网的常温水出水管 T 饮水机 U 水盘盖 V 水盘 W 带插头的电源线 X 通风栅格 Y 电源按钮 Z 水质软化器(仅限于 WP3864) 带有可分离式盖板的电池仓(可装入一节 3 伏 CR2032 锂电 池) 注意事项 使用本产品之前,请仔细阅读本使用说明书,并妥善保管以备日后 参考。 危险 不要将本产品浸入水或其它液体中,也不要在水龙头下冲洗。 警告 在将产品连接电源之前,请检查净水器底部标示的电压是否与当 地的电源电压相符。 如果插头、电源线或产品本身受损,请勿使用本产品。 如果电源软线损坏,为了避免危险,必须由制造商、其维修部或 类似部门的专业人员来更换。 本产品不打算由肢体不健全、感觉或精神上有障碍或缺乏相关经 验和知识的人(包括儿童)使用,除非有负责他们安全的人对他 们使用本产品进行监督或指导。...
- Page 54 简体中文 请按照本用户手册中的说明更换滤芯。请参阅“更换”一章。 如果 2 天或以上没有使用净水机,请完全倒空净水箱,并倒掉 这些过滤水。 切勿在本产品上放置任何物品。 除了“清洁和保养”一章中提及的清洁剂之外,不得使用任何其 它化学品来清洗净水箱的内部和原水箱的外部。 只能用洗碗机或开水清洗水盘盖。切勿用洗碗机或开水清洗任何 其它部件。 不要随意改动净水机。 在向原水箱注水完毕之前,请勿使用产品背面的电源按钮启动 产品。 为防止损坏,请让发热物体远离净水机。 当净水箱中有水时,请勿将其提起或取出。否则,水箱中的水会 全部流出。 产品只能送到由飞利浦授权的维修中心检修。不要自己修理产 品,否则产品维修保证书将会无效。 飞利浦强烈建议您每隔 3 个月清洁一次本产品。如果未及时按 照“清洁和保养”一章中所述的步骤清洁产品,则可能导致技 术故障。 切勿使用基于矿物酸的除垢剂,如硫酸、盐酸、氨基磺酸和醋酸 (例如,醋)。这些除垢剂会对净水机造成损坏。 降低包囊的认证系统可用于可能包含可过滤胞囊的经消毒处理 的水。 卫生 这款飞利浦净水机将为您提供洁净安全、可以信赖的饮用水。不 过,如果在使用净水机时不注意卫生,则可能会给饮水者带来患病 风险,因其可能会对过滤水造成微生物污染。 在清洁水箱之前,必须先将双手洗净。 在清洁或触摸与未过滤水或过滤水相接触的表面(如净水箱内部 和原水箱注水口)时,请务必注意保持卫生。 不要使用抹布或海绵来清洁或擦干原水箱和净水箱内部,因其 可能含有细菌。要以卫生的方式清洁水箱,请遵循“清洁和保 养”一章中的清洁说明。 请务必使用洁净、消过毒的抹布和清洁设备来清洁净水箱的内部 和原水箱的外部。 请务必通过蒸煮方式或消毒剂对抹布和清洁设备进行消毒。建议...
- Page 55 简体中文 插入纯净保护系统显示屏电池 用硬币打开上盖内部的电池仓盖。 将随附的 3 伏 CR2032 锂电池装入电池仓。您可在附件袋中找 到该电池。 CR2032 注意: 纯净保护系统显示屏由该电池供电,而不是由主电源供电。 3 将电池仓盖放回电池仓并用硬币将其拧紧。 安装 一定要在稳固、平整且水平的表面上放置和使用本产品。 将净水水箱置于出水装置上方。 3 取下长效滤芯的保护盖。 注意: 小心不要撕掉长效滤芯的密封环。 注意: 长效滤芯中可能会释放出一些碳颗粒并且会出现在原水箱 中。这是正常现象,不会造成任何健康危险。您只需清洁原水箱, 将碳微粒清除即可。 将长效滤芯的顶部插入原水箱的底部 (1),然后向右转动将其固 定 (2)。 仅限于 WP3864:将水质软化器推进原水水箱内(可听到“咔 哒”一声)。 注意: 水质软化器在打开包装时是湿的。这是正常现象,因为水质 软化器必须保湿,才能确保其有效性。 注意: 水质软化器变湿时,内部会发生颜色变化。这是正常现象。 6 将原水箱放置在净水箱的上面。 请务必确保水质软化器(仅限于 WP3864)和长效滤芯已安装至原 水水箱。...
- Page 56 简体中文 将上盖盖在原水箱上。 注意: 铁锈和沉淀物预过滤网、锁装置及其滤芯架在您打开产品包 装时已放在上盖上。 冲洗产品 在饮水机内的加热器完全装满水之前,即除非见到净水水箱中有 水,否则请勿打开背面的通电按钮。 按盖子打开区,打开上盖的盖子。 显示屏将亮起。 使用大水壶将原水箱注满。 原水箱容量为 7 升。 注意: 原水箱的最大水位标示线位于铁锈和沉淀物预过滤网架上。 3 合上盖子。 水会先流入饮水机内的加热器。当加热器装满水时,水才会流水 净水水箱。 注意: 偶尔解除儿童锁并按热水控制杆,使加热器中的空气排出。 请先等到净水水箱中装有了水,再继续下一个步骤。 将电源插头插入接地的电源插座 (1) 并按下产品背面的开/关按 钮 (2) 以启动本产品。...
- Page 57 简体中文 如果绿色通电指示灯和红色加热指示灯亮起,则表明加热器中的 水正在加热。 6 请先等到红色的加热指示灯熄灭,再继续下一个步骤。 将大型容器(例如水桶)放置在出水管下面。 8 按下热水控制杆和常温水控制杆,让净水水箱和加热器中的水全 部流入容器中。 小心热水。 注意: 偶尔解除儿童锁并按热水控制杆,使加热器中的空气排出。 倒掉已过滤的水。 使用本产品 按盖子打开区,打开上盖的盖子。 显示屏将亮起。 使用大水壶向原水箱注水。 注意: 原水箱的最大水位标示线位于铁锈和沉淀物预过滤网架上。 注意: 计数器计算的依据为假定向全空水箱注入约 5 升水为准。 3 合上盖子。 等到水全部流入净水箱中。 起初将不会看到净水箱在注水,因为过滤水要先注入饮水机内的加 热器。 放出常温水 将杯子或瓶子置于常温水出水管下面。...
- Page 58 简体中文 按下常温水控制杆。 3 当杯中或瓶中的水达到所需水量时,释放常温水控制杆。 持续出水锁定 如果想倒出大量的水,可锁定常温水控制杆(而不必持续按压)。 按下常温水控制杆 (1),然后向内侧按下持续出水锁 (2)。 此时,产品就会持续倒出常温水。 要释放持续出水锁,只需按下常温水控制杆即可。 倒出热水 注意: 如果不使用热水功能,请确保将产品背面的开/关按钮设在关 闭位置 (O) 以节约电能。 将电源插头插入接地的电源插座,并按下产品背面的开/关按钮 以启动本产品。 注意: 当净水箱内储存有足够水时,您只可以使用背面的开/关按 钮。 红色加热指示灯和绿色电源指示灯将亮起。 红色加热指示灯熄灭,即表示水达到了适当的温度,可获得 4 杯(每杯 200 毫升)热水。绿色电源指示灯始终点亮。 注意: 当红色指示灯在您倒出第一杯水后重新亮起时,您仍可获 得 3 杯热水(因为加热器的容量足够大)。 将杯子或瓶子置于热水出水管下面。...
- Page 59 简体中文 3 解开儿童锁。将儿童锁向内侧推,同时按下热水控制杆,即可解 锁。 注意: 儿童锁可防止幼儿倒出热水,以免幼儿烫伤。 当杯子或瓶子中的水达到所需水量时,请释放热水控制杆。 纯净保护系统显示屏 滤芯容量指示 纯净保护系统显示屏会在长效滤芯需要更换时提供反馈。 首次使用长效滤芯时,显示屏会显示全部 4 格进度栏。 纯净保护系统显示屏会记录长效滤芯的使用情况。当滤芯容量使 用了 25% 时,显示屏显示 3 格进度栏。 当滤芯容量使用了 50% 时,显示屏显示 2 格进度栏。 当滤芯容量使用了 75% 时,显示屏显示 1 格进度栏。...
- Page 60 简体中文 当滤芯容量使用了 90% 时,显示屏显示 1 格进度栏和滤芯更换 图标。确保您在这个时候准备了新的长效滤芯以供更换。如果需 要,您可以用新的长效滤芯进行更换,并重置显示屏,从而使滤 芯容量不致于变成 0%。 注意: 要重置纯净保护系统显示屏,请按住显示屏激活/重置按钮 3 秒钟。显示屏重置成功后会闪烁 3 次。随后滤芯更换图标消失,显 示屏重新显示进度栏的全部格子。 当滤芯容量变成 0% 时,显示屏显示滤芯更换图标,并有两个箭 头在显示屏上闪烁。发生这种情况时,必须立即更换长效滤芯。 更换此滤芯后,重置显示屏。 注意: 要重置纯净保护系统显示屏,请按住显示屏激活/重置按钮 3 秒钟。显示屏重置成功后会闪烁 3 次。随后滤芯更换图标消失,显 示屏重新显示进度栏的全部格子。 纯净保护系统显示屏的工作方式 纯净保护系统显示屏配备了用于计算过滤了多少水的计数器。计数 器计算的依据为假定向全空水箱注入约 5 升水为准。为了提供额 外的健康保障,计数器还会计算长效滤芯已经使用的天数。随着时 间的过去,进度栏长度会减少。滤芯更换符号会在第一天使用后第 163 天出现。当滤芯总共使用 182 天后,显示屏上将会显示两个箭 头*。 *计算依据为一个 4 口之家一天用水 4-6 升。长效滤芯可持续使用长 达 6 个月,约合最大使用寿命 1000 升。 为了节能,纯净保护系统显示屏会在您合盖...
- Page 61 简体中文 当纯净保护系统显示屏电池快要耗尽时,电池符号会在显示屏 上闪烁。 当显示屏闪烁电池符号时,必须用新的 3 伏 CR2032 锂电池更 换旧的电池。请参阅“更换”一章中“更换纯净保护系统显示屏 的电池”部分。 清洁和保养 只可使用热水对本产品外部和沉淀物预过滤网进行清洁。长效滤芯 不能清洁,只可更换(请参阅“更换”一章)。水质软化器(仅限 于 WP3864)不能清洁,只可翻新(请参阅本章中“翻新水质软化 器(仅限于 WP3864)”部分)并最终更换。 切勿使用钢丝绒、除垢剂、研磨性清洁剂或腐蚀性液体(例如稀释 剂、酒精、汽油或丙酮)来清洁净水器的外部。这些物质可能会致 使净水器的机身材料破裂、变色或变形。请勿用洗碗机或开水清洗 净水器的任何部件(水盘盖除外)。 不要使用抹布或海绵来清洁或擦干水箱内部,因其可能含有细菌。 要以卫生的方式清洁水箱,请按照以下清洁方法进行操作。 不要将上盖浸入水或其他液体中,以免损坏纯净保护系统系统。 清洁产品外表面 按下产品背面的开/关按钮关闭产品电源 (1),并从接地的插座上 拔下电源插头 (2)。 用湿布擦拭产品的外部。 3 将水盘从产品中拉出。...
- Page 62 简体中文 将手指放入水盘边缘的孔中,将水盘盖推离固定栓。然后抓住水 盘盖的背面,将其提离水盘。 将水盘中的水全部倒入水池。 6 将水盘盖盖回水盘上,将水盘滑入产品中。 拧下出水装置上的出水管。 8 将出水管倒置,在水龙头下冲洗出水管中的银滤网。 注意: 必须定期清洁银滤网,以确保过滤水正常流出。 将出水管拧回出水装置。 清洁铁锈和沉淀物预过滤网 每 2 周清洁一次铁锈和沉淀物预过滤网。 您可以在附件袋中找到 1 个备用铁锈和沉淀物预过滤网。 按盖子打开区,打开上盖的盖子。...
- Page 63 简体中文 从上盖中取出滤芯架。 3 从滤芯架取出锁装置。 从滤芯架卸下铁锈和沉淀物预过滤网,然后在热水下冲洗。 将铁锈和沉淀物预过滤网装回滤芯架。 6 将锁装置放回滤芯架(可听到“咔哒”一声)。...
- Page 64 简体中文 将滤芯架装回上盖。 按照快速简易的清洁步骤清洁和为产品内部除垢 每隔 3 个月,必须按照本节中所述的快速和简易清洁步骤对产品内 部进行一次彻底的清洁和除垢。 确保净水水箱中有大约 4 升(稍稍越过如图所示黑线的水位) 净水。 如果产品没有通电,请打开产品电源,直到红色的加热指示灯熄 灭。 注意: 确保原水箱已倒空。 3 从产品取出水盘和水盘盖。 将铁锈和沉淀物预过滤网架从上盖中取出。然后卸下上盖。 仅限于 WP3864:将水质软化器从原水箱中取出。 6 提起原水箱。要取下长效滤芯,请将其向左转动 (1),从原水箱 中取出 (2)。...
- Page 65 简体中文 将一小袋产品随附的专用清洁剂全部倒入溶器中。 8 使用热水控制杆将 1 升热水倒入容器中。 注意: 如果清洁剂没有完全溶解,可不停地搅动水,直至所有清洁 剂溶解在水中。 继续之前,检查是否所有滤芯均已取出。 1 0 卸下原水水箱。 确保不要让原水箱底部与不洁表面相接触。如要放置原水箱,请将 其倒放。 提示: 您可以使用水和温和的清洁剂清洁原水水箱。清洁之后,用 干净的开水彻底冲洗原水水箱。 将清洁溶液倒入净水箱中。 清洁液流入饮水机内的加热器中。 清洁液可对净水水箱的部件和出水装置内部进行有效的清洁和 除垢。 将大容量的容器(例如水桶)放置在出水管下面。向下推热水控 制杆,直至倒出大约 1 升水量。然后向下推常温水控制杆,直 至倒出大约 1 升水量。最后,等到红色加热指示灯熄灭,向下 推两个控制杆,倒出剩余的溶液。 请务必使用两个控制杆来倒水,以确保两个出水管都得到清洁。 1 3 关闭产品电源并拔出电源插头。...
- Page 66 简体中文 取下净水水箱,将饮水机置于其一旁,然后拉出底部的排水塞。 注意,拔下排水塞后,出水口可能排出热水。 注意: 会有一些水滴在出水装置的上面。 将饮水机放在水桶或水槽上。 1 6 向下推热水控制杆,通过排水口和热水出水口将水全部倒出。 加热器中的水现已全部倒出。 将排水塞塞回出水装置的底部。 注意: 请确保正确插入排水塞,否则,便不能重新安装水盘,从而 造成溢漏。 1 8 用热水清洗铁锈和沉淀物预过滤网、原水水箱和净水水箱。 注意: 如要清洁出水装置的顶部,请不要触摸中央位置的孔(因为 该孔要与过滤水相接触)。 用湿布擦拭上盖。 切勿将上盖浸入水中。 2 0 将净水水箱置于饮水机的上面。将水质软化器(仅限于 WP3864)放入原水水箱中,并将长效滤芯安装至原水水箱。然 后将带滤芯的原水水箱放回至净水水箱上。将带铁锈和沉淀物预 过滤网的上盖装回原水水箱。 给原水水箱注水,待水流入净水水箱和饮水机内部的加热器。 从常温水和热水出水口放掉第一升过滤水,消除可能残留的异 味。 注意: 偶尔解除儿童锁并按热水控制杆,使加热器中的空气排出。...
- Page 67 简体中文 翻新水质软化器(仅限于 WP3864) 水质软化器需要定期翻新。根据您的居住地的水质硬度,飞利浦建 议您按照以下间隔执行翻新操作: 首次使用时 首次使用之后 北京、沈阳、天津 4 周 2 周 武汉、南京、重庆、上海、成 8 周 4 周 都、广州、杭州 青岛、深圳 12 周 6 周 其它省市 8 周 4 周 必须每 6 个月更换一次水质软化器,请参阅“更换”一章。 确保原水箱已倒空。 取下上盖。 3 将水质软化器从原水箱中取出。 拿一个大碗放置水质软化器。冲洗此碗,确保其干净。冲洗时请 勿将水质软化器留在碗里。 在碗中注入常温水。根据水量,以每升水中加入 100 克食盐的 比例进行溶液配比。搅动盐水溶液,直到所有盐均已溶解在水 中。 如果使用中式汤匙,则每升水中需加入 6 汤匙食盐。...
- Page 68 简体中文 6 将水质软化器放进装有盐水溶液的碗里至少 1 小时。确保水质 软化器完全浸在水里。 注意: 最短浸泡时间为 1 小时。当然,可将水质软化器浸泡更长时 间。 将水质软化器从碗中取出。倒掉盐水溶液并冲洗碗里。 8 在碗中重新注入至少一升的新鲜常温水,将水质软化器浸入碗中 5 分钟。确保水质软化器完全浸入水中。 取出水质软化器,将其重新装到原水箱中。 1 0 将上盖重新安装在产品上。 存储 如要存放产品,请将里面的水全部倒空(包括加热器中的水)。为 此,请遵循以下步骤。 关闭产品电源并拔出电源插头。...
- Page 69 简体中文 从产品中卸下原水水箱和净水水箱。 3 将出水装置侧放,并拔出底部的排水塞。 注意,拔下排水塞后,出水口可能排出热水。 注意: 会有一些水滴在出水装置的上面。 将饮水机放在水桶或水槽上。 向下推热水控制杆,通过排水口和热水出水口将水全部倒出。 加热器中的水现已全部倒出。 6 将排水塞塞回出水装置的底部。 注意: 请确保正确插入排水塞,否则,便不能重新安装水盘,从而 造成溢漏。 重新组装产品,将其存放在安全、干燥的地方。 存放长效滤芯以及铁锈和沉淀物预过滤网 不能存储已开封的长效滤芯或铁锈和沉淀物预过滤网。如果打算在 相当长一段时间内不使用滤芯,请将其丢弃。...
- Page 70 简体中文 存放水质软化器(仅限于 WP3864) 如果您想在产品以外存放水质软化器,您必须将它放在一个装满水 的碗中。确保水质软化器完全浸在水中。 不要让水质软化器干掉。 更换 更换滤芯 必须每隔 6 个月更换一次水质软化器。新的水质软化器可从飞 利浦经销商处或经授权的飞利浦服务中心获得,其供应型号为 WP3963。 必须每隔 6 个月更换一次长效滤芯,或在过滤 1000 升水后进行 更换。当必须更换此滤芯时,纯净保护系统显示屏会显示滤芯更 换符号。新的长效滤芯可从飞利浦经销商或经授权的飞利浦服务 中心获得,其供应型号为 WP3962。 当您不能再正常清洁铁锈和沉淀物滤芯时,请进行更换。产品随 附一个额外的铁锈和沉淀物滤芯。 仅可使用原装飞利浦滤芯进行更换。 有关更多信息,请访问我们的网站 www.philips.com/aqua,或与 您所在国家/地区的飞利浦客户服务中心联系(中国地区热线电话: 4008 800 008)。 更换纯净保护系统显示屏电池 在正常使用条件下,电池可使用 2 年。 当电池符号在显示屏上闪烁时,请更换电池。 用硬币打开上盖内部的电池仓盖。 从电池仓中取出一次性电池。 3 将新的 3 伏 CR2032 锂电池放入电池仓中。 将电池仓盖放回电池仓并用硬币将其拧紧。 环保...
- Page 71 简体中文 保修与服务 飞利浦优质生活部门为其产品提供自购买之日起两年保修。有关详 细的保修条件,请参阅包装盒内的单独保修卡。如果您对产品有任 何疑问,您可以在 www.philips.com/aqua 上咨询我们的在线支持或 致电飞利浦客户服务热线(电话号码 4008 800 008)。我们已尽最 大努力设计、开发和测试本款优质产品。但是,如果您的产品需要 维修,请致电飞利浦客户服务热线预约上门维修服务。我们的维修 技术员将确保在维修期间保持卫生,维修后,飞利浦净水机将为您 提供值得信任的安全饮用水。 故障种类和处理方法 本章归纳了您在使用净水机时最常遇到的问题。如果这仍不能帮助 您解决问题,请与您所在地的飞利浦顾客服务中心联系。 问题 原因 解决方法 我没有看到长效 长效滤芯的孔很小, 确保长效滤芯中的孔是通畅的。如果该孔已堵塞, 滤芯中有水出 这是为了增加滤芯的 请使用牙签将其疏通。 来。 使用寿命。该孔可能 被堵塞了。 显示屏上的滤芯 您已使用长效滤芯过 更换长效滤芯。更换长效滤芯后,按住显示屏激 更换符号开始闪 滤了超过 1000 升水 活/重置按钮 3 秒钟以重置进度条。显示屏闪烁 3 烁。...
- Page 72 简体中文 问题 原因 解决方法 产品漏水。 产品中盛放了过多的 不要让原水水箱中的水超过铁锈和沉淀物预过滤网 水。 架中的最大水位标示线。 您未将排水塞正确插 将排水塞正确插回饮水机的底部(请参阅“存 入饮水机的底部。 储”一章)。 无法开启上盖的 您尝试的是拉动,而 按盖子打开区,打开盖子。 盖子。 不是按压盖子。 出水管中流出的 出水管中的滤网被堵 清洁出水管中的。请参阅“清洁和保养”一章中 过滤水量变小。 塞了。 的“产品的外部”一节。 长效滤芯中流出 滤芯已被堵塞,因为 更换长效滤芯。更换长效滤芯后,按住显示屏激 的过滤水量变 它已基本达到寿命极 活/重置按钮 3 秒钟以重置进度条。显示屏闪烁 3 小。 限。 次。随后滤芯更换符号消失,并且进度条重新显示 全部 4 格进度条。 我发现原水箱上 长效滤芯中可能会释...
- Page 73 简体中文 问题 原因 解决方法 我不知道在哪里 您可以在销售净水机的商店或飞利浦净水机的主要 购买替换滤芯 零售点购买替换滤芯。铁锈和沉淀物预过滤网不另 售,净水机的包装中另外随附一个铁锈和沉淀物预 过滤网。用完此滤芯后,您可以用购买的每个长效 滤芯都会配有的两个铁锈和沉淀物预过滤网进行 更换。您可以致电您所在国家/地区的客户服务中 心,寻找一个离您家不远的出售替换滤网的商店。 长效滤芯的供应型号是 WP3962。水质软化器的供 应型号是 WP3963。 重置加热器 关闭产品电源 (1) 并拔出电源插头 (2)。 向原水箱中注水。确保净水箱中至少装有 4 升水。 3 向下按热水控制杆并倒出少量的热水。 至少等待 5 分钟(不倒出热水)。 将电源插头再次插入接地的电源插座,然后按开/关按钮,再次 打开产品。...
- Page 74 简体中文...
- Page 75 简体中文...
- Page 78 4222.003.4040.3...
Need help?
Do you have a question about the WP3864 and is the answer not in the manual?
Questions and answers