Table of Contents
Advertisement
Advertisement
Table of Contents

Related Manuals for Franklin eBOOKMAN EBM-900


Summary of Contents for Franklin eBOOKMAN EBM-900
- Page 1 EBM-900/901/911 Electronic Publishers www.franklin.com/ebookman...
- Page 2 User’s Guide www.franklin.com/ebookman...
- Page 3 Disclaimer This is the eBookMan User’s Guide version 2.1. ® All displays pictured are simulated, are not intended to specify included applications or content, and are subject, along with all technical information and specifications, to change without notice.
-
Page 4: License Agreement
This license is effective until terminated. This license terminates immediately without notice from FRANKLIN if you fail to comply with any provision of this license. -
Page 5: Table Of Contents
Table of Contents Welcome! Support ...15 About Screen Illustrations ...15 Getting Started 1. Getting Started I. Install eBookMan ® Desktop Manager ...18 II. Install Batteries ...19 III. Connect eBookMan to a PC ...20 IV. Start the Desktop Manager ...21 V. Synchronize the OS and Applications ...22 VI. - Page 6 Managing Files in eBookMan ...81 6. Data Entry Handwriting ...85 Onscreen Keyboard ...91 7. Franklin Reader Opening and Closing eBooks ...96 Understanding Franklin Reader Features ...98 Using the Menus ...101 Setting Preferences ...103 Moving Around ...106 Searching within an eBook ...108 Using Bookmarks ...118 Using Help ...120...
- Page 7 8. Mobipocket Reader Opening and Closing Documents ...123 Understanding the Library ...125 Viewing a Document ...128 Using the Menus ...130 Changing the Settings ...131 Moving around within a Document ...132 Searching a Document ...133 Using Bookmarks ...134 Getting Help ...136 Exiting Mobipocket Reader ...137 9.
- Page 8 Using the Menus ...160 Synchronizing with Microsoft Exiting Address Book ...161 12. Date Book Adding Appointments ...164 Editing Appointments ...165 Understanding the Views ...172 Field Limits ...175 Using the Menus ...175 Synchronizing with Microsoft Exiting Date Book ...177 13. ToDo Book Adding Entries ...179 Editing Entries ...180 Field Limits ...183...
- Page 9 16. Calculate Understanding the Keys ...199 Using the Menu ...200 Making Calculations ...200 Using Calculator Memory ...201 Exiting Calculate ...201 A. Getting Updates Checking for Updates ...204 Updating the eBookMan Updating the eBookMan Software ...206 B. Serial Port Connection Serial cradle users ...207 Serial cable users ...208 C.
- Page 10 F. Legal Information Specifications ...231 FCC Notice ...231 Copyrights, Trademarks, Legal ...232 Limited Warranty, Disclaimer of Warranties and Limited Remedy ...233 Limited Warranty (outside U.S.) ...234 Index Table of Contents Index...
-
Page 11: Welcome
Congratulations on your purchase of eBookMan! eBookMan is a versatile, handheld computing device. Your package includes: • the eBookMan device with cover and stylus • a USB cable (ebm-900 only) or USB cradle (ebm-901 and ebm-911) • two AAA batteries (ebm-911 only) •... - Page 12 Franklin makes these core applications available from the Installation CD and with each OS download: The Franklin Reader application opens and navigates books for- matted as Franklin Universal Binary (*.fub) files. Use Franklin Reader to read Bibles, reference material, dictionaries, transla- tors and other books.
- Page 13 Content Applications Chapter 7: Franklin Reader - This chapter describes the Franklin Reader and shows you how to move around in books and use the Menu and Search options. Chapter 8: Mobipocket Reader - This chapter explains how to use MobiPocket Reader to view eBooks, eNews and eDocs and how to use the Mobi Web Companioin.
- Page 14 Appendix A. Getting Updates - Explains how to install the Desktop Manager and update eBookMan software from Franklin’s Web site. B. Serial Port Connection - Provides steps for connecting your eBookMan device to a PC using a serial port.
-
Page 15: About Screen Illustrations
Should you require further technical support in the United States or Canada, visit web site www.franklin.com/ebookman and follow the link to the support screen or call (609) 386-8997 between 9AM and 5PM EST Monday through Friday. - Page 17 ETTING TARTED eBookMan ® User’s Guide...
-
Page 18: Getting Started
Calibrate your eBookMan device. VII. Set the date and time on your eBookMan device. Desktop Manager from the Installation ® The Franklin eBookMan Setup screen appears. ® Desktop Manager on your PC. Desktop Manager ®... -
Page 19: Ii. Install Batteries
4. Follow the instructions on the screen to install the program. 5. Once installation is finished, click the Exit button to close the Franklin eBookMan Setup screen. You may be prompted to restart your computer. II. Install Batteries Your device requires two AAA batteries. -
Page 20: Iii. Connect Ebookman To A Pc
If you Connection” on do not have a USB port, a USB-to-serial connector can be pur- page 207. chased from www.franklin.com/ebookman/accessories.asp or your local retailer. Chapter 1. Getting Started Your eBookMan powers on, and the tour begins. Tap the introductory sentence in the language you want to view the tour. -
Page 21: Iv. Start The Desktop Manager
Plug your device into the cradle. Plug the USB connector into a USB port on your computer. USB port USB connector IV. Start the Desktop Manager 1. On your PC, double click the desktop shortcut or click Start|Programs|Franklin Electronic Publishers|eBookMan Desktop Manager. ® NT users. Device USB connector... -
Page 22: V. Synchronize The Os And Applications
Note: You can change the connection configuration at any time from the Desktop Manager. Click Setup | Connection..., and the 2. Click the arrow to display the list of connections. Connection 3. Select the port you want to highlight it. Configuration dia- log box appears. - Page 23 3. Click CD-ROM to retrieve files from the Installation CD. The following dialog box appears. 4. Click OK to unpack the OS and applications. The Desktop Manager connects to www.franklin.com and authenticates your eBookMan software. 5. Click Yes to send the OS and core applications to eBookMan.
- Page 24 Synchronizing will take approximately 4-6 minutes with a USB connection. When the process is complete, the following dialog box appears. 7. Click OK to end synchronization. 8. Disconnect your eBookMan device from your PC. What eBookMan is doing . . . During the synchronization process, you may encounter the fol- lowing graphics on the eBookMan touch-sensitive screen: eBookMan is communicating with your PC.
-
Page 25: Vi. Calibrate Your Ebookman
VI. Calibrate your eBookMan After synchronization, follow these steps. 1. Disconnect eBookMan from your PC. The calibration screen appears after a few seconds. The Calibration screen enables you to set reference points by which eBookMan determines the accuracy and precision of the touch-sensitive screen. -
Page 26: Vii. Set The Date And Time
VII. Set the Date and Time The OS and organizer applications use the date and time set- tings to operate properly. Setting the Date To set the date, follow these steps. 1. From My eBookMan Note: The date and time appear on the Status bar in the Launcher. -
Page 27: Registering Your Ebookman Device
1. Open your Internet connection on your PC. 2. Connect eBookMan to your PC. 3. Turn on your eBookMan device. 4. Start the Desktop Manager. 5. Click Web|Register. 6. Follow the instructions on the screen to create a Franklin account and download content. eBookMan ® User’s Guide... - Page 28 Chapter 1. Getting Started...
-
Page 29: Ebookman ® Desktop Manager
2. eBookMan eBookMan Desktop Manager is the PC software program that ® transfers applications and content to your eBookMan device. You must install the Desktop Manager on your PC before using eBookMan. For information about installation, see “Chapter 1. Getting Started” on page 18. This chapter describes the Desktop Manager views and menus, the eBookMan Monitor and the Mobipocket Web Companion. -
Page 30: Understanding The Views
Understanding the Views The Desktop Manager uses two views: Connection and Contents. In the Desktop Manager, click View to the Contents View. Click View to the Connection View. Connection View If the Desktop Manager detects the eBookMan device, the image shows the connection. Note: By default, the Connection View... -
Page 31: Contents View
Contents View The Contents View uses two list panes to organize and display files stored on your PC (Contents pane) and content stored in your eBookMan device (Device pane). Contents Pane The Contents pane contains the file structure on your PC. Similar to Windows Explorer, this pane shows all files and fold- ers in the selected directory. - Page 32 Delete Properties Device Pane Note: The Device pane shows two folders: RAM and MultiMediaCard (MMC). The RAM folder contains the content files that appear in All synchronized memory on the connected eBookMan device. The MMC folder files appear contains the content files that appear on the MMC contained in under the RAM the connected device.
-
Page 33: Using The Menus
Managing the Panes Only one pane is active at a time. The title bar of the active pane is highlighted. To activate the other pane, click anywhere in it. To change the width of the panes, drag the divider. To switch the posi- tion of the panes, click the View menu and then select Switch Panes. -
Page 34: View Menu
Web Menu The Web menu gives you direct access to the eBookMan page on Franklin’s Web site. From this site, you can register your device, browse and purchase titles, and get product support. If your web browser is not set up for automatic Internet connec- tion, you will be prompted to connect to the Internet. -
Page 35: Setup Menu
Applications cations from Franklin’s Web site if the OS is a later version from the one you have. eBookMan Home Goes to the eBookMan home page at Franklin’s Page Web site. Product Support Goes to technical support at Franklin’s Web site. -
Page 36: Ebookman Monitor
Help Menu Use the Help menu to access help and get information about Desktop Manager and Intellisync Help Topics About eBookMan Displays version and copyright Desktop Manager information for the Desktop Manager. About Intellisync Displays version and copyright information eBookMan Monitor eBookMan Monitor runs in the system tray on your PC. -
Page 37: Uninstalling The Desktop Manager
Mobipocket Web Companion The Mobipocket Web Companion is a PC program that enables you to download, update and synchronize electronic documents to eBookMan. Electronic documents include text files, newspa- pers, electronic books (eBooks), web pages (*.htm and *.html), and Palm documents (*.pdb and *.prc files). The Web Companion also provides access to Mobipocket’s Web site and includes a publishing feature that formats web and Palm documents for the Mobipocket Reader . - Page 38 Chapter 2. eBookMan ® Desktop Manager...
-
Page 39: Managing & Synchronizing Content
For example, you can use the calculator ( Calculate ) without content. Other applications require content. For example, the Franklin Reader requires eBooks formatted as Franklin Universal Binary (*.fub) files. Before you use the Franklin Reader , you must download an eBook and move it to eBookMan. -
Page 40: Directory Structure
.fxe Other file types are generated while using programs in eBookMan. For example, *.bmark files are created when you add bookmarks in the Franklin Reader . These files are synchro- nized when you click Directory Structure By default, eBookMan content is stored in the C:\Program Files\Franklin Electronic Publishers\eBookMan Desktop Manager\Data\Contents directory. - Page 41 If you save content files in other directories, you must move or copy the file or files to the Contents folder before synchroniza- tion. To copy a file to the Contents folder, locate the file in the Contents pane of the Desktop Manager and do one of the fol- lowing: •...
-
Page 42: Deleting Files
To restore files to eBookMan, follow these steps: 1. Move all files from the Library back to the Contents folder. 2. Click The Audible Folder The Desktop Manager uses the Audible folder to administer tasks from AudibleManager of this folder or its subdirectories. Note: Audible files are added to and deleted from eBookMan Deleting Files To delete a file from eBookMan, you must remove the file from... -
Page 43: Using Intellisync Tm
Intellisync included on the Installation CD and in the full download, sup- ports MS Outlook ® 98 and 2000. Intellisync Upgrade, which can be purchased separately at Franklin’s accessories Web page, supports Microsoft 4.x, Lotus Notes 5.0, Lotus Organizer ®... - Page 44 You see the Intellisync for eBookMan Sync Options dialog box. 2. Click the box next to the eBookMan organizer program you want to synchronize with your PC organizer application. Note: The Choose Translator dialog box appears the first time you select a translator. During subsequent config- uration, you must check the box next to the organizer program you want to edit and click the Choose button.
-
Page 45: Changing Advanced Settings
Export Exports data to your PC organizer applica- tion from the organizer program on eBookMan. Synchronize Synchronizes data between the organizer program on eBookMan and your PC orga- nizer application. Click Options to change settings used when exchanging data with your PC organizer application or click Browse to map an alternate file or folder to this application. - Page 46 2. Click Advanced. 3. Click the tab containing the settings you want to change. Note: If you delete an 4. To edit field mappings, clickField Mapping. eBookMan organ- izer database from your eBookMan device, you must synchronize to 5. Click OK to accept this file or folder. replace the data- base.
- Page 47 6. Map the fields for the organizer program. Your PC organizer application fields are bold and listed in the right column. Click and drag a field in the right column up or down to align it with a matching eBookMan application field in the left column.
-
Page 48: Adding New Content And Applications
Franklin’s Web site at www.franklin.com/estore. You also can search a list of thou- sands of eBooks, many of which are free, at Franklin’s Web site. Audiobooks can be found at www.audible.com. Other Franklin partner Web sites include, but are not limited to: www.mobipocket.com... - Page 49 , the Desktop Manager does the following. 1. Compares the files in the Device pane (on eBookMan) and Contents pane (on your PC). Note: Some files available at www.franklin.com/ebookman are downloaded to the Desktop Manager in a com- pressed format. During synchronization, zipped files are identified.
- Page 50 1. From the Desktop Manager, locate the file in the Contents pane. 2. Send the file to eBookMan. 3. Click OK. You see a dialog box that shows the progress of the conver- sion. You can click Cancel to stop the conversion. When conversion is complete, a *.seb file with the same name appears in the Contents pane.
-
Page 51: Using The Mobipocket Web Companion
PC, start the Desktop Manager and then start Web Companion. To start the Web Companion, do one of the following: • From the desktop, click Start|Programs|Franklin Electronic Publishers|Mobipocket Web Companion. • From the Desktop Manager, click Web|Mobipocket Web Companion. - Page 52 Note: Configure the Web Companion The Web Companion will To configure the Web Companion, follow these steps. periodically 1. Click Edit|Configuration. update your eNews when you are connected to a local network. 2. Click the check box for the synchronization mode you want. Chapter 3.
- Page 53 The Automatic update gets eNews from the Internet when- ever you synchronize with your eBookMan device. 3. Click the check box for the proxy configuration you want. The Internet Explorer proxy is the default configuration. If you are an AOL user, select Use no proxy. If you access the Internet through a firewall where authenti- cation is required, select Use this proxy and enter the nec- essary data in the Address, Port and User name fields.
- Page 54 3. Save the file or files to your computer. 4. Find the file on your PC. 5. Right click the file. 6. Click Send to eBookMan. eNews To download eNews, follow these steps. 1. Subscribe to the eNewspaper you want. Important! Write your user name and pass-...
- Page 55 d. Click OK. Your Web browser stays active for you to download and install other eNewspapers. e. Repeat these steps for each eNewspaper subscription you want. 2. Select the sections of the eNewspapers. a. Click next to an eNewspaper subscription to see the list of available sections.
- Page 56 To unsubscribe, click then either click File|Unsubscribe or right-click the eNewspaper Important! and click Unsubscribe from the context menu. To retain the eDocs images and links In addition to eBooks and eNews, you can download and read in an HTML file, other file types.
- Page 57 Using Quick Publish Some files, such as Web pages, need to be published to main- tain their images and links when viewed in Mobipocket Reader . To publish a Web page, do the following: 1. Save the page to a folder on your PC. 2.
- Page 58 Chapter 3. Managing & Synchronizing Content...
- Page 59 EVICE eBookMan ® User’s Guide...
-
Page 60: Hardware Features
4 . H a r d w a r e F e a t u r e s This chapter introduces you to the controls and hardware fea- tures on your eBookMan. It also contains tips on caring for the eBookMan device and instructions for resetting it. -
Page 61: Control Pad
Control Pad The area on the device that contains the Handwriting area, the Launcher and Menu icons and the scroll arrows. On/Off Button & Press once to turn the device on. Press Backlight again to turn the device off. You can also control control the backlight (in models with backlight screens) with this button. -
Page 62: Back Panel
Back Panel Note: Headphone eBookMan jack Earphones are sold separately at www.franklin.com/ ebookman/ accessories.asp. You can use ear- Control phones with a 3.5 Wheel mm plug and 8- 35 ohm imped- ance. Note: Headphone jack Plug your headphones or earphones in here... -
Page 63: Cover
Please note that the Control Wheel rocks up and down and does not spin. Please do not force the wheel or you will damage the device. Note: Leather carrying cases can be pur- chased at www.franklin.com /ebookman/ accessories.asp or your local retailer. -
Page 64: Product Care
Product Care eBookMan is designed to be light, compact and durable. Important! However, it is an electronic device and must be treated carefully. Putting unnecessary pressure on it or striking the device against Keep a record of other objects can cause damage. your serial num- In order to avoid damage to your eBookMan, please: ber (on the back... -
Page 65: Hard Reset
• In the Ready for restart screen, tap Restart now. • Calibrate your unit and you return to the Launcher. 2. Reset from the back of the unit. Should you be unable to access the Launcher menu, use the blunt end of a paper clip to gently press the reset button located on the back of the device just above the battery com- partment. - Page 66 Chapter 4. Hardware Features...
-
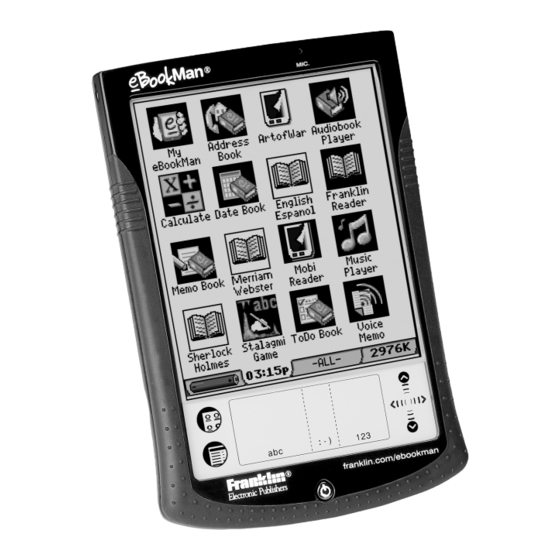
Page 67: The Launcher
RAM and in an installed MultiMediaCard (MMC), are represented by icons on the screen. Program icons, such as Date Book and Franklin Reader , appear on a dark background. Content icons, such as music and audio books, appear on a white background. -
Page 68: Using The Launcher Menu
Using the Launcher Menu There are several options available on the Launcher menu. Tap Launcher menu Handwriting Guide Provides a quick, onscreen reference for Note: The Handwriting Guide is also Restart System available from most screens that support data Pen Calibration entry. -
Page 69: Setting Contrast
Active Programs Enables you to view and manage programs that are open. Programs can be closed quickly from this location to make memory available for other programs. For details, see “Opening and Closing Programs” on page File Manager Displays the name and size of all program and content files stored in RAM. -
Page 70: Changing Ebookman Settings
Changing eBookMan Settings You can set preferences that apply to your eBookMan device and all programs in My eBookMan appears in the top left corner of the Launcher and is displayed in all category views. to open My eBookMan Select Date Select Time Volume Password... - Page 71 Sounds Enables you to turn the device sounds off. Audiobooks, music files, and the Date Book alarm are not affected by this option. Pen Language Enables you to activate character recognition for different languages. eBookMan provides Western European character recognition for the following languages: Dutch, French, German, Italian, Portuguese and Spanish.
-
Page 72: Opening And Closing Programs
Week Starts Double-click To save your changes and close My eBookMan Launcher appears and all changes take effect immediately. Opening and Closing Programs Note: To open a program or file, tap its corresponding icon. When a When running program is running, you can return to the Launcher without clos- multiple programs at the same time, ing it by tapping... -
Page 73: Performing A System Restart
Active Programs screen 2. Tap a program to select it. 3. Tap Stop Program. The program title becomes italicized to indicate it is closing, and the amount of memory available refreshes. 4. Tap Done to return to the Launcher. Performing a System Restart As with any computer, you may experience a problem with a program and need to restart the device. -
Page 74: Using A Password
Using a Password Warning! After setting a You can protect data stored in your eBookMan device by setting password, you a password. When a password is set, your eBookMan device must enter your automatically enables it. You must enter the password each time password each you turn on eBookMan. -
Page 75: Disabling A Password
The message, “Password has been changed,” appears on the screen. 7. Tap OK. Your password is set and enabled. The device returns to the My eBookMan 8. Tap Done to return to the Launcher. Disabling a Password To disable a password, follow these steps. 1. -
Page 76: Deleting A Password
4. Enter a new password and tap OK. The Enter password dialog box appears with the Retype New prompt. Enter password dialog box At any of the Enter password dialog boxes, you can tap Cancel to exit the screen without changing a password. 5. -
Page 77: Forgotten Password
The message, “Password has been changed,” appears on the screen. 6. Tap OK. Your password is deleted, and the device returns to the My eBookMan ® screen. 7. Tap Done to return to the Launcher. Forgotten Password Important: If you forget your password and the password is enabled, you will not be able to use your eBookMan. -
Page 78: Using Categories
Using Categories A category is the name used to group and display icons that appear in the Launcher. As the number of icons that appear in the Launcher increases, use categories to manage the program and content icons that are displayed. The default categories are: -ALL-, CONTENT, PROGRAMS and UNFILED. -
Page 79: Adding A Category
Changing the Category View To change the icons that appear in the Launcher, follow these steps. 1. From the Launcher, tap the category indicator. The Category menu appears. 2. Tap the category you want. The icons in the Launcher immediately change to the cate- gory you specified, and the active category is displayed in the Category indicator. -
Page 80: Renaming A Category
4. Enter a name for the new category. For example, write “Music.” Write the name in the Handwriting area or tap the name using the onscreen keyboard. The Edit Categories screen can display a maximum of 20 characters in a name. The category indicator can display a maximum of nine char- acters in a name. -
Page 81: Managing Files In Ebookman
The Rename a Category dialog box appears. The current name of the category is displayed and highlighted. Rename a Category dialog box 5. Enter a new name and tap OK. Write a new name in the Handwriting area or tap enter a new name using the onscreen keyboard. - Page 82 Viewing Details About a File To find details about a file, follow these steps. 1. From the Launcher, tap 2. Tap File Manager. The File Manager screen appears. File Manager screen 3. Tap the file you want. Use the scroll bar or scroll area to see more files. 4.
- Page 83 Categorizing Files To associate a file with a category, follow these steps. 1. Follow the steps 1-4 under “Viewing Details About a File” on page 82. 2. Tap next to Category. The list of categories appears. File Details screen 3. Tap the category you want. 4.
- Page 84 Chapter 5. The Launcher...
-
Page 85: Handwriting
6. Data Entry This chapter explains how to enter data using natural handwrit- ing, identifies acceptable characters and provides useful hand- writing tips. It also describes the onscreen keyboard and all the options it offers. eBookMan gives you the choice of writing your data or tapping it on an onscreen keyboard. - Page 86 To use the Handwriting Guide, follow these steps. 1. From the Launcher, tap 2. Tap Handwriting Guide. You see the first screen of the Handwriting Guide. Letter and punctuation strokes recognized in the Letter input area ( 3. Tap the arrows at the top right corner to scroll through each screen of the Handwriting Guide.
- Page 87 Function strokes recognized in the Letter, Number, or Punctuation input areas. 4. Tap to exit the Handwriting Guide and return to the Launcher. Entering Data With Natural Handwriting Entering data with natural handwriting takes some practice. Follow these steps to enter a sentence in the Memo Book . 1.
- Page 88 5. In the center of the Letter input area, write the letter “a”. • Start the stroke where indicated by the point and draw it as it appears in the Handwriting Guide. For example, to draw an “a” start here and write the character left to right.
- Page 89 Practicing Natural Handwriting For more handwriting practice, use Stalagmite . 1. From the Launcher, tap 2. Tap Help for more information on how to play. Writing Punctuation Follow these guidelines when entering punctuation: Period Write in the lower part of the appropriate input area.
-
Page 90: Deleting Characters
Deleting Characters Delete characters in the data entry field by writing the back func- tion. To delete one character, place the cursor to the right of the character you want to delete and write the back function in the Letter input area. To delete consecutive characters,do the fol- lowing: 1. -
Page 91: Using The Onscreen Keyboard
Hints For Successful Handwriting • Keep eBookMan vertically oriented to avoid writing slanted characters. • Write characters as they appear in the Handwriting Guide. • Always write in lower case. • Write the characters large and in the appropriate input area. •... - Page 92 If the character you want to enter does not appear on the default keyboard, use the Cap, Shift, Accent, or Shift/Accent option to find it. • Tap cap to access the Caps lock keyboard. The Caps lock keyboard contains capital letters, punctua- tion, and special characters.
- Page 93 The Accent keyboard contains lowercase accented let- ters, punctuation, and special characters. Tap acnt again to return to the Default keyboard. • Tap shft + acnt to access the Shifted Accent keyboard. The Shifted Accent keyboard contains uppercase accent- ed letters, punctuation, and special characters. Tap shft + acnt again to return to the Default keyboard.
- Page 94 Chapter 6. Data Entry...
- Page 95 ONTENT PPLICATIONS eBookMan ® User’s Guide...
-
Page 96: Opening And Closing Ebooks
“Registering your eBookMan Device” on page 27. Opening and Closing eBooks Open eBooks from Franklin Reader or from the Launcher. To open an eBook from Franklin Reader , follow these steps. 1. Tap to open Franklin Reader . The screen that appears varies based on available content and whether or not eBooks were opened previously. - Page 97 • If eBooks are available and no eBooks have been opened, you see the Booklist. The Booklist is an alpha- betical list of Franklin eBooks that are installed in your eBookMan. Note: If an eBook had been opened previously, Franklin Reader displays the last viewed screen of the eBook.
-
Page 98: Understanding Franklin Reader Features
Preferences” on page 103. Understanding Franklin Reader Features Most Franklin Reader screens consist of a title bar, tool bar and a view that represents eBook content. Title Bar The title bar displays the name of the eBook, the title of your current location within an eBook or the Outline Location within an eBook. -
Page 99: Tool Bar
Tool Bar The tool bar displays icons that enable you to move around in an eBook and access other locations in Franklin Reader . The icons that appear on the tool bar vary by location within the pro- gram and by available features within an eBook. The following icons are available. - Page 100 The Views Note: Franklin Reader uses five views to represent the content of an A section is an eBook: List, Text, Sub-text, Search, and Bookmark. item that is listed on the top level of List View the Outline. The List view displays chapters, sections or headwords of an eBook.
-
Page 101: Using The Menus
The Text view displays the main text of an eBook. Read, scroll, highlight text, and add bookmarks from text. To change the way text is displayed in Franklin Reader , see “Setting Preferences.” Sub-text View The Sub-text view displays additional text such as context-sen- sitive help, bibliographic entries, footnotes, and tables. -
Page 102: Options Menu
Reader Functions, and get help for the program. Help (h) Reader Functions (f) Chapter 7. Franklin Reader section. Closes Franklin Reader . Edit menu Removes selected text. The text is stored on the clipboard to copy to another location. -
Page 103: Setting Preferences
Displays the name of most recent eBooks that were opened and are still available. Setting Preferences You can set your preferences for Franklin Reader and the eBook you are currently viewing. The options on the Preferences screen may vary by eBook. - Page 104 Tap Cancel to exit without changing the defaults. Franklin Reader Settings You can set features that change the appearance of all eBooks in the Franklin Reader , such as font size and display. Book font sizes Small font size Chapter 7. Franklin Reader By default, the large font (B) is highlighted.
-
Page 105: Ebook Settings
Show scroll bars When checked, this option shows scroll bars. Tap the check box next to the scroll bar option to deselect it. Show quick Tap the check box next to the Quick commands Commands option to deselect it. Note: Most books do not have Quick Commands. -
Page 106: Moving Around
Rather than flipping pages, moving around in an eBook involves tapping icons and using the menus associated with Franklin Reader . It also involves tapping through lists, scrolling through text, and tapping Special Markers or hyperlinks associated with the content of the eBook. -
Page 107: Quick Commands
Special Markers When reading and moving through text, you may see Special Markers - images of blocked text. Special markers indicate that more information is available. The following are some examples of Special Markers: Footnote Graphic or figure Bibliographic entry Unavailable section of text Unavailable graphic illustration Table reference... -
Page 108: Searching Within An Ebook
• • Searching within an eBook Franklin Reader enables you to search for words or phrases within an eBook. The search method varies by location in the program and in the eBook. The basic search methods include Lookup, Quick Search and the Search screen. -
Page 109: Quick Search
If you enter a series of letters, the program searches for them in sequence. When it encounters a letter for which there is no match, it highlights the first list item with the last matched letters. When you delete characters, the Lookup backs up to the previous match. - Page 110 Abbreviations" on page 121. 2. Enter up to six words by using the Handwriting area or the Chapter 7. Franklin Reader Access the Search screen from any location within Franklin Reader in one of the following ways: • • and then either tap Go To|Search or write Menu shortcut s.
- Page 111 3. Tap Search to initiate the search. The search results appear. If you enter words that cannot be found, you see a dialog box indicating “No candidates found.” Enter a new search request and try again. 4. Tap the list item in which you want to find the word or phrase.
- Page 112 "receipt" or "reciept", write rec??pt and tap Search. All words matching this pattern are displayed. To see all the words that begin with "hypo", write hypo and tap Search. Chapter 7. Franklin Reader...
- Page 113 Use this feature to find information about two or more items. To perform a search from this screen, follow these steps. 1. Go to the Search screen. Access the Search screen from any location within Franklin Reader in one of the following ways: • •...
-
Page 114: Search Results
More to see a more search matches are available in a different category. Tap particular catego- More to see them. Chapter 7. Franklin Reader You can select up to 30 items from the provided list. Search screen with selected items to see the Selection List, a complete list of selected items. - Page 115 Search results can occur in the following categories: A. Entries using other forms These matches occur when other forms of the word or words you entered match a compound word or phrase. Other forms include inflections and root words. B. Headwords These matches occur when the word or words you entered exactly match a headword.
- Page 116 G. Titles using Synonyms Synonyms are words of similar meaning and usage. This cat- egory returns matches just like "Titles" except that it uses synonyms for the word or words you entered. Chapter 7. Franklin Reader Text in Synonyms in PDR 2001 Demo...
- Page 117 H. Titles & Text These matches occur when some of the words you entered match in an Outline and some match in text. You must enter the text to see these matches. This category also returns matches if the words you entered occur in different titles along a single Outline path.
-
Page 118: Using Bookmarks
It is considered a spe- cial marker. 3. Tap OK to add the bookmark. Chapter 7. Franklin Reader tapping and then either tapping Edit|Add Bookmark or writing Menu shortcut m. The title of the current section of text appears highlighted in a new bookmark. - Page 119 Viewing an Entered Bookmark You can view the text of an existing bookmark or a list of all bookmarks. To view or edit a bookmark, follow these steps. Note: If you are already at the location in text where you entered the bookmark, begin at Step 3.
-
Page 120: Using Help
Using Help Your Franklin Reader comes with context-sensitive help and a guide to Reader Functions. You can view Reader Functions from any location. Tap Functions or write Menu shortcut f to read the guide. You can read the help in any location. Tap tap Options|Help or write Menu shortcut h to read the help. -
Page 121: Search Abbreviations
Search Abbreviations The following abbreviations are available in Bible references and translators. Bible ebook Abbreviations Add these testament or book abbreviations at the beginning of your search request to narrow your search parameters to only that testament or book. The Old Testament (ot): Genesis ...Gen Exodus ...Ex Leviticus ...Lev... -
Page 122: Exiting Franklin Reader
Dutch ...Ned French...Fra German...Deu Exiting Franklin Reader You can either close Franklin Reader and return to the Launcher, or you can return to the Launcher and leave the pro- gram running in the background. 1. Tap to return to the Launcher without closing the pro- gram. -
Page 123: Opening And Closing Documents
8. Mobipocket Reader eBookMan includes the Mobipocket Reader , a program that lets you read, search, and bookmark electronic books (eBooks), electronic newspaper articles (eNewspapers) and other electron- ic documents (eDocuments). This chapter describes how to open and close content, use the Library, view content, change settings, use bookmarks, search a document, get online help and exit Mobipocket Reader . - Page 124 Library screen with documents The Library contains the list of eBooks, eNews and eDocs that you have downloaded into your eBookMan. The docu- ments are categorized by type. You can also create your own categories and assign documents to those categories. •...
-
Page 125: Understanding The Library
Understanding the Library The Library in Mobipocket Reader is the place you go to open a different document or manage your documents. The Library consists of a header, a list of file types, a list of documents, a tip, and footer. From a document, access the Library by tapping ping and then Library. - Page 126 Tap eBooks, eNews or eDocs to see the available documents in these file types. You see a list of available documents in the current file category. The active file type appears bolded and has no underline. There is also a Categories option that enables you to file your documents by category.
-
Page 127: List Of Documents
7. Tap to delete a category. You must confirm the deletion. Tap OK to confirm. Tap Cancel to exit the dialog box without deleting the category. List of Documents Each file type and category name contains of a list of docu- ments. -
Page 128: Viewing A Document
Tips For each Library screen, a tip is displayed near the bottom of the screen. This tip is a reminder about the status of the screen (“There are no documents in this category.”) or a helpful hint about learning more about a particular document (“For more information about a document, click on its icon.”) Footer The very bottom of each Library screen contains additional... -
Page 129: Progress Bar
Tool Bar The tool bar displays the title of the document and the current page number with accompanying menus. next to the document title to access the main menu. Tap next to the page number to access the page menu. Tap the menu item you want. The tool bar also displays icons that enable you to move around in a document and access other locations in Mobipocket Reader . -
Page 130: Using The Menus
If you have saved any bookmarks, a small notch is placed on the progress bar indicating the location of the bookmark in a document. when a document has bookmarks. Tap the previous or next bookmark position. Using the Menus There are two menus in Mobipocket Reader , a main menu and a page menu. -
Page 131: Changing The Settings
Library Goes to the Library. Exit Exits Mobipocket Reader . Page Menu Use the page menu to go to the first page, go to any page you want or add a bookmark. In addition, this menu may contain several other items which are part of the guide specified by the Open eBook standard. -
Page 132: Moving Around Within A Document
Font Size Touch screen turn page Note: Tap an empty check box ( to activate a set- Display margins ting ( Open Library at startup Full justification Dictionary: Moving around within a Document Page up and down through the document in the following ways. Chapter 8. -
Page 133: Searching A Document
• As you move through a document, the progress bar at the bottom of the screen indicates your current position in the document. Tap any part of the progress bar to move to another position in the document. Tap previous location. •... -
Page 134: Using Bookmarks
2. Tap on the line to activate the data entry mode. 3. Use the Handwriting area or the onscreen keyboard to enter 4. Tap a check box to restrict your search by either or both of Note: Bookmarks are assigned to par- ticular pages, so if the font size changes, the... - Page 135 To add a bookmark, follow these steps. 1. From any location in text, tap then tap Add bookmark. Add Bookmark dialog box You see the Add Bookmark dialog box. 2. Use the Handwriting area or the onscreen keyboard to enter a short label describing the bookmark.
- Page 136 To view or edit the bookmark list, follow these steps. 1. Tap and then tap Bookmark List. Bookmark list The list is organized by page number. The bookmark label appears next to the page number where the bookmark was added. If you have more bookmarks than can fit on one screen, three dots appear at the bottom left and right of the screen.
-
Page 137: Getting Help
Large Tables Display Where possible, tables that are too large for the screen continue on the following page. If it is not possible, a mode called "Large tables " is activated. In this mode, icons appear around the table to enable you to navigate the information. -
Page 138: Exiting Mobipocket Reader
Mobipocket Help Table of Contents 4. Tap the section you want to read. 5. Tap or tap 6. Tap the title of the document you were previously viewing. Exiting Mobipocket Reader You can close Mobipocket Reader and return to the Launcher or you can return to the Launcher and leave Mobipocket Reader running in the background. -
Page 139: Audiobook Player
9. Audiobook Player eBookMan includes Audiobook Player , an application that reads audio books, lectures, public radio programs, newspaper arti- cles, and more. With eBookMan, you can listen to your favorite spoken works anywhere, anytime. It’s a whole new way to be entertained and informed while on the go or while relaxing. -
Page 140: Understanding The Buttons
Understanding the Buttons The following buttons perform the audio functions: Starts playing the selected audio title in the designated section. During play, pauses the reading. Stops playing the title. Fast forwards the title. Rewinds the title. Using the Menus Audiobook Player uses three menus: File, Edit and Control. Some menu items have a character in the right column. -
Page 141: Selecting A Title And Section
Edit Menu Use the Edit menu to set preferences. Edit menu Preferences (p) Enables you to select left-hand controls. Control Menu Use the Control menu to move through the selected title. You can jump forward or backward in increments of 10 seconds, one minute, 10 minutes, or one hour. -
Page 142: Saving Audiobooks To Multimediacards
MMC will not be erased. 4. Start Audible Manager. 5. In the bottom left area, under Franklin eBookMan, select 6. Click My Device|Format Franklin eBookMan. Once you format or erase an MMC in Audible Manager, Audiobook Playe r in your eBookMan will only recognize audio- books stored on the most recently formatted MMC. -
Page 143: Exiting Audiobook Player
Exiting Audiobook Player You can either close Audiobook Player and return to the Launcher, or you can return to the Launcher and leave Audiobook Player running in the background. 1. Tap to return to the Launcher with Audiobook Player run- ning in the background. - Page 144 Chapter 9. Audiobook Player...
-
Page 145: Understanding The Buttons
10. Music Player eBookMan includes Music Player , a program that enables you to play music. This chapter describes features of the program and details how to select and play music titles, how to use the menus, and how to control the volume. Music Player supports MP3 files. -
Page 146: Using The Menus
Using the Menus Note: Music Player uses three menus: File, Edit, and Control. To see When the drop- down list is open, the menus, tap Menu shortcut. to quickly step through music File Menu titles. Use the File menu to view information about the program and exit the program. -
Page 147: Listening To Music
Play Single Plays the selected music title. Play All Plays all music titles in the order listed. Repeat Single Plays the selected music title repeatedly. Repeat All Plays all music titles in the order listed and repeats the entire list of song. Selecting a Title Music Player uses a drop-down list to show the currently loaded music titles. -
Page 148: Exiting Music Player
4. Tap when done listening. Exiting Music Player You can either close Music Player and return to the Launcher, or you can return to the Launcher and leave Music Player running in the background. 1. Tap to return to the Launcher with Music Player running in the background. - Page 149 RGANIZER PPLICATIONS eBookMan ® User’s Guide...
-
Page 150: Address Book
11. Address Book eBookMan includes Address Book , a standard organizer pro- gram for storing names, telephone numbers and street and internet addresses. This chapter describes how to add, view, edit, find and remove entries. at the Launcher to open Address Book . You see the Contacts List (if entries have been made), a New button, and a Search field. -
Page 151: Adding Contacts
Adding Contacts To add a contact, follow these steps. 1. Tap New. Label column You see the Edit Address screen. It includes four buttons for the available views: Personal, Address, Misc and Note. Personal is selected as the Personal View is the first view to appear when you tap New. -
Page 152: Understanding The Views
4. In Personal View, tap Details to select the phone number 5. Tap Done or Note: If you do not specify a person- al or company name, the entry in the Contacts List will be - Understanding the Views Untitled-, and will show the desig- Address Book provides four screens to enter information for nated phone... - Page 153 Address View At this screen, you can enter addresses for work and home. Address View For both the Work Address and Home Address, you can enter the street name, city, state, zip code and country. Misc View At this screen, you can enter additional personal information about your contact.
-
Page 154: Note View
Setting a Birthday You can add a contact’s birthday in the Misc View. Follow these steps. 1. Tap next to Birthday. You see the Month drop-down list. 2. Tap the Month you want to select. 3. Tap the day number. The day number is highlighted. -
Page 155: Editing Entries
When a note is attached to a contact, the Contacts List. Editing Entries To edit an entry, follow these steps. 1. Go to the Edit Address screen from the Contacts List in one of the following ways. • Tap the entry you want. Selecting an entry from the Contacts List... -
Page 156: Address Details
4. Tap Done or Contacts List. To remove the entry, tap Delete. Tap OK to confirm or tap Cancel to exit the dialog box without deleting the entry. Address Details Use the Details dialog box to select the phone number or email address you want displayed on the Contacts List. -
Page 157: Custom Fields
Custom Fields To create a custom field in the Misc view, follow these steps. 1. From the Contacts List, tap Fields. You see the Custom Fields dialog box. Custom Fields dialog box with edited label 2. Tap in the field of the label you want to edit. 3. -
Page 158: Searching For An Entry
3. Tap the option you want to select. Last, First 4. Tap OK to accept your changes. Tap Cancel to close the Preferences dialog box without sav- ing your changes. Searching for an Entry In the Contacts List, do the following to find an entry. 1. -
Page 159: Deleting Entries
Deleting Entries You can delete an entry from the Contacts List or from any of the views in the Edit Address screen. To delete an entry, do one of the following: • In the Contacts List, hold your stylus down on the entry you want to delete. -
Page 160: Using The Menus
Using the Menus In addition to the drop-down and pop-up menus described in the different views, there are two Main menus available in Address Book . The File menu is available at the Contacts list and the Edit menu is available in each of the four views when the cursor is blinking. -
Page 161: Exiting Address Book
Edit Menu Cut (x) Removes any selected text. A copy is retained on the clipboard. Copy (c) Places a copy of any selected text on the clipboard. Paste (v) Places text from the clipboard into the selected location. Keyboard (k) Displays the onscreen keyboard. - Page 162 Chapter 11. Address Book...
-
Page 163: Date Book
12. Date Book eBookMan includes Date Book , a standard organizer program for maintaining your schedule. Once you enter appointments, you can view them by day, by week or by month. This chapter describes how to add appointments and edit them. It also shows you how to use the different views and menus and how to move around within the program. -
Page 164: Adding Appointments
Adding Appointments You can add appointments for the default times or you can cre- ate custom time slots. To add an appointment, follow these steps. 1. Tap Go To. See also: 2. Tap the month you want. To learn more 3. -
Page 165: Editing Appointments
To add an appointment for a custom time slot, follow these steps. 1. Tap New. The cursor is active on a blank line in the data entry column at the top of the screen. 2. Enter your data. 3. Tap in the empty time column. You see the Select Time dialog box. - Page 166 You can also enter the location of an appointment, set an appointment to repeat, set an alarm and attach a note in the Edit dialog box. To make these edits, tap in the data entry col- umn of an appointment to select it, then tap Edit. The Edit dia- log box appears.
- Page 167 date box. You see the Select Date screen. Tap the day/month/year and tap Select. To repeat your appointment indefinitely, tap the No end date check box. 6. Tap OK to save your changes and return to the Edit dialog box. To exit the Recurrence screen without saving any changes, tap Cancel or To delete a previously set recurrence, tap Delete.
- Page 168 Recurrence screen for Weekly interval Monthly Recurrence The Monthly setting repeats your appointment on a monthly basis. To repeat an appointment every third month, tap the Monthly check box, write 3 in the Recur every . . . month(s) on the field and tap the day or date you want. The date setting is derived from the current day.
-
Page 169: Setting Alarms
Recurrence screen for Yearly interval You can set an end date in each of the views. Tap the End by check box and then tap the date button. You go to the Select Date screen. Select your date as explained in “Setting the Date” on page 171. - Page 170 4. Enter the interval number for when you want to be alerted. 5. Tap OK to accept your changes and return to the Edit dialog box. Tap Cancel to return to the Edit dialog box without changing the alarm settings. At the Daily View, an appointment.
-
Page 171: Adding Notes
Adding Notes To add comments or information to the current appointment, fol- low these steps. 1. Tap Note in the Edit dialog box. You see the Notes screen. Notes screen 2. Enter your note. You can use the Handwriting area or the onscreen keyboard. 3. -
Page 172: Understanding The Views
4. Tap the day of the month you want. To return to the current date from a different location, tap Today. 5. To select the date, tap Select. To exit without selecting a date, tap Cancel. Understanding the Views You can choose any of three different views while using your Date Book . -
Page 173: Weekly View
Buttons representing each day of the week, beginning at Sunday or Monday, are displayed across the top right of the screen. 1. Tap the day you want to select. The selected day is shaded. 2. Tap to go to the previous or next calendar week. 3. -
Page 174: Monthly View
If your schedule contains more appointments than can fit on one screen, a scroll bar appears. Tap the up and down arrows on the scroll bar or the scroll lines on the Control Pad to move up or down your schedule a line at a time. Tap in the scroll bar above or below the slider, or tap the scroll arrows in the Control Pad to move up or down one screen at a time. -
Page 175: Field Limits
Days for which you have entered appointments are marked with a bar. The bar appears to the top right for a.m. appoint- ments and to the bottom right for p.m. appointments. The month and year are displayed at the top left of the screen. - Page 176 File menu About Preferences (p) Help (h) Exit (e) Edit Menu Use the Edit menu to cut, copy and paste text, access the onscreen keyboard and view the Handwriting Guide. Cut and Copy are activated only when text is selected. Drag your stylus over the text you want to cut or copy.
-
Page 177: Synchronizing With Microsoft ® Outlook
Synchronizing with Microsoft Outlook ® For detailed instructions please see “Using Intellisync ” on page 43. Exiting Date Book You can close Date Book and return to the Launcher or you can return to the Launcher and leave Date Book running in the background. - Page 178 Chapter 12. Date Book...
-
Page 179: Adding Entries
13. ToDo Book eBookMan includes ToDo Book , a standard organizer program for entering your todos and keeping track of them. This chapter describes how to enter, edit and delete todos and how to set pri- ority levels for your tasks. at the Launcher to open ToDo Book . -
Page 180: Editing Entries
Priority selection pop-up menu. 3. Tap Edit to add settings. See “Editing Entries” below for more information. 4. Tap OK to exit the Edit dialog box. 5. Tap in the empty completion check box as completed Editing Entries You can change the text of a todo right in the ToDo List. Tap to place the cursor in a todo where you want to make your edits, and add or delete text. -
Page 181: Entering Settings
You see a dialog box asking you to confirm the deletion. Tap OK to delete or tap Cancel to exit without deleting. • To create an exact copy of the todo, tap Duplicate. Entering Settings To enter or edit settings for a todo, tap in the line of the todo to select it, then tap Edit. -
Page 182: Selecting A Date
To delete the note, tap Delete. You see a dialog box asking you to confirm the deletion. Tap OK to delete or tap Cancel to exit without deleting. 5. Tap in the empty completion check box as complete 6. Tap OK to save your changes. Tap Cancel to exit the Edit dialog box without saving your changes or settings. -
Page 183: Field Limits
Changing Your ToDo List View The default view has the completion check box and the priority icon to the right of the todo. To change the display of your todos, do the following: 1. Tap Show to change the way you view your todos. Show dialog 2. -
Page 184: Using The Menus
Using the Menus There are two menus in ToDo Book : File and Edit. The File menu is available when no todo is selected in the ToDo List. When a todo is selected, both menus are available. To select a menu item, first tap then either tap the menu item you want or write the Menu short- cut in the Handwriting area. -
Page 185: Exiting Todo Book
Cut (x) Removes any selected text. A copy is retained on the clipboard. Copy (c) Places a copy of any selected text on the clipboard. Paste (v) Places text from the clipboard into the selected location. Keyboard (k) Displays the onscreen keyboard. Handwriting Guide (g) Displays the libraries of input charac- ters. - Page 186 Chapter 13. ToDo Book...
-
Page 187: Adding Memos
14. Memo Book eBookMan includes Memo Book , a standard organizer program for storing memos. This chapter describes how to add, view and edit memos. at the Launcher to open Memo Book . When you open the program for the first time, you see an empty screen with a New button at the bottom left and a Sort arrow to the bottom right. -
Page 188: Viewing Memos
2. Enter your memo. Write in the Handwriting area or use the onscreen keyboard to enter your memo. You can enter a maximum of 4096 characters. 3. Tap Done to enter your memo. Tap Delete to exit without entering your memo. Viewing Memos When you open Memo Book you see the Memo List, a num- bered list of the memos you entered in the order that you... -
Page 189: Using The Menus
Editing Memos You can go to the Edit screen for the memo you want to view or edit. You can edit the memo text or delete your memo. 1. Tap the memo you want to edit. You see the Edit screen. 2. - Page 190 File Menu Use the File menu to view information about Memo Book and exit the program. The File menu is available at the Memo List. Both menus are available at the Edit screen. File menu About Displays the version number of Memo Book . Help (h) Display online help.
-
Page 191: Exiting Memo Book
Handwriting Guide (g) Displays the libraries of input characters. Synchronizing with Microsoft For detailed instructions please see “Using Intellisync” on page Exiting Memo Book You can close Memo Book and return to the Launcher or you can return to the Launcher and leave Memo Book running in the background. - Page 192 Chapter 14. Memo Book...
-
Page 193: Miscellaneous Applications
ISCELLANEOUS PPLICATIONS ® eBookMan User’s Guide... -
Page 194: Understanding The Buttons
15. Voice Memo eBookMan includes Voice Memo , a program that enables you to record memos and play them back. This chapter describes fea- tures of the program and details how to record and play memos, how to use the menus, and how to control the volume. at the Launcher to open Voice Memo . -
Page 195: Using The Menus
Using the Menus Voice Memo uses three menus: File, Edit, and Control. Tap in the Control Pad. To select an option, you can tap the menu item you want or write the Menu shortcut in the Handwriting area. The File Menu Use the File menu to view information about the program and exit the program. -
Page 196: Recording Voice Memos
The Control Menu Use the Control menu to set your preferences for the applica- tion. Play Single Play All Repeat Single Repeat All Recording Voice Memos Note: 1. Tap When the drop- down list is open, 2. Speak into the microphone located at the top right of the to quickly step through record- ings. -
Page 197: Listening To Voice Memos
Note: The length and number of memos you can record depends on the memory available in your device. If your device runs out of memory, the recording will stop. Rock the wheel to adjust the volume. Listening to Voice Memos 1. - Page 198 Chapter 15. Voice Memo...
-
Page 199: Understanding The Keys
16. Calculate eBookMan includes a standard calculator with memory features. The display screen holds 10 digits. This chapter describes the calculator keys, menus, how to make calculations, and how to use calculator memory. at the Launcher to open the program. Understanding the Keys The following keys perform mathematical functions: Multiplies... -
Page 200: Making Calculations
Using the Menu To access the menu, tap uses a menu that contains the following items. Help About Displays legal information about Calculate . Exit Note: Making Calculations If you want to perform a func- To make a simple calculation, follow these steps. tion using the 1. -
Page 201: Using Calculator Memory
Using Calculator Memory Using memory, you can add or subtract to and from a stored value. Once the memory is set, you can recall the value and use it in different calculations. You also can clear memory. To use memory, follow these steps. 1. - Page 202 Chapter 16. Calculate...
- Page 203 PPENDIX eBookMan ® User’s Guide...
-
Page 204: Checking For Updates
4. Start the Desktop Manager. 5. Click Web|My Updates. You go to Franklin’s Web page that has links to the latest Desktop Manager and OS and applications. The version num- bers of your currently installed Desktop Manager and the Operating System on your eBookMan are compared to those of the Desktop Manager and OS posted on Franklin’s Web site. - Page 205 3. On the eBookMan Download Software page, scroll down and, under Step 1, click the button next to the Desktop Manager you want. You can download the eBookMan the eBookMan Desktop Manager with Intellisync enables you to synchronize the personal information in your eBookMan to and from Microsoft 4.
-
Page 206: Updating The Ebookman Software
The program automatically compares the version numbers of your currently installed OS and the latest one that is avail- able on Franklin’s Web site. If the one on Franklin’s Web site is newer, the download begins. Follow the instructions on the screen to download and syn- chronize the latest OS and applications. -
Page 207: B. Serial Port Connection
B. Serial Port Connection If you have purchased a serial cradle or cable, please read the following sections to learn how to connect your device to your Serial cradle users The USB-to-serial cradle has three connectors: • DB-9 serial connector •... -
Page 208: Serial Cable Users
Serial cable users The USB-to-serial cable has four connectors: • USB connector • DB-9 serial connector • Female PS/2 connector • Male PS/2 connector Keyboard connector Keyboard port Male PS/2 connector on keyboard cable (B) Female PS/2 connector on USB-to-serial port cable Do the following to connect your device to a serial port on your computer using the USB-to-serial cable. -
Page 209: C. Multimediacards
8 MB to 64 MB. Please note that you cannot write to MMCs purchased with content on them. Note: MMCs are sold separately at www.franklin.com/ ebookman/accessories.asp or your local retailer. You can put applications and files on an MMC using the Desktop Manager. -
Page 210: Backing Up To Mmc
Backing Up to MMC Note: To save a backup copy of the eBookMan Operating System, Backup requires substantial bat- core applications, and information you entered into your eBookMan on an MMC, follow these steps. tery power. If you attempt to backup 1. -
Page 211: Restoring From Mmc
Restoring from MMC If you overwrite or delete files on your eBookMan that are backed up to MMC, you can restore those files easily. To restore files from MMC, follow these steps. 1. Insert an MMC into your eBookMan following the instructions under “Inserting MMCs”... -
Page 212: D. Glossary
In your eBookMan device, a name used to group applications and content that appears in the Launcher. files, e.g. Franklin Reader , Mobipocket Reader , Audiobook Player , and Music Player . In the Desktop Manager, the pane that shows all files and folders in the selected directory. - Page 213 Core application A free eBookMan program that is bundled with the operating system. Core applications include Franklin Reader , Franklin Viewer , Audiobook Player , Music Player , Voice Memo , Address Book , Date Book , Memo Book , ToDo Book , and Calculate .
- Page 214 Fields that are linked are referred to as mapped fields. (Franklin Universal Binary) The file type rec- ognized by Franklin Reader. A stroke made in the Handwriting area to perform a specific function - for example, backspace.
- Page 215 See MultiMediaCard. (MPEG audio layer 3) A compressed music file much smaller in size than its counterpart on a CD, and hence easily sent over the Internet. MultiMediaCard (MMC) An electronic card, similar to a floppy disk for your PC. An MMC with preloaded content is read-only.
- Page 216 Microsoft ® Outlook ® is an organizer applica- tion that runs on your PC. Franklin Reader is a program that runs on your eBookMan device. (Personal System/2-IBM compatible) The part of a cable that plugs into either a port on your PC or a port on your device.
- Page 217 serial port One of the types of connector ports on a computer. It can be used to connect devices such as modems, mice and so on. shutoff time The amount of time your device stays on if you forget to turn it off. simpliWrite A copyrighted system of handwriting recogni- tion developed by ART.
-
Page 218: Downloading And Installing The Desktop Manager Operating System, Or Applications
Customers in the United States or Canada can also send email or even chat with Franklin. If you need further technical support, see “Support” on page 15 for a list of contacts. - Page 219 Problem When I try to download or install the operating system (OS), my eBookMan device freezes and the error message "eBookMan not responding" appears on my computer screen. The Device pane in my Desktop Manager shows the message “Waiting for an eBookMan.
- Page 220 Problem When I try to open the User’s Guide in my Web browser from Franklin’s Web site, I get a blank screen. Appendix Solution • Your browser may not have the option (plug- in) for opening .pdf doc- uments. Right-click on the eBookMan ®...
-
Page 221: Sending Files From The Desktop Manager To Ebookman
Sending Files from the Desktop Manager to eBookMan Problem The PC fails to recognize my eBookMan device. Solution This may be because the drivers for your USB port are either missing or cor- rupted. To reinstall the driv- ers do the following: 1. - Page 222 Problem Newly downloaded materi- al is not copied over to my eBookMan device during synchronization. Appendix Solution • Make sure your file is in the Contents folder. Only files in the Contents folder are moved over during syn- chronization. • Your file may be of a type that is not recog- nized by eBookMan.
-
Page 223: The Desktop Manager
The Desktop Manager Problem When I try to start the Desktop Manager, an error message appears stating that the maximum available Universal Serial Bus (USB) power has been exceeded. Solution • Disconnect one or more of the devices attached to your USB port. •... -
Page 224: The Ebookman Device
The eBookMan Device Problem I have to tap slightly off- center on the icons in the Launcher to open the application or file. How can I fix the screen? When I press the On/Off button, my eBookMan device beeps but does not turn on. - Page 225 Problem I’m having difficulty getting my eBookMan device to understand my handwriting input. Where can I go for help? I am having a hard time writing letters. Is there another way to enter data in the eBookMan? How do I make new entries in the eBookMan Address Book ? When I tap on the “abc”...
- Page 226 Problem I forgot my password for my eBookMan device. What can I do to access my data and content? Appendix Solution If you forget your pass- word, you must perform a hard reset. This will clear the old password, but will also remove the operating system and all your data from the unit.
- Page 227 MMC, it is best to update both your Desktop Manager and your eBookMan operating sys- tem. For free updates, go to www.franklin.com/ ebookman, click on the link to eBookMan, then click on What’s new. Click on the link to download the latest Desktop Manager.
- Page 228 Problem An application on my eBookMan device is not responding. What should I Why are files I remove from my eBookMan device never removed permanent- ly from the unit? Appendix Solution There could be a number of reasons why the appli- cation may have stopped responding.Try the follow- ing.
- Page 229 Problem If I tap Restart System at the Launcher menu will I lose all my data? I see “OK” at the bottom right of the screen, but when I tap the screen or try to write nothing hap- pens. Solution No.
- Page 230 Appendix...
-
Page 231: F. Legal Information
F. Legal Information Specifications Model: EBM-900 Dimension: 13.15 x 8.6 x 1.7 cm. | Weight: approx. 185 g. Batteries: 2 X AAA | Memory: 8 MB | ISBN: 1-56712-607-3 Model: EBM-901 Dimension; 13.15 x 8.6 x 1.7 cm. | Weight: approx. 185 g. -
Page 232: Copyrights, Trademarks, Legal
This software is the property of Audible, Inc. Possession and use of this software must conform strictly to the license agreement between Franklin and Audible, Inc., and possession does not convey any rights to disclose, reproduce or permit others to use the software without the specific written authorization of Audible, Inc. -
Page 233: Limited Warranty, Disclaimer Of Warranties And Limited Remedy
(A) LIMITED WARRANTY. FRANKLIN WARRANTS TO THE ORIGINAL END USER THAT FOR A PERIOD OF ONE (1) YEAR FROM THE ORIGINAL DATE OF PURCHASE AS EVI- DENCED BY A COPY OF YOUR RECEIPT, YOUR FRANKLIN PRODUCT SHALL BE FREE FROM DEFECTS IN MATERIALS AND WORKMANSHIP. THIS LIMITED WARRANTY DOES... -
Page 234: Limited Warranty (Outside U.s.)
This product, excluding batteries and liquid crystal display (LCD), is guaranteed by Franklin for a period of one year from the date of purchase. It will be repaired or replaced with an equivalent product (at Franklin’s option) free of charge for any defect due to faulty workmanship or materials. -
Page 235: Record 194
Abbreviation 110, 121 Translator language 110 Bible 121 Translator 122 About Address Book 160 Audiobook Player 140 Calculate 200 eBookMan Desktop Manager 36 Intellisync 36 Memo Book 190 Music Player 146 ToDo Book 184 Voice Memo 195 Accessory Case 63 Cover 63 Address Book 12, 14, 150-161 Address view 153... - Page 236 Start 140 Stop 140, 145, 194 Cable 11, 21, 62, 208 Serial 208 Calculate 12, 14, 199-202 Exiting 201 Keys 199 Memory 201 Calibration 25 Caps lock keyboard 92 Category 126 Indicator 67 Change folder 34 Change sync folder 34, 40 Change to contents folder 34 Change to library folder 34 Configuration...
- Page 237 Exit 34, 140, 146, 161, 184, 195 Address Book 160, 161 Audiobook Player 140, 143 Calculate 200, 201 Date Book 176 Desktop Manager 34 Franklin Reader 99, 102, 122 Memo Book 190 Mobipocket Reader 131 Music Player 146, 148 ToDo Book 185 Views 100...
- Page 238 Send to PC 33 Synchronize 33 File types 39, 125 eBook 125 eDoc 125 eNews 125 Footnote 107 Forward 99 Franklin Reader 12, 13, 67, 96-122 Features 98 Icon 96 Lookup 108 Moving Around 106 Preferences 103 Searching 108 Franklin Reader Settings 104...
- Page 239 About Intellisync 36 Help topics 36 Home 99 HTML 39, 48 Iambic 232 Icon 67 Content 67 Franklin Reader 96 Program 67 ID number 64 Installation 35, 37, 204 Installation CD 11, 18, 22 Intellisync 11, 35, 43 Advanced Settings 45...
-
Page 240: My Updates 35
Menu icon 61 Menus in Audiobook Player 140 in Calculate 200 in Date Book 175 in Desktop Manager 33 in Franklin Reader 101 in Mobipocket Reader 130 in Music Player 146 in ToDo Book 184 in Voice Memo 195 Microphone 60, 196 Voice memo 60 Microsoft®... -
Page 241: Product Support 35
Help 102 Preferences 103 Reader Functions 102 Organizer program 150 Outline 99, 100 Page menu 131 Add bookmark 131 eBook Info 131 Go to first page 131 Go to page 131 Table of Contents 131 Panel Back 62 Password 27, 54 Deletion 76 Revision 75 Paste... -
Page 242: Word Match 112
Word match 112 Search Screen 109 Search View 100 SEB 50 Section 141 Select All Memo Book 190 Select destination 50 Send to eBookMan 33, 49 Send to PC 32, 33 Serial number 64, 69 Setup menu 35 Connection 35 Install 35 Intellisync 35 Shift keyboard 92... - Page 243 View menu 34 Device info 34 Refresh 34 Switch panes 34 Toolbar 34 Voice Memo 12, 194-198 Buttons 194 Exit 197 Fast forward 194 File menu 195 Listen 197 Play 194 Record 194, 196 Rewind 194 Web companion 11, 37, 51 Configure 52 Update 55 Web menu 34...
Need help?
Do you have a question about the eBOOKMAN EBM-900 and is the answer not in the manual?
Questions and answers