Table of Contents
Advertisement
Quick Links
Advertisement
Table of Contents

Related Manuals for Avid Technology XMON EUCON

Summary of Contents for Avid Technology XMON EUCON
- Page 1 XMON EUCON ™ Software Application User Guide...
- Page 2 Legal Notices This guide is copyrighted ©2011 by Avid Technology, Inc., with all rights reserved. Under copyright laws, this guide may not be duplicated in whole or in part without the written consent of Avid. 003, 96 I/O, 96i I/O, 192 Digital I/O, 192 I/O, 888|24 I/O, 882|20 I/O,...
-
Page 3: Table Of Contents
Installing and Configuring the XMON EUCON Software Application ....... . . - Page 4 XMON EUCON Software Application User Guide...
-
Page 5: Chapter 1. Introduction To The Xmon Eucon Software Application
Software Application The XMON EUCON™ Software Application is a simple EUCON-enabled utility that lets you control the XMON hardware from an Avid MC Pro or System 5-MC control surface. Once configured, the Control Room and Monitor section can be locked to XMON, letting you continue to control XMON monitoring from the control surface while switching to other software applica- tions and workstations. -
Page 6: About Www.avid.com
Products and Developers Learn about Avid products; download demo software or learn about our Development Partners and their plug-ins, applications, and hardware. News and Events Get the latest news from Avid or sign up for a product demo. XMON EUCON Software Application User Guide... -
Page 7: Chapter 2. Installing Xmon
EUCON Software Application. Monitoring is based on the XMON analog interface, which is remotely controlled from the XMON EUCON Software Application and the MC Pro Control Room section. All supported audio inputs and outputs for control room monitoring and studio com- munication are connected to the XMON interface. -
Page 8: Pro Tools|Hd Wiring Diagram
7 = Mini Speaker Out 2 (R) 7 = Rs 8 = Talkback/Slate (Out) 8 = LFE 8 = LFE Wiring diagram for HD I/O and XMON Not all channels shown are supported by the XMON EUCON Software Application. XMON EUCON Software Application User Guide... -
Page 9: Db-25 Connectors
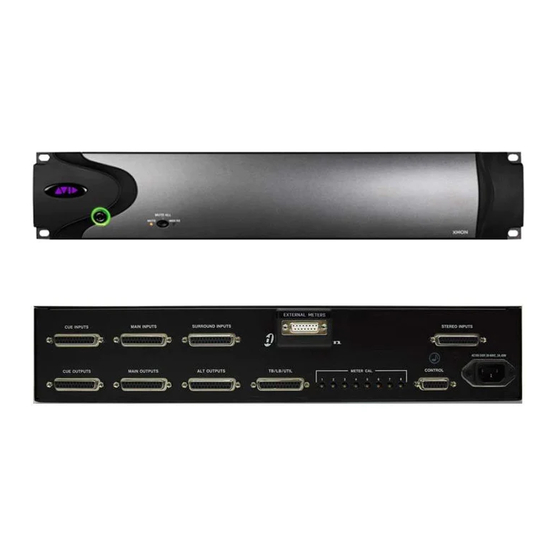
DB-25 Connectors This section shows a wiring diagram for each of XMON’s seven DB-25 connectors, and their pinout tables. DB-25 Wiring Diagram DB-25 connector (user view) DB-25 Connector Pinout Tables Cue Inputs Signal Name Pin# Signal Type Input+ Cue Input1 Input- Input+ Cue Input2... - Page 10 Signal Type Input+ Surround Input2-1 Input- Input+ Surround Input2-2 Input- Input+ Surround Input2-3 Input- Input+ Surround Input2-4 Input- Input+ Surround Input2-5 Input- Input+ Surround Input2-6 Input- Input+ Surround Input2-7 Input- Input+ Surround Input2-8 Input- XMON EUCON Software Application User Guide...
- Page 11 2Track Inputs Signal Name Pin# Signal Type Input+ 2Track Input1 Input- Input+ 2Track Input2 Input- Input+ 2Track Input3 Input- Input+ 2Track Input4 Input- Input+ 2Track Input5 Input- Input+ 2Track Input6 Input- Input+ 2Track Input7 Input- Input+ 2Track Input8 Input- Cue Outputs Signal Name Pin# Signal Type...
- Page 12 Alt 2 (Lc) Output- Output+ Alt 3 (C) Output- Output+ Alt 4 (Rc) Output- Output+ Alt 5 (R) Output- Output+ Alt 6 (SurL) Output- Output+ Alt 7 (SurR) Output- Output+ Alt 8 (LF) Output- XMON EUCON Software Application User Guide...
- Page 13 TB/LB Signal Name Pin# Signal Type Input+ TB Input2 Input- Input+ LB Input1 Input- Input+ LB Input2 Input- Input+ AFL Input1 Input- Input+ AFL Input2 Input- Output+ Mini Spk L Output- Output+ Mini Spk R Output- Output+ TB OUT Output- Chapter 2: Installing XMON 13...
-
Page 14: Installing The M-Audio Midi Uno
Windows displays the Found New Hardware Wizard. Choose Install software automatically and click Next. Once the Wizard has completed, click Finish. When the installation is complete, Windows displays Your new hardware is installed and ready to use. XMON EUCON Software Application User Guide... -
Page 15: Connecting The Control Cable Breakout Adapter
Connecting the Control Cable Breakout Adapter The Control Cable Breakout Adapter lets the XMON EUCON Software Application communicate with and control the XMON hardware. To connect the Control Cable Breakout Adapter and M-Audio MIDI Uno: Connect the 15-pin end of the Control Cable Breakout Adapter to the Control port on the back panel of the XMON hardware. -
Page 16: Selecting Midi Port
Mac (left) and Windows (right) installer icons Selecting a MIDI Port The XMON EUCON Software Application uses a MIDI port to communicate with the XMON hardware. The Mac and Windows versions of XMON select this port differently. Pro Tools users must deselect the MIDI device that XMON uses in Setup>MIDI>Input Devices. - Page 17 To lock the Control Room section to the XMON EUCON Software Application: Make sure the MC Pro is attached to the workstation running the XMON EUCON Software Application. Make sure the XMON EUCON Software Application is in focus (i.e., the front-most application).
- Page 18 XMON EUCON Software Application User Guide...
-
Page 19: Chapter 3. Using Xmon
Chapter 3: Using XMON XMON to EUCON Mapping This section clarifies the terminology used for the XMON and MC Pro/System 5-MC hardware. Control Room The Control Room section of the MC Pro/System 5-MC can route input sources to three sets of outputs. Main Spkrs Routes selected source(s) to the Main 1–8 (7.1-channel) outputs on the XMON hardware. -
Page 20: Selecting Sources From Mc Pro
You can re-order the blue sources by clicking on one and re-selecting another source (see figure below). Re-ordering the sources The Monitor and Control Room source selector buttons are always in Sum mode. Selecting a new source does not turn off the previously selected source(s). XMON EUCON Software Application User Guide... - Page 21 Control Room Sources The following input sources are available for the Control Room: • Main • Surround • Stereo 1 • Stereo 2 • Stereo 3 • Stereo 4 • Listenback • AFL Monitors A–D To select input sources for the four Monitor feeds: Press the SETUP key in the Control Room section of the MC Pro surface.
-
Page 22: Setting Control Room, Monitor, And Dim Levels
Press and hold the DIM key down. The Control Room level dims temporarily. Adjust the Control Room knob to the desired amount of attenuation. Release the DIM key and the Control Room level returns to normal illumination. XMON EUCON Software Application User Guide... -
Page 23: Speaker Management
• Clicking the gray Off button toggles speakers on that were previously active before the Off button was pressed. Additional Information The following XMON features are currently not supported in the XMON EUCON Software Application: • Linking Monitor Output levels •... - Page 24 XMON EUCON Software Application User Guide...
- Page 26 Avid Technical Support (USA) Product Information 2001 Junipero Serra Boulevard Visit the Online Support Center at For company and product information, Daly City, CA 94014-3886 USA www.avid.com/support visit us on the web at www.avid.com...
Need help?
Do you have a question about the XMON EUCON and is the answer not in the manual?
Questions and answers