Toyota 4RUNNER Manual
3-2. using the audio system
Hide thumbs
Also See for 4RUNNER:
- Owner's manual (656 pages) ,
- Manual (268 pages) ,
- Operating manual (135 pages)

Related Manuals for Toyota 4RUNNER


Summary of Contents for Toyota 4RUNNER
- Page 1 3-2. Using the audio system Audio system types Without navigation system and Display Audio system Type A: CD player with changer controller and AM/FM radio Type B: CD player with changer controller and AM/FM radio 4RUNNER_U...
- Page 2 3-2. Using the audio system Type C: CD player with changer and AM/FM radio Title Page Using the radio P. 338 Using the CD player P. 345 Playing MP3 and WMA discs P. 354 Operating an iPod P. 362 Operating a USB memory P.
- Page 3 3-2. Using the audio system With Display Audio system Owners of models equipped with a Display Audio system should refer to the “Display Audio System Owner's Manual”. With navigation system Owners of models equipped with a navigation system should refer to the “Navigation System Owner's Manual”.
- Page 4 3-2. Using the audio system Language settings (type B and C) The language used for all voice guidance, voice recognition and mes- sages may be changed. STEP Press STEP Press (MORE). STEP Press (LANG). STEP Press as corresponds to the desired lan- guage.
- Page 5 3-2. Using the audio system ■ Certification For the Display Audio system FCC ID: AJDK032 IC ID: 775E-K032 For the Display Audio system and the audio system NOTE: This device complies with Part 15 of FCC Rules and Industry Canada licence-exempt RSS standard(s).
- Page 6 3-2. Using the audio system CAUTION: This equipment complies with FCC/IC radiation exposure limits set forth for an uncontrolled environment and meets the FCC radio frequency (RF) Expo- sure Guidelines in Supplement C to OET65 and RSS-102 of the IC radio fre- quency (RF) Exposure rules.
- Page 7 3-2. Using the audio system Co-location: This transmitter must not be co-located or operated in conjunction with any other antenna or transmitter. CAUTION ■ For vehicles sold in the U.S.A. and Canada ● Part 15 of the FCC Rules and RSS-Gen of the IC Rules FCC Warning: Changes or modifications not expressly approved by the party responsible for compliance could void the user's authority to operate the equipment.
-
Page 8: Using The Radio
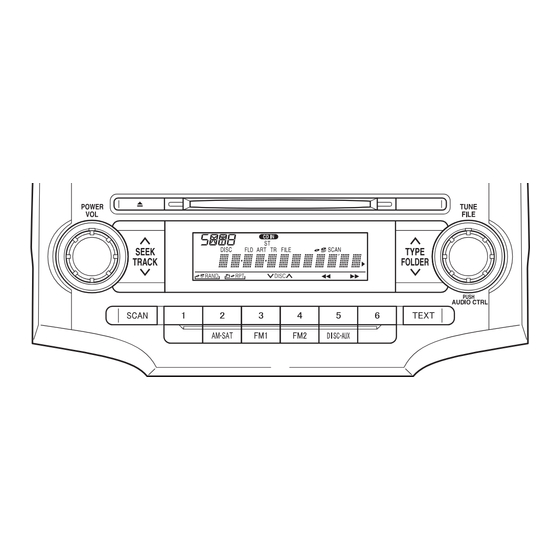
3-2. Using the audio system Using the radio Type A Power Volume Adjusting the frequency (AM, FM mode) Seeking a frequency or channel Station selector (SAT mode) Scanning for AM⋅SAT/FM Displaying radio Changing the receivable stations mode buttons text messages channel category Type B and C... - Page 9 3-2. Using the audio system ® Setting station presets (excluding XM Satellite Radio) STEP Search for desired stations by turning ∧ pressing “ ” or “∨” on STEP Press and hold a button (from ) until you hear a beep. Type B and C: Each time is pressed, station pages are changed.
- Page 10 3-2. Using the audio system ® Satellite Radio (if equipped) ® ■ Receiving XM Satellite Radio STEP Press The display changes as follows each time pressed. Type A: AM → SAT1 → SAT2 → SAT3 Type B and C: AM → FM → SAT STEP Turn to select the desired channel in all the...
- Page 11 3-2. Using the audio system ® ■ Scanning XM Satellite Radio channels ● Scanning channels in the current category STEP Press STEP When the desired channel is reached, press again. ● Scanning the preset channels STEP Press and hold until you hear a beep. STEP When the desired channel is reached, press again.
- Page 12 3-2. Using the audio system ■ When the battery is disconnected All preset stations are erased. (type A only) ■ Reception sensitivity Type B and C ⎯ Cargo loaded on the roof luggage carrier, especially ● ® metal objects, may adversely affect the reception of XM Satellite Radio.
- Page 13 ANTENNA securely. CHECK There is a short-circuit in the antenna or the sur- ANTENNA rounding antenna cable. See a Toyota certified dealer. ® You have not subscribed to XM Satellite Radio. The radio is being updated with the latest encryp- ®...
- Page 14 3-2. Using the audio system The channel you selected is no longer available. Wait for about 2 seconds until the radio returns to CHANNEL NOT the previous channel or “CH001”. If it does not AVAILABLE change automatically, select another channel. ®...
-
Page 15: Using The Cd Player
3-2. Using the audio system Using the CD player Type A Power Volume Displaying text messages CD eject Selecting a track Rewinding Selecting a track Repeat play Fast-forwarding Random playback Playback Searching playback Type B and C Power Volume Displaying text messages CD eject Selecting a track CD load... - Page 16 3-2. Using the audio system Loading CDs ■ Loading a CD (type A and B) Insert a CD. ■ Loading a CD (type C) STEP Press STEP When the indicator on the slot turns from amber to green, insert a CD. ■...
- Page 17 3-2. Using the audio system Ejecting CDs ■ Ejecting a CD (type A and B) Press and remove the CD. ■ Ejecting a CD (type C) STEP To select the CD to be ejected, press ) or The selected CD number is shown on the display. STEP Press and remove the CD.
- Page 18 3-2. Using the audio system Scanning tracks STEP Press The first ten seconds of each track will be played. To cancel, press again. STEP Press again when the desired track is reached. Selecting a CD (type C only) ■ Selecting a CD to play Press ) or ■...
- Page 19 3-2. Using the audio system Random playback ■ Current CD Press (RAND) or (RDM). Songs are played in random order. To cancel, press the button once more (type A and B), or twice more (type C). ■ All CDs (type C only) Press (RDM) twice.
- Page 20 3-2. Using the audio system Switching the display Press Each time is pressed, the display changes in the following order: Type A: Track no./Elapsed time → CD title → Track name. Type B and C: Track title → Track name/Artist name → Track name/ Elapsed time.
- Page 21 “WAIT” or “PLEASE WAIT”: Operation has stopped due to a high tempera- ture inside the player. Wait for a while and then press . Contact your Toyota dealer if the CD still cannot be played back. ■ Discs that can be used Discs with the marks shown below can be used.
- Page 22 3-2. Using the audio system NOTICE ■ CDs and adapters that cannot be used Do not use the following types of CDs, 3 in. (8 cm) CD adapters or Dual Discs. Doing so may damage the CD player and/or the CD insert/eject function. ●...
- Page 23 3-2. Using the audio system NOTICE ■ CD player precautions Failure to follow the precautions below may result in serious damage to the CDs or the player itself. ● Do not insert anything other than CDs into the CD slot. ●...
-
Page 24: Playing Mp3 And Wma Discs
3-2. Using the audio system Playing MP3 and WMA discs Type A Power Volume Selecting a file CD eject Selecting a folder and files Selecting a file Fast-forwarding Searching Displaying text Repeat play playback messages Rewinding Random playback Playback Type B and C Selecting a file Power Volume... - Page 25 3-2. Using the audio system Loading and ejecting MP3 and WMA discs →P. 346 Selecting MP3 and WMA discs (type C only) →P. 347 Selecting and scanning a folder ■ Selecting folders one at a time Press “∧” or “∨” on to select the desired folder.
- Page 26 3-2. Using the audio system ■ Selecting the desired file by cueing the files in the folder Press When the desired file is reached, press once again. Fast-forwarding and rewinding files Type A: Press ) or ∧ Type B and C: Press and hold “ ”...
- Page 27 3-2. Using the audio system Repeat play ■ Repeating a file Press (RPT) or (RPT). To cancel, press the button once more (type A and B), or twice more (type C). ■ Repeating all of the files in a folder Type A: Press and hold (RPT) until you hear a beep.
- Page 28 “WAIT” or “PLEASE WAIT”: Operation has stopped due to a high tempera- ture inside the player. Wait for a while and then press . Contact your Toyota dealer if the CD still cannot be played. ■ Discs that can be used →P.
- Page 29 3-2. Using the audio system ■ MP3 and WMA files MP3 (MPEG Audio LAYER3) is a standard audio compression format. Files can be compressed to approximately 1/10 of their original size by using MP3 compression. WMA (Windows Media Audio) is a Microsoft audio compression format. This format compresses audio data to a size smaller than that of the MP3 format.
- Page 30 3-2. Using the audio system ● Compatible media Media that can be used for MP3 and WMA playback are CD-Rs and CD- RWs. Playback in some instances may not be possible if the CD-R or CD-RW is not finalized. Playback may not be possible or the audio may jump if the disc is scratched or marked with fingerprints.
- Page 31 3-2. Using the audio system ● MP3 and WMA playback When a disc containing MP3 or WMA files is inserted, all files on the disc are first checked. Once the file check is finished, the first MP3 or WMA file is played.
-
Page 32: Operating An Ipod
3-2. Using the audio system ∗ Operating an iPod Connecting an iPod enables you to enjoy music from the vehicle speakers. ■ Connecting an iPod Open the glove box and con- STEP nect an iPod using an iPod cable. Turn on the power of the iPod if it is not turned on. - Page 33 3-2. Using the audio system ■ Control panel Power Volume Selecting a track/ fast-forwarding Selector knob and rewinding Selector buttons Displaying text Playback/pause messages Playback 4RUNNER_U...
- Page 34 3-2. Using the audio system Selecting a play mode STEP Press (BROWSE) to select iPod menu mode. STEP Press as corresponds to the desired play mode. Pressing (MORE) to change to the second selection list. ■ Play mode list First Second Third Fourth...
- Page 35 3-2. Using the audio system ■ Selecting a list STEP Turn to display the first selection list. STEP Press to select the desired item. STEP Repeat the same procedure to select the desired song name. To return to the previous selection list, press Selecting songs from a song list STEP Press...
- Page 36 3-2. Using the audio system Selecting songs Turn or press “∧” or “∨” on to select the desired song. Playing and pausing songs Press Fast-forwarding and rewinding songs ∧ Press and hold “ ” or “∨” on Shuffle playback ■ Playing songs from one playlist or album in random order Press (RDM).
- Page 37 3-2. Using the audio system Switching the display Press Each time is pressed, the display changes in the following order: Track title → Track title/Artist name → Track title/Album name → Track title/Elapsed time ■ About iPod ● Apple is not responsible for the operation of this device or its compliance with safety and regulatory standards.
- Page 38 3-2. Using the audio system ■ Compatible models Model Generation Software version iPod 5th generation Ver. 1.2.0 or higher iPod nano 1st generation Ver. 1.3.0 or higher 2nd generation Ver. 1.1.2 or higher 3rd generation Ver. 1.0.0 or higher iPod touch 1st generation Ver.
-
Page 39: Operating A Usb Memory
3-2. Using the audio system ∗ Operating a USB memory Connecting a USB memory enables you to enjoy music from the vehicle speakers. ■ Connecting a USB memory Open the glove box and con- STEP nect a USB memory. Turn on the power of the USB memory if it is not turned on. - Page 40 3-2. Using the audio system ■ Control panel Selector knob Power Volume Selecting a track/ fast-forwarding Selecting a and rewinding folder and file Selector buttons Searching Displaying text playback Playback/pause messages Playback Selecting and scanning a folder ■ Selecting a folder Press “∧”...
- Page 41 3-2. Using the audio system Selecting and scanning files ■ Selecting a file Turn or press “∧” or “∨” on to select the desired file. ■ Scanning the files in a folder Press The first ten seconds of each file will be played. To cancel, press again.
- Page 42 3-2. Using the audio system Repeat play ■ Repeating a file Press (RPT). To cancel, press the button twice. ■ Repeating all the files in a folder Press (RPT) twice. To cancel, press the button again. Switching the display Press Each time is pressed, the display changes in the following order:...
- Page 43 3-2. Using the audio system ■ USB memory ● Compatible device USB memories that can be used for MP3 and WMA playback. Depending on the type of USB device, playback may not be possible. ● Compatible device formats The following device formats can be used: •...
- Page 44 3-2. Using the audio system ● MP3 file compatibility • Compatible standards MP3 (MPEG1 AUDIO LAYERII, III, MPEG2 AUDIO LAYERII, III, MPEG2.5) • Compatible sampling frequencies MPEG1 AUDIO LAYERII, III: 32, 44.1, 48 (kHz) MPEG2 AUDIO LAYERII, III: 16, 22.05, 24 (kHz) MPEG2.5: 8, 11.025, 12 (kHz) •...
- Page 45 3-2. Using the audio system ● Extensions If the file extensions .mp3 and .wma are used for files other than MP3 and WMA files, they will be mistakenly recognized and played as MP3 and WMA files. This may result in large amounts of interference and damage to the speakers.
-
Page 46: Optimal Use Of The Audio System
3-2. Using the audio system Optimal use of the audio system Type A Adjusting the sound quality and ASL Type B and C Adjusting the sound quality and ASL Selector buttons Menu button 4RUNNER_U... - Page 47 3-2. Using the audio system Using the audio control function ■ Changing sound quality modes Type A Pressing selects the mode to be changed in the following order: “BAS”→“TRE”→“FAD”→“BAL”→“ASL” Type B and C STEP Press STEP Press (type C only) as corresponds to the desired mode.
- Page 48 3-2. Using the audio system Type B and C Mode Sound qual- Turn to the Turn to the Level displayed ity mode left right BASS Bass* -5 to 5 Mid-range* -5 to 5 High (type C only) TREB Treble* -5 to 5 Front/rear Shifts to FADE...
- Page 49 3-2. Using the audio system Type B and C STEP Press STEP Press (MORE). STEP Press (ASL). STEP Press (type B only) or (type B only) as corresponds to the desired mode. Type B: “LOW”, “MID”, “HIGH”, or “OFF” Type C: “ON” or “OFF” ASL automatically adjusts the volume and tone quality according to vehicle speed.
- Page 50 3-2. Using the audio system Party mode switch You can switch the sounds quality types by pressing the switch. Base mode Party mode In party mode, the sound volume from the speakers on the back door is bigger than in base mode. (The output from the speakers on the rear doors will be transferred to the back door speakers.)
-
Page 51: Using The Aux Port
3-2. Using the audio system Using the AUX port This port can be used to connect a portable audio device and listen to it through the vehicle’s speakers. Open the cover and connect STEP the portable audio device. CTH32AS023 STEP Press ■... -
Page 52: Using The Steering Wheel Audio Switches
3-2. Using the audio system ∗ Using the steering wheel audio switches Some audio features can be controlled using the switches on the steering wheel. Increases/decreases vol- Radio mode: Selects radio stations CD mode: Selects tracks, files (MP3 and WMA) and discs (type C only) CTH32AS046 iPod mode:... - Page 53 3-2. Using the audio system Turning the power on Press when the audio system is turned off. The audio system can be turned off by holding the switch down until you hear a beep. Changing the audio source Press when the audio system is turned on. The audio source changes as follows each time the switch is pressed.
- Page 54 3-2. Using the audio system Selecting a track/file or song ® STEP Press to select CD, iPod, USB memory or Bluetooth audio mode. STEP Press “∨” or “∧” on to select the desired track/file or song. Selecting a folder or album ®...
-
Page 55: Detachable Pole Antenna
3-2. Using the audio system Detachable pole antenna The antenna can be removed. ■ Removing the antenna Place the included wrench STEP around the antenna. When not in use, the wrench is stored in glove box. CTH32AS077 Loosen the antenna with the STEP wrench and remove it. - Page 56 3-2. Using the audio system ■ Installing the antenna Tighten the antenna by one STEP hand until it will not turn any more. CTH32AS079 Using the wrench, tighten the STEP antenna an additional 1/8th turn (20 to 45 degrees) to secure it in place.
- Page 57 3-2. Using the audio system NOTICE ■ To avoid damaging the antenna Remove the antenna in the following situations. ● When using an automatic carwash. ● When the antenna will touch the ceiling of a garage, etc. ● When covering the vehicle with a car cover. ■...
Need help?
Do you have a question about the 4RUNNER and is the answer not in the manual?
Questions and answers