
Related Manuals for Sunbeam Juice Stream JE5200


Summary of Contents for Sunbeam Juice Stream JE5200
- Page 1 Juice Stream ™ Whole fruit juice extractor Instruction Booklet JE5200 Please read these instructions carefully and retain for future reference.
-
Page 2: Table Of Contents
Contents Safety Precautions for your Juicer Features of your Juice Stream ™ Helpful hints for juicing A guide to the benefits of juicing Assembling your Juicer Operating your Juicer Juicing speed guide Disassembling your Juicer Care and Cleaning Trouble shooting guide Recipes Day starters Juice remedies... -
Page 3: Safety Precautions For Your Juicer
• Never operate without pulp container. • Do not use the juicer if the rotating sieve is damaged. • Ensure the juicer is correctly and completely assembled before turning the appliance ‘On’. Sunbeam is very safety conscious when designing and • Do not use an appliance for any purpose other than manufacturing consumer products, but it is essential its intended use. that the product user also exercise care when using • Do not place an appliance on or near a hot gas an electrical appliance. Listed below are precautions flame, electric element or on a heated oven. -
Page 4: Features Of Your Juice Stream
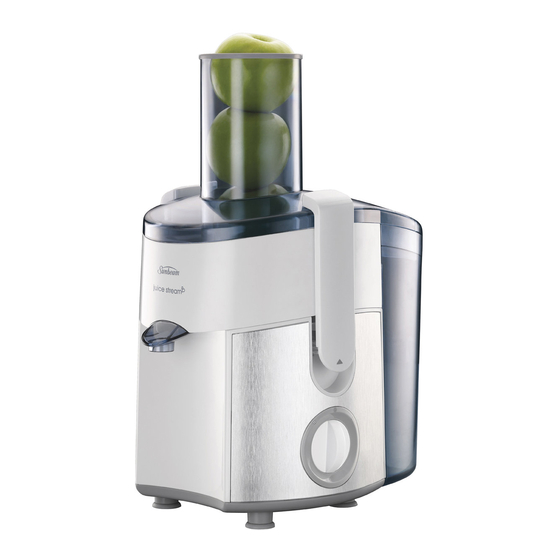
Features of your Sunbeam Juice Stream ™ Food pusher Whole fruit & vegetable feed chute The extra wide 75mm diameter feed chute takes whole fruit and vegetables reducing the amount of preparation needed. Juicer cover 1.5 Litre external pulp container Large 1.5 litre capacity pulp container is ideal for extracting large volumes of juice without stopping. Once full the pulp container can be easily removed without having to dismantle the juicer. Twin-locking handles Side arms lock all the parts in place for total safety. Unless correctly assembled the juicer will not operate. - Page 5 Stainless steel blade and filtering basket To maximise juice extraction the blade and filtering basket is constructed and fitted with stainless steel mesh for durability, performance and cleaning ease. Juice Collector / Bowl Control switch with two speeds and off Two-speed control maximises juicing results. Low speed for soft fruit, particularly those with a high water content including oranges and watermelon. High speed is ideal for hard and fibrous fruit and vegetables such as apples, ginger, celery and carrots. Juicing jug Juicing jug catches the juice and makes it easy to pour into serving glasses. Non-slip feet Heavy-duty non-slip feet ensure the juicer remains stable and prevents slipping on the bench top during use.
-
Page 6: Helpful Hints For Juicing
Helpful hints for juicing Preparing fruit and vegetables Bananas can be hard to juice but the taste goes a long way. When juicing a blend of Wash all fruit and vegetables well before fruit with bananas, add the banana as either juicing. There is no need to peel vegetables the first or second piece of fruit. The nectar that have a thin skin but a light scrub with of the banana will sit inside the filtering a clean sponge will help rid of any dirt that basket and as the remaining fruits are added may be stuck on or any waxy coatings. into the juice extractor they will release the Peel fruit and vegetables that have a thick banana nectar throughout the rest of the skin such as melons, pineapple and citrus juice resulting in frothy flavoursome juice. fruit. When juicing small fruit such as grapes or Juice only the freshest of fruit and vegetables strawberries, add the fruit in handfuls rather to get the most out them and the best than one at a time, this will maximise the flavours. amount of juice extracted. Cut large pieces of fruit, such as melons into Be aware that beetroot stains all other fruit large wedges. and vegetables. If juicing several different Some seeds from citrus fruits can be bitter juice combinations, juice the drink with the so you may want to remove some of the seeds beetroot last, so as to not stain the other if desired. -
Page 7: A Guide To The Benefits Of Juicing
A guide to the benefits of juicing Fruit / Vegetable Source of Benefits KJ per 100g Apples Carotenes, pectin, potassium, May help in the treatment 150kj/100g vitamin C and dietary fibre, of constipation. energy giving carbohydrates. Apricots Beta-carotene, iron, vitamin C, High in natural sugars for energy. 280kj/100g dietary fibre. Banana Potassium, carbohydrates, Provides sustained energy. 225kj/100g dietary fibre, vitamin B6, vitamin C. Beetroot Folate, potassium, leafy tops are rich The folate is excellent for 120kj/100g in beta carotene, calcium and iron. healthy cells. Blueberries Carotenoids, vitamin C. - Page 8 A guide to the benefits of juicing (continued) Fruit / Vegetable Source of Benefits KJ per 100g Mango Beta carotene, potassium, flavenoids Easy to digest. 235kj/100g and other antioxidants. Mint Antispasmodic volatile oils, Aids digestion. flavenoids, menthol. Oranges High in vitamin C, fibre, beta Excellent for healthy skin and helps 100kj/100g carotene, flavenoids, thiamine, the body’s defences against bacterial pectin, folate. infections. Papaya Protective carotenoids, rich in Helps digest proteins. 160kj/100g vitamin C, fibre, rich in papain. Parsley Vitamin C, iron.
-
Page 9: Assembling Your Juicer
Assembling your juicer Before Use 3. P osition the stainless steel blade and filtering basket onto the motor drive shaft After unpacking your juicer, we recommend and push down until firmly in place. that you dissemble the unit before using – figure 3. for the first time. Wash all parts except the Figure 3 motor base in hot soapy water. Rinse and dry immediately. Important: Always ensure your juicer is unplugged from the power outlet when not in use, during assembling or whilst removing parts. 1. S et the motor base on a dry, level surface. For convenience when juicing, have the control switch facing you – figure 1. Figure 1 4. P lace the juicer cover onto the juice collector / bowl, with the feed chute positioned over the stainless steel blade and filtering basket and push into position – figure 4. Figure 4 2. P lace the juice collector / bowl onto the top of the motor base – figure 2. - Page 10 Assembling your juicer (continued) 5. S ecure the juicer cover by raising the twin- 7. T ake the food pusher, align the groove locking handles and clip the tops to the on the food pusher with the notch on juicer cover. Press firmly on the lower part the inside of the feed chute and of the twin-locking handles to lock into slide the food pusher down into place – figure 5. the feed chute – figure 7. Figure 7 Figure 5 6. S lightly tilt the pulp container and slide into place under the juicer cover – figure 6. Tip: To reduce cleaning we recommend that you line the pulp container with a plastic bag to collect the pulp. Figure 6...
-
Page 11: Operating Your Juicer
Operating your juicer Note: The juicer should be completely Important: Do not operate for more than 1 assembled before use, if this is not the case minute and 42 seconds at a time when see ‘Assembling your juicer’ on page 7. juicing heavy loads. None of the recipes in this manual are considered a heavy load. 1. E nsure the control switch on the juicer is in the ‘Off’ position and insert the power 6. W ith the juicer in operation, place the cord into a 230-240V AC power outlet and fruit and vegetables into the feed chute. Using the food pusher, guide the fruit and turn the power ‘On’. vegetables down the feed chute and onto 2. C lean fruit and vegetables thoroughly, the stainless steel blade. ready for juicing. Tip: For maximum juice extraction, guide Note: The extra large feed chute allows the food pusher down the feed chute in a whole fruit and vegetables to be juiced, slow downward motion. however some fruit and vegetables may require other preparation before juicing, Important: Do not push fruit or vegetables into such as peeling and removing stones, see the feed chute with your fingers, always use ‘Juicing speed guide’ on page 10 for our the food pusher provided. recommendations. -
Page 12: Juicing Speed Guide
Juicing speed guide FRUIT / VegeTABLe TyPe ReCOmmeNDeD SPeeD Apples Apricots – remove stone Banana – remove skin Beetroot Blueberries Capsicum - remove seeds Carrots Celery Cherries – remove pips Cucumber Fennel Ginger Grapes - remove stems Grapefruit – remove skin Honeydew melon – remove skin Kiwi fruit – remove skin Lemon – remove skin Lime – remove skin Mandarins – remove skin Mangoes – remove skin & seed Mint Oranges – remove skin Papaya || / | Parsley Pawpaw || / | Peaches – remove stone Pears || / | Pineapple – remove skin Plums – remove stone Raspberries Rockmelons – remove skin... -
Page 13: Disassembling Your Juicer
Disassembling your juicer 1. T urn the power ‘Off’ at the power outlet 4. Lift the juicer cover from the juice and unplug the cord. collector/bowl – figure 10. 2. S lightly tilt the pulp container and slide Figure 10 away from the juicer – figure 8. Figure 8 5. P lace fingers under the rim of the stainless steel blade and filtering basket and lift out – figure 11. Important: Juicing blades are very sharp, handle juicing filter basket with care when removing, replacing and cleaning. 3. P lace fingers under the bottom of the twin-locking handles and lift Figure 11 to release – figure 9. Figure 9 6. L ift the juice collector/bowl from the motor base – figure 12. Figure 12... -
Page 14: Care And Cleaning
Care and cleaning Note: Ensure that the juicer is unplugged Using a brush, hold the stainless steel blade from the power outlet prior to cleaning. and filtering basket under running water and brush the outside of the basket first. Then Important: Do not place any part of your juicer with the basket still under running water, in the dishwasher. brush the inside of the basket in an anti- clockwise direction, removing the pulp. To Quick clean ensure the stainless steel blade and filtering For easy cleaning, ensure that immediately basket is free of all remaining pulp, hold it after use that the juicer is disassembled and up to light and ensure that the holes in the that each removable part is rinsed under filtering basket are not blocked. running water, removing any wet pulp and Important: Juicing blades are very sharp, then allow to air dry. handle juicing filter basket with care when Thorough cleaning removing, replacing and cleaning. Disassemble the juicer and place all Use a soft, damp cloth to wipe the motor removable parts aside, see ‘Disassembling base clean. your juicer’ on page 11. To clean the motor base Rinse the juice collector, juicer cover, pulp Clean the motor base of the juicer using a container and food pusher under running damp soft sponge with mild detergent and... -
Page 15: Troubleshooting Guide
Troubleshooting Guide Problem Possible cause What to do Juicer will not start when speed The juicer hasn’t been assembled See ‘Assembling your juicer’ is selected. correctly. on page 7. The juicer motor appears to struggle Pulp container is full. Empty the pulp container. during operation. Pulp is caught in the Stop juicing, remove the juicer cover juicer cover. and clean out pulp. See ‘Disassembling your juicer’ and ‘Care and Cleaning’ sections. Try a slower juicing action – guide the food pusher down the feed chute in a slow downward motion. Stainless steel blade and filtering After extended juicing of fibrous fruit basket is blocked with excess pulp. and vegetables the mesh on the filtering basket may need to be cleaned. Stop juicing, disassemble the juice extractor and clean the filtering basket. See ‘Disassembling your juicer’ and ‘Care and Cleaning’ sections. The selected juicing speed See ‘Juicing speed guide’ on page 10. is incorrect. You notice less juice coming Large amounts of highly fibrous fruit Stop juicing, disassemble the juice out of the juice spout. -
Page 16: Recipes
Recipes DAy STARTeRS Orange madness Pawpaw ½ large, peeled, seeds For all recipes in this section, process all removed ingredients listed in the recipe through the juicer, stir and serve immediately. Rockmelon ¼ , peeled, seeds removed All recipes make approximately 2 small Lime ¼ , peeled serves. Grapes ½ cup Zinger morning Calmer Pineapple ¼ small, peeled Mango 1, seed removed Green apples Oranges 2, peeled Celery 1 stalk Blood plums 4, seeds removed Mint 1 sprig Pick Up The Pace Lemon ¼... -
Page 17: Juice Remedies
Recipes (continued) JUICe RemeDIeS Body Cleanser Carrot For all recipes in this section, process all ingredients listed in the recipe through the Celery juicer, stir and serve immediately. Pear All recipes make approximately 2 small Beetroot 1 small serves. Power Purifier Immune Booster Carrot Green apples Beetroot 1 small Celery 3 stalks Red capsicum ½ , seeds removed Ginger 2cm piece Spinach 2 large leaves See the light Classic Karma Green apples Carrot Carrot Green apples Ginger... -
Page 18: Juice Jolts
Recipes (continued) JUICe JOLTS Watery Wonderland Watermelon 1 wedge, 300g piece For all recipes in this section, process all ingredients listed in the recipe through the Pineapple ¼ small, peeled juicer, stir and serve immediately. Mint 1 sprig All recipes make approximately 2 small serves. Juice Rush Rockmelon ¼ , peeled Tropical memories Carrot Pineapple ¼ small, peeled Watermelon 1 wedge, 300g piece Strawberries 2 large Lime half, peeled Kiwi Fruit 1, peeled Watermelon 1 wedge, 200g piece Tropical Treasure Mango ½... -
Page 19: A Good Start For Kids
Recipes (continued) A gOOD START FOR KIDS Juicy Juice Raspberries 125g, frozen, thawed For all recipes in this section, process all ingredients listed in the recipe through the Pear 1 small juicer, stir and serve immediately. Water ¹/ ³ cup All recipes make approximately 2 small serves. Drink your Veges! Carrot goody gumdrops Green apple Orange 1, peeled Celery 1 stalk Pineapple ¼ small, peeled Strawberries 2 large Kid Cold Crusher Orange Kiwi Fruit 1, peeled... - Page 20 Notes...
- Page 21 Notes...
- Page 22 Notes...
- Page 23 12 months of purchase (3 months commercial use) due to faulty materials or manufacture, we will replace it for you free of charge. Should you experience any difficulties with In Australia you are entitled to a your appliance, please phone our customer replacement or refund for a major failure and service line for advice on 1300 881 861 in for compensation for any other reasonably Australia, or 0800 786 232 in New Zealand. foreseeable loss or damage. You are also Alternatively, you can send a written claim entitled to have the goods repaired or to Sunbeam at the address listed below. replaced if the goods fail to be of acceptable On receipt of your claim, Sunbeam will quality and the failure does not amount to seek to resolve your difficulties or, if the a major failure. appliance is defective, advise you on how Should your appliance require repair or to obtain a replacement or refund. service after the guarantee period, contact Your Sunbeam 12 Month Replacement your nearest Sunbeam service centre. Guarantee naturally does not cover misuse For a complete list of Sunbeam’s authorised...
- Page 24 Sunbeam Corporation Limited 2009. ABN 45 000 006 771 Units 5 & 6, 13 Lord Street Botany NSW 2019 Australia Unit 3, Building D 26 Vestey Drive Mt Wellington Auckland New Zealand Sunbeam Corporation is a division of GUD Holdings Ltd. 9/11...
Need help?
Do you have a question about the Juice Stream JE5200 and is the answer not in the manual?
Questions and answers