Magellan RoadMate 300 Reference Manual
Hide thumbs
Also See for RoadMate 300:
- Manual de l'utilisateur (146 pages) ,
- Manual del usuario (146 pages) ,
- Reference manual (84 pages)

Related Manuals for Magellan RoadMate 300


Summary of Contents for Magellan RoadMate 300
-
Page 1: Magellan Roadmate
Magellan RoadMate ® ™ Reference Manual Instructions for Operating the Magellan RoadMate 300... -
Page 2: Important Safety Warnings
*** IMPORTANT SAFETY WARNINGS *** The Magellan RoadMate 300 is a vehicle-navigation aid designed to assist you in arriving at your selected destinations. When using the Magellan RoadMate, these safety rules must be followed to prevent accidents that can result in injury or death to yourself or others: •... -
Page 3: Table Of Contents
Data Storage and Access ........................17 Basemap Routing vs. Detailed Map Routing....................19 Routing Between Regions ........................20 Basic Operation .......................... 22 Turning the Magellan RoadMate On ......................22 Inputting Text Characters........................22 Additional Characters (More) ........................23 Numerical Characters (123)........................23 Using QuickSpell®.......................... - Page 4 Add a POI as an Address ........................47 Viewing an Address on the Map ......................48 Deleting an Address from the List ......................49 Uploading Addresses to your Magellan RoadMate ................... 49 Trip Planner ..........................50 Trip Planner Screen ..........................51 Toolbar ..............................
- Page 5 Table of Contents Basemap Routing........................... 79 Selecting a Point on the Map ....................... 79 Search BaseMap City .......................... 80 Accessing Map Files..........................81 Switching Map Files ..........................81 Switching SD Cards ..........................82 Selecting a Destination Using “Select Address” ..................84 Select Address ............................
- Page 6 Table of Contents Stop Track Recorder .......................... 135 Save Track Record ..........................136 View Track ............................137 Delete, Rename Track ........................138 Configuration............................140 Brightness ............................140 Volume ............................140 Auto Power Off ..........................141 Language ............................141 User Settings............................142 POI Selection ...........................
-
Page 7: Information
Information Information About Satellite Navigation Global satellite navigation is an exciting technology, providing enhanced productivity and accuracy in a vast number of industries. It adds a new level of enjoyment and safety to a wide range of navigation, sports, and recreational activities. -
Page 8: Precision
On average, a satellite-navigation receiver is accurate to within 15 meters. Thales Navigation employs several technologies to increase the accuracy of their professional and Magellan®-branded receivers. An accuracy of 3 meters or better is achieved using correction signals from satellite navigation-augmentation systems. In the U.S., an accuracy of 3 meters is achieved using signal corrections from a network of ground stations and fixed-position satellites known as WAAS (Wide-Area Augmentation System). -
Page 9: A Word On The Safe Usage Of Gps Maps
From Source to Destination Thales Navigation, maker of Magellan GPS products, is not a cartography company. We do not create the maps that are used on our GPS devices. We seek to acquire map data from the best public and private sources available at the time of publication. -
Page 10: Magellan Roadmate 300
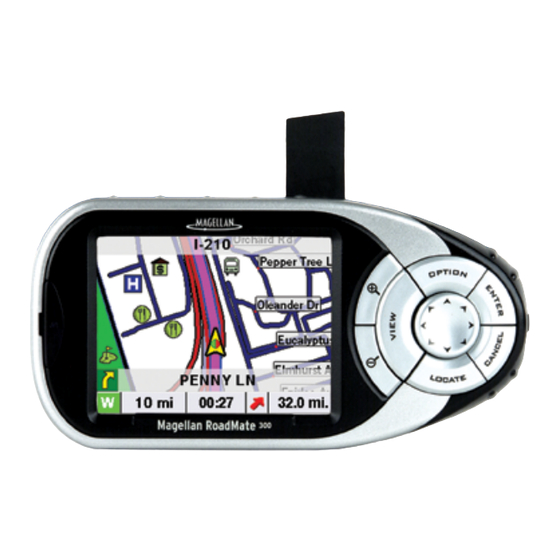
Magellan RoadMate Magellan RoadMate 300 Front View Power Press to turn the Magellan RoadMate on or off. Zoom In While viewing the map, press to enlarge the map view Zoom Out While viewing the map, press to shrink the map view... -
Page 11: Left- And Right-Side Views
Magellan RoadMate Left- and Right-Side Views USB Connection Connect to your PC to upload map data or software updates Power Connection Plug into your vehicle or at home Headset Connection Plug in an earpiece for noisy areas Bottom View SD Card Slot... -
Page 12: Secure Digital (Sd) Cards
The Secure Digital (SD) card is a small, lightweight flash memory device that allows increased data storage for your Magellan RoadMate. The compact size is ideal for storing large amounts of data and not taking a lot of physical space. -
Page 13: Sd Card-Authorization Options
SD Card-Authorization Options The Magellan RoadMate requires an SD card to be “authorized”. A card is authorized by using the serial number of the card to generate and unlock code specifically for that card. This is so you cannot use faulty or poorly manufactured cards in the unit and risk corrupting the data on the unit. - Page 14 Next. Your default internet browser will launch and take you to Magellan’s Product Unlock Codes page. Select “Unlocking an SD to use with your Magellan RoadMate 300”. Click on Continue. Enter your E-mail address and password. If you have not registered previously, click on “Click here to create an...
- Page 15 SD Cards Select the type of SD card you wish to authorize. Next, enter the serial number you wrote down. Continue to enter the required information and click on Continue. Your Unlock Code is displayed. Make sure you write down the Unlock Code in the space provided in this manual.
- Page 16 SD Cards You are now ready to upload maps to your SD card. By Calling Customer Service. Follow the directions as before. Select “I would like to request an Authorization Code by phone/fax”. Select Next. The dialog box will display the phone number to call along with the hours of operation.
- Page 17 SD Cards You are now ready to upload maps to your SD card. Print this page, and use the space provided to write down your serial number and unlock code. SD Card Serial Number: ______________________________________________________ Unlock Code: _______________________________________________________________ SD Card Serial Number: ______________________________________________________ Unlock Code: _______________________________________________________________ SD Card Serial Number: ______________________________________________________ Unlock Code: _______________________________________________________________...
-
Page 18: Installation
Take care when mounting the Magellan RoadMate in your vehicle, whether using the windshield mount or another mount, that it does not obstruct the driver’s view of the road. Make sure that the placement of the Magellan RoadMate and cable does not interfere with the operation of vehicle safety devices, such as air bags. You assume the risks associated with damage to your vehicle or your vehicle’s occupants as a result of how you choose to mount the Magellan... -
Page 19: Installing The External Antenna
Plug the cigarette lighter connector into an appropriate 12V receptacle in your car. Rotate the antenna upward. Installation is complete. You are ready to turn the Magellan RoadMate on and go. Installing the External Antenna The external antenna (not included) provides faster satellite fix times and greater signal strength. Because it is mounted outside of the vehicle, it is not affected by reflective coatings on windows and has an unobstructed line of sight to the... - Page 20 Installation Plug the end of the external antenna into the socket on the back of the unit. Attach the antenna to a flat portion of the roof of your vehicle. The antenna is magnetic. Do not use any adhesives to attach the antenna to your vehicle. Route the antenna cable so it does not interfere with the operation of the vehicle.
-
Page 21: Magellan Roadmate Manager Application
Installation Magellan RoadMate Manager Application The Magellan RoadMate Manager is used to configure your personal settings, select and store detailed map regions, and upload everything to your Magellan RoadMate. This Application will guide you step by step through the installation process. Simply insert the CD into your computer’s CD drive and the process will begin automatically. - Page 22 Installation Choose a program folder. This tells the installation under which group of programs to place the program icon. Typically, it will create a Magellan group and store the program icon there. Click Next. The installation will begin. The Installer will prompt you to insert CD #2 to continue the installation. Insert CD #2 and click OK.
-
Page 23: Maps And Data
Data Storage and Access Before we get into detail about how to upload maps to the Magellan RoadMate, it is important to understand how the RoadMate stores and accesses the data. The unit stores the basemap and other files in it’s internal memory. After these files, it still has about 80 megabytes left over to store customized detailed map files. - Page 24 The Magellan RoadMate 300 cannot route between map files, only between detailed regions contained within the same map file. Also, the Magellan RoadMate can have only one map file active at a time, so it is important to have a plan in mind when creating your regions and map files.
-
Page 25: Basemap Routing Vs. Detailed Map Routing
(such as waterways, Destination railroads, or parks). The Magellan RoadMate can route via the basemap to a city center or point selected on the screen using the available road data. Where there is no data, a thin, straight line from point to point will be used with a flag indicating the start and finish of normal street routing. -
Page 26: Routing Between Regions
Detailed regions can occupy any space on the map. They can be side by side (non-overlapping), or they can have space between them. Regardless of how the maps are arranged or what size they are, the Magellan RoadMate treats the detailed maps as an “overlay”... - Page 27 Say that you want to drive from Los Angeles to San Francisco. First, you need to know how much space you have available (which the Magellan RoadMate Manager software will show you). You can draw one region that has both Los Angeles and San Francisco contained within it, but it may be too large to store in the unit or on an SD Card.
-
Page 28: Basic Operation
If power is properly connected, a logo screen is displayed. Next, you will need to select the language you wish to use for your Magellan RoadMate. This screen appears only if you start the unit right out of the box. If you have connected the Magellan RoadMate 300 to your PC and launched the Magellan RoadMate Manager application, the unused language files have been removed from the... -
Page 29: Additional Characters (More)
What Is QuickSpell? The Magellan RoadMate uses QuickSpell technology to provide you with the fastest method possible to enter characters. QuickSpell eliminates the possibility of a misspelled word or looking for a city or street that is not loaded. As you begin entering characters, the QuickSpell feature of the Magellan RoadMate dims out those characters that are not available, thereby speeding up the process of entering data. - Page 30 Basic Operation Select “N”. Select the space bar. When you feel that enough characters have been entered so that the list of cities is short enough to find “San Francisco”, select OK. Scroll up or down the list and select “San Francisco, CA”. If the list is still too long, press the Cancel button to return to the keyboard and continue entering characters.
-
Page 31: The Magellan Roadmate Manager Application
The application will start after a few seconds. The main window will appear. Choose Unit Setup to configure and load maps to your Magellan RoadMate. You can also add addresses, plan trips, edit your user settings, and play back your recorded tracks (see “Track Recorder” on... - Page 32 Choose Tutorial to get an interactive demonstration of the features of your Magellan RoadMate. Choose Memory Card Setup to authorize and load maps to an SD Card. You can show or hide the Help Window by selecting Help or by pressing Select Quit to exit the Magellan RoadMate Manager Application.
-
Page 33: Maps
Maps From the Main Menu select Unit Setup. Make sure you remove any SD card in your unit. Connect your Magellan RoadMate to your PC using the USB cable, and connect the power supply. Turn the unit on and select Next. -
Page 34: Map Screen
Maps Map Screen The Map screen is where you will define the detailed regions you wish to use in your Magellan RoadMate. The Map screen is divided into six main sections: Toolbar Overview Window Map Window Saved Regions List Upload Information... -
Page 35: Saved Regions List
Shows you the total size of the region(s) you have selected to upload, and the available size of the unit’s built-in memory. Save: Saves the selected regions to a Map File and uploads the selected regions to your Magellan RoadMate’s internal memory. -
Page 36: Drawing Regions
Maps The regions are loaded and are shown in the list as inactive. Drawing Regions Select the Zoom In tool to enlarge the Map window by either clicking on an area, or clicking and dragging a rectangle over the area you want to enlarge. -
Page 37: Viewing A Region
Maps Continue drawing regions. After you draw and name each region it will be activated. Viewing a Region You can show an entire region in the map window. Select the region you wish to view, then select View Region The entire region is shown in the Map Window and is scaled to fit. -
Page 38: Deleting Regions
Maps Deleting Regions Select the region you wish to delete, then select Delete Region A dialog box will appear to confirm your selection. Select OK. The region is removed from the list and from your computer’s hard drive. This action is not undoable. -
Page 39: Uploading Maps To Internal Memory
Uploading Maps to Internal Memory When you have finished creating detailed regions, you can save them to a map file for uploading to your Magellan RoadMate. Select up to three detailed regions (as indicated by the checkmark to the left of the region name). -
Page 40: Deleting Maps From Internal Memory
Maps Deleting Maps from Internal Memory You can delete a map from internal memory only if the current map you are trying to upload requires more space than is available. Select the regions you wish to upload. The application will calculate the size of the regions and the available space. -
Page 41: Uploading Maps To An Sd Card
Maps Uploading Maps to an SD Card Your Magellan RoadMate includes a Secure Digital (SD) Card slot for increased expandability (SD Card not included). Please visit our web site at www.magellangps.com for a list of compatible SD cards. Make sure that you have an authorized Card in your unit. If your Card is not authorized, you will be prompted to authorize your card (See “SD Card-Authorization Options”... - Page 42 The Map Window and process for drawing regions and uploading them to an SD Card vs. an internal memory are identical. The upload information reflects the SD Card only. The Magellan RoadMate Manager software limits the size of map files to 240 MB. This is to reduce the amount of time it takes to process and upload the data.
-
Page 43: User Settings
User Settings From the Main Menu select Unit Setup. Make sure you remove any SD card in your unit. Connect your Magellan RoadMate to your PC using the USB cable and connect the power supply. Turn the unit on and select Next. -
Page 44: Settings Screen
The settings on the Magellan RoadMate can be configured for each of the three users. These settings can be configured on the PC and uploaded to the Magellan RoadMate. They can also be saved to the computer’s hard drive for further adjustment. - Page 45 Forest Desert Route Preferences: When you check “Automatic Re-Route,” the Magellan RoadMate will recalculate your route if you detour from the previously calculated route. Tone Options: Changes the alert sound to a bell, a chime, or a beep. Press the speaker button to hear an example.
-
Page 46: Setting The User Preferences
Uploading the Settings When you have finished making changes to the settings, you can then upload the changes to your Magellan RoadMate. Select Save. The application will upload the settings to your unit. Next time you turn it on, your personal settings will be active. -
Page 47: Address Book
Address Book Address Book Select Unit Setup. Make sure you remove any SD card in your unit. Connect your Magellan RoadMate to your PC using the USB cable and connect the power supply. Turn the unit on and select Next. -
Page 48: Address Book Screen
Address Book Screen With the Address Book, you can create entries on your computer and upload them to your Magellan RoadMate. Entries can be added by marking a point on the map, by searching for an address, or by searching for a POI. These addresses can then be used to route to on the unit, or they can be used in planning a trip both on the unit and the application. -
Page 49: Saved Addresses List
Shows definitions of the different tools, along with instructions on performing tasks. The Help Window can be shown or hidden by pressing the Help button or F1. Upload Information Window Save: Uploads the address book (and trip list; See “Trip Planner” on page 50) to your Magellan RoadMate’s internal memory. Return: Returns to the main menu. -
Page 50: Saving Your Address List To Your Computer
Address Book The address list is shown in the Address List Window. Saving Your Address List to Your Computer When you have finished adding addresses, you can save the list to an address file on your computer’s hard drive. Select Save Address File A dialog box will appear, prompting you to enter the name you wish to give your file. -
Page 51: Adding An Address On The Map
Address Book Adding an Address on the Map Select the Zoom In tool to enlarge the Map Window either by clicking on an area or by clicking and dragging a rectangle over the area you want to enlarge. Select the Pan tool to move the map and find the area of the map that shows the location of the address to add to your address book. -
Page 52: Add Custom Address
Address Book Add Custom Address An address can also be entered manually. Select the Add Address tool. A dialog box will appear, prompting you to enter information for the address you wish to enter. The state can be either typed in or selected from the pull-down menu. -
Page 53: Add A Poi As An Address
Address Book Add a POI as an Address Along with entering favorite spots and business addresses to your list, you can also add POIs to your list. Select the Add POI tool. A dialog box will appear, prompting you to enter information about the POI you wish to add. -
Page 54: Viewing An Address On The Map
Address Book When you are finished, click OK. Your POI is added to your address list. Viewing an Address on the Map You can view any of the entries in your address book on the Map screen. Select the address you wish to view and click on View Address on Map If you are at a scale greater than 1:100,000, the map will zoom in automatically to 1:100,000. -
Page 55: Deleting An Address From The List
Uploading Addresses to your Magellan RoadMate When you have finished making changes to your address book, you can then upload the list to your Magellan RoadMate. Select Save. The address file on your unit will be overwritten with the new file. The... -
Page 56: Trip Planner
Trip Planner Trip Planner Select Unit Setup. Make sure you remove any SD card in your unit. Connect your Magellan RoadMate to your PC using the USB cable and connect the power supply. Turn the unit on and select Next. -
Page 57: Trip Planner Screen
You can plot destinations by marking a point on a map, selecting a street address, or selecting a POI. Once completed, you can easily upload the trip to your Magellan RoadMate and begin your trip. -
Page 58: Address Book
Shows definitions of the different tools, along with instructions on performing tasks. The Help Window can be shown or hidden by pressing the Help button or F1. Upload Information Window Save: Uploads the trips (and addresses; See “Address Book” on page 41.) to your Magellan RoadMate’s internal memory. Return: Returns to the main menu. -
Page 59: Saving A Trip File To Your Computer
Trip Planner A dialog box will appear, asking you to choose a trip/address file. Select the file you wish to load and select Open. The Trip list and address list have been loaded. Saving a Trip File to Your Computer Once you have finished creating your trips, it is a good idea to save them to your computer’s hard drive. -
Page 60: Adding Points On The Map
Trip Planner Adding Points on the Map Select the Zoom In tool to enlarge the Map Window either by clicking on an area or by clicking and dragging a rectangle over the area you want to enlarge. Select the Pan tool to move the map and find the area of the map that shows your starting point. -
Page 61: Adding An Address From The Address List To An Existing Trip
Trip Planner Select Calculate Route A route is drawn between the two points you have marked. The map automatically zooms out to show you the entire route. Adding an Address from the Address List to an Existing Trip You can easily add an address from the address book to the trip by dragging it from the Address Book Window onto the trip tree. - Page 62 Trip Planner Release the mouse button, and the address is added to the end of the trip. Now that the trip has been altered, the previously calculated route changes to straight lines. By dragging a point onto another point, you can change the order. Click the point you wish to move and drag it on top of another point.
-
Page 63: Creating A New Trip From The Address Book
Trip Planner Creating a New Trip From the Address Book Select an address from your address list. You do not have to select addresses in any order; you can rearrange them later. Select Add Address from List A new trip is created, and your address is added to it. Select the next address to add to your trip and click on Add Address from List... -
Page 64: Creating A New Trip With A Custom Address
Trip Planner Select Calculate Route . A route is drawn between the two points. Creating a New Trip with a Custom Address You can add a specific address to a trip. Select the Add Address tool. A dialog box will appear, prompting you to enter information for the address you wish to enter. - Page 65 Trip Planner A new trip has been created with the address. Add a second point to your trip. Select an address from your address list and click on Address from List Select Calculate Route . A route is drawn between the two points. Select the Add Address tool.
- Page 66 Trip Planner A dialog box will appear, prompting you to enter information for the address you wish to enter. The State can be either typed in or selected from the pull-down menu. The City field uses autofill to assist you in finding the city.
-
Page 67: Renaming A Trip
Trip Planner To complete this trip, rearrange the points in the trip so that your “home” address is at the top. Notice on the map that the green flag has moved to indicate the new starting point of the trip. Then, add the “home”... -
Page 68: Creating A New Trip With A Poi
Trip Planner When you are finished, press the Return or Enter key on your keyboard. Your trip is renamed. Creating a New Trip with a POI POIs can be added to a trip, just like adding an address. Select Add POI A dialog box will appear, prompting you to enter information about the POI you wish to add. - Page 69 Trip Planner Enter the name of the POI exactly as it should be. As you type, the list of possible POIs is narrowed down. You can continue to type the name or select from the list. When you are finished, click on OK. A new trip has been created with the POI you selected.
-
Page 70: Viewing A Trip
Uploading Trips to your Magellan RoadMate When you have finished creating trips, you can then upload the list to your Magellan RoadMate. Select Save. A dialog box will appear warning you that the trips and addresses file on your unit will be overwritten with the new file. -
Page 71: Track Replay
Track Replay Track Replay Select Unit Setup. Make sure you remove any SD card in your unit. Connect your Magellan RoadMate to your PC using the USB cable and connect the power supply. Turn the unit on and select Next. -
Page 72: Track Replay Screen
Track Replay Track Replay Screen The Track Replay feature lets you see a graphical representation of any track you have recorded. The replay also shows the date and time of each recorded track point, along with it’s coordinates and elevation. These tracks can be edited or fine tuned to use in simulations. -
Page 73: Track Points
Track Replay Load Track File: Loads a track file from the unit or from your computer’s hard drive. Save Track File: Saves the current track to a track file. Delete Track: Delete the current track. Edit Track Point: Lets you change the position of, or add a track point. View Track: Shows the entire track in the Map window. -
Page 74: Load A Track From Your Computer
Track Replay A dialog box will appear. Select the tracks you wish to load. You can select a single track or, select multiple tracks by using the Control key. When you have finished, select Open. The track is shown highlighted in orange in the Map window. Select View Track to enlarge the track to fit the Map window. -
Page 75: Save A Track To Your Computer
“C:” drive (or the drive whick you choose to install the program onto), then select “Program Files”, “Magellan”, “Magellan RoadMate Manager NA”, and finally “Data”. Select the tracks you wish to load. You can select a single track or, select multiple tracks by using the Control key. -
Page 76: Track Playback
Track Replay The track file has been saved and made active. Track Playback Press Play. The track will begin playback. The cursor in the map window indicates the current position on the track. Press Pause. The playback is suspended. Press Step Back or Step Forward to move the cursor one point at a time. -
Page 77: Moving And Adding Track Points
Track Replay You can adjust the playback speed. Normal payback speed is “1X”. You can select to playback the track at up to 50 times faster than normal speed. Press Stop. At any time during playback you can use the navigation tools to zoom in and scroll the map to follow the track replay. - Page 78 Track Replay Move the cursor over a track point. The cursor changes to indicate that you can move the point in any direction. Click on the point and drag it to a new location. Notice when as you move the point, the information in the Track Points window changes to correspond to the new location.
-
Page 79: Deleting And Viewing Track Points
Track Replay Drag the point to a new location. The Track point window has been updated to include your new point. Deleting and Viewing Track Points To delete a track point, right-click on the point in the Track Point Window. Select Delete. The track point is deleted To view the location of a track point on the map, right-click on the point in the Track Window. -
Page 80: Set The Date And Time Of A Track Point
Track Replay The map window is centered on the selected track point at the current zoom level. Set the Date and Time of a Track Point To adjust the date and time of a track point, select the point in the track point window. -
Page 81: Viewing The Current Track
Track Replay The date and time is changed and the following track point are automatically adjusted. Viewing the Current Track Select View. The map window is scaled to show the entire track. Clearing the Current Track. While the track is active, select Clear Track... - Page 82 Track Replay A dialog box will appear listing all the available tracks. Select the track you wish to clear and select OK. If you have made any changes to the track since it was active, you will be notified and give the option not to clear the track. Select Yes. The track has been cleared from the map.
-
Page 83: Selecting Destinations
Selecting Destinations Selecting Destinations † Select Region Select Address Previous Destinations List Addresses Address Book Create New Entry Trip Planner Search POI by Name † Select Region Dining, ATM, Gas... Search Nearest Search BaseMap City † † Select Region If your map file contains only one region, this Intersection screen will not appear. -
Page 84: Choosing The Route Method
Every route is calculated based on the Route Method criteria selected. Every time a new destination is selected, the Magellan RoadMate prompts you for the method that will be used to calculate the route. Shortest Time: This selection calculates a route that should take the least amount of time using known speed limits, streets, and other information in the database. -
Page 85: Basemap Routing
Basemap routing works if the point you wish to route to is outside your active detailed map area or if you have not uploaded any detailed maps to your Magellan RoadMate or an SD card. Selecting a Point on the Map Zoom out to view a larger map area. -
Page 86: Search Basemap City
Selecting Destinations If your present position is in a detailed map, you will be routed normally. Once you exit the detailed map, you will be routed along major highways to the offramp closest to your destination as indicated by the flag. Then a straight thin line will show to route you to your destination. -
Page 87: Accessing Map Files
Accessing Map Files The Magellan RoadMate has the capability of storing detailed map files in its internal memory, or on an SD card. The files are accessed in the same way. If however, you have only one map file stored, this file will be active by default. -
Page 88: Switching Sd Cards
Selecting Destinations If you currently have a map file loaded the unit will prompt you to confirm the switch. The Magellan RoadMate will list all available map files and also where they are stored (unit or card). Select the map file you wish to use. - Page 89 By removing the card with the current map file on it, the unit will default to the map file stored in memory. The Magellan RoadMate will list all available map files and also where they are stored (unit or card). Select the map file you wish to use.
-
Page 90: Selecting A Destination Using "Select Address
Use the navigation key to scroll the list up or down and select the desired street from the list. The Magellan RoadMate will list all the cities the street is in based on the selected region. If this list does not appear, the street is only in one city. Select the desired city... - Page 91 Enter the street address. The acceptable range of numbers is displayed at the top of the screen. If you do not know the exact address, just select Done and the Magellan RoadMate will route you to the lowest number in the range. Select Done to continue.
-
Page 92: Selecting A Destination Using "Address Book
Selecting Destinations Selecting a Destination Using “Address Book” The Address Book can store up to 200 addresses for each of the three users. When you select “Address Book” you are given four options. Selecting “Previous Destinations” lets you select from a list of the last 50 destinations you have routed to with the option of saving them to your address book. -
Page 93: Previous Destinations – Save To Your Address Book
Selecting Destinations The Magellan RoadMate will calculate the route. When the calculations are complete, the Map screen will be displayed Previous Destinations – Save to your Address Book From the Select Destination screen, select Address Book. Select Previous Destinations. Select the address that you wish to save. -
Page 94: Address Book: List Addresses
Selecting Destinations Enter the desired text. Select OK. You can also add this address to your Favorites list. Select Favorites. When you are satisfied with the information, select Save. The address is saved to the Address Book. Press Cancel to return to the Previous Destinations screen. - Page 95 You will then have the option of routing to, editing, or deleting this address. Route Select Route. Select the desired Route Method. The Magellan RoadMate will calculate the route. When the calculations are complete, the Map screen will be displayed. Edit Select Edit.
-
Page 96: List Favorites
Selecting Destinations Select Save to save the changes and return to the Address Book screen. Delete Select Delete. A dialog box will appear prompting you to confirm the deletion. Select Yes. The address has been deleted from your address book and you are returned to the Select Destination screen. - Page 97 All of the addresses marked as favorites will be displayed. Route Select Route. Select the desired Route Method. The Magellan RoadMate will calculate the route. When the calculations are complete, the Map screen will be displayed. Edit Select Edit. Click on either the top line (name) or the bottom line (information) and the desired...
-
Page 98: Search Address Book
Selecting Destinations Select Save to save the changes and return to the address screen. Delete Select Delete. A dialog box will appear prompting you to confirm the deletion. Select Yes. The address has been deleted from your address book and you are returned to the Select Destination screen. - Page 99 You will then have the option of routing to, editing, or deleting this address. Route Select Route. Select the desired Route Method. The Magellan RoadMate will calculate the route. When the calculations are complete, the Map screen will be displayed.
-
Page 100: Address Book: Create New Entry
Selecting Destinations Edit Select Edit. Click on either the top line (name) or the bottom line (information) and the desired text. Select Save to save the changes and return to the address screen. Delete Select Delete. A dialog box will appear prompting you to confirm the deletion. Select Yes. The address has been deleted and you are returned to the Address Book screen. - Page 101 Selecting Destinations Select Create New Entry. Select Select on Map. Touch the screen and drag the map to a point near to the desired address. Press the Enter key. A dialog box will appear prompting you to edit the information. Select Edit Name. Enter a name for the address.
-
Page 102: Select Address
Selecting Destinations The location is saved to your address book and you are returned to the map screen. Press Cancel to resume normal routing. Select Address From the Select Destination screen, select Address Book. Select Create New Entry Select Select Address. Select the detailed region you wish to search from. - Page 103 Selecting Destinations Enter the first few characters for the street name. After you have selected the characters, select OK. Use the navigation key to scroll the list up or down and select the desired street from the list. Select the city that the street is in. Enter the street address.
-
Page 104: Dining, Atm, Gas
Selecting Destinations If you wish, you can select Favorite to add this address to your Favorites list. Select Save. You are returned to the Address Book screen. Dining, ATM, Gas... From the Select Destination screen, select Address Book. Select Create New Entry Select Dining, ATM, Gas.. - Page 105 Selecting Destinations Select the detailed region you wish to search from. Select the POI category. Enter the first few characters for the POI name. After you have selected the characters, select OK. Use the navigation key to scroll the list up or down and select the desired POI. A dialog box will appear prompting you to edit the information.
- Page 106 Selecting Destinations Search Nearest POI This function lets you search for a point of interest from three criteria and save it to your address book: Current Position, By City Center, and By Airport. Select Search Nearest POI. Select the detailed region you wish to search from. Current Position This option lets you find a specific point of interest based on where you are at the time.
- Page 107 Selecting Destinations You are returned to the Address Book screen. By City Center This option lets you find a specific point of interest closest to a chosen city center. Select By City Center. Enter the first few characters for the city name. After you have selected the characters, select OK.
- Page 108 Selecting Destinations A dialog box will appear prompting you to edit the information. You can choose to keep the default name. If you wish, you can select Favorite to add this address to your Favorites list. Select Save. You are returned to the Address Book screen. By Airport This option lets you find a specific point of interest closest to a chosen airport.
- Page 109 Selecting Destinations A list of available POIs that match your criteria is shown. Use the navigation key to scroll the list up or down and select the desired POI. A dialog box will appear prompting you to edit the information. You can choose to keep the default name.
-
Page 110: Intersection
Selecting Destinations A dialog box will appear prompting you to edit the information. Select Edit Name. Enter a name for the address. When you are finished, select OK. If you wish, you can select Favorite to add this address to your Favorites list. Select Save. - Page 111 Selecting Destinations Select Intersection. Select the detailed region you wish to search from. Enter the first few characters for the first street. After you have selected the characters, select OK. Use the navigation key to scroll the list up or down and select the desired street. Select the city that the street is in.
-
Page 112: Address Book: Trip Planner
Note however, that only 200 addresses can be saved per user. Guide Me Use this option to route to trips previously created on your unit or from trips uploaded to your unit from the Magellan RoadMate Manager application. - Page 113 Select the desired Route Method. The Magellan RoadMate will calculate the route. When the calculations are complete, the Map screen will be displayed You will be routed to the first point selected. When you arrive, the Magellan RoadMate will notify you.
-
Page 114: New
Selecting Destinations Selecting Cancel or, if you turn off your car and turn it back on, the Magellan RoadMate will ask you to resume trip guidance. Select Resume to be routed to the next address in your trip. Select Cancel to stop trip guidance. - Page 115 Selecting Destinations Select the addresses you wish to use in your trip in the order you wish them to be listed. When you have finished, select Done: [trip name]. You will be taken back to the Trip Planner screen. At this point you can choose to route to your new trip.
-
Page 116: Edit
The Magellan RoadMate will calculate the route. When the calculations are complete, the Map screen will be displayed. When you arrive at your first point the Magellan RoadMate will notify you. Selecting Cancel or, if you turn off your car and turn it back on, the Magellan RoadMate will ask you to resume trip guidance. -
Page 117: Delete, Rename
Selecting Destinations When you are finished making changes, press the Cancel button to return to the Trip Planner screen. Delete, Rename From the Select Destination screen, select Address Book. Select Trip Planner. Select Delete, Rename. Delete Select Delete. Select the trip you wish to delete. - Page 118 Selecting Destinations A dialog box will appear prompting you to confirm your selection. Select Yes. The trip has been deleted. Rename Select Rename. Select the trip you wish to rename. Use the backspace key to erase the name, then enter the new name. When you are finished, select OK.
-
Page 119: Selecting A Destination Using "Dining, Atm, Gas
Selecting Destinations Selecting a Destination Using “Dining, ATM, Gas...” Points of Interest (commonly referred to as POIs), include businesses, recreation areas, landmarks, or other services. These range from restaurants, parks, and gas stations, to hotels and city centers. The purpose of the POI database (accessed through the “Dining, ATM, Gas...”... -
Page 120: Dining, Atm, Gas
Use the navigation key to scroll the list up or down and select the desired POI. Select the desired Route Method. The Magellan RoadMate will calculate the route. When the calculations are complete, the Map screen will be displayed. Dining, ATM, Gas...: Search Nearest POI Current Position This option lets you route to a specific point of interest based on where you are at the... -
Page 121: By City Center
Use the navigation key to scroll the list up or down and select the desired POI. Select the desired Route Method. The Magellan RoadMate will calculate the route. When the calculations are complete, the Map screen will be displayed By City Center This option lets you route to a specific point of interest closest to a chosen city center. - Page 122 Selecting Destinations Select Search Nearest POI. Select the detailed region you wish to search from. Select By City Center. Enter the first few characters for the city name. After you have selected the characters, select OK. If you wish, you may enter the entire city name. Use the navigation key to scroll the list up or down and select the desired city.
-
Page 123: By Airport
Use the navigation key to scroll the list up or down and select the desired POI. Select the desired Route Method. The Magellan RoadMate will calculate the route. When the calculations are complete, the Map screen will be displayed By Airport This option lets you route to a specific point of interest closest to a chosen airport. - Page 124 Selecting Destinations Select By Airport. Enter the first few characters for the Airport name. After you have selected the characters, select OK. If you wish, you may enter the entire Airport name. Use the navigation key to scroll the list up or down and select the desired Airport. Select the POI category (if available, select the sub-category).
-
Page 125: Dining, Atm, Gas
Map screen will be displayed Dining, ATM, Gas...: Search BaseMap City The Magellan RoadMate’s built-in basemap contains over 34,000 city centers. You can search for and route to any one of these city centers. From the Select Destination screen, select Dining, ATM, Gas.. -
Page 126: Selecting A Poi On The Map
Selecting Destinations Select the desired Route Method. The Magellan RoadMate will calculate the route. When the calculations are complete, the Map screen will be displayed Selecting a POI on the Map While viewing the Map screen, you can select a POI icon and be routed to it, or save it to you address book. -
Page 127: Selecting A Destination Using "Intersection
Selecting Destinations Selecting a Destination Using “Intersection” Intersections are very common markers for routing when you don’t know the actual address. The Magellan RoadMate can route you to an intersection of two streets contained within the active detailed map. From the Select Destination screen, select Intersection. - Page 128 Selecting Destinations Use the navigation key to scroll the list up or down and select the desired street. Select the desired Route Method. The Magellan RoadMate will calculate the route. When the calculations are complete, the Map screen will be displayed...
-
Page 129: Traveling
Traveling Guidance Information Screens The Magellan RoadMate has three screens you can use to assist you in traveling to your destination: the Map screen, the Maneuver List screen, and the TrueView (or Split TrueView) screen. The Map Screen — This screen displays a map of your surrounding area, along with the planned route (if calculated) and information about the route. -
Page 130: Map Screen
If the Magellan RoadMate loses the satellite signal for more than 15 seconds and is unable to compute your location, the display will automatically switch to the Maneuver List screen. This will give you the information needed for your next maneuver. -
Page 131: Maneuver List Screen
Traveling Maneuver List Screen Next Maneuver Direction of Travel and GPS Signal Strength Distance to Next Maneuver 1/10 Mile Countdown Distance to Destination Estimated Time to Destination Direction of Destination TrueView Screen Direction of Travel and GPS Signal Strength Distance to Next Maneuver 1/10 Mile Countdown Distance to Destination Estimated Time to Destination... -
Page 132: Route Changes
Detouring from the Planned Route If you detour from the calculated route, the Magellan RoadMate will get you back on course in one of two ways: 1. If you detour from the calculated route to stop at a gas station or a convenience store, and the unit shuts off as you turn off the car, or you turn off the unit manually, when you return to your vehicle and the unit is turned back on, you are presented with a screen asking if you want to resume your route. -
Page 133: Changing The Route Method
When you selected the destination for the first time, you indicated what route method you wanted the Magellan RoadMate to use to calculate the route. The Magellan RoadMate provides a way of letting you change the Route Method during the trip. -
Page 134: Current Location
Traveling Current Location Displaying Information About Your Current Location Whenever you want to view information about your present location you can press the Locate button. This screen displays the name of the street you are currently traveling on, the city and state, your current heading, speed and latitude and longitude coordinates. -
Page 135: User Options
Track Recorder – Records a graphical representation of where you’ve been that you can save and playback on your computer using the Magellan RoadMate Manager application. Configuration – Lets you change the audio, video, language, and power option settings of the Magellan RoadMate. User Settings – Lets you further customize the Magellan RoadMate. -
Page 136: Trip Computer
The Trip Computer is a valuable tool for recording the mileage and time spent driving while on vacation or on a business trip. The information for the trip can be saved to the Magellan RoadMate as a report and viewed at any time, giving you easy access to previous and current trip information. -
Page 137: Resetting The Trip Computer
User Options Use the keypad to enter a name for the saved Trip Report and select OK. Your trip is saved and you are returned to the current trip screen. Resetting the Trip Computer Select Reset. The values f or the Trip Computer will be set to zero. Resetting the Trip Computer will also set the status of the computer to “Running...”... -
Page 138: Deleting A Trip Report
User Options Deleting a Trip Report From any screen, press the Option button. Select Trip Computer. Select the Trip Report to be deleted. The details of the Trip Report are displayed. Select Delete. Select Yes to confirm. The Trip Report is deleted, and you are returned to the Trip Computer screen. -
Page 139: Track Recorder
From any screen, press the Option button and select Track Recorder. Select Start to begin recording a new track. The Magellan RoadMate will begin recording. At this point you can return to the Map screen by pressing the Cancel button and continue driving normally. -
Page 140: Save Track Record
User Options A dialog box will appear asking you if you wish to stop the track and save it, stop the track and not save it, or resume recording the track. Select No. The track recorder is stopped and you are returned to the Track Recorder screen. Save Track Record From any screen press the Option button and select Track Recorder. -
Page 141: Track Recorder
User Options You are returned to the Track Recorder screen. View Track From any screen press the Option button and select Track Recorder. Select View. Select the track you wish to view from the list. The track will be displayed. When you are finished viewing the track, press the Cancel button. -
Page 142: Delete, Rename Track
User Options Delete, Rename Track From any screen press the Option button and select Track Recorder. Select Delete, Rename. Delete Select Delete. Select the track you wish to delete. A dialog box swill appear asking you to confirm your request. Select Yes. The track is deleted. - Page 143 User Options Rename Select Rename. Select the name of the track you wish to rename. Use the backspace key to erase the old name and enter the new name. Select OK. The track has been renamed.
-
Page 144: Configuration
User Options Configuration The Configuration menu lets you adjust the visual and audio settings of the Magellan RoadMate. From any screen, press the Option button. Select Configuration. Brightness Select “Brightness”. Press right arrow to increase the brightness, press the left arrow to decrease the brightness. -
Page 145: Auto Power Off
Language The first time you use your Magellan RoadMate you will be asked to select a language to use. When you connect the unit to the Magellan RoadMate Manager, the software will disable the remaining languages. After that, switching languages is... -
Page 146: User Settings
User Options User Settings The Magellan RoadMate can be further configured to each user’s preferences. With the exception of Diagnostics, these settings can also be configured using the Magellan RoadMate Manager Software. From any screen, press the Option button. Select User Settings. -
Page 147: Map Options
User Options Map Options You can customize how the data is displayed on the Map screen. Select Map Options. Select the options you wish to change. When you are finished, select Save. Map Orientation Heading Up sets the map display so that the direction of travel is always at the top of the screen. -
Page 148: Route Preferences
Route Preferences Route references is where you activate or deactivate Automatic Re-Route. Automatic Re-Route enables the Magellan RoadMate to automatically re-calculate the route to the destination when it has detected that the vehicle is not on the previously calculated route. Select Route Preferences. -
Page 149: Menu Colors
User Options Select Split TrueView. The box is checked indicating that the feature is active. Select Save. The TrueView screen is now split with one half showing TrueView, and the other half showing the map. Menu Colors Select Menu Colors. Select the preferred color scheme and select Save. -
Page 150: Tone Options
User Options Tone Options You can have the Magellan RoadMate alert you by one of three tones. Select Tone Options. Select the desired sound you want the Magellan RoadMate to alert you with. When you are finished, select Save. Diagnostics The Magellan RoadMate has a number of diagnostic features that enable you to check the condition of the unit. -
Page 151: Search By Street
User Options Audio Test Checks that the speaker is working correctly. Headphone Test Checks that sound is transmitted to the headphone jack correctly. GPS Status Monitors the satellite signal. Initialize GPS Resets the unit and reacquires the satellite signal. Note: Previously saved satellite data will be reset and reacquiring the satellite signal may take 15 minutes or more. - Page 152 Use the navigation key to scroll the list up or down and select the desired street from the list. The Magellan RoadMate will list all the cities the street is in based on the selected region. If this list does not appear, the street is only in one city. Select the desired city from the list.
-
Page 153: Search Basemap City
Magellan RoadMate. This feature is useful when receiving software updates. Simulator Mode In Simulator Mode, you can demonstrate the capabilities of the Magellan RoadMate without actually driving. In order for the simulation to work, you must set a route first. - Page 154 User Options The Propose simulator when calculating route option will ask you if you want to activate the simulator after you select a location to route to. After you select your destination and select Route, a dialog box will appear asking you if you would like to simulate driving the route.
-
Page 155: User - Edit Name
User Options User - Edit Name You can change the default user name. Select User - Edit Name. Use the backspace key to erase the default name and enter the name you wish to use for that user. When you have finished, select OK. The user name is enabled. - Page 156 User Options Select Activate. The box is checked indicating that the feature is active. Select Save. Confirm password protection activation by selecting Yes. Password protection is now active. When you select your User profile at startup, you will be asked for your password in order to continue.
Need help?
Do you have a question about the RoadMate 300 and is the answer not in the manual?
Questions and answers