STA-RITE Sr200na, Sr200lp,, Sr333na, Sr333lp,, Sr400na, Sr400lp Owner's Manual
Installation, operation & parts sr pool and spa heater natural gas / lp gas
Hide thumbs
Also See for Sr200na, Sr200lp,, Sr333na, Sr333lp,, Sr400na, Sr400lp:
- Owner's manual (38 pages) ,
- Owner's manual (36 pages) ,
- Operation & installation manual (57 pages)
Table of Contents
Advertisement
SR POOL AND SPA HEATER
NATURAL GAS / LP GAS
O W N E R ' S
INSTALLATION, OPERATION & PARTS
MODELS
200K BTU/HR
333K BTU/HR
400K BTU/HR
SPECIAL INSTRUCTIONS TO OWNER
Retain this manual for future reference.
This manual supplies information for the installation, operation,
and servicing of the appliance. It is strongly recommended that
this manual be reviewed completely before proceeding with an
installation. Its use will reduce service calls and chance of injury
and will lengthen product life.
or explosion may result causing property damage, personal injury or death.
– Do not store or use gasoline or other flammable vapors and liquids in the
vicinity of this or any other appliance.
– WHAT TO DO IF YOU SMELL GAS
• Do not try to light any appliance.
• Do not touch any electrical switch; do not use any phone in your building.
• Immediately call your gas supplier from a neighbor's phone. Follow the
gas supplier's instructions.
• If you cannot reach your gas supplier, call the fire department.
– Installation and service must be performed by a qualified installer, service
agency or the gas supplier.
Sta-Rite Pool/Spa Group
293 Wright Street, Delavan, WI 53115
North America: 800-752-0183, FAX 800-582-2217
International: 262-728-5551, FAX: 262-728-4461, TELEX: ITT 4970245
www.sta-ritepool.com
Union City, TN • Delavan, WI • Mississauga, Ont. • Murrieta, CA
© 2003, Sta-Rite Industries, Inc. Printed in U.S.A.
M A N U A L
SR200NA
SR200LP
SR333NA
SR333LP
SR400NA
SR400LP
If the information in these instructions is not followed exactly, a fire
2668 039
S396 (Rev. 1/17/03)
Advertisement
Table of Contents

Related Manuals for STA-RITE Sr200na, Sr200lp,, Sr333na, Sr333lp,, Sr400na, Sr400lp


Summary of Contents for STA-RITE Sr200na, Sr200lp,, Sr333na, Sr333lp,, Sr400na, Sr400lp
- Page 1 SR POOL AND SPA HEATER NATURAL GAS / LP GAS O W N E R ’ S M A N U A L INSTALLATION, OPERATION & PARTS MODELS 200K BTU/HR SR200NA 333K BTU/HR SR333NA 400K BTU/HR SR400NA SPECIAL INSTRUCTIONS TO OWNER Retain this manual for future reference.
-
Page 2: Table Of Contents
INSTALLATION, OPERATION AND SERVICE MANUAL Model SR Pool and Spa Heater Natural Gas/LP Gas TO INSTALLER: Affix these instructions adjacent to the heater. TO CONSUMER: Retain these instructions for future reference. FOR YOUR SAFETY - This product must be installed and serviced by a professional service technician, qualified in pool heater installation. -
Page 3: General Specifications, Requirements
SAFETY INSTRUCTIONS ( Do not attempt to adjust the gas flow by adjusting the reg- ulator setting. Risk of fire or explosion from incorrect fuel use or faulty fuel conversion. Do not try to run a heater set up for natural gas on LP gas (Propane) or vice versa. Only qualified service technicians should attempt to convert heater from one fuel to the other. -
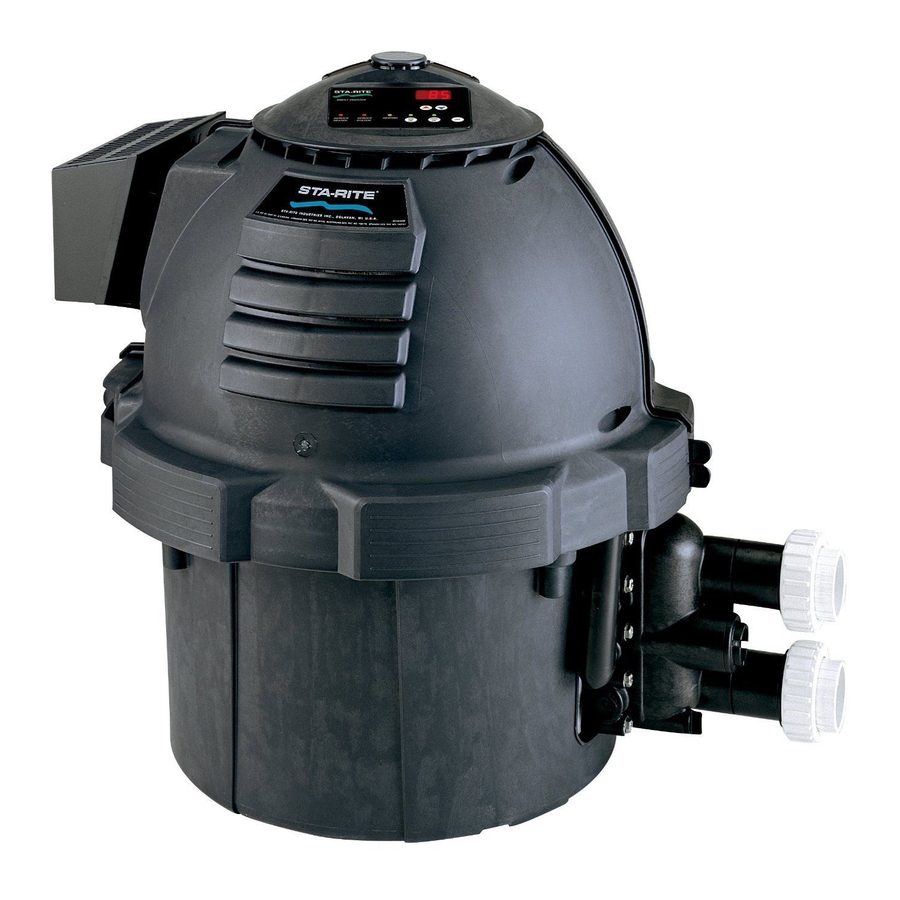
Page 4: Description Of The Heater
DESCRIPTION OF THE HEATER Mixer Inlet (Cold Water) Outlet Burner (Mixed Water) FIGURE 2 Figure 2 is a diagram of the heater showing how it operates. Precisely matched orifice plates meter the air and gas into the mixer. The blower draws the air and gas through the mixer and forces it into the burner’s flameholder. -
Page 5: What To Do If You Smell Gas
WHAT TO DO IF YOU SMELL GAS • Do not try to light any appliance. • Do not touch any electrical switch; do not use any phone in your building. • Immediately call your gas supplier from a neighbor’s phone. Follow the gas supplier’s instructions. •... -
Page 6: To Turn Off Gas To The Appliance
6. Turn the knob on the gas control clockwise ( the black line, depress slightly, and turn to “OFF” position. See Figure 4. Gas control is shown ON. Turn Clockwise and press down to turn gas off. You are here FIGURE 4: Turning gas control OFF 7. -
Page 7: After Start-Up
The five operating switches are: POOL ON Press this button to govern heater operation by the pool temperature setting. SPA ON Press this button to govern heater operation by the spa temperature setting. OFF Press this button to switch off the heater. ▲TEMP Press this button to raise the temperature setting. -
Page 8: Maintenance Instructions
CARE AND MAINTENANCE MAINTENANCE INSTRUCTIONS Risk of fire or explosion from flammable vapors. Do not store gasoline, cleaning fluids, varnishes, paints, or other volatile flammable liquids near heater or in the same room with heater. The following maintenance is recommended every six months and at the start of every swimming season: 1. -
Page 9: Installation Instructions
INSTALLATION INSTRUCTIONS Risk of fire, explosion, or asphyxiation if heater is improperly installed, adjusted, serviced or maintained. These instructions are for licensed, certified, trained and experienced installers only. Be sure your installer or service technician holds all required licenses or certification for your area. -
Page 10: Control Panel Indexing
CONTROL PANEL INDEXING The exhaust discharges vertically from outside the vent cover. The heater control panel assembly on top of the jacket can be turned to any of six positions for convenient access to the panel as follows: 1. Unbolt and separate the jacket halves. 2. -
Page 11: Outside Vent Cover Removal
The heater is design certified by CSA International for installation on combustible flooring. For installation on car- peting, the heater must be mounted on a metal or wood panel that extends at least three (3) inches beyond the base of the heater. If the heater is installed in a closet or alcove, the entire floor shall be covered by the panel. -
Page 12: Vertical Venting - Negative Pressure
VERTICAL VENTING - NEGATIVE PRESSURE (See Figures 11 and 12) Vent the heater vertically in a negative pressure (positive draft) system in accordance with the National Fuel Gas Code, ANSI Z223.1, and local codes. Type “B” Double- wall vent connector is recommended; however single-wall pipe is allowed by the National Fuel Gas Code in some circumstances. - Page 13 6. See Table 4 for height of vent termination above the roof. 7. Do not run the heater vent into a common vent with any other appliance. Fire Hazard. Do not vent the heater directly into a masonry chimney. Installation into a masonry chimney must use a chimney liner and must meet National Fuel Gas Code requirements and all local code requirements.
- Page 14 4. Install vent pipe so that it can expand and contract freely as the temperature changes. Support the vent pipe according to applicable codes and vent manufac- turer’s instructions. Pipe support must allow the vent pipe free movement out and back, from side to side, or up and down as necessary, without putting a strain on the heater or vent body.
-
Page 15: Water Connections
• at least 4 feet below or horizontally from, or 1 foot above, any doors or windows or gravity air inlet to a building • At least 3 feet above any forced air inlet located within 10 feet • At least 4 feet horizontally from electric meters, gas meters, regulators and relief equipment •... -
Page 16: Water Piping
A manual bypass valve should be installed across the heater when the pump flow exceeds 120 GPM. See instructions below for setting of the manual bypass. Make sure that the outlet plumbing from the heater con- tains no shut-off valves or other flow restrictions that could prevent flow through the heater (except as noted below). -
Page 17: Water Flow Rate
WATER FLOW RATE Maximum and minimum water flow rates required by the heater are listed below: Table 8: Maximum and Minimum Flow Rate in GPM Model Minimum Flow If the water flow rate to the heater is above 120 GPM, it must be reduced by installing a manual bypass valve (Figure 17). -
Page 18: Pressure Relief Valve
WATER PRESSURE SWITCH Hazardous pressure. Do not bypass the Water Pressure Switch or render it inoperable. Switch Settings The water pressure switch turns off the burner if the water flow is interrupted. If the water flow is restricted, the water pressure switch may prevent the burner from firing and cause the “Service System”... -
Page 19: Checking Combination Gas Control Valve
To avoid water damage or scalding from operation of the relief valve, install a drain pipe in the outlet of the pressure relief valve that will direct water discharging from the valve to a safe place for disposal. Do not install any reduc- ing couplings or valves in the drain pipe. -
Page 20: Gas Connections
GAS CONNECTIONS The heater requires a gas supply of not less than 4” wc and not more than 14” wc. Gas supply pressures outside of this range may result in improper burner operation. A minimum inlet pressure of 4” wc is required to maintain input rating. The gas supply must be installed in accordance with the National Fuel Gas Code, ANSI Z223.1, and all applicable local codes. -
Page 21: Fireman's Switch Connection
Connect the hot lead of the power supply to the black wire, the neutral lead to the white wire, and the ground wire to the green wire (See Figure 23). A time clock controlling the filter pump should have a low- voltage Fireman’s Switch that switches off the heater at least 15 minutes before shutting off the pump. - Page 22 6. Reinstall and bolt up the jacket halves. The fuse for the Fireman’s Switch is 1.25 amp 1-1/4x1/4” fast blow fuse, available locally. MAXIMUM TEMPERATURE SET POINT 1. Unbolt and remove upper jacket halves (see Figure 3, Page 5). 2. Depress clips and remove control board assembly dome (see Figure 9, Page 10).
- Page 23 Initial Troubleshooting Only qualified, trained service technicians with appropriate test equipment should service the heater. Remember that all parts of the system affect heater operation. Before starting this troubleshooting procedure, make sure that the pump is running correctly, that there are no blockages in the system, that the valves are correctly set and that the time clock is correctly set and is running.
- Page 24 Heater Will Not Fire - A Start Is green “SPA” or “POOL” LED “on” Depress “POOL” or “SPA” ON button on Membrane Pad. Does “POOL” or “SPA” LED come on? Check for 120 VAC power to heater. Check for 24 VAC at sec- ondary of Transformer.
- Page 25 Heater Will Not Fire - B Start Is red “SERVICE HEATER” LED “on” CONTINUE Is red “SERVICE SYSTEM” LED on? Verify that pump is on, filter is not blocked, and the water flow is above the minimum requirement. With pump running, adjust Water Pressure Switch to lower pressure until ‘SER- VICE SYSTEM”...
-
Page 26: Troubleshooting
Heater Will Not Fire - C Start Is “SERVICE HEATER” LED “on”? If any red diagnostic LED’s (AGS, AFS, SFS, HLS, PS, or THERMISTOR) come “on”, go to Pages 28 and 29. CONTINUE Did burner fire at all? Go to “BURNER TROUBLESHOOTING”... - Page 27 Heater Will Not Fire - D Start Gas flows during igni- tion try, but burner does not fire. Check for 120 VAC at Igniter leads during ignition try. Check for 120 VAC between S1 and S2 terminals on Ignition Control Module during ignition try.
-
Page 28: Diagnostic Led’s
Diagnostic LED’s: AGS, AFS, HLS, PS, THERMISTOR AGS or HLS “on” Replace High Limit Switch (HLS) or Automatic Gas Shutoff (AGS) CONTINUE If problem persists, verify proper operation of Internal Bypass Valve and Thermal Governor, and check for Heat Exchanger blockage. PS “on”... -
Page 29: Sfs Diagnostic Led’s
Diagnostic LED’s: SFS SFS “on” A) Is the Stack Flue Switch or Sensor correctly connected to the wiring harness? B) Is the Membrane Pad connected to the correct pins on the Control Board? (See Page 36) Check the J3 and J6 connectors for corrosion on the male pins. - Page 30 Burner Troubleshooting SYMPTOM Loud, high-pitched whine Flame is “fluttery.” Exhaust may have acrid smell or burner may fail to stay lit. Burner pulsates or surges, especially on ignition. Combustion appears normal, but flame does not stay lit. Heat Exchanger Troubleshooting SYMPTOM Boiling in heat exchanger.
-
Page 31: Burner System Parts
For complete For complete Electrical System Electrical System parts breakdown parts breakdown (Key Nos. 1 through 4), (Key Nos. 1 through 4), See Page 35 See Page 34 For complete Water System For complete parts breakdown Water System (Key Nos. 10 through 13), parts breakdown see Page 34 (Key Nos. - Page 32 For Heater mounting bolts and clamps, purchase separately Bolt Down Bracket Kit, Part No. 42001-0085S. PI LO 2692 1196...
- Page 33 REPAIR PARTS – BURNER SYSTEM Part Description Combination Gas Control Valve Kit 3/4” Union • Gas Orifice Kit – NG (Incl. Key Nos. 3 and 4)† Gas Orifice – NG* Gas Orifice O-Ring • Gas Orifice Kit – LPG (Incl. Key Nos. 3 and 4)† Gas Orifice –...
-
Page 34: Repair Parts – Water System
REPAIR PARTS – WATER SYSTEM Part Description Tube Sheet Coil Assembly Kit (Includes Key No. 2) Coil/Tubesheet Sealing O-Ring Kit Manifold Bottom Plate Manifold O-Ring* • O-Ring Kit (Incl. Key Nos. 2, 4) Manifold Insert* Manifold Baffle Plate* Manifold Bypass Valve Kit Water Pressure Switch Manifold Body with Safeties (Incl. - Page 35 REPAIR PARTS – ELECTRICAL SYSTEM Part Description • Display Cover Retainer Cap Kit (Incl. Key No. 1)* Display Cover Retainer Cap • CPSC Warning Label Heater Display Cover Igniter Bracket • Igniter/Igniter Gasket Kit (Incl. Key Nos. 4 and 5) Igniter** Igniter Gasket Manifold Switch Cover...
-
Page 36: Connection Diagram
Pool Heater Wiring Connection Diagram AGS Switch Stack Flue Sensor Gas Valve External Control Interface Circuit Disabled, Heater Membrane Pad Enabled External Control Interface JMP3 JMP3 External Control Interface Circuit Enabled, "Pool On" and "Spa On" Keys Disabled. "OFF" Key on Membrane Pad Remains Functional. - Page 37 Pool Heater Electrical Schematic Ladder Diagram 24 VAC COM NO SWITCH THERMISTOR SENSOR NOTES: ARE CONNECTED ON THE IGNITION MODULE. 2. ) PIN AND SOCKET CONNECTOR. 3. ) IF ANY OF THE ORIGINAL WIRES AS SUPPLIED WITH THE APPLIANCE MUST BE REPLACED, THEY MUST BE REPLACED WITH TYPE 105°C OR ITS EQUIVALENT.
-
Page 40: Warranty
STA-RITE LIMITED WARRANTY Pumps, filters, skimmers, underwater lights (except bulbs), accessories and fittings manufactured by Sta-Rite are war- ranted to be free of defects in material and workmanship for one (1) year from date of installation. Product specific warranties: HRPB, DEPB, System 3, and PL – Tanks ..10 years Internal filter components and valves .
Need help?
Do you have a question about the Sr200na, Sr200lp,, Sr333na, Sr333lp,, Sr400na, Sr400lp and is the answer not in the manual?
Questions and answers