Table of Contents
Advertisement
Quick Links
Advertisement
Table of Contents

Related Manuals for Roland GLC-1


Summary of Contents for Roland GLC-1
- Page 1 GLC-1 Roland Group-Learning Controller Owner’s Manual and User’s Guide Copyright © 2010, 2010 ROLAND CORPORATION All rights reserved. No part of this publication may be reproduced in any form without the written permission of ROLAND CORPORATION.
-
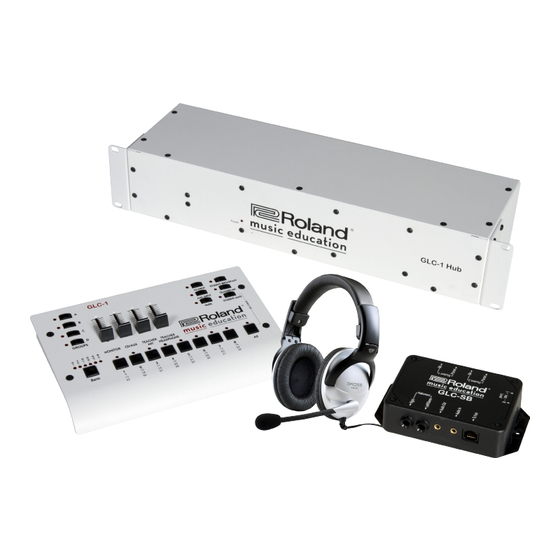
Page 2: Glc-1 Teacher Control Pad
The result is a flexible music conferencing system that’s fully expandable. The GLC-1 can also operate in Split mode, allowing a teacher to communicate with up to 16 students in mono via nine supplied GLC-SB interface boxes and headsets by adding optional headsets as needed—or up to 48 students in mono with optional GLC-EXPKIT expansion kits and additional headsets. -
Page 3: Included Items
GLC-1 Teacher Control Pad ........ -
Page 4: Table Of Contents
Secure the Components and Cables ................(12) Chapter 2: Operating the GLC-1 Initialize the System Using [ALL CLEAR] . - Page 5 GLC-1 Hub Connectors ........
-
Page 6: Panel Descriptions
PanelDescriptions Panel Descriptions GLC-1 Teacher Control Pad 1. [GROUPS A, B, C, D] Buttons Establish two-way communication between the teacher and students in a selected group. When one of these buttons (i.e. [A], [B], [C], or [D]) is held down and student number buttons are... - Page 7 11. [TEACHER HEADPHONE] Slider Adjusts the volume level of the teacher’s headphones. Slide the slider towards the top of the GLC-1 to increase the volume level and slide the slider towards the bottom to decrease the volume level (p. 13).
-
Page 8: Glc-1 Hub
7. [Split On/Off] Switch Determines the operational mode of the GLC-1. When this switch is set to Off (i.e. to the right), the GLC-1 operates in Standard mode, accommodating one stereo instrument per student interface box. When this switch is set to On (i.e. to the left), the GLC-1 operates in Split mode, allowing two mono instruments per student interface box, or a Roland piano operating in Twin Piano mode, accommodating two students per station. - Page 9 Connects the GLC-SB interface box to the input jack(s) on an external audio recording device (e.g. CD, computer, handheld recorder, etc.). 4. [Instrument Left/Stereo] Connector Connects the GLC-1 interface box to the headphone jack or left/stereo output jack on a student/teacher instrument. Note: In Split mode, this is Student 1’s [Instrument] input (p. 10). 5. [Instrument Right] Connector Connects the GLC-1 interface box to the right output jack on a student/teacher instrument.
-
Page 10: Chapter 1: Installation Guide
• Set the main power switch on the GLC-1 to the Off position before connecting the AC power adapter to a 120v wall plug receptacle. Use only the AC power adapter supplied with the Music Tutor Lab Controller; other AC adapters can damage the unit and void the warranty. -
Page 11: Rj-45 (8-Conductor Telephone-Type) Cables
Review the Included Items The GLC-1 music conferencing system includes all of the components needed to connect up to eight student instruments and one teacher instrument in stereo. Before setting up the GLC-1, be sure you have the following components: Item Qty. -
Page 12: Test The Basic System
Optional—Connect the audio outputs on the external audio playback device(s) to the [Aux. In] / [CD In] jacks on the GLC-1 Hub using optional cables. • Optional—Connect the [Rec. Out] jacks on the GLC-1 Hub to the audio input(s) on the external audio recording device using optional cables. •... -
Page 13: Test The Student Stations
Care should be taken to make sure that all cords and cables are secured in a neat and orderly fashion to prevent students from tripping over them and pulling them out of their sockets. This can cause serious damage to the GLC-1. -
Page 14: Chapter 2: Operating The Glc-1
For example, when a teacher needs to hear a particular student, or group of students, he or she can do so using the GLC-1 Teacher Control Pad. When a teacher needs to arrange the class into four groups of four students for quartet-style playing, he or she can do so from the GLC-1 Teacher Control Pad. -
Page 15: [Teacher Mic] Button
Chapter2:OperatingtheGLC-1 [TEACHER MIC] Button Use this button to turn the teacher’s microphone on and off. Be sure the [TEACHER MIC] button is engaged when communicating with students, pairs, groups, or the entire class. [TEACHER MIC] Slider Use this slider to control the teacher’s microphone level. Move the slider upward to increase the teacher’s microphone level, and move the slider downward to decrease the teacher’s microphone level. -
Page 16: Create Student Groups Or Pairs
Chapter2:OperatingtheGLC-1 Create Student Groups or Pairs To add a student to a group for practice and/or performance, hold down one of the [GROUPS A, B, C, D] buttons and select group members using the Student [1–8] buttons—use the [Bank] button to access the Student [1-8] buttons for additional students. -
Page 17: Broadcast A Student's Performance To The Class
Chapter2:OperatingtheGLC-1 Broadcast a Student’s Performance to the Class Selected student(s) hears: Their instrument and microphone. The teacher’s instrument and microphone. Teacher hears: The teacher’s instrument and microphone. The selected (broadcasting) student’s instrument and microphone. Unselected students hears: Their instrument and microphone. -
Page 18: Use An External Monitoring (Speaker) System
While the conferencing system is in use, use the GLC-1’s [Monitor] slider to adjust the overall level being sent to the external monitoring system. Move the slider upward to increase the overall level and move the slider downward to decrease the overall level. -
Page 19: Appendix A: Specifications
RJ-45 (8-conductor telephone type) Note: Do not use Cat 5e or Cat 6 cable. Other GLC-1 Includes (1) GLC-1 Hub, (1) GLC-1 Teacher Control Pad, (9) GLC-SB interface boxes, (9) stereo headsets, (9) 1/4” to 1/4” TRS cables, (10) RJ-45 (8-conductor telephone-type) cables, (1) AC adapter, and (1) owner’s manual Options GLC-EXPKIT expansion kit includes: (1) 8-student expansion card, (8) GLC-SB interface boxes, (8) stereo headsets, (8) 1/4”... -
Page 20: Appendix B: Limited Factory Warranty
System This GLC-1 is warranted to be free of defects in materials or workmanship for a period of 12 months from the date of purchase. This warranty is non-transferable and the benefits apply to the original owner. Proof of purchase in the form of an itemized sales receipt is required for warranty coverage. - Page 21 Notes...
- Page 22 Notes...
- Page 23 Notes...
- Page 24 Notes...
- Page 26 3372US ROLAND CORPORATION U.S., 5100 S. Eastern Avenue, Los Angeles CA 90040-2936...
Need help?
Do you have a question about the GLC-1 and is the answer not in the manual?
Questions and answers