Advertisement
Introduction
The A-01 is a MIDI controller with two ribbon controllers and four rotary encoders. You can assign any MIDI messages to these controllers, and use them to control your DAW or external MIDI device. In addition, the A-01 contains an 8-bit CPU sound module and a step sequencer, allowing you to also use it as a stand-alone synthesizer.
The A-01 also supports the Bluetooth® Smart standard, and can wirelessly exchange MIDI data with a mobile device such as a tablet or smartphone.
Panel Descriptions
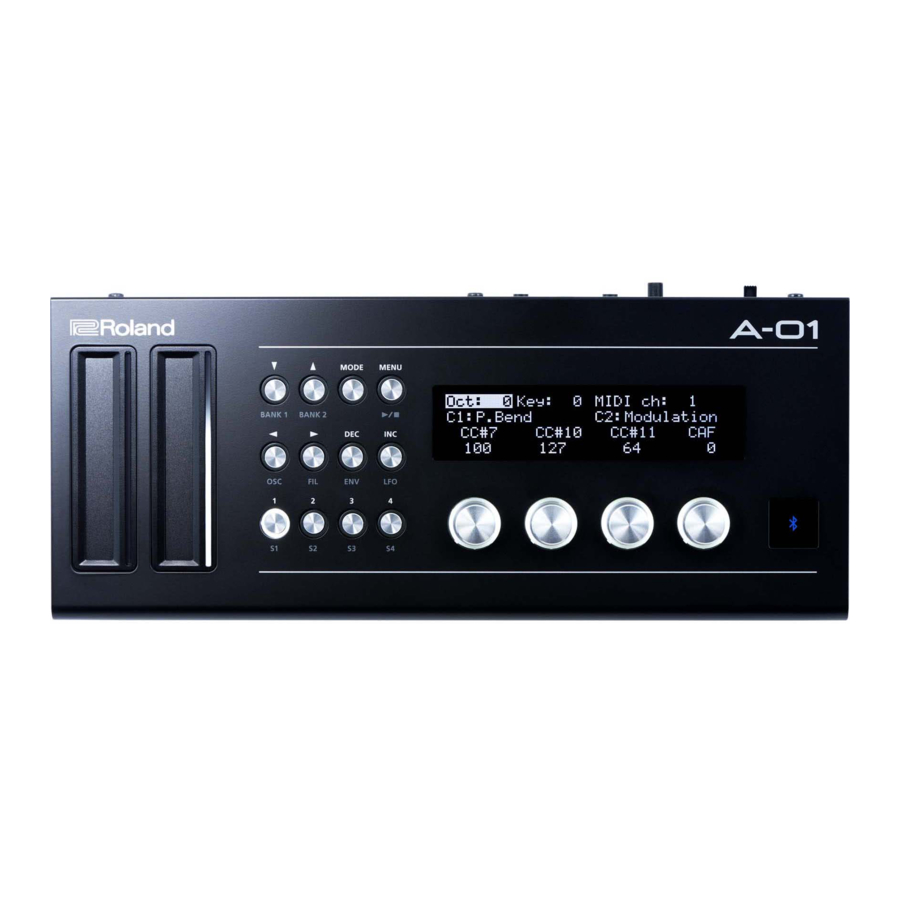
Top panel

- Ribbon controllers (C1, C2)
These are touch-type controllers.
* From the left, they are numbered C1 and C2. - Operation buttons
Use these to make settings for the A-01. - Rotary encoders (R1–R4)
Use these to control external devices. (Subsequently, we'll call these "encoders.")
* From the left, they are numbered R1, R2, R3, and R4. - Bluetooth LED
This LED is lit blue when a Bluetooth connection is enabled.
Rear panel

- [POWER] switch
Turns the power on/off.
* Before turning the unit on/off, always be sure to turn the volume down. Even with the volume turned down, you might hear some sound when switching the unit on/off. However, this is normal and does not indicate a malfunction. - Micro USB port
Connect this to your computer so that MIDI data can be transferred. - [VOLUME] knob
Adjusts the output of the built-in speakers, PHONES jack. - PHONES jack
Connect your headphones here. - CV OUT jack, GATE OUT jack
MIDI messages from the A-01 or from an external device are converted to single-note CV/GATE signals and output from these jacks.
![]()
Take care not to connect these jacks to your headphones or earphones. Doing so will cause malfunctions. - MIDI IN connector, MIDI OUT connector
Connect these to your MIDI equipment to receive or send MIDI messages.

Connecting Your Equipment

Connecting a computer
- Using a commercially available USB cable (A-micro B-type), connect the A-01 to your computer and turn on the power of the A-01.
- Start the DAW or sequencer software that you're using, and specify the A-01 as the MIDI device.
Connecting a tablet
You'll use the Bluetooth function to connect the A-01 to your tablet.
- Power-on the A-01, and place your tablet nearby.
- Enable the Bluetooth function of your tablet, and in the list of detected devices, choose "Roland A-01."
When the connection is established, the A-01's Bluetooth LED is lit. - Start the app that you're using, and specify the A-01 as the Bluetooth MIDI device.
Switching the Mode (CONTROLLER / SYNTH / SEQ)
The A-01 has three modes: CONTROLLER, SYNTH, and SEQ. Press the [MODE] button to switch between these modes.

- CONTROLLER Mode
In CONTROLLER mode you use the two ribbon controllers (C1, C2) and four encoders to control your MIDI equipment. The assignments of each controller can be saved in buttons [1]–[4]. - SYNTH Mode
In SYNTH mode you can create sound by editing the settings of the oscillator, filter, envelope, and LFO. You can save up to 16 of the sounds (tones) that you create (8 tones x 2 banks). - SEQ (Step Sequencer) Mode
The A-01 operates as a 16-step step sequencer, allowing you to view and edit the steps in four blocks each containing four steps.
Using CONTROLLER Mode
In CONTROLLER mode, the A-01 performs the functions that are printed above each operation button.
Editing the settings
To edit the settings, use the [◄] [►] [▲] [▼] buttons to move to an item, and use the [INC] [DEC] buttons to edit the parameter.

Recalling and saving a patch
You can recall or save controller settings for the patch as follows. Up to 16 sets of patches (4 patches × 4 banks) can be saved.
- Hold down the [▼] button and use the [1]–[4] buttons to select a bank.
- Press one of the [1]–[4] buttons to recall a patch. If you long-press a button, the current settings are saved in that number.
* When you save the settings, the previously-saved settings are overwritten by the newly-saved settings.
Using SYNTH Mode
In SYNTH mode, the A-01 performs the functions that are printed below each operation button.
Creating a tone
- Press the button corresponding to the item (OSC, FIL, ENV, LFO) that you want to edit. The parameters are displayed.
Button or encoder corresponding to the parameter for each item
* PWM: Pulse Width Modulation, Mod: ModulationS1 S2 S3 S4 R1 R2 R3 R4 OSC Saw Square PWM Noise PW Portamento Portamento Time Octave FIL Type1 Type2 Type3 OFF Cutoff Resonance Envelope Mod LFO Mod ENV Envelope Gate — — Attack Decay Sustain Release LFO Sine Square Saw Random LFO Mod LFO Rate LFO PWM (Zoom) - To edit a parameter, operate the button (S1–S4) or encoder (R1–R4) corresponding to that parameter.
* Parameters that are assigned to the buttons (S1–S4) allow you to select one choice.
* In LFO, the Zoom parameter lets you change the magnification of the audio waveform. - Repeat steps 1 and 2 to create your tone.
Recalling or saving a tone
Here's how to recall or save a tone.
- Use the [BANK 1], [BANK 2] buttons to select a bank.
- Press one of the [OSC], [FIL], [ENV], [LFO], or [S1]–[S4] buttons to recall a tone. By long-pressing a button, you can save the tone.
* When you save a tone, the newly-saved tone overwrites the previously-saved tone.
Performing
So that you can perform using the separately sold K-25m keyboard unit, the default settings assign pitch bend to ribbon controller (C1) and modulation to ribbon controller (C2). By pressing the [ ] button you can play back the step sequencer.
Using SEQ Mode
SEQ mode contains settings for the entire pattern (16 steps) and settings for each individual step.

Playing/stopping the pattern
To play the pattern, press the [] button. To stop the pattern, press the [] button once again.
Settings for the entire pattern
- As shown in the table below, make settings for the entire pattern.


Creating a pattern: Inputting and editing steps
- Use the [◄] [►] buttons to select the block that you want to input.
- Use the [1]–[4] buttons to enter (turn on/off) each step.
* Enter a tie: Hold down a [1]–[4] button and press [INC] button.
Enter a tie Off: Hold down a [1]–[4] button and press [DEC] button. - As shown in the table below, specify how each step will sound.
Parameter Explanation Editing procedure Key Specifies the pitch of the step. Hold down a [1]–[4] button and turn the encoder (R1). Gate Time Specifies the duration of the note. To enter a tie, set this value to 101%. Hold down a [1]–[4] button and turn the encoder (R2). Cutoff Specifies the cutoff frequency of the low pass filter. Hold down a [1]–[4] button and turn the encoder (R3). Resonance Emphasizes the overtone components in the region of the low pass filter's cutoff frequency. Hold down a [1]–[4] button and turn the encoder (R4). Velocity Specifies the strength (velocity) of the note. While holding down one of the [1]–[4] buttons, press the [▼] button and turn encoder (R1). - Repeat steps 1–3 to create your pattern.
Recalling or saving a pattern
Here's how to recall or save a pattern.
- Use the [BANK 1] [BANK 2] buttons to select a bank.
- Press one of the [OSC], [FIL], [ENV], [LFO], or [S1]–[S4] buttons to recall a pattern. By long-pressing a button, you can save the pattern.
* When you save a pattern, the newly-saved pattern overwrites the previously-saved pattern.
Main Specifications
Roland A-01: CONTROLLER + GENERATOR
| Memory | CONTROLLER mode: 16 patches (4 patches x 4 banks) SYNTH mode: 16 tones (8 tones x 2 banks) SEQ mode: 16 patterns (8 patterns x 2banks) |
| Power Supply | Rechargeable Ni-MH battery (AA, HR6) x 4, Alkaline battery (AA, LR6) x 4, USB bus power |
| Current Draw | 500 mA (USB bus power) |
| Dimensions | 300 (W) x 128 (D) x 46 (H) mm |
| 11-13/16 (W) x 5-1/16 (D) x 1-13/16 (H) inches | |
| Weight | 950 g (including batteries) |
| 2 lbs 2 oz | |
| Accessories | Owner's Manual, Leaflet "USING THE UNIT SAFELY, " Alkaline battery (AA, LR6) x 4 |
| Options (sold separately) | Keyboard unit: K-25m |
* In the interest of product improvement, the specifications and/or appearance of this unit are subject to change without prior notice.
System Settings
Here's how to make system settings for the A-01 and MIDI-related settings.
- Press the [MENU] button.
- Use the [▲ ][▼ ] buttons to select a parameter, and use the [DEC] / [INC] buttons to specify a value.
- When you have finished making settings, press the [MENU] button to return to the original mode.
Parameter list
| SYSTEM parameter | Value | Explanation | |
| Master Tune | -64–63 | Species the master tuning. | |
| System Tempo | 40-240 | Specifies the basic tempo. If synchronization (slave) is disabled, the tempo of the pattern will be the value that you specify here. * When you change this value, the tempo of the currently-recalled pattern also changes. | |
| LCD Contrast | 1–10 | Adjusts the brightness of the display. | |
| Auto Off | Off, 30 min | Specifies the time after which the power automatically turns off if the unit has not been operated. * Auto Off does not occur if the unit is USB-connected. | |
| Eco Mode | Off, 3 sec, 10 sec, 1 min | Specifies the time after which the display is dimmed if the unit has not been operated. | |
| Bluetooth LE | Off, On | Turns Bluetooth communication on/off. | |
| Bluetooth LE Name | Off, 1–9 | Specifies the name that is displayed for the Bluetooth device. | |
| Key Velocity | Specifies the velocity value that is transmitted when you play the keyboard. | ||
| Touch | The transmitted velocity corresponds to the force with which you play the key. | ||
| 1–127 | A fixed velocity is always transmitted, regardless of the force with which you play the key. | ||
| Velo Curve | Specifies the keyboard touch. | ||
| Light | The keyboard feels light. | ||
| Normal | The keyboard feels normal. | ||
| Heavy | The keyboard feels heavy. | ||
| MIDI Clock | Auto | The tempo automatically synchronizes to MIDI clock (default). | |
| Internal | The tempo specified on the A-01 unit is used. Choose the "Internal" setting if you don't want to synchronize to an external device. | ||
| CV Scale | -63–+63 | Adjusts the output scale of the CV signal. | |
| CV Fine Tune | -100–+100 | Applies a fine adjustment to the output voltage of the CV signal. | |
| CV Ref Note | C0–C4 | Specifies the note number (in steps of an octave) for which the output of the CV OUT jack will be 0 V. | |
| Bulk Dump | Execute, Cancel | Transmits controller settings, tones, and patterns via MIDI. | Execute: [4] button Cancel: [DEC] button |
| Factory Reset | Resets the unit to the factory-set state. | ||
| PATCH parameter | Value | Explanation | |
| Bank Select MSB | 0–127 | Specifies the bank select MSB value. | |
| Bank Select LSB | 0–127 | Specifies the bank select LSB value. | |
| Program Change | 1–128 | Specifies the program change value. | |
| C1 Hold | Off On (hold value) | This setting specifies whether the value is held or returned to 0 when you release your finger from a ribbon controller (C1, C2). | |
| C2 Hold | |||
| Note Scale | 16 Types | Selects the scale (such as Chromatic or Major) that is used when using the ribbon controller (C1) to play preview sounds. | |
| Seq Tx Ch | 1–16 | Specifies the channel on which the MIDI messages of SEQ mode (step sequencer) are transmitted. | |
| Synth Ctrl Src | ALL, KEYBOARD, 16STEPSEQ, MIDI ch 1–16 | Selects the source that plays the synth. | |
| CV/GATE Ctrl Src | Selects the signal that is output from the CV OUT jack and GATE OUT jack. | ||
| CV Portamento SW | Applies a portamento effect to the CV signal. | ||
| Off | Portamento is not applied. | ||
| Always | Portamento is always applied. | ||
| Legato | Portamento is applied only when you play legato. | ||
| CV Portamento Time | 1–127 | Specifies the time of the portamento effect that is applied to the CV signal. Higher values make the portamento apply more slowly. | |
| CV Pitch Bend Range | 1–12 | Specifies the range of pitch bend in semitone units. | |
| SysEX 1 | Type: Roland, Normal | Specify the system exclusive messages that are assigned to the ribbon controllers (C1, C2) or encoders (R1–R4). | |
| SysEX 2 | |||
| SysEX 3 | |||
| SysEX 4 | |||
Important Notes
The A-01 operates on batteries or on USB bus power. If using the unit on batteries, install four AA batteries, ensuring that the batteries are oriented correctly.
- When the batteries run low, the LED at the top of ribbon controller (C1) blinks. Please install new batteries.
- If you handle batteries improperly, you risk explosion and fluid leakage.
- This unit is equipped with a protection circuit. A brief interval (a few seconds) after turning the unit on is required before it will operate normally.
- The power to this unit will be turned off automatically after a predetermined amount of time has passed since it was last used for playing music, or its buttons or controls were operated (Auto Off function). If you do not want the power to be turned off automatically, disengage the Auto Off function.
- Any settings that you are in the process of editing will be lost when the power is turned off. If you have any settings that you want to keep, you should save them beforehand.
- To restore power, turn the power on again.

Documents / ResourcesDownload manual
Here you can download full pdf version of manual, it may contain additional safety instructions, warranty information, FCC rules, etc.
Advertisement


Need help?
Do you have a question about the A-01 and is the answer not in the manual?
Questions and answers