
Related Manuals for Roberts Symphony CD9949


Summary of Contents for Roberts Symphony CD9949
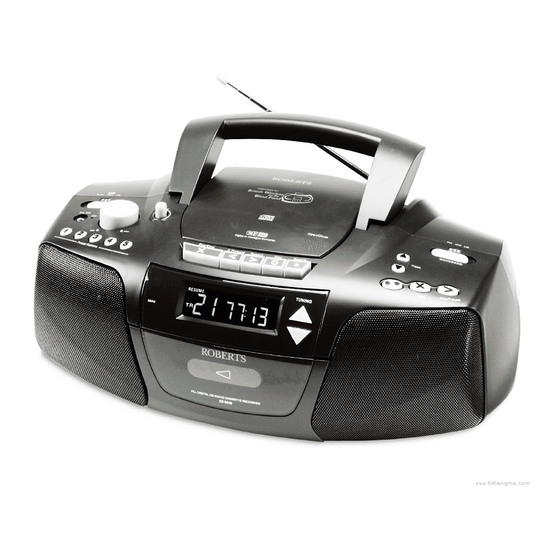
- Page 1 CD9949 Stereo CD Radio Cassette Recorder with book mark Symphony Please read this manual before use...
-
Page 2: Table Of Contents
Contents ..................1 Controls ..................2 Battery Operation ..............3 Mains Operation ................ 3 Operating the radio ..............4 Presetting stations ..............5 Recalling a preset station ............6 Inserting a CD ................7 Playing a CD ................7 CD bookmark ................8 Selecting a track ............... -
Page 3: Controls
Controls 1. Preset buttons 2. Internal microphone 18. Tuning up/down buttons 3. External mic socket 19. Record key 9. Mains socket 4. Headphone socket 20. Play key 10. Telescopic aerial 5. Function switch 14. CD track up/down buttons 21. Rewind key 11. -
Page 4: Battery Operation
3. Reduced power, distortion, and a ‘stuttering’ sound are all signs that the batteries may need replacing. We would recommend for economy that your CD9949 is used on the mains whenever possible with battery operation for occasional or stand-by use only. -
Page 5: Operating The Radio
Operating the radio Radio Tape 1. Slide Function switch to the Radio position. 2. Slide Waveband switch to select the required wave band . For the FM waveband fully extend the Telescopic aerial angle and rotate, if necessary, to obtain best reception. 3. -
Page 6: Presetting Stations
Presetting stations You may preset up to 15 different stations, 5 on FM, 5 on MW and 5 on Radio Tape 1. Slide Function switch to the Radio position to switch on. 2. Slide Waveband switch to select the required wave band 3. -
Page 7: Recalling A Preset Station
Recalling a preset station Radio Tape 1. Slide Function switch to the Radio position to switch on. 2. Slide Waveband switch to select the required wave band 3. Momentarily press the required Preset button, the preset number and station frequency will appear in the display. 4. -
Page 8: Inserting A Cd
Inserting a CD Radio Tape 1. Slide the Function switch to the CD position. 2. To open the CD compartment, press the CD door on the edge marked Open/Close 3. Insert an Audio CD, printed side facing up. Close the CD door. The CD player will scan the contents of the CD and the total number of tracks and total playing time will appear on the display. -
Page 9: Cd Bookmark
CD bookmark Your 'Symphony' CD radio cassette recorder has a unique feature called CD Bookmark. Whilst playing a CD simply press stop and your CD unit will automatically remember the last played position ensuring that next time you press Play you return to the same place without losing a single word. -
Page 10: Selecting A Track
Selecting a track 1. Whilst the CD is playing, press and release either the Track up or Track down buttons to change to the desired track. TRACK 2. You can also change tracks when the player is in stop mode. Change to the desired track using the Track up or Track down buttons (e.g. -
Page 11: Listening To Cassette Tapes
Listening to cassette tapes Radio Tape Note: This unit is not suitable for recording onto CHROME (IEC II) or METAL (IEC IV) cassettes. For playback any cassette type may be used 1. Slide the Function switch to the Tape position. 2. -
Page 12: Recording From The Radio
Recording from the Radio Radio Tape 1. Slide the Function switch to the Radio position. 2. Tune in to the desired station. 3. Adjust the Volume control to suit your requirements. 4. Insert a blank cassette with the tape surface uppermost and the side you wish to record on facing towards you. -
Page 13: Recording From
Recording from CD Radio Tape 1. Slide the Function switch to the CD position. 2. Insert a CD into the compartment. Insert a blank cassette with the tape surface upwards and the side you wish to record on facing towards you. 3. -
Page 14: Recording From An External Microphone
Recording from an external microphone (not included) Radio Tape When recording from an external microphone the loudspeakers remain connected for monitoring purposes. If you do not wish to hear the recording being made simply rotate the volume control to minimum. The recording level is set automatically and is not affected by the setting of the Volume control. -
Page 15: Preventing Accidental Erasure
Preventing accidental erasure 1. To safeguard your recordings against accidental erasure, break off the appropriate tab on the cassette as shown . 2. There is one tab for each side of the cassette. This will prevent the Record button from being pressed. 3. -
Page 16: Headphones
Headphones (not included) 1. A Headphone Socket (3.5mm) located on the left hand end of your CD radio cassette is provided for use with either headphones or an earpiece. Inserting the headphone plug automatically mutes the internal loudspeaker. -
Page 17: Specification
Specifications Circuit Features Power Requirements Loudspeaker 2 x 100mm Mains AC 230 volts, 50Hz only Output Power 2 x 2.5 Watts Batteries 8 x LR14 (C size) Headphone socket 3.5mm dia Microphone socket 3.5mm dia Aerial System FM Telescopic aerial Frequency Coverage Built-in Ferrite aerial 87.5-108MHz... -
Page 18: Mains Supply
When replacing the fuse only a 3A ASTA approved to BS1362 type should be used and be sure to re-fit the fuse cover. Your CD9949 will operate from a supply of AC 230 volts, 50Hz only. DO NOT cut off the mains plug from this equipment. If the plug fitted is not suitable for the power points in your home or the cable is too IF IN DOUBT - CONSULT A QUALIFIED ELECTRICIAN. -
Page 19: Guarantee
Guarantee This instrument is guaranteed for twelve months from the date of delivery to the original owner against failure due to faulty workmanship or component breakdown, subject to the procedure stated below. Should any component or part fail during this guarantee period it will be repaired or replaced free of charge. - Page 20 ROBERTS RADIO TECHNICAL SERVICES DEPARTMENT 97-99 Worton Road Isleworth Middlesex TW7 6EG Technical Helpline:- 020 8758 0338 (Mon-Fri) Issue 1...
Need help?
Do you have a question about the Symphony CD9949 and is the answer not in the manual?
Questions and answers