Table of Contents
Advertisement
Quick Links
Advertisement
Table of Contents

Related Manuals for Lenovo VDK8726


Summary of Contents for Lenovo VDK8726
- Page 1 LENOVO USB VIDEO DOCKING User’s Manual VDK8726...
- Page 2 (Beijing) Ltd. WILL NOT BE LIABLE for any damages caused by your failure to follow the instructions herein or by any misoperation of this product due to your misunderstanding of the content of this guide. Lenovo (Beijing) Ltd. has emended and checked the document strictly, but we do not assure that there is no error or oversight.
-
Page 3: Table Of Contents
Connecting VGA/DVI Monitor ....................11 Connecting USB Devices ......................12 Connecting Microphone and Speaker/Headphones ..............12 3. Using the Lenovo USB Video Docking ............. 13 USB 2.0 Host Ports ......................13 Audio Ports ........................13 Configuring Windows Audio Device ..................14 Configuring Instant Messaging Software Audio Device ............ - Page 4 Docking Station with Video User’s Manual Federal Communications Commission (FCC) Declaration of Conformity ....30 ICES ..........................31 WEEE Information ......................31...
-
Page 5: Introduction
1. Introduction The Lenovo USB Video Docking is a unique expansion unit designed for computer that has extra connectivity demands. Just with one USB 2.0 host port on computer, its connection can be extended not only to USB peripherals, Ethernet network, speaker, microphone but also an additional monitor. -
Page 6: Features
User’s Manual Lenovo USB Video Docking VDK8726 Features Great expansion unit for computers with extra connectivity demand Extends connectivity to USB peripherals, Ethernet network, speaker, microphone, and even an additional monitor Creative appearance complements any home or office space Windows 7 compatible Hot pluggable;... -
Page 7: Front Panel
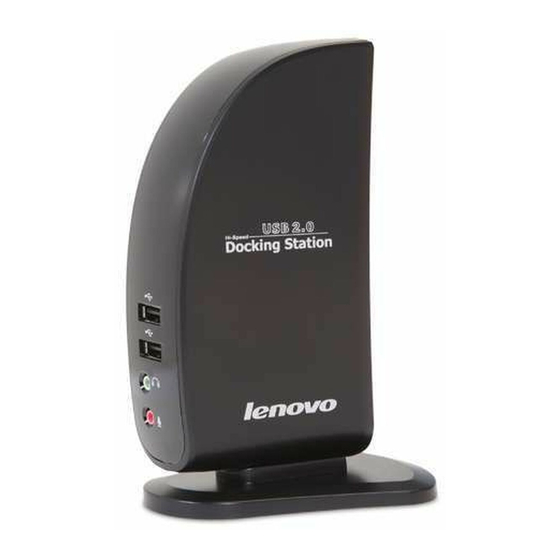
Front Panel Power LED: Glows when the docking station is powered. USB Hub LED: Glows when any of the four USB downstream ports is connected to a USB device. USB 2.0 downstream ports: For connection to USB peripherals. 3.5 mm stereo audio output port: For connection to stereo headphones or speakers. -
Page 8: Rear Panel
User’s Manual Lenovo USB Video Docking VDK8726 Rear Panel USB 2.0 downstream ports: For connection to USB peripherals. 10/100 Mbps Ethernet port: For connection to the Ethernet network via a network cable (not provided in package). DVI video output port: For connection to a DVI monitor. -
Page 9: Installation
2. Installation As the Lenovo USB Video Docking comprise several components and some components require specific installation procedure, please follow the steps described in this manual to install the drivers first and then make the connection. A. On Windows ® XP / Windows Vista ®... - Page 10 User’s Manual Lenovo USB Video Docking VDK8726 2. It will take for a while to install the driver. 3. Please click I Accept after reading the statement of “SOFTWARE END USER LICENCE AGREEMENT FOR DISPPLAYLINK MIRROR DRIVER and DISPLAYLINK GRAPHICS ADAPTER SOFTWARE”.
- Page 11 4. Please wait while Windows configures DisplayLink Core Software. Your screens may temporarily go black or flash during this process. Note: You may need to restart your system for the configuration changes made to DisplayLink Graphics to take effect. After the installation is completed, you will see the DisplayLink Manager Icon in System Tray that looks like a monitor as below.
-
Page 12: On Windows ® 7
User’s Manual Lenovo USB Video Docking VDK8726 B. On Windows ® 7 To install the Driver: 1. Insert the provided CD into your disc drive, locate and double-click the Setup.exe file under E:\Driver where E is your disc drive letter. Click Next to the next step for... - Page 13 2. Please click I Accept after reading the statement of “SOFTWARE END USER LICENCE AGREEMENT FOR DISPPLAYLINK MIRROR DRIVER and DISPLAYLINK GRAPHICS ADAPTER SOFTWARE”. 3. Please wait while Windows configures DisplayLink Core Software. Your screens may temporarily go black or flash during this process.
- Page 14 User’s Manual Lenovo USB Video Docking VDK8726 4. After the installation is completed, the following Window will pop up. You can change the appearance of your displays through the Window. Moreover, additional controls are available in Windows ® 7: Orientation (Portrait, landscape, rotated portrait, rotated landscape) 5.
-
Page 15: Connecting The Docking Station To Computer
C. Connecting the Docking Station to Computer 1. Plug the power cord of the power adaptor into the DC IN jack on the back of the docking station and then connect the power adapter to a working electrical outlet. The Power indicator on the front panel glows when the docking station is powered on. -
Page 16: Connecting Usb Devices
User’s Manual Lenovo USB Video Docking VDK8726 Upon the connection it’s normal that the screen flicks black a couple of times. Once the connection is done, an extended screen will appear on the add-on monitor. Sometimes it takes time for the add-on monitor to show the video. Please wait for a while. -
Page 17: Using The Lenovo Usb Video Docking
3. Using the Lenovo USB Video Docking USB 2.0 Host Ports The four USB host ports on the docking station function just like the ports on a USB hub. Just connect any USB device to the docking station’s USB ports when required. -
Page 18: Configuring Windows Audio Device
User’s Manual Lenovo USB Video Docking VDK8726 Configuring Windows Audio Device To specify a sound device for music playback in Windows, open Control Panel and double-click the sound or audio icon. Then select a desired device in the playback section. If you want to use your original sound card for music playback, make sure to select it instead of USB (Multimedia) Audio Device. -
Page 19: Video Port
Video Port Display Modes There are several ways you can utilize the monitor attached on the docking station. The add-on monitor can be configured to use either “mirror mode”, “extended mode” or be the primary display as described in this section. Extend Your Windows Desktop to Add-on Monitor (Default) In this so-called “extended mode”, your display will be spread over the add-on monitor(s). - Page 20 User’s Manual Lenovo USB Video Docking VDK8726 5. Click OK to close the settings screen. Once the setting is done, to use your extended desktop, simply drag and drop your open windows over to your second monitor. However, note that some applications may not support display on the extended desktop.
- Page 21 Video and DVD Playback in Extened Mode On Windows Vista ® with extended mode, it’s suggested that you run video or DVD playback programs on your primary monitor instead of the add-on monitor to ensure the playback performance. Mirror Your Windows Desktop This mode is referred to as “mirror”...
-
Page 22: Adjusting Resolution, Color Depth And Refresh Rate
User’s Manual Lenovo USB Video Docking VDK8726 Be the Primary Monitor To make the add-on monitor the primary display: 1. Position the mouse anywhere on your computer desktop, right-click and select Screen Resolution on Windows ® 7, Personalize > Display Settings on Windows Vista ®... - Page 23 Color Depth Refresh rates available at Refresh rates available at 16 bit color quality 32 bit color quality Resolution 60 72 75 85 60 72 75 85 640x480 56 60 72 75 85 56 60 72 75 85 800x600 60 70 75 85 60 70 75 85 1024x768 60 85...
-
Page 24: Disconnecting The Docking Station
User’s Manual Lenovo USB Video Docking VDK8726 1. Position the mouse anywhere on your computer desktop, right-click and select Screen Resolution on Windows ® 7, Personalize > Display Settings on Windows Vista ® or Properties > Settings on Windows ® XP. -
Page 25: How Standby Or Hibernating Mode Affects Devices Attached To The Docking Station
How Standby or Hibernating Mode Affects Devices Attached to the Docking Station External Monitors When the docking station is connected to a computer and an external monitor, if the computer goes into standby or hibernating mode, the external monitor display goes blank. -
Page 26: Uninstalling The Drivers
User’s Manual Lenovo USB Video Docking VDK8726 4. Uninstalling the Drivers Uninstalling the Driver Please take these steps to uninstall Drive: 1. Open the Control Panel and double-click Uninstall a Program on Windows ® 7, Programs and Features on Windows Vista ® or Add or Remove Programs on Windows ®... -
Page 27: Troubleshooting
5. Troubleshooting Q1: I connected the dock to PC with USB Cable but it does not work. Ans1: 1. Ensure that the dock is well powered by its AC power adapter. The Docking Station always needs external power supply for operation, as it does not take power from the USB upstream port. - Page 28 User’s Manual Lenovo USB Video Docking VDK8726 Q4: I could not hear anything from the earphone connected to my computer’s earphone jack when the dock was connected to my computer. Ans4: Windows 7 can detect the position the earphone or speaker connects, USB dock or computer built-in jack.
- Page 29 Figure 1: Display Setting - Vista Select the monitor to be configured. Its mode, resolution, color quality and position can all be re-set here. Q8: How to update DsplayLink’s driver for Video output? Ans8: On Windows 7, the DisplayLink software connects to the Microsoft Windows update site to obtain the latest DisplayLink driver.
- Page 30 User’s Manual Lenovo USB Video Docking VDK8726 You can disable this feature during installation by clearing the Automatically check for updates checkbox. Using the Updates Wizard By default, automatic updates are configured to check for updated software on the plugging in of a DisplayLink Graphics Adapter, or the resume or start of your PC, every seven days.
- Page 31 reminder and future update checks entirely. The Choose Updates, installation screen opens showing all the available updates. The most recent update is automatically set to Download, whilst others are skipped. Click ‘Next’ to download the latest update. The Downloading Updates screen opens. If you check the highlighted box, then installation of the latest software begins immediately after the download has finished, otherwise click ‘Next’...
- Page 32 User’s Manual Lenovo USB Video Docking VDK8726 You can check for updates manually at any time. To manually check for updates: Click the DisplayLink icon, the DisplayLink menu opens. If you have the most recent software, the dialog box, shown below, appears. Otherwise the Choose updates to install dialog opens.
- Page 33 2. Select the options you want to change and click OK. DisplayLink software will save your changes. You may check the latest version of video driver through below link: http://www.displaylink.com/support/downloads.php...
-
Page 34: Regulatory Compliance
• Consult an authorized dealer or service representative for help. Lenovo is not responsible for any radio or television interference caused by using other than recommended cables and connectors or by unauthorized changes or modifications to this equipment. Unauthorized changes or modifications could void the user’s authority to operate the equipment. -
Page 35: Ices
Responsible party: Lenovo (United States) Incorporated 1009 Think Place - Building One Morrisville, NC 27560 Phone Number: 919-294-5900 ICES Industry Canada Class B emission compliance statement This Class B digital apparatus complies with Canadian ICES-003. Avis de conformité à la réglementation d’Industrie Canada Cet appareil numérique de la classe B est conforme à... - Page 36 User’s Manual Lenovo USB Video Docking VDK8726...
Need help?
Do you have a question about the VDK8726 and is the answer not in the manual?
Questions and answers