
Related Manuals for Gibson Robot Interface Pack


Summary of Contents for Gibson Robot Interface Pack
- Page 1 Gibson Robot Gibson Robot Interface Pack (RIP) Interface Pack (RIP) Owner’s Manual Version 1.0...
-
Page 2: Important Safety Instructions
Environmental Factors Heat and moisture can harm your Gibson RIP. Please do not install or operate this product near sources of moisture, such as sinks, damp basements, leaky roofs, etc. and never store it near heat sources, such as heaters or radiators. -
Page 3: Warranty Protection
Warranty Protection It is very important to us that you are satisfied with your Gibson product. Register it and activate your warranty protection by mailing the warranty card included with Dark Fire to Gibson USA, Department W, P.O. Box 100087, Nashville, TN 37210-0087. If you encounter any kind of problem, contact us as soon as possible so we can make things right. - Page 4 Gibson or its authorized representative has been advised of the possibility of such damages, and Gibson shall not be liable for any expenses, claims or suits arising from or relating to any of the foregoing.
-
Page 5: Chapter 1: Introduction
Chapter 1: Introduction We know you don’t like to read manuals—you just want to play! And we certainly understand. So, you have two options. If you’re familiar with computers and driver installation: The printed Quick Start guide is probably all you need. But after you’re up and running, return to this manual and read about the Console application and the various tips and tricks. -
Page 6: Minimum System Requirements
DVD-ROM drive for program installation Mac: Mac OS X 10.3.9 or later. (Gibson does not officially support operation under Boot Camp, although most users report that it works well.) Windows: Either XP Home, XP Professional, XP Professional x64 Edition, Vista ... -
Page 7: Chapter 2: Important General Installation Instructions (Mac And Windows)
Instructions (Mac and Windows) Check the Gibson Website for Updates Gibson is committed to enhancing RIP’s performance. For the latest updates, go to www.gibson.com/darkfire/downloads/software. This is where you’ll also find updated documentation on exciting new features that Gibson will be adding. Please download the latest version of this manual to make sure you’re taking advantage of everything RIP... - Page 8 Caution: FireWire Connector Orientation 6-pin FireWire connectors have one straight edge and one curved edge. These fit into matching straight and curved sections in the computer’s FireWire port. 6-pin FireWire connectors (male on the left, female on the right). Note how the bottom is straight, and the top is curved (angled).
- Page 9 RIP Automatic Fault Detection RIP can detect faulty cables or bad FireWire connections. If you open the Gibson RIP virtual mixing Console and the console GUI (Graphic User Interface) does not appear, check your connections. If the Console disappears for no apparent reason while the application is open, the FireWire cable has likely been unplugged, become slightly unseated from its connector, or the RIP’s AC adapter has been disconnected.
-
Page 10: Chapter 3: Macintosh Installation
5. Double-click on the DVD-ROM’s icon when it appears on the Desktop. 6. Locate the DVD-ROM file called “Gibson RIP Console,” then drag its icon into the Applications folder shortcut next to the Console icon. (If for any reason this does not work, locate the top menu bar in the Mac’s Finder, click on Go, then select... -
Page 11: Chapter 4: Windows Xp Installation
Otherwise, you will not be able to install the RIP software. CAUTION: DO NOT connect the Gibson RIP to your computer’s FireWire port yet. 2. If RIP is connected to your computer, disconnect it now. Insert the Gibson installation DVD-ROM into your computer, and the main install window should appear automatically. - Page 12 5. The “Windows Logo Testing” window appears. Click on “Continue Anyway.” 6. The “Installation Complete” window appears. Click on “Next.” 7. When the “Install Complete” window appears, click on “Finish.” Now that the software is installed, turn off your computer.
- Page 13 8. Locate the Gibson RIP, the power supply adapter included with your Dark Fire guitar, and the FireWire cable. Plug one end of the FireWire cable into the FireWire connector on the rear of the Gibson RIP. Attach the other end of the FireWire cable to an open FireWire port on your computer.
- Page 14 12. If the “Windows Logo Testing” window appears again, ignore it and click on “Continue Anyway.” Automatic installation continues. 13. When the “Completing the Found New Hardware Wizard” appears, click “Finish” to close the wizard. Installation for Windows XP is now complete. Proceed to Chapter 6, “Updating RIP Firmware.”...
-
Page 15: Chapter 5: Windows Vista (32/64-Bit) Installation
Otherwise, you will not be able to install the RIP software. CAUTION: DO NOT connect the Gibson RIP to your computer’s FireWire port yet. 2. If RIP is connected to your computer, disconnect it now. Insert the Gibson installation DVD-ROM into your computer, and the main install window should appear automatically. - Page 16 5. The “Windows Security” window appears. Click on “Install.” 6. The “Installation Complete” window appears. Click on “Next.” 7. When the “Install Complete” window appears, click on “Finish.” Now that the drivers are installed, turn off your computer.
- Page 17 8. Locate the Gibson RIP, the power supply adapter included with your Dark Fire guitar, and the FireWire cable. Plug one end of the FireWire cable into the FireWire connector on the rear of the Gibson RIP. Attach the other end of the FireWire cable to an open FireWire port on your computer.
-
Page 18: Chapter 6: Updating Rip Firmware
Click “Yes” to install new firmware. Do not turn off or unplug your Gibson RIP or your computer while the firmware is being installed! This can leave RIP in a non- functional state that requires returning it to the factory. -
Page 19: Chapter 7: Connecting To The Gibson Rip
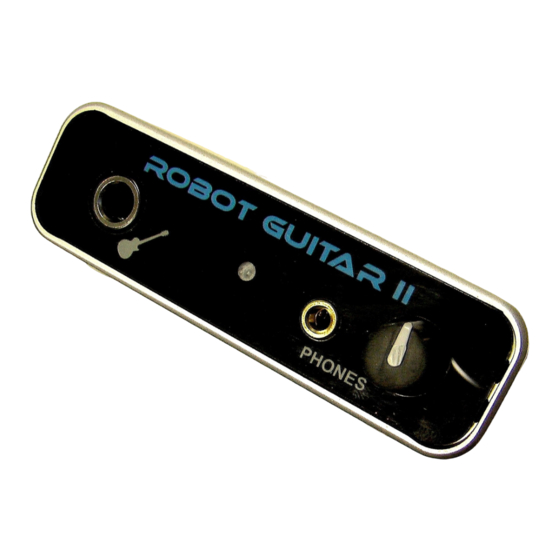
RIP is a versatile interface that also works with guitars other than Dark Fire. Guitar Input and Analog Outputs Gibson RIP’s front panel has (left to right) a guitar input, indigo power indicator light, and 1/8” stereo headphone output jack with a corresponding volume knob. The guitar input’s 1 Megohm impedance prevents loading down your pickups, thus preserving the guitar’s... - Page 20 FireWire Connector The RIP’s rear-panel FireWire connector is a 6-pin IEEE 1394a connector that operates at 400 Mbps. It connects the audio interface to your computer. Connecting Your Guitar to RIP Standard guitars: Connect your guitar to the front-panel 1/4" jack using a standard, 1/4"...
-
Page 21: Chapter 8: Console Application (Outputs Tab)
Mac: Open the Applications folder and double-click on the Gibson RIP Console icon. Windows XP: Click on the Start menu and choose Programs > Gibson RIP > Gibson RIP Console. Windows Vista: Click on the Start menu and choose All Programs > Gibson RIP >... - Page 22 The System Tray Icon (Windows Only) Opening the console adds an icon to the system tray. Clicking the left mouse button on the tray icon brings the console window to the foreground if it is minimized. Output Bus Controls The console interface works like a digital mixer. The Analog Out 1 and Analog Out 2 bus faders toward the right control the master level going to RIP’s two 1/4”...
- Page 23 The green label fields default to “Left” and “Right” but you can edit these and save the new labeling in a console session (see below). The Mute buttons and Faders below the green label fields affect everything being mixed to this bus. Thus, pulling the faders down will reduce the level of your application’s output as well as any RIP output signals being monitored, as described later.
- Page 24 There is one strip, or input channel, for each guitar signal. Note that none of these controls affect the recording process; they determine only how the signal will be monitored at the output bus. Each input channel has: Green label. You can edit and save this if you want to change the name. For ...
-
Page 25: Adjusting Playback Volume
The Playback controls. The channel names default to Left and Right, as shown in the green fields. These can be edited and saved with a Console session, as described later. The controls operate the same way as the input monitor controls, except there are no pan knobs or level meters. -
Page 26: Console Sessions
Console Sessions You can save the state of the Gibson RIP to a file called a “Session.” To save or load a session, click on the “Save” or “Load” button respectively at the top of the Console window. The “Reset” button restores the Console to its default state. However, the “Gang”... - Page 27 Windows Vista: Sessions are stored in the User’s “Documents” folder, in a sub-folder named “RIP sessions.” Mac: Sessions are stored in the User’s “Documents” folder, in a sub-folder named “RIP sessions.” Hot Keys (Shortcuts) Several “hot keys” (shortcuts) can Control the console when its window is active. (Note: The following shortcuts are for Windows.
- Page 28 Typical Console Scenarios The following assume that the Playback and Output level controls are at 0dB except as noted. You want to practice Dark Fire without any processing, and be able to listen to any of the string and pickup options through a monitoring system (including headphones plugged into RIP’s front panel): Turn up the individual string/pickup faders.
-
Page 29: Chapter 9: Console Application (Settings Tab)
Chapter 9: Console Application (Settings Tab) Click on the “Settings” tab to access RIP’s system settings. Note that it’s best to adjust Console settings before opening any applications that access RIP so that the application “sees” these settings when it opens. If the application is already open, close it and re-open after changing any settings. - Page 30 The About Button This displays the console version and driver version numbers, and provides a link to Gibson’s home page. The upper picture shows the About window for Windows XP and Vista, while the lower one shows the About window for Mac OS X.
- Page 31 Buffer Size Settings (Mac) The buffer size is set within the application, not the console. For example, with Ableton Live Lite 7 Gibson Studio Edition: 1. With Live open, click on Live in the menu bar and select Preferences. The Preferences window opens.
- Page 32 88.2kHz: The less common of two “high-resolution” sample rates (neither is available in Ableton Live Lite 7 Gibson Studio Edition). Recording at 88.2kHz creates files that are twice as large as those created when using 44.1kHz. Also, some plug-ins used in audio applications may not work as well at 88.2kHz, or you may be able to use fewer...
- Page 33 Sample Rate (Windows Vista) With ASIO applications such as Live Lite 7 Gibson Studio Edition, Sonar, Acid, Reason, etc., set the sample rate in the application itself. For example, in Live you set the sample rate by going to Preferences, then clicking on the Audio tab:...
- Page 34 Preferences window. It may be called ASIO Panel, ASIO Control, Hardware Setup, etc. For example, with Live Lite 7 Gibson Studio Edition, the ASIO panel is located in the Audio tab under Preferences (located under the Options menu) and called Hardware Setup.
-
Page 35: Led Diagnostics
Simply set the mixer setting as desired in the console, then close the console to save those settings to flash memory. Then, when you turn on your Gibson RIP, those settings will automatically be loaded into the RIP’s internal mixer. This is useful for live performance if, for example, you’ve crafted a perfect mix of all the Dark Fire outputs,... -
Page 36: Chapter 10: Firewire Analyzer (Windows Only)
ASIO-compatible audio software. Here’s how to open the Analyzer. Windows XP: Go Start > Programs > Gibson RIP and click on “FireWire Analyzer.” Windows Vista: Go Start > All Programs > Gibson RIP and click on “FireWire Analyzer.”... -
Page 37: Asio Wakeup
Status The upper area of the FireWire Analyzer window displays your current sample rate and buffer size, as selected in the Console or an audio application. Below that is the calculated buffer time in milliseconds. Playback The playback section shows the number of buffers sent to the hardware, the maximum buffer time, and the average buffer time. -
Page 38: Warning Signs
Firmware The firmware statistics display RIP’s internal state. The analyzer will periodically query RIP and show the results. Warning Signs If your audio is glitching, popping, or crackling, use the Analyzer to see if: The average playback time is substantially different from the average record time ... -
Page 39: Appendix A: Troubleshooting Guide
Appendix A: Troubleshooting Guide Problem: You cannot install your Gibson RIP under Windows 95/98/ME/2000 or Mac OS9. Solution: There is no driver support for the RIP under Windows 95/98/ME/2000 or OS9. You need at least Windows XP, Vista, Server, or Mac OS X (10.3.9 or later) to use your RIP. - Page 40 Solution: If RIP detects a problem with the FireWire connection, it will not show the Console. Check your FireWire connections. If they are solid, substitute a different FireWire cable. Problem: No matter what you do, you can't seem to solve the problem. Solution: Contact Gibson customer service. US (Toll Free) 1-800-4GIBSON US (Local)
-
Page 41: Appendix B: Firewire Tips
Appendix B: FireWire Tips Some say that FireWire was never really intended for audio interfaces, but it’s here, it’s universal, and it works…well, mostly. Some people have a hard time getting FireWire to play nice, but these tips can help. There are different FireWire chip sets. - Page 42 If you do encounter problems, don’t bang your head against the wall trying to troubleshoot without first checking the Gibson web site. There may be known issues that can be fixed with a simple driver download, or by disabling a conflicting device.
-
Page 43: Appendix C: Uninstalling The Rip Drivers And Console
It’s also possible that in the future, updated RIP software will require uninstalling previous versions. Macintosh: Drag the Gibson RIP Console icon out of the Applications folder and into the trash. Windows XP: Go Start > Programs > Gibson RIP > Uninstall. -
Page 44: Appendix D: Computer Latency And Recording
—always use ASIO for the best results. Also, avoid any options like “Emulated ASIO.” They are not true ASIO drivers. The bottom line with Windows machines is always choose “Gibson RIP ASIO” for the lowest latency, and adjust latency to the lowest possible value short of audio problems under the Console’s “Settings”... - Page 45 So, if you wear headphones with a system that has 5 ms of latency, you’ll experience the same amount of delay as if your head was 5 feet away from your monitor speakers. Periodically go to http://www.gibson.com/downloads/software to check for updated drivers that may improve performance.
-
Page 46: Appendix E: Using Rip With Non-Asio
Appendix E: Using RIP With Non-ASIO Windows Applications RIP is designed to work with ASIO applications on Windows XP and Vista because these are optimized for music and provide the lowest possible latency. However, many “consumer-oriented” Windows applications, like Windows Media Player, are not ASIO- compatible but instead use protocols like MME, DirectX, and WDM. -
Page 47: Windows Vista
1. Go Start > Control Panel. 2. Double-click on “Sound.” 3. Click on the Playback tab, then click on Analog Out, 2 – Gibson RIP, then click on Set Default. RIP is now the default for system sounds and applications such as Windows Media Player.
Need help?
Do you have a question about the Robot Interface Pack and is the answer not in the manual?
Questions and answers