Yamaha YAS-71 Owner's Manual
Front surround system (center system + subwoofer/system control)
Hide thumbs
Also See for YAS-71:
- Owner's manual (44 pages) ,
- Owner's manual (44 pages) ,
- Owner's manual (332 pages)
Table of Contents
Advertisement
Advertisement
Table of Contents

Related Manuals for Yamaha YAS-71


Summary of Contents for Yamaha YAS-71
- Page 2 Read these instructions. Keep these instructions. CAUTION Heed all warnings. RISKOF ELECTRIC SHOCKDO Follow all instructions. NOTOPEN Do not use this apparatus near water. Clean only with dry cloth. CAUTION: TO REDUCE THE RISK OF Do not block any ventilation openings.
- Page 3 The above statements apply ONLY to those products This equipment generates/uses radio frequencies and, if distributed by Yamaha Corporation of America or its not installed and used according to the instructions found subsidiaries. in the users manual, may cause interference...
- Page 4 Since hearing damage from loud sounds often uudetectable until it is too late, Yamaha and the Electronic Industries Association's Consumer Electronics Group LISTENING recommend you to avoid prolonged exposure from excessive volume levels.
- Page 5 Connecting the center system and the subwoofer/system control ..............ADJUSTING THE AUDIO DELAY ....... Connecting external components ......... Connecting the Yamaha iPod universal dock ....14 LISTENING AT LOW VOLUME (NIGHT Connecting the Yamaha Bluetooth audio receiver ..14 LISTENING MODE) ..........
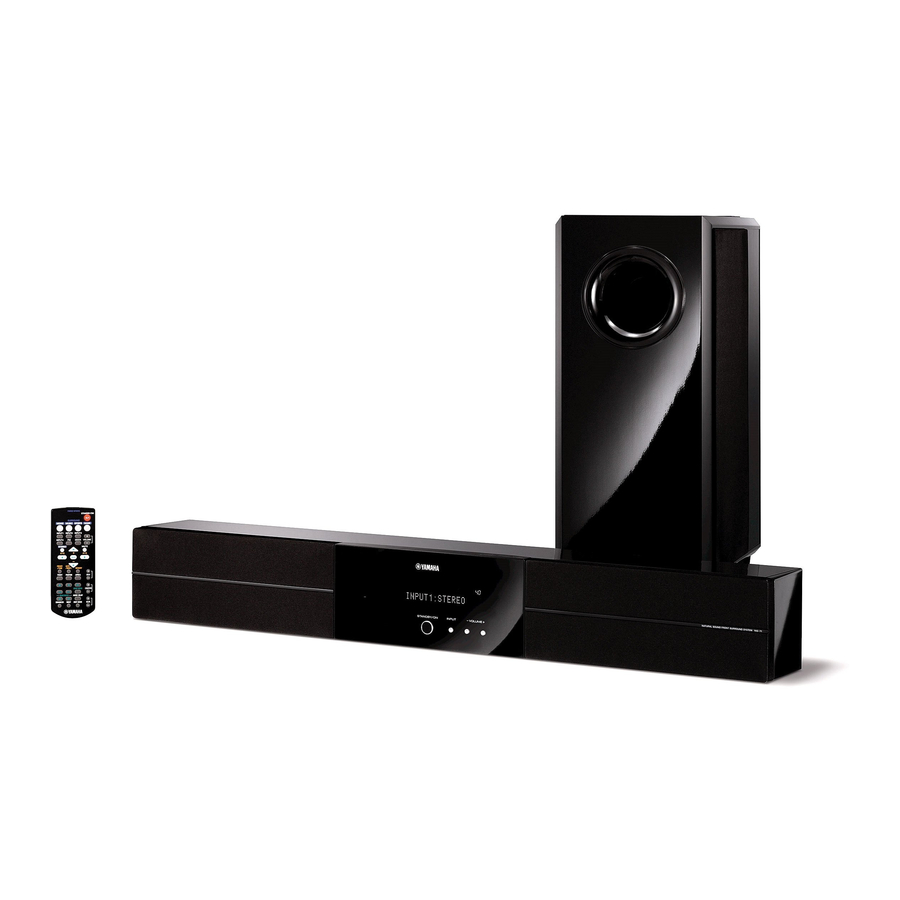
- Page 6 This product consists of the following items. Before making connections, make sure you received all of the following items. • Units Subwoofer/system control Center system (YAS-71CU) (YAS-71SPX) • Accessories Remote control System control cable Speaker cable (4 m) Speaker cable (4 m) (4 m) (For US customers only)
- Page 7 • Front panel of the center system STANDBY/ON INPUT @ Front panel display @ STAN DBY/ON Shows information about the operational status of the Turns on the system, or sets it to standby mode. system. (_' P. 4) P. 16) @ Remote control sensor Receives infrared signals from the remote control.
- Page 8 (_' P. 23) • Lights up when the system is receiving a signal from an iPod stationed in the Yamaha iPod TUNED indicator universal dock (such as YDS-10 or YDS-I 1, sold Lights up when the system is receiving a station.
- Page 9 Remote control Input buttons Select an input source you want to listen to. Infrared signal P. 16) transmitter STEREO • Turns extended stereo mode on and off alternately. P. 21) • Turns off surround mode. (_' P. 18) Cursors (4 / I_ / • / V)/ENTER Position: Change the setting.
- Page 10 @ POSITION Shifts the optimum listening area according to your listening position. (_' P. 19) TEST Outputs the test tone. (_' P. 20) @ ENHANCER Turns on and off compressed music enhancer mode alternately. (_' P. 21) @ NIGHT Turns night listening mode on or off. (_' P.
- Page 11 q_ttlt/IL'_f_Titt_J • Using the remote control (20') Within 6 rn Use the remote control within 6 m (20') of the center system and point it toward the remote control sensor. • Be careful not to spill liquid on the remote control. •...
- Page 12 Also produces virtual center chauuel sounds (dialogue, etc.) and virtual smTouud channel sounds effectively using the Yamaha front surround system. Subwoofer/system control (YAS-71SPX) Place the subwoofer uear the ceuter system and turn it slightly toward the center of the room to reduce wall reflections.
- Page 13 • Attaching the center system to a wall Installing the center system using the keyholes You can attach the center system to a wall using commercially available screws (#8, Diameter: 7.5 mm or more 5116" or more)). When installing the center system on a wall, all installation work must be performed by a qualified contractor or dealer.
- Page 14 • When connecting the center system, fix the speaker cables in place where they will not become loose. If your foot or hand accidentally gets caught on a loose speaker cable, the center system may fall. • After attaching the center system, check that the center system is fixed securely. Yamaha will bear no responsibility for any accidents caused by improper installations.
- Page 15 • Do not connect the power cable until all connections are completed. • Do not use excessive force when inserting the cable plug. Doing so may damage the cable plug and/or terminal. Follow the procedure below to connect the center system and the subwoofer/system control. Connecting speaker cables Connect the cable plug...
- Page 16 I[._.li'li'laP_l[.ll The subwoofer/system control has 3 digital input jacks (optical digital x 2, coaxial digital x 1) and 1 analog input jack. Before connecting your external components, check the output jacks of the components and be sure to use correct connection cables.
- Page 17 ,_oli'li'l=_qiNi- [INPUT 3] COAXIAL jack CD player I _;AxiAi ) Coaxial digital cable JDIGITAL O UTPUT • Analog connection [INPUT 4] ANALOG jacks Example1 : TV Example 2: VCR or video camera VCR or video camera, etc., with no digital output. iiiiiiiiiii iiiiiiiiiii iiiiiiiiiii...
- Page 18 The system is equipped with the DOCK terminal, which allows you to connect the Yamaha iPod universal dock (such as YDS-10 or YDS-I 1, sold separately) where you can dock your iPod. Connect the Yamaha iPod universal dock to the DOCK terminal of the subwoofer/system control using its dedicated cable.
- Page 19 "i'li'li'l gqiPll-- After you have made all connections, connect the power cable of the subwoofer/system control. To AC wall outlet x(_t.. You call attach the cover after you have made all conuections o1" detach according to your preference. Attach the cover to the rear panel of the subwoofer/system control using the 6 supplied screws as shown.
- Page 20 Once you have finished all cable connections P. 11 to 15) and remote control preparation P. 7), follow procedure below to start basic playback operation. To turn off the volume temporarily, press MUTE. While the mute function is activated, the MUTE indicator flashes. To resume the volume, press MUTE again.
- Page 21 Ordinarily, two front speakers, a center speaker, two surround speakers, Typical 5.1 channel speaker system and a subwoofer are necessary for enjoying 5.1 channel surround sound. • Virtual 7.1 channel The AIR SURROUND XTREME technology, using only the front left and right speakers of the center system and subwoofer, enables you to enjoy a realistic 7.1 channel sound by simulating sound from virtual speakers at center, surround, and surround backs.
- Page 22 IF:fl:i.'lli:l:{.]l&_l_J;tt:l:l_l Press one of the surround mode buttons. The names of the selected input source and the selected surround mode appear in the front panel display. Surround mode buttons i Hb.'ii i 'i _ r,'iiiii Bi.. Surround mode descriptions Movie MOVIE his mode is useful when you enjoy movie contents on media such as DVD, etc.
- Page 23 :fl'tr_lll'i'[ellJ_l_J:ft'laiM This function shifts the optimum listening area from side to side according to your listening position for the best Virtual Surround effect. Press POSITION to enter position mode. The current position appears in the front panel display. Press </11_to shift the optimum listening area (L6, L5, L4, L3, L2, L1, CENTER, R1, R2, R3, R4, R5, R6).
- Page 24 IF:fl:tf.']li:l:{.]lJ_l_J;ft:lah_l You can select the optimum listening area from two modes. Press AREA. Each time you press AREA, NORMAL and WIDE modes change alternately. AREA NORMAL Select this to sharpen the sound effect. "AREA NORMAL" appears in the front panel display when NORMAL mode is selected.
- Page 25 :fl'R'.'_ll"i'[e11Nl_J:ft'l=i_rd An extended sound is achieved t_)r a 2 channel source such as a CD player. Press STEREO to enter extended stereo mode. "EXTENDED" appears in the front panel display. STEREO E ....:.;:':; i i:::. HL)k'. L:, Each time you press STEREO, the function is turned on (EXTENDED) and off (STEREO) alternately.
- Page 26 You can use two tuning modes to tune into the desired FM station: Frequency tuning mode You can search or specify the frequency of the desired FM station automatically or manually. (See "Basic tuning operation" on page 23.) Preset tuning mode You can preset the desired FM station in advance, and then recall the station by specifying the preset group and number.
- Page 27 W_t_Vh_Eem_oI_LTJE:!.'foY,JDIo_,__ Manual tuning It the signal received from the station you want to select is weak, you can tune into the desired station by specifying the frequency manually. In FM tuning mode, press AUTO/MAN'L repeatedly so that the AUTO indicator disappears, and then press +/- repeatedly to specify the frequency of the desired station.
- Page 28 • Automatic station preset You can store up to 40 FM stations (AI to ES: 8 preset numbers in each of the 5 preset groups). Press FM to set the input to FM. "FM" appears in the front panel display. Press and hold MEMORY for more than 3 seconds.
- Page 29 !!_...tE_ltVitv[t..mgol._irjE,:!=.fol*_fDI_l'*_I,,...t_ • Manual station preset Use this feature to preset your desired station manually. Tune into a station. Press +/- to select a preset number (1 to 8) while the MEMORY indicator is flashing. See "Basic tuning operation" on page 23 for tuning instructions.
- Page 30 IW ! _.'_i =l _V h_[e]l _el _ i rj l : ! =" { eTzf B I ef'z T,.'_f< • Recalling the preset stations Press PRESET/TUNE to select preset tuning mode. Press A4 E or A_ E repeatedly to select the desired preset group (A to E).
- Page 31 Battery charge feature This system charges the battery of an iPod stationed in the Yamaha iPod universal dock connected to the DOCK terminal of the subwoofer/system control while this system is turned on. Stationing your iPod in the Yamaha iPod universal dock Once you station your iPod in the Yamaha iPod universal dock, "iPod connected"...
- Page 32 • Controlling your iPod in simple remote mode Docking your iPod in the Yamaha iPod universal dock (such as YDS-10 or YDS-1 l, sold separately) enters simple remote mode. You can perform the basic operations of your iPod (play, stop, skip backward/forward, etc.) using the...
- Page 33 You can connect the Yamaha Bluetooth audio receiver (such as YBA-I 0, sold separately) to the DOCK terminal of the subwoofer/system control and enjoy the music contents stored in your Bluetooth component (such as a portable music player or computer equipped with a Bluetooth transmitter, etc.) without wiring between the system and the Bluetooth component.
- Page 34 Press and hold BLUETOOTH ON for more than 3 seconds to start pairing. "Searching..." appears when the pairing starts. While the Yamaha Bluetooth audio receiver is in pairing mode, the DOCK indicator flashes in the front panel display. -4'-- To cancel the pairing, press BI, UETOOTH OFF.
- Page 35 FPD TV images sometimes lag behind the sound. You can use this function to delay the sound output to synchronize with the video image. Press AUDIO DELAY to enter adjusting mode. Press A/V to adjust the delay time. Options: 0 to 240 ms You can adjust the delay time by the 10 ms.
- Page 36 Night listening mode enables you to listen to dialog or vocals more clearly at lower volume by suppressing louder sound effects. This function is useful when you enjoy movies or music at night. Press NIGHT. "NIGHT ON" appears in the front panel display. The NIGHT indicator lights up when Night listening d<_iiii:i:!i!i!i!i!i!!!i_i mode is selected.
- Page 37 You can change the brightness of the front panel display. You can also turn off the front panel display to view a movie a darker environment. Press DISP. MODE repeatedly. DISP. MODE, Each time you press the brightness of the front panel changes.
- Page 38 If there is any problem with the system, check the following items. If you cannot solve a problem with the following remedies, or if the problem is not listed below, turn off and unplug the system, and then consult your nearest authorized Yamaha dealer or Service Center. Power...
- Page 39 [) :[ 5.,:.0 !G!G,!:=,:.i;.,!:=,:.:i Your iPod was removed from the Yamaha Station your iPod back in the Yamaha iPod universal iPod universal dock (such as YDS-10 or dock (YDS- 10 or YDS-I 1, sold separalely)
- Page 40 Yamaha Bluetoolh audio receiver (such as YBA-10, sold separately). The pairing is perlbrmed when the Perform the pairing when the Yamaha Bluetooth Yamaha Bluetooth audio receiver (such as audit) receiver (such as YBA-IO, sold separately) YBA-10, sold separately)
- Page 41 AIR SURROUND XTREME • Dolby Pro Logic II New surround technology developed by Yamaha enables It is an improved matrix decoding technology that surround sound with fewer speakers. In comparison to provides better spatiality and directionality on Dolby traditional front surround technology, the AIR Surround programmed material;...
- Page 42 YAS-71CU FM Tuner • Type ....2 way acoustic suspension magnetic shiehling type • Tuning range • Driver [U.S.A. and Canada models] ......87.50 to 107.90 MHz Woofer .... 8 cm (3") cone magnetic shielding type x 4 (L2, R2) [Other models] ..........
- Page 43 _J_I_mTED WITH l /_ISOYINKL YAMAHA CORPORATION Printed in China _ WP54420-1 © 2008 Yamaha Corporation AJl rights reserved.
Need help?
Do you have a question about the YAS-71 and is the answer not in the manual?
Questions and answers
How can I get speker cables replace
The Yamaha YAS-71 uses supplied speaker cables with unique connectors that resemble small phone line connectors. To replace them:
1. Try to find original or compatible replacement cables online or from Yamaha support.
2. If unavailable, you may fabricate cables using similar connectors. Identify the connector type (likely modular RJ-style) and match the wiring.
3. Ensure you match the color-coded plugs to the same color speaker jacks.
4. Do not use excessive force when inserting cables, and complete all connections before powering the system.
Use caution to avoid damaging the terminals.
This answer is automatically generated