Whirlpool SC8720ED Use And Care Manual
30" gas modular downdraft cooktop
Hide thumbs
Also See for SC8720ED:
- Dimensions and installation information (1 page) ,
- Use and care manual (34 pages) ,
- Installation instructions manual (9 pages)
Table of Contents
Advertisement
Quick Links
®
_liances
NOW TO MAKE: A HOME RUNI"
30" GAS MODULAR
DOWNDRA
TO THE iNSTALLER: PLEASE LEAVE THiS
iNSTRUCTiON
BOOK WiTH THE UNIT.
TO THE CONSUMER: PLEASE READ AND
KEEP THiS BOOK FOR FUTURE REFERENCE.
PART NO. 8111 P466=60/9763399
A Note to You ......................... 2
................... 3-5
Getting to Know Your
..................................
6
Air shutter adjustment ........ 7
LO flame adjustment .......... 8
.................................
9
Using ..................................
9
Caring for ..........................
11
.................. 12
..........................
12
Using ................................
15
Caring for .........................
16
Grill .......................................
18
installing ...........................
18
Using ................................
20
Caring for .......................... 23
.................................
25
installing ........................... 25
Using ................................
26
Caring for .......................... 28
Vent ......................................
29
Using ................................
29
Caring for .......................... 30
................. 31
.................................
33
..............................
36
1o800o253ol 30'1
Caff us with questions
or comments.
MODEL
SC8720ED
Advertisement
Table of Contents

Related Manuals for Whirlpool SC8720ED


Summary of Contents for Whirlpool SC8720ED
-
Page 1: Table Of Contents
® _liances NOW TO MAKE: A HOME RUNI" A Note to You ......2 Cooktop Safety ....3-5 Getting to Know Your Cooktop ........Air shutter adjustment ..7 LO flame adjustment ..8 Controls ......... Using ........Caring for ......Surface Burners .... -
Page 2: A Note To You
WHIRLPOOL ° appmianc÷o Because your life is getting busier and more complicated, WHIRLPOOL cooktops are easy to use, save time, and help you manage your home better. To ensure that you enjoy years of trouble-free operation, we developed this Use and Care Guide. It is full of valuable infor- mation about how to operate and maintain your appliance properly and safely. -
Page 3: Cooktop Safety
Cooktop Safety Your safety is im£ortant This guide contains safety statements under warning symbols. Please pay special This symbol alerts you to such attention to these symbols and follow any dangers as fire, electrical shock, instructions given. Here is a brief explanation burns, and personal injury. - Page 4 Check to be sure glass cooking utensils are safe for use on the cooktop. Only certain types of glass, glass-ceramic, ceramic, earthenware, or other glazed utensils are suitable for cooktops without breaking due to the sudden change in temperature. Donotwearloose or hanging garments Never leave surface burners unattended whenusing thecooktop.
- Page 5 Whirlpool service Clean only parts listed in this manual company or Qualified Agency. and use procedures recommended.
-
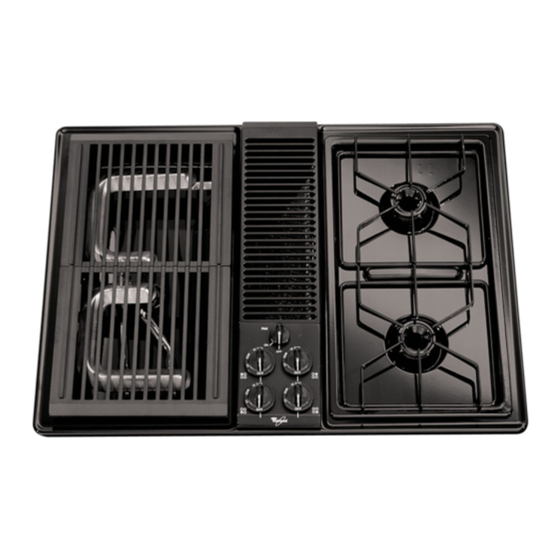
Page 6: Cooktop
Your Know Cooktop This section contains captioned illustrations of your cooktop. Use them to become familiar with the location and appearance of all parts and features. To help you find information on specific parts and features quickly, page references are included. Optional griddle accessory (p.n. -
Page 7: Air Shutter Adjustment
Air shutter adjustment To adjust grill burner To adjust surface burner shutters or surface burner shutter (on some models) shutters Rotate air shutter on To open mixer head Screw to make air adjustment Air opening To close Air opening insert screwdriver blade in slot To close To open... -
Page 8: Lo Flame Adjustment
LO flame adjustment This appliance has been shipped from the 4._Turn the center stem adjusting screw factory with LO and MED flame settings slightly to set the flame size. adjusted for use with natural gas and NOTE: Turn clockwise to reduce or coun- average installations. -
Page 9: Controls
Controls Carbon Monoxide Poisoning Hazard Do not operate with a yellow flame. Doing so can result in death, heart attack, or convulsions. Explosion Hazard Do not store flammable materials such as gasoline near the cooktop. Doing so can result in death, explosion, fire, or burns. - Page 10 Untilyou get usedto thesettings,use the followingasa guide.Forbestresults, startcooking atthehighsetting; t henturn thecontrol k nobdown to continue cooking. SETTING RECOMMENDED LITE To light the burner. After the burner lights, turn control back to a desired setting to stop the clicking of the Explosion Hazard ignitor.
-
Page 11: Caring For
Caring fer centrels NOTE: Do not use oven cleaners, bleach, or rust removers to clean any part of the cooktop. Use this chart to help you clean your control knobs and panel. PART WHAT TO USE HOW TO CLEAN Control knobs Sponge and warm, Turn knobs to OFF and pull straight up. -
Page 12: Surface Burners
You can install extra surface burners on the left side of your cooktop. To get the surface burner accessory, order Part Number SCM 10DB/DW from a Whirlpool service company or dealer (see Step 2 on page 33) or call the Whirlpool Consumer Assistance Center toll-free 1-800-253-1301. - Page 13 Mixer tube openings Orifices Prong ignitor Flash tubes ignitor opening Side openings Aeration tray Burner basin Supports 3._Set the surface bumer accessory into place. 4., Set the aeration tray into place. Insert Mixer tube openings should be pointed the prong at the end of the tray into the toward the orifices.
- Page 14 To remove: Aeration tray Prong 1,_Make sure the control knobs are turned off and the cooktop is cool. 4,, Hold the aeration tray by the sides and slide away to remove the prong from the opening and clear the surface burners. Orifices 2,, Remove burner grates.
-
Page 15: Using
Using Cookware tips Home canning information No one brand of cookware is best for all The larger diameter of most water-bath or people, Knowing something about pan pressure canners combined with high heat materials and construction will help you settings for long periods of time can cause select the correct cookware for your needs, damage to the cooktop. -
Page 16: Caring For
Caring for surface burners Use this chart to help you clean your surface burner accessory. PART WHAT TO USE HOW TO CLEAN Surface burner Warm, soapy water In dishwasher, wash with other cooking utensils. grates and a nonabrasive, plastic scrubbing Dry completely. - Page 17 Burner f|arne Carbon Monoxide Poisoning Hazard Do not operate with a yellow flame. Doing so can result in death, heart attack, or convulsions. NOTE: Occasionally check the burner Flame shape flames for proper size and shape as shown. and size Setting A good flame is blue in color.
-
Page 18: Grill
Only install the grill on the left side of your cooktop. To get the grill accessory, order Part Number SCM20DB from a Whirlpool service company or dealer (see Step 2 on page 33) or call the Whirlpool Consumer Assistance Center toll-free 1=800=253=1301. To instaih... - Page 19 3,_ Placethegrillgrates onthetopofthe cooktop. To remove: 1,_Make sure the control knobs are turned 3,_Remove grill burner. off and the grill is cool. 2,_Remove grill grates.
-
Page 20: Using
UsiHg Before you use the grill The fan switch turns on by itself while you first time: are using the grill. Do not use the grill if the fan does not go on. 1._Heat the grill burner to remove the Do not cover the entire cooking surface protective shipping coating. - Page 21 Grilling tips (continued) If meat begins to cook too quickly, turn the grill control knob to a lower setting. Grease drippings will ignite occasionally to produce harmless puffs of flame for a second or two. This is normal while cook- ing.
- Page 22 Grill chart Preheat on HI for 5 or 10 minutes for best flavor. Grilling times are guidelines only and may need to be adjusted to get the taste and/or doneness you want. COOKING TIME FOOD SETTING (in minutes) COMMENTS Steak (½-¾") Rare 6-10 Turn after half the time.
-
Page 23: Caring For
COOKING TIME FOOD SETTING (in minutes) COMMENTS Fish Small, w hole(1") Brush with butter. Turn after 15-20 half the time. Steaks (1") Brush with butter. Turn after 20-25 half the time. Fillets(½")(withskinon) Start skin side down. Brush 10-15 with butter. Turn after half the time. - Page 24 PART WHAT TO USE HOW TO CLEAN Clean with a soapy, nonabrasive scrubbing Grill burner Warm, soapy water pad or in a dishwasher. Rinse and dry well and a nonabrasive, before using again. plastic scrubbing pad For heavy soil first clean with pad, rinse, and dry.
-
Page 25: Griddle
Part Number SCM20DB. To get the griddle accessory, order Part Number SCM40DB from a Whirlpool service company or dealer (see Step 2 on page 33) or call the Whirlpool Consumer Assistance Center toll-free 1 =800=253=1301. Side openings Mixer tube openings o@,. -
Page 26: Using
Drain groove 3,_Place the griddle over the grill burner so that the drain groove is in front. This will let extra grease collect in the drain jar. Using Before using the griddle the first time: 1,, Wash griddle in warm, soapy water. Rinse and dry well. - Page 27 Griddle chart Preheat for five minutes at the setting listed below. Griddling times are guidelines only and may need to be adjusted to get the taste and/or doneness you want, CONTROL APPROXIMATE COOKING TIME (in minutes) FOOD SETTING FIRST SIDE SECOND SIDE Sausage patties Bacon (slice)
-
Page 28: Caring For
Carin# for #riddle You must clean your griddle after each use to keep the finish in good shape. PART WHAT TO USE HOW TO CLEAN Griddle Warm, soapy water Wash once griddle has cooled. Do not put a and a nonabrasive, hot griddle in cold water. -
Page 29: Vent
Vent Using The built-in vent system removes cooking vapors, odors, and smoke from foods prepared on the cooktop, grill, and griddle. The vent system will go on by itself when the grill burner is being used. To turn on the vent system yourseJf:... -
Page 30: Caring For
Caring vent Air grille Electrical Shock Hazard Filter Disconnect the electrical supply before servicing the cooktop. Retainer clip (turn to remove filter) Turn fan and cooktop controls before cleaning the vent system. Do not put hand in vent box when NOTES: fan or controls are on. -
Page 31: Troubleshooting
Troubleshooting Most cooking problems often are caused by little things you can find and fix without tools of any kind. Check the lists below and on the next page before calling for assistance or service. If you still need help, see "Requesting Assistance or Service" on page 33. if nothing operates, check... - Page 32 PROBLEM CAUSE Burnerflameslift off _Air/gas mixture is incorrect. Contact a nauthorized ports,areyellow, Whirlpool service technician t ocheckair/gas mixture. or arenoisywhen turnedoff Burnermakespopping _Burner i swetfromwashing. L etdry. noisewhenon Grill does not work You have not left space between food items.
-
Page 33: Requesting Assistance Or Service
To locate FSP replacement parts in your recommend a qualified service company in area, refer to Step 2 or call the Whirlpool your area. Consumer Assistance Center number If you prefer, write to: in Step 1. -
Page 34: Warranty
HEREIN. IMPLIED WARRANTIES, INCLUDING WARRANTIES OF MERCHANTABILITY OR FITNESS FOR A PARTICULAR PURPOSE, ARE LIMITED TO ONE YEAR OR THE SHORTEST PERIOD ALLOWED BY LAW. WHIRLPOOL SHALL NOT BE LIABLE FOR INCIDENTAL OR CONSEQUENTIAL DAMAGES. SOME STATES AND PROVINCES DO NOT ALLOW THE EXCLUSION OR LIMITATION OF INCIDENTAL OR CONSEQUENTIAL DAMAGES, OR LIMITATIONS ON THE DURATION OF IMPLIED WARRANTIES OF MERCHANTABILITY OR FITNESS, SO THESE EXCLUSIONS OR LIMITATIONS MAY NOT APPLY TO YOU.
Need help?
Do you have a question about the SC8720ED and is the answer not in the manual?
Questions and answers