Advertisement
Quick Links
Main Features
• The recorder has three recording modes: HQ (High Quality) mode, SP (Standard
Playback) mode, and LP (Long Playback) mode.
• The Variable Control Voice Actuator (VCVA) reduces memory usage by pausing
recording when it senses silence.
• Recorded sound files can be stored in three separate folders (up to 100 files per
folder).
• Back lighting to illuminate the LCD panel allows you to read the display in the
dark.
• The USB cable and Digital Wave Player-Software allow you to record sound files
directly on PC.
DIGITAL VOICE
• The high-quality directional microphone helps you clearly record from a sound
source aimed at with the microphone.
RECORDER
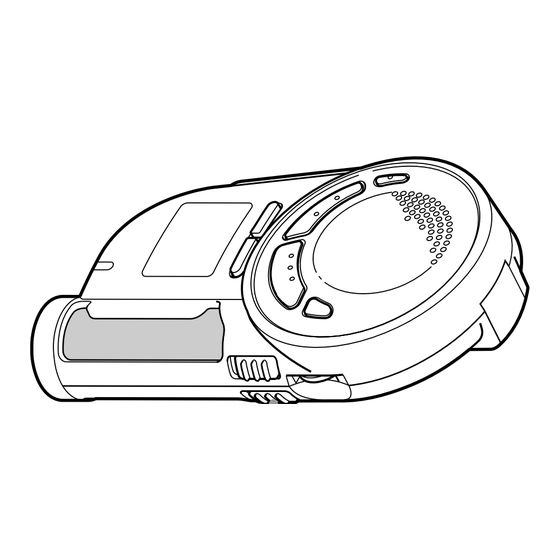
Identification of Parts
DW-90
DW-360
INSTRUCTIONS
Please read these instructions for information about using
the product correctly and safely.
Keep the instructions handy for future reference.
To ensure successful recordings, we recommend that
you test the record function and volume before use.
Shinjuku Monolith, 3-1 Nishi-Shinjuku 2-chome, Shinjuku-ku, Tokyo 163-0914, Japan. Tel. 03-3340-2111
Two Corporate Center Drive, Melville, NY 11747-3157, U.S.A. Tel. 1-800-622-6372
(Premises/Goods delivery) Wendenstrasse 14-18, 20097 Hamburg, Germany. Tel. 040-237730
(Letters) Postfach 10 49 08. 20034 Hamburg. Germany.
2-8 Honduras Street, London EC1Y 0TX, United Kingdom, Tel. 020-7253-2772
http://www.olympus.com
Declaration of Conformity
Display (LCD Panel)
Model Number:
DW-90, DW-360
Trade Name:
DIGITAL VOICE RECORDER
Responsible Party:
OLYMPUS AMERICA INC.
Address:
2 Corporate Center Drive, Melville, NY 11747-3157,
U.S.A.
Telephone Number:
800-622-6372
This device Complies with Part 15 of the FCC Rules. Operation is subject to the following
two conditions: (1) This device may not cause harmful interference, and (2) this device must
accept any interference received, including interference that may cause undesired operation.
Tested To Comply
With FCC Standards
FOR HOME OR OFFICE USE
Canadian RFI
This digital apparatus does not exceed the Class B limits for radio noise emissions from digital
apparatus as set out in the Radio Interference Regulations of the Canadian Department of
Communications.
Cet apparail numerique ne depasse pas limits de Categorie B pour les emissions de gruit radio
emanant d'appareils numeriques, tel que prevu dans les Reglements sur l'Interference Radio du
Standby Mode and Display Shut Off
Department Canadian des Communications.
If the recorder is stopped or paused for 60 minutes or longer during recording or
playing, it goes into Standby (power-save) mode, and the display shuts off. To exit
"CE" mark indicates that this product
Il marchio "CE" indica che questo
Standby mode and turn on the display, press any button.
complies
with
the
European
prodotto è conforme alle norme della
requirements for safety, health,
comunità europea per quanto riguarda
environment and customer protection.
la sicurezza, la salute, l'ambiente e la
L'indication "CE" signfie que ce produit
protezione del consumatore.
est conforme aux exigences concemant
La marca "CE" indica que este producto
la sécurité, la santé, l'environnement et
se encuentra de conformidad con las
la protection du consommateur.
exigencias europeas sobre seguridad,
Das „CE" Zeichen bestätigt die
salud, medio ambiente y protección al
übereinstimmug mit den Europäischen
consumidor.
Bestimmungen für Betriebssicherheit
E2-2797-03
und Umweltschutz.
AP0311
Inserting Batteries
Notes on the Folders
The recorder has three folders: A, B, and S.
1
Holding the battery compartment cover
• Folders A and B
pressed slightly toward the recorder,
Each recorded message stored in a folder is saved as a Wave file. These folders
slide the cover until it unlocks, then
can be selectively used to distinguish the kind of recording. Up to 100 files can be
open the cover.
stored per folder.
2
• Folder S
Insert two size-AAA alkaline batteries,
In folder S, files are nested in date subfolders,* making it useful for storing a
observing the correct polarity.
certain day's schedule for future reference. Up to 15 files can be stored in a single
3
Close the battery cover completely.
date subfolder, and up to 100 files altogether can be recorded in folder S.
* There is one subfolder for each day of the year.
An optional Ni-MH Rechargeable Battery from
Olympus can be used for the recorder.
However, the battery level may not be indicated
correctly when the Ni-MH Rechargeabel battery
is used.
Replacing Batteries
1 microphone (front)
When
appears on the display, replace the batteries as
2 microphone (side)
soon as possible. Size-AAA alkaline batteries are
3 Display (LCD panel)
recommended. When the batteries are depleted,
4 HOLD switch
a Battery indicator
5 MICSENS (Microphone
appears on the display, and the recorder shuts off.
sensitivity) switch
It is recommended to set the HOLD switch to the HOLD position before you replace
6 VOLUME control
batteries to maintain the current settings (time/date, etc.). For your convenience,
7 REC (Record) button
the recorder also logs the current settings in nonvolatile memory at hourly intervals.
8 ERASE button
9 Earphone jack
0 Microphone stand hole
! Recording lamp
Setting Time/Date
Folder S
@ DISPLAY button
(schedule)
# REC MODE button
$ STOP button
If you have set the time and date, information as to when a sound file was recorded
% MENU/FOLDER button
is stored automatically with that file.
^ Built-in speaker
The setting of the time and date is necessary for the management of the files in
folder S (see "Notes on the Folders" for details), for the alarm playback function,
and for the schedule alarm playback function.
When you install batteries for the first time or each time you replace the batteries,
To change folders
the hour indication will flash. In such a case, be sure to set the time and date by
Press the MENU/FOLDER button while the recorder is
following steps 4 through 6 described below.
stopped.
Each time you press the MENU/FOLDER button, the display
1
& Battery cover
Press and hold the MENU/FOLDER button for
changes as follows:
* PLAY/ ` button
1 second or longer.
A → B → S → A . . .
( 9 (Fast Forward) /+ button
To change date subfolders in folder S, select folder S first,
2
Press the 9/+ or 0/– button to select the Time/
) 0 (Rewind) /– button
and then press the 9/+ or 0/– button to select the
- Rubber foot
Date Setup screen.
date subfolder.
= Strap holes
"TIME" flashes on the display.
q PC (USB) terminal
3
Press the PLAY button.
The hour indicator flashes.
Recording
4
Press the 9/+ or 0/– button to set the hour.
5
1
Press the PLAY button to accept the hour.
Press the MENU/FOLDER button to select the desired folder (A, B, or S).
The minute indicator flashes.
When you select folder S, the current date subfolder appears on the display.
Repeat steps 4 and 5 to continue to set the minute, year, month and date in
If you select folder A or B, go to the step 3.
the same way.
2
If you select folder S, press the 9/+ or
6
0/– button to select the desired date subfolder.
After setting the date, press the STOP button.
This completes the time/date setup procedure.
3
Set the recording mode (see "Recording Modes").
• You can switch the time indication between the 12-hour system and the 24-hour
4
Set the microphone sensitivity (see "Microphone
system by pressing the DISPLAY button while you are setting the hour or minute.
Sensitivity").
1 Folder indicator
(Example: 5:23 P.M.)
2 Recording mode indicator
5
Press the REC button to start recording.
3 Current time/date, recording
The recording lamp lights, and recording starts.
time/date (REC DATE), elapsed
(Initial setting)
recording time, remaining
Each time you press the DISPLAY button, the display
recording time (REMAIN), menu
switches between current recording time and
• You can change the order of the date indication by pressing the DISPLAY button
display, etc.
remaining recording time.
while you are setting the year, month, or day.
4 Alarm indicator
(Example: February 14, 2001)
6
5 Battery indicator
To stop recording, press the STOP button.
6 7Rewind indicator,
8Fast Forward indicator,
sRecord indicator, `Play
(Initial setting)
* When the remaining recording time becomes 5 minutes or less,
indicator
the display changes to remaining recording time automatically.
• Each time you press the DISPLAY button while the recorder is stopped, the display
7 File number indicator
Notes
8 VCVA (Variable Control Voice
changes as follows (with folder A or B selected):
• Even if you press the DISPLAY button, the display will not change
Time → Remaining recording time → Date → Time . . .
Actuator) indicator
to current recording time if the remaining recording time is 5 minutes
The selected indication appears on the display each time the recorder is stopped.
or less.
Notes
• When the remaining recording time becomes 1 minute or less, the recording lamp flashes.
• If "FULL" appears on the display, you cannot record in the selected folder. In such a case,
• If you leave the recorder untouched for 3 minutes or longer before pressing the STOP button
erase unnecessary files (see "Erasing from folder A or B" or "Erasing from folder S").
in step 6, Setup mode will be canceled, and any time/date settings you made will be canceled.
• There is one subfolder for each day of the year.
• If you press the STOP button during setup, time/date setup is canceled.
• You can set the time and date on the recorder by connecting it to your PC (see "Other functions
of Olympus Digital Wave Player" for details).
To Pause Recording
To pause
Press the REC button during recording. , "PAUSE" on the display and the
recording lamp will flash.
To resume recording
Press the REC button again. , Recording will resume at the point of interruption.
Note
The recorder will enter Stop mode if it has been left paused for 10 minutes or longer.
To check the remaining recording time
Press the DISPLAY button while the recorder is stopped.
Folder A
File
To check the total number of files recorded
in the folder
Press the MENU/FOLDER
button
Press and hold the STOP button while the recorder is
stopped. The total number of files recorded in the folder
Maximum
of 100 files
appears on the display.
* In the case of folder S, the number of the date subfolder is
not included.
Folder B
Playing Back
Maximum
of 100 files
1
Press the MENU/FOLDER button to select the desired folder (A, B, or S).
2
Press the 9/+ or 0/– button to select the file to play back.
Date subfolder
File
If you select folder S, select the desired date subfolder.*
* When you select the desired date subfolder, it is useful to press and hold the 9/+ or
0/– button for 1 second or longer. The recorder locates the next date subfolder that
Maximum
Maximum
contains recorded files.
of 15 files
of 100 files
3
Press the PLAY button to start playback.
The playing time** appears on the display.
** Each time you press the DISPLAY button during playback, the
display changes as follows:
Playing time → Remaining playing time → Recording date of
the file → Recording time of the file → Playing time . . .
4
Use the VOLUME control to adjust the volume to
your liking.
Note
When you play back a file in the date subfolder without choosing
a specified file, the recorder will play back all the files in the
selected date subfolder from filename "001". When you play
MIN
back a file immediately after recording the file, only the most
a Current folder
recently recorded file will be played back.
Canceling Playback
To stop
Press the STOP button. , The recorder returns to the beginning of the file being
played.
To pause
Press the PLAY button. ,"PAUSE" flashes on the display.
To resume playback
Press the PLAY button again. ,Playback will resume at the point of interruption.
Note
The recorder will enter Stop mode if it has been left paused for 10 minutes or longer.
Playback Functions
a Date to record
Operation
How to cancel
Fast Playback
Press and hold the PLAY
If you press and hold the PLAY
(F-PLAY)
button for 1 second or
button for 1 second or longer
longer while playing a
again, the recorder will resume
file.
normal playback.
Press and hold the 9
When you release the 9 button,
Fast Forward
(8)
button while playing a
the recorder will resume normal
file.
playback.
a Folder
b Current recording
Press and hold the 0
When you release the 0 button,
Rewind (7)
mode
button while playing a
the recorder will resume normal
c Current file number
d Recording time*
file.
playback.
e Remaining
recording time
• Fast playback is approximately 30% faster than normal playback.
• When fast playback of a file is over, the recorder will play back the next file at
normal speed. If you once press the STOP button and start playback again, the
recorder will play back files in normal speed as well.
• No sound is heard from the built-in speaker during fast forwarding or rewinding.
• The end of the file is located by pressing and holding the 9 button during fast
forwarding. The recorder will pause at the end of the file. If you do not release the
9 button, the recorder will continue fast forward.
• The beginning of the file is located by pressing and holding the 0 button during
rewinding. The recorder will pause at the beginning of the file. If you do not release
the 0 button, the recorder will continue rewinding.
Locating the beginning of the file
Erase All Files in a Date Subfolder
Press the 9/+ or 0/– button in Stop mode,* playback, fast playback, or
1
Press the MENU/FOLDER button to select folder S.
playback pause.
Each time you press the 9/+ or 0/– button, the recorder will locate the beginning
2
Press the 9/+ or 0/– button to select the date subfolder to be
of the next or previous file.
erased.
* When folder S is selected, you cannot locate the beginning of the file in Stop mode.
3
Notes
Press and hold the ERASE button for 2 seconds or
• Even if you press the 9/+ or 0/– button during playback or fast playback, the recorder
longer.
will continue playback in the same playback mode.
"ALL" flashes, then alternatively the date of the selected
• When you select folder A or B, you can locate the beginning of each file continuously by
subfolder and "YES" appear on the display for 8 seconds.
pressing and holding the 9/+ or 0/– button while in Stop mode. During operation, "SKIP"
flashes on the display.
4
Press the ERASE button again.
All files in the date subfolder are erased.
Note
Erasing from Folder A or B
If you leave the recorder untouched for 8 seconds or longer before you press the ERASE button
a Current folder
in step 4, Erase mode will be canceled, and the recorder will enter Stop mode.
b Total number of
files recorded in
Erase All Files in the S Folder
the current folder*
Erasing One File at a Time
1
c Remaining
Press the MENU/FOLDER button to select folder S.
recording time
1
Press the MENU/FOLDER button to select folder A or B.
2
Press and hold the ERASE button for 4 seconds or
longer.
2
Press the 9/+ or 0/– button to select the file to be erased.
"S" and "ALL" flash, then alternatively "ERASE" and "YES"
3
Press the ERASE button.
appear on the display for 8 seconds.
3
The file number flashes, then alternatively "ERASE" and
Press the ERASE button again.
"YES" appear on the display for 8 seconds.
All files in folder S are erased.
4
Note
Press the ERASE button again.
If you leave the recorder untouched for 8 seconds or longer before you press the ERASE button
The file is erased.
in step 3, Erase mode will be canceled, and the recorder will enter Stop mode.
Sequential file numbers are reassigned automatically.
Notes
Recording Modes
• You can erase a file while in playback or playback pause.
• If you leave the recorder untouched for 8 seconds or longer before you press the ERASE
button in step 4, Erase mode will be canceled, and the recorder will enter Stop mode.
You can select from among three recording modes: HQ (High Quality) mode, SP
Erase All Files from a Folder
(Standard Playback) mode and LP (Long Playback) mode.
Maximum recording time
1
Press the MENU/FOLDER button to select the folder from which you
a Current folder
want to erase all files.
b Current file number
HQ mode
c Playing time**
2
Press and hold the ERASE button for 2 seconds or
SP mode
longer.
LP mode
The folder name and "ALL" flash, then alternatively
"ERASE" and "YES" appear on the display for 8 seconds.
* The recording time available may be shorter than specified if a large number of short
recordings are made. (Use the remaining time and recorded time only as references.)
3
Press the ERASE button again.
Press the REC MODE button in Stop mode.
All files in the selected folder are erased simultaneously.
Each time you press the REC MODE button, the recording
Note
mode changes as follows:
MAX
If you leave the recorder untouched for 8 seconds or longer before you press the ERASE button
in step 3, Erase mode will be canceled, and the recorder will enter Stop mode.
(Initial setting)
Erasing from Folder S
Note
Choose HQ or SP mode for recording meetings or lectures with crisp clarity.
Erasing One File at a Time in a Date Subfolder
Microphone Sensitivity
1
Press the MENU/FOLDER button and select folder S.
Microphone sensitivity is adjustable to meet your
2
Press the 9/+ or 0/– button to select the date subfolder.
recording needs.
Using the MICSENS switch, choose between
3
Press the PLAY button.
the NORMAL and LECTURE positions.
The recorder starts to playback all the files in the selected date subfolder.
NORMAL:
Normal-sensitivity Omnidirectional
mode for dictation.
4
During playback, press the 9/+ or 0/– button to select the file to be
LECTURE: High-sensitivity Unidirectional mode
erased.
for meetings or lectures.
5
Press the STOP button.
Notes
• Be sure to choose HQ or SP recording mode if you set
6
Press the ERASE button.
the MICSENS switch to the LECTURE position to use
The file number flashes, then alternatively "ERASE" and
the characteristics of the unidirectional microphone to
"YES" appear on the display for 8 seconds.
the fullest.
• Do NOT touch the microphone grill while recording. Doing so may cause noise, and the
7
Press the ERASE button again.
performance of the microphone may deteriorate.
The file is erased.
• Be sure to keep the front microphone oriented toward the speaker during recording.
• To ensure successful recording, make a test recording to choose appropriate microphone
Sequential file numbers are reassigned automatically.
sensitivity before recording.
Note
If you leave the recorder untouched for 8 seconds or longer before you press the ERASE button
in step 7, Erase mode will be canceled, and the recorder will enter Stop mode.
Moving Files Between Folders
(MOVE)
You can move a file recorded in folder A or B to the other.
The moved file is added at to the end of the destination folder.
1
Choose the file you want to transfer and press the
PLAY button to play it.*
* You can move the file during playback pause as well.
2
Press and hold the MENU/FOLDER button for 1
second or longer while the file is playing.
Playback stops, and "MOVE" flashes on the display. The
file is moved.
The destination folder and the number of the moved file
appear on the display, and moving is completed.
Notes
• You cannot move files between folder S and the other folders.
• If the destination folder is full (100 files), "FULL" appears on the display, and you cannot move
the file to that folder.
Entering Options Mode
1
Press and hold the MENU/FOLDER button for 1 second or longer in
Stop mode to enter Options mode.
2
Each time you press the 9/+ or 0/– button, the displayed setting
item changes in the following order:
To close the menu, press the STOP button.
Using the Variable Control Voice Actuator (VCVA)
When the microphone senses that sounds have reached a preset volume, the built-
in Variable Control Voice Actuator (VCVA) starts recording automatically, and stops
it when the volume drops.
Particularly helpful for extended recording, the VCVA not only conserves memory
by turning off recording during silent periods, but also makes playback more efficient
and convenient.
1
Press and hold the MENU/FOLDER button for
1 second or longer.
The menu opens, and "VCVA" appears on the display.
2
Press the PLAY button.
3
Press the 9/+ or 0/– button to select between
"On" and "OFF."
On: The VCVA is activated.
OFF: The VCVA is canceled.
4
Press the STOP button to close the menu.
5
Press the REC button to start recording.
Notes
• When the VCVA senses sound louder than its start/stop actuation
a VCVA indicator
level setting, recording starts automatically. When it senses silence
DW-90
DW-360
for 1 second or longer, recording pauses automatically, and the recorder enters Standby mode.
approx. 22 min.
approx. 90 min.
• When recording is in progress, the recording lamp is lit. When the recorder is in Standby
approx. 33 min.
approx. 136 min.
mode, "VCVA" flashes on the display, and the recording lamp flashes.
approx. 90 min.
approx. 363 min.
Alarm Playback Function (ALARM)
The alarm playback function can be set to play a selected file at a preset time.
Up to 20 alarms can be set.
1
Choose the file to be played when the alarm sounds.
2
Press and hold the MENU/FOLDER button for 1 second or longer.
3
Press the 9/+ or 0/– button to select the Alarm
a Current recording
Playback Setup screen.
mode
"ALARM" flashes on the display.
4
Press the PLAY button.
The month indicator flashes.
5
Press the 9/+ or 0/– button to set the month.
6
Press the PLAY button to register your month setting.
Continue to set the date, hour, and minute.
7
Set the minute and press the STOP button.
An alarm will sound at the scheduled time for 5 minutes. Press
any button other than the DISPLAY or REC MODE button while
the alarm is sounding to play back the file you associate with the
alarm. Press the STOP button to stop file alarm playback.
a Alarm indicator
Notes
• The alarm tone stops automatically if no button is pressed within 5 minutes after the alarm
starts. The file is not played back in this case.
• After alarm playback is over, the alarm playback function is canceled automatically.
• You cannot set the alarm playback function for more than 20 files. Also, if no files are recorded
in the selected folder, you cannot set the alarm playback function.
To cancel an alarm playback
1
Repeat steps 1 to 4 in "Alarm Playback Function."
The month indicator flashes.
2
Press the 9/+ or 0/– button to select the month of the alarm you
want to cancel.
3
Press the PLAY button to register this month setting for alarm
cancellation.
Continue to select the date, hour and minute of the desired alarm
cancellation.
When you set the minute, "On" flashes on the display.
4
Press the 9/+ or 0/– button to select "OFF."
A set alarm playback is canceled.
5
Press the STOP button to close the menu.
Advertisement

Related Manuals for Olympus DW-90


Summary of Contents for Olympus DW-90
- Page 1 Erasing from Folder A or B Using the Variable Control Voice Actuator (VCVA) in the folder Olympus can be used for the recorder. If you leave the recorder untouched for 8 seconds or longer before you press the ERASE button Press the MENU/FOLDER...
- Page 2 You cannot create subfolders under the schedule folder or the date subfolders contained in it. Q3 Recording is not possible. Notes You cannot play back the files stored on the recorder by Olympus Digital Wave Player on the Press the PLAY button. Click on the desired folder under which to create subfolders.
Need help?
Do you have a question about the DW-90 and is the answer not in the manual?
Questions and answers