Table of Contents
Advertisement
Available languages
Available languages
Owner's
Manual
Husqvarna
ROTARY LAWN MOWER
875 Series Briggs & Stratton Engine
Power-Propelled
21" Multi-Cut
Model No.
917.374461
• Espa_ol, p. 20
CAUTION:
Read and follow all
Safety Rules and Instructions
before operating this equipment
Sears, Roebuck and Co., Hoffman Estates, IL 60179
Visit our Craftsman website: www.sears.com/craftsman
U.S.A.
Advertisement
Table of Contents

Related Manuals for Husqvarna 917.374461


Summary of Contents for Husqvarna 917.374461
- Page 1 Owner's Manual Husqvarna ROTARY LAWN MOWER 875 Series Briggs & Stratton Engine Power-Propelled 21" Multi-Cut Model No. 917.374461 • Espa_ol, p. 20 CAUTION: Read and follow all Safety Rules and Instructions before operating this equipment U.S.A. Sears, Roebuck and Co., Hoffman Estates, IL 60179...
- Page 2 Maintenance ........12-15 Safety Rules .......... Warranty ........... Service and Adjustments ....15-16 Product Specifications ......Storage ..........17-18 Assembly ! Pre-Operation ......Troubleshooting ......... 18-19 Operation ..........7-11 Repair Parts ........38-46 Maintenance Schedule ......IMPORTANT: This cutting machine is capable of amputating hands and feet and throwing...
- Page 3 4442 of the California Public Resources Code). Other states may have similar laws. Federal laws apply on federal lands. A spark arrester for the muffler is available through your nearest Husqvarna other authorized service center (See the REPAIR PARTS section of this manual).
- Page 4 IN DURATION TO THE WARRANTY PERIOD DEFINED IN THE LIMITED WARRANTY STATE- nonincome producinq use, except as herein stated. MENT. HUSQVARNA RESERVES THE RIGHT TO Emission control system components necessary CHANGE OR IMPROVE THE DESIGN OF THE comply with CARB-TIER-II and EPA regulations.
-
Page 5: Lawn Mower Maintenance
They are not shipped with your mower. They are also available at most Husqvarna retailers service centers. Some of these accessories may not apply to your lawn mower. LAWN MOWER PERFORMANCE CLIPPING... -
Page 6: How To Set Up Your Mower
Read these instructions and this manual HOW TO SET UP YOUR MOWER its entirety before you attempt to assemble TO UNFOLD HANDLE or operate your new lawn mower. IMPORTANT: Unfold handle carefully IMPORTANT: This lawn mower as not to pinch or damage control cables. - Page 7 TO PREPARE BATTERY NOTE: Your battery must be charged before you can start your lawn mower. Handle pin 1. Connect battery charger connector SQUEEZE (male) to harness connector (female). Plug battery charger into 110 volt A.C. outlet. Handle bracket Leave battery charger connected...
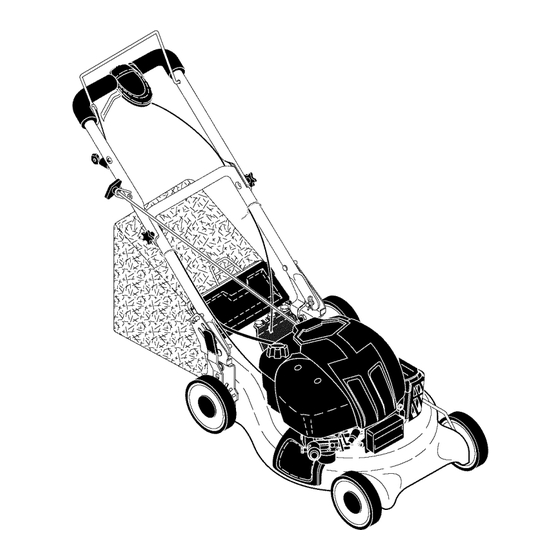
- Page 8 KNOW YOUR LAWN MOWER READ THIS OWNER'S MANUAL AND ALL SAFETY RULES BEFORE OPERATING YOUR LAWN MOWER. Compare the illustrations with your lawn mower to familiarize yourself with the location of various controls and adjustments. Save this manual future reference. These symbols may appear...
- Page 9 DRIVE CONTROL ADJUSTMENT The operation of any lawn SAFETY GLASSES mower can result in foreign Over time, the drive control system objectsthrownintothe eyes, become "loose", resulting in decreased which can result in severe speed. There is a turnbuckle on the drive eye damage.
-
Page 10: To Convert Mower
TO CONVERT MOWER Discharge deflector Your lawn mower was shipped ready to be used as a mulcher. To convert to bagging or discharging: REAR BAGGING • Open rear door and remove mulcher plug. Store mulcher plug in a safe place. •... -
Page 11: Before Starting Engine
ADD GASOLINE • Fill fuel tank to bottom of tank filler neck. catcher Do not overfill. Use fresh, clean, regular frame handle Grass unleaded gasoline with a minimum of 87 octane. Do not mix oil with gasoline. Pur- chase fuel in quantities that can be used within 30 days to assure fuel freshness. -
Page 12: Mowing Tips
MOWING TIPS MULCHING MOWING TIPS Ai_ CAUTION: Do not use de-thatcher IMPORTANT: For best performance, blade attachments on your mower. Such keep mower housing free of built-up attachments are hazardous, will damage grass and trash. See "CLEANING" in the Maintenance section of this manual. -
Page 13: Lubrication Chart
BEFORE AFTER EVERY EVERY EVERY EACH EACH 25HOURS BEFORE SCHEDULE HOURS OR SEASON HOURS STORAGE Check for Loose Fasteners Clean / Inspect Grass Catcher* Check Tires N Check Drive Wheels Clean Lawn Mower ..M Clean under Drive Cover *** Check Drive Belt / Pulleys Check / Sharpen... -
Page 14: Lawn Mower
LAWN MOWER IMPORTANT: Blade bolt is heat treated. Alwaysobservesafety ruleswhen per- If bolt needs replacing, replace only with formingany maintenance. approved bolt shown in the Repair Parts section of this manual. TIRES Blade adapter Crankshaft • Keep tires free of gasoline, oil, or insect control chemicals which can harm rubber. - Page 15 ENGINE Continue adding small amounts of oil, LU BRICATION rechecking the dipstick until oil level settles at FULL. DO NOT overfill, Use only high quality detergent oil rated with API service classification SG-SL. engine will smoke heavily from the muffler on startup.
- Page 16 CLEANING • Keepfinishedsurfacesand wheelsfree of all gasoline,oil, etc. IMPORTANT:For best performance, • We do not recommendusing a garden keepmowerhousingfree of built-grass hoseto clean lawn mowerunlessthe andtrash. Cleanthe undersideof your electricalsystem,muffler,air filter and moweraftereach use. carburetorare coveredto keepwater _CAUTION: Disconnectspark plug wire out.
- Page 17 Husqvarna three height adjustment holes. or other qualified service center for repair Handle pin and adjustment.
-
Page 18: Troubleshooting
Allow the engine TROUBLESHOOTING - See appropriate to cool before storing in any enclosure. section in manual unless directed to a Husqvarna Parts & Repair Center. PROBLEM CAUSE CORRECTION Does not start 1. Dirty air filter. 1. Clean/replace air filter. - Page 19 TROUBLESHOOTING - See appropriate section in manual unless directed to a Husqvarna Parts & Repair Center, PROBLEM CAUSE CORRECTION Does not start 9. Control bar defective. Replace control bar. 10. Turn fuel valve lever (continued) 10. Fuel valve lever (if so equipped) in OFF position.
- Page 20 Reglas de Seguridad ........ 20-21 Programa de Mantenimiento ......31 Garantia ............Servicio y Adjustes ........34-35 AImacenamiento ........35-36 Especificaciones del Producto ....... 23 Montaje / Pre-Operacion ......24-25 Identificaci6n de problemas ...... 36-37 Operacion ..........26-30 Partes de repuesto ........38-46 Mantenimiento ..........
- Page 21 HACER: • Nunca Ilenar contenedores en un vehiculo, en • Puede recortar a traves de la superficie de un camion o caravana con un forro de plastico. Colocar siempre los contenedores en el suelo la cuesta, nunca hacia arriba y hacia abajo. lejos de su vehiculo antes de Ilenar.
- Page 22 Husqvarna Forest & Garden Company. Esta de encendido, cuerdas y brazos de arranque; ficha ha de enviarse dentro de diez...
-
Page 23: Mantenimiento
Estos accesorios estaban disponibles cuando se produjo la segadora. No son facilitados junto al cortacesped Tambien estan disponibles en la mayoria de las tiendas de Husqvarna yen los centros de servicio. Algunos de estos accesorios tal vez no se apliquen a su segadora. RENDIMIENTO... - Page 24 COMO PREPARAR SU SEGADORA Lea estas instrucciones y el manual comple- tamente antes de tratar de montar u operar su PARA DESDOBLAR EL MANGO segadora nueva. IMPORTANTE: Despliegue el mango con IMPORTANTE: Este cortacesped viene SIN mucho cuidado para no pellizcar o dadar los ACEITE O GASOLtNA en el motor.
- Page 25 PARA PREPARAR LA BATERIA AVISO: Su bateda tiene que estar cargada an- tes de que pueda hacer arrancar su segadora. 1. Conecte el conector del cargador de la del mango bateda (macho) al conector de la arnes (hembra). Enchufe el cargador de la bateda dentro del enchufe de 110 volt C.A.
- Page 26 FAMILIARICESE CON SU SEGADORA LEA ESTE MANUAL DEL DUENO Y LAS REGLAS DE SEGURtDAD ANTES DE OPARAR SU SEGADORA. Compare las ilustraciones con su segadora para familiarizarse con la ubicacion de los diversos controles y ajustes. Guarde este manual para referencia en el futuro. Estos simbolos pueden apareser sobre su segadora o en la literatura proporcionada con el producto.
- Page 27 AJUSTE DEL MANDO Laoperacion d e cualquier Ocasionalmente, el sistema de mando puede segadora puede hacerque "aflojarse", provocando una disminuci6n de la salten objetos extrafios dentro de velocidad. Hay un torniquete en la sede del susojos,Ioquepuede producir mando para apretar la tension del cable. Pro- dafiosgraves enestos.Siempre ceder de la siguiente manera: useanteojos deseguridad o proteccion p ara...
- Page 28 PARA CONVERTIR LA SEGADORA Desviador de la descarga Su segadora fue enviada lista para usarse como acolchadora de capa vegetal. Para convertirla a una operaci6n de ensacado o de descarga: SEGADORAS CON DESCARGA TRASERA • Abra la puerta trasera y remueva la tap6n acolchadora.
- Page 29 separaci6n y formaci6n de acidos durante el Mango almacenamiento. La gasolina acidica puede bastidor daSar el sistema del combustible de un motor recogedor durante el almacenamiento. Para evitar los problemas con el motor, se debe vaciar el sistema del combustible antes de guardarlo por un periodo de 30 dias o mas.
- Page 30 ONSEJOSPARA SEGAR CONSEJOS PARA SEGAR Y ACOL- PRECAUClON: Noutilizar d ispositivos a nti- CHAR pajadela hoja en la segadora ya que estos IMPORTANTE: Para obtener el mejor accesorios son peligrosos, pueden daSar su rendimiento mantenga la caja de la segadora segadora y anular su garantia.
- Page 31 PROGRAMA ANTES DEsPuEs CADA CADA CADA ANTESDEL DE CADA OE CADA 2S.ORAS O ALMACE- MANTENIMIENTO uso .ORASTEMPORADA.ORAS.AM,E.TO Revisar si hay Sujetadores Sueltos Limpiar/Inspeccionar el Recogedor de Cesped * Controlar los Neumaticos Controlar las Ruedas Motrices *** Limpiar la Segadora ..Limpiar debajo la Cubierta de la Transmisi6n Revisar las Correas y las Poleas Impulsadas...
- Page 32 SEGADORA Instale el perno de la cuchilla con la aran- dela de seguridad y la arandela endurecida Siempre observe las reglas de seguridad cu- en el adaptador de la cuchilla y el cigue5al. ando haga el mantenimiento. Use un bloque de madera entre la cuchilla y la caja de la segadora y apriete el perno LLANTAS de la cuchilla girandolo en el sentido en que...
- Page 33 • Lacajadeengranajes s eIlenaconlubricante Limpie todo el aceite derramado en la sega- hastael nivel a decuado e n lafabrica. L a dora yen el lado del motor. Qnica vezqueel lubricante n ecesita atenci6n Echar aceite despacio en el conducto del escuando se le haprestado s ervicio a la aceite, parandose a intervalos regulares cajadeengranajes.
- Page 34 BUJiA • Limpie el motor a menudo para evitar que Cambie el bujia al comienzo de cada tempo- se acumule la basura. Un motor tapado fun- rada de siega o despues de cada 100 horas de ciona mas caliente y se acorta su duracion. operaci6n, Io que suceda primero.
- Page 35 El mango de su segadora cuenta con tres (3) carburador, Ileve su segadora a contacto con posiciones de altura - ajQstelo a la altura que le su centro de servicio Husqvarna o con un otro acomode. centro de servicio cualificado para repararla y/o •...
- Page 36 DE PROBLEMAS - Vea la secci6n apropiada en el manual amenos estd dirigido a un centro de servico Husqvarna. PROBLEMA CAUSA CORRECCION No arranca Filtro de aire sucio. Limpie/cambie el filtro de aire. Sin combustible. Llene el estanque de combustible.
- Page 37 Ciguefial del motor doblado. Pongase en contacto con su centro de servicio Husqvarna o con un otro centro de servicio cualificado. 3. Adaptador de la cuchilla quebrado. Cambie el adaptador de la cuchilla.
- Page 38 CRAFTSMAN ROTARY LAWN MOWER- - MODEL NUMBER 917.374461...
- Page 39 CRAFTSMAN ROTARY LAWN MOWER- - MODEL NUMBER 917.374461 PART PART PART DESCRIPTION DESCRIPTION DESCRIPTION 199982 Upper Handle Assembly 163183 Bolt, Hex Head 5/16-18 x 5/8 183058X418 Mulcher Door Assembly (Includes Foam Grip) 73800500 Nut, Hex, with 169699X418 Discharge Guard 193664X498 Handle, Lower Lockwasher Insert 5/16-18 88349...
- Page 40 CRAFTSMAN ROTARY LAWN MOWER- - MODEL NUMBER 917.374461 /" 22 2 42 15 I"...
- Page 41 CRAFTSMAN ROTARY LAWN MOWER- - MODEL NUMBER 917.374461 PART PART PART DESCRIPTION DESCRIPTION DESCRIPTION 407344 Drive Control Assembly 408001X428 Cover Drive 406580 V-Belt 406260X460 Cover, Top 750634 Screw, Threaded, Rolled 404832X004 Belt Keeper 406282 Pulley #10-25 x .50 412747 Case, Lower 190039 Lever, Drive Control 12000058...
-
Page 42: Briggs & Stratton
BRIGGS & STRATTON 4-CYCLE ENGINE MODEL NUMBER 12SS05-3856-B1 1022 102.€ 2380 1034 914®_ 1022 46 @ 10 _ 11058 OPERATOR'S MANUAL I 1022 _5G 2o_... -
Page 43: Gasket Set
BRIGGS & STRATTON 4-CYCLE ENGINE MODEL NUMBER 12SS05-3856-B1 443% 9661 276 _ 127_ 188_ 190 _ 670 _ 613 _ 121 CARBURETOR OVERHAUL KIT 524_ 633 _ 104_ 127_ 134@ 977 CARBURETOR GASKET SET 276 _ 51At_ _276 _ 633 ©_ 51B_... - Page 44 BRIGGS & STRATTON 4-CYCLE ENGINE MODEL NUMBER 12S505-3856-B1 592@ 58__ 459 @ 689 o 305_ 1211 I 1329 REPLACEMENT ENGINE I 334 _ 1210_T_J 745 _ 9211 969_ I 1036 EMISSIONS LABEL 1330 REPAIR MANUAL 358 ENGINE GASKET SET 455 _,_ 102_...
- Page 45 BRIGGS & STRATTON 4-CYCLE ENGINE MODEL NUMBER 12SS05-3856-B1 742 _ 937 9 783@ 784 (_ 651 _ 785_ 513_ 783A _ 803_ 3101 802_ Engine Power Rating Information The gross power rating for individual gas engine models is labeled in accordance with SAE (So- ciety of Automo-tive Engineers) code Jl1940 (Small Engine Power &...
- Page 46 BRIGGS & STRATTON 4-CYCLE ENGINE MODEL NUMBER 12SS05-3856-B1 PART PART DESCRIPTION DESCRIPTION 692670 Cylinder Assembly 498978 Jet-Main (High Altitude) Kit-Carburetor Overhaul 399269 Kit-Bushing/Seal 792383 299819s • Seal-Oil (Magneto Side) 792382 Spacer-Carburetor Carburetor 493279 Sump-Engine 790120 792381 Head-Cylinder 694468 O Plug-Welch Valve-Throttle 697230 ,+ Gasket-Cylinder...
- Page 47 BRIGGS & STRATTON 4-CYCLE ENGINE MODEL NUMBER 12SS05-3856-B1 PART PART DESCRIPTION DESCRIPTION 695891 Brake 692296 • Seal-Dipstick Tube 398758 Switch-Interlock 495265 Tube-Dipstick 690786 Starter-Armature 691325 Spline-Starter 492919 Washer Set 699985 Cap-Fuel Tank 92613 Bolt 690243 Base-Air Cleaner Primer 273356 Filter-Pre Cleaner (Governor Control Lever) 691342 Cover-Air Cleaner...
- Page 48 Your Home For repair - in your home - of all major brand appliances, lawn and garden equipment, or heating and cooling systems, no matter made it, no matter sold For the replacement parts, accessories owner's manuals that you need to do-it-yourself. For Sears professional installation of home appliances...
Need help?
Do you have a question about the 917.374461 and is the answer not in the manual?
Questions and answers