Advertisement
Quick Links
CARVIN ENGINEERING DATA
The B1500 mono block bass head offers classic natural bass tone with the high-
est power headroom available in any bass amp to date. The B1500 delivers 700w
at 8Ω, 1250w at 4Ω and 1900w at 2Ω. The B500 bulges with the same huge tone
but delivers 225w at 8 ohms, 350w at 4Ω and 500w at 2Ω.
Four discrete Class A input stages produce the harmonic basis for the preamp
right from the input jack. It begins with a boutique flat response, then we add 6
tone controls for you to carve out your signature sound. Harmonic content increases
as you turn up the Drive control producing a growl at maximum settings. Solid
design, bullet-proof construction and a list of indispensable features assure the
B500 or B1500 will be the heart of your rig for years to come.
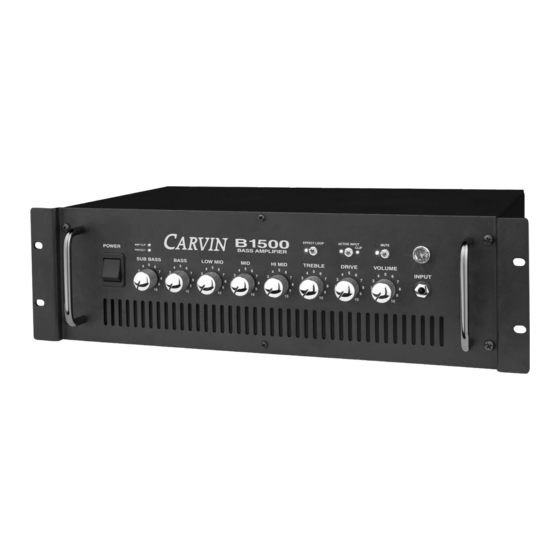
• Discrete Class A input stages
• Active/Passive input gain switch with input CLIP indicator
• Preamp DRIVE and master VOLUME controls
• Six EQ controls: SUB BASS, BASS, LOW MID, MID, HIGH MID, and TREBLE
• Signal MUTE front panel switch (also controlled by optional FS22 footswitch)
• EFFECT LOOP front panel bypass switch (also controlled by optional FS22
footswitch)
• DIRECT OUT balanced XLR with independent LEVEL control, switchable
"Pre-Post" and "Ground Lift", DC isolated
• TUNER output jack independent of MUTE switch
• Internal OPTO (optical isolation) clip-activated power amp limiter with
"limiter free" normal operation
• High current SPEAKON
®
• Metal shaft controls with threaded metal bushings mounted directly to front panel
• 19" 3U all steel chassis
GETTING STARTED QUICKLY
If you are like most players, you probably want to plug in your new amp and get started play-
ing right away. Before you start, be sure your amp is plugged into the correct AC voltage.
1. With POWER off, connect a speaker cabinet to one of the rear SPEAKER OUTPUTs.
2. Set the VOLUME and DRIVE to "0" and set the ACTIVE INPUT switch for your type of bass.
3. Set all tone controls to their center "5" position. This is the "FLAT" setting for the amp.
4. Now, turn the amp ON. Turn the output level of the bass guitar fully up. Gradually increase
the amp VOLUME control to the desired level. If no sound is heard, turn down the VOLUME con-
trol and check the MUTE and PROTECT LEDs.
5. Increasing the DRIVE control will add harmonic richness to your sound. Turning up the
DRIVE also increases volume. Re-adjust the VOLUME after adjusting the DRIVE.
6. Adjust the tone controls to your liking. Keep in mind that turning up a tone control isn't
always the answer. Sometimes turning down one of the MID controls will get you the sound you
want. Depending on your speakers you may get more volume and clearer bass from your cabinet
by lowering the SUB BASS control and increasing the BASS or LO MID control.
7. Need more volume? There is a limit to the amount of volume a speaker can produce and
driving a speaker beyond it's limit can damage it. Even though the B1500 is a powerful amp,
adding more speakers is the only way for substantially more output. Every time you double
your speakers, you increase your acoustic output by a factor of four.
Hopefully, this will help you get started. Have fun exploring the features and sounds of the B500/B1500.
Take the time with your new amp to realize it's full potential - and yours!
76-41500B 051304
connectors and 1/4" speaker jacks
B500 / B1500 BASS AMPLIFIERS
DESIGNED FOR THE RIGORS OF TOURING
The B500 & B1500 are constructed using a heavy-duty 16 gauge steel chassis and a 12
gauge steel front panel that are galvanized to prevent rust. Connections include Speakon®
output connectors and a full featured XLR Direct Out. Controls feature metal shafts and threaded
metal bushings mounted to directly to the front panel. All internal cabling is securely tied and
harnessed. Every circuit card is MIL SPEC, double-sided, through-hole plated, fire retar-
dant FR-4 glass epoxy. Toroid transformers are used as they are the engineer's choice for
greater power supply current while reducing weight and magnetic "hum" fields.
RECEIVING INSPECTION—read before getting started
INSPECT YOUR UNIT FOR ANY DAMAGE which may have occurred during shipping. If any
damage is found, please notify the shipping company and CARVIN immediately.
SAVE THE CARTON & ALL PACKING MATERIALS. In the event you have to re-ship your unit,
always use the original carton and packing material. This will provide the best possible pro-
tection during shipment. CARVIN and the shipping company are not liable for any damage
caused by improper packing.
SAVE YOUR INVOICE. It will be required for warranty service if needed in the future.
SHIPMENT SHORTAGE. If you find items missing, they may have been shipped separately.
Please allow several days for the rest of your order to arrive before inquiring.
RECORD THE SERIAL NUMBER on the enclosed warranty card for your records. Keep your
portion of the card and return the portion with your name and comments to us.
USA customers register online at: www.carvin.com/registration
All other countries register online at: www.carvinworld.com/registration
B500/B1500 SPECIFICATIONS:
MODEL
Output Power
8Ω,
THD <1.0%
4Ω,
THD <1.0%
2Ω,
THD <1.0%
Input Impedance:
Tone Controls:
±12dB @ 30, 100, 300, 1k, 3k, 10k (Hz)
Drive Control:
Varies input gain and harmonic content
AC Requirements:
120VAC 60 Hz or 240VAC 50 Hz optional models
Power Requirements:
B500: 500VA, B1500: 1900VA
Dimensions (no cabinet):
(3U) 5-1/4"H x 19"W x 10"D
Weight :
B500: 25 lbs. B1500: 35 lbs net wt.
Warranty:
OPERATING MANUAL
B500
B1500
225w
700w
350w
1250w
500w
1900w
>200K
One year parts and labor
Advertisement

Related Manuals for CARVIN B1500


Summary of Contents for CARVIN B1500
- Page 1 • Six EQ controls: SUB BASS, BASS, LOW MID, MID, HIGH MID, and TREBLE tection during shipment. CARVIN and the shipping company are not liable for any damage • Signal MUTE front panel switch (also controlled by optional FS22 footswitch) caused by improper packing.
-
Page 2: Front Panel Controls
FRONT PANEL CONTROLS EFFECT LOOP EFFECT LOOP ACTIVE ACTIVE MUTE MUTE AMP CLIP AMP CLIP PROTECT PROTECT 1. INPUT JACK 8. EFFECT LOOP SWITCH / LED The 1/4” INPUT jack accommodates both passive and active instruments. The high imped- The EFFECT LOOP switch engages the rear effects loop connections. The effects loop can ance Class A input stage offers enough headroom to perform without clipping even when used be turned on with the EFFECT LOOP switch on the front panel or by using the optional FS22 with high output active basses. -
Page 3: Rear Panel Controls
RETURN jack to the output of the effects unit. The effects loop can be capacity. While standard 1/4” speaker cables will work, the CARVIN 12 GA SPEAKON ®... -
Page 4: Limited Warranty
Your Carvin product is guaranteed against failure for 1 YEAR unless otherwise stated. ence of uninsulated “dan- user to the presence of Carvin will service and supply all parts at no charge to the customer providing the unit gerous voltage” within the RISK OF ELECTRIC SHOCK...
Need help?
Do you have a question about the B1500 and is the answer not in the manual?
Questions and answers