Table of Contents
Advertisement
Quick Links
ADVANCED WEATHER STATION
MODEL IWA-80004
USER'S INSTRUCTIONS
Thank you for your purchase of this advanced
weather station. The utmost care has gone into the design
and manufacture of your clock. Please read the
instructions carefully and keep the manual for future
reference.
The receiver unit has a clear, easy-to-read display that
shows the indoor/outdoor temperature, time, date, month
and day of the week. It will receive and display temperature
readings from the wireless remote sensor. The 433 MHz
technology means no wire installation is required and
you can place the sensor anywhere within the 100 feet
transmission zone.
MAIN FEATURES:
Digital time with Manual Time Setting option
Daily Sunrise/Sunset and Moonrise/Moonset Time Display
for 244 cities in USA, Canada and Mexico.
Weather Forecast
- Weather Forecast with Sunny, Slightly Cloudy, Cloudy,
Rainy and Cloud Burst Animation
- Weather Girl with Suitable Clothing in Outdoor Condition
Barometric Pressure Measurement.
- Current and Past 12hr Absolute and Relative Barometric
Pressure Reading
- Barometric Pressure Bar Chart.
- Display in mb/hPa or in Hg Selectable.
433MHz RF Transmitting Frequency.
Maximum Three Selectable RF channels with Wireless Thermo
Sensor. (One Wireless Thermo Sensor Included)
Transmission Range: 100 feet (Open Area).
Measurable Range:
Indoor Temperature : 32°F ~ 122°F
Indoor Humidity : 20% ~ 99%
Outdoor Temperature : -4°F ~ +122°F
Max/Min Memory for Humidity, Indoor and Outdoor
Temperature.
Low-battery Indicator for Outdoor Thermo Sensor.
Perpetual Calendar Up to Year 2099.
12/24Hour Time Display Selectable.
2 Alarm Function
Wall Mount or Table Stand Selectable.
BATTERY
Main Unit
Main Unit
: DC 1.5 V 2A size x 3 pcs
: DC 1.5 V 2A size x 3 pcs
Thermo Sensor Unit : DC 1.5 V 3A size x 2 pcs
Thermo Sensor Unit : DC 1.5 V 3A size x 2 pcs
SPECIFICATIONS
MAIN UNIT
Recommended operating range:
REMOTE SENSOR
Recommended operating range:
RF transmission frequency:
No. of remote unit:
RF transmission range:
maximum 100 feet
Power
Main Unit
: DC 1.5 V 2A size x 3 pcs
Thermo Sensor Unit : DC 1.5 V 3A size x 2 pcs
Dimension
Main Unit
: 5.94 x 9.13 x 1.22 inch
Thermo Sensor Unit : 3.7 x 2.36 x 1.10 inch
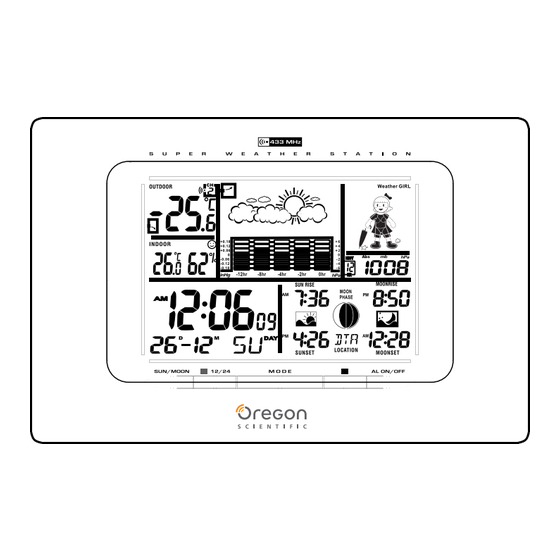
MAIN UNIT APPEARANCE:
A1
A2
A3
A4
A5
A6
A7
B6
B7
B8
B9
BEFORE USING THE TRANSMITTER
Part A-LCD
A1: Outdoor Temperature Trend
A2: Comfort Icon
A3: Indoor Temperature/Humidity
A4: Radio Control Icon
A5: Time Zone
A6: Radio Controlled Time
A7: Date, Month & Week
A8: Outdoor Temperature Moonrise Time
A9: Selected Channel
A10: Barometric Pressure Trend
Part B-BUTTON
B1: "SUN/MOON" Button
B2: "+ / (12/24)" Button
B3: "MODE" Button
B4: "- /
" Button
B5: "ALARM ON/OFF" Button
B6: "CHANNEL" Button
Part C- STRUCTURE
C1: Wall Mount Hole
THERMO SENSOR UNIT APPEARANCE
D1
D2
Front view
D1: Transmission Indication LED
D2: Outdoor Temperature
D3: Wall Mount Hole
D4: Channel Select Switch
Set Up:
- Insert batteries
- Use a pin to press the RESET (B12) button
WEATHER FORECAST FUNCTION
1.
After Batteries inserted or holding "WEATHER"
button (B7) for 3 seconds, Weather Icon (A11)
blinks. Enter the current weather condition by
pressing "▲" (B8) or "▼" (B9) buttons. Press
"WEATHER" button (B7) to confirm the setting.
The weather forecast may not be accurate if the
current weather condition entered is not correct.
2.
The current weather status should be entered
again if the altitude of the weather station is changed.
0 °C to 45 °C
(Barometric pressure is lower at higher altitude
32 °F to 113 °F
location. Therefore, altitude change will affect
the weather forecast) The weather station will
start the first forecast at 6 hours after the current
weather status is entered.
-20 °C to 55 °C
3.
Totally 5 different weather conditions in the weather
-4 °F to 131 °F
forecast.
433 MHz
1 unit
A8
A9 A10 A11
A12
p
Wireless Weather Station
IWA-80004
MODEL NO:IWA-80004
MADE IN CHINA
A11: Weather Forecast
A12: Barometric Pressure Bar Graph
A13: Weather Girl
A14: Past Hour(Pressure History)
A15: Absolute/ Relative Barometric
Pressure Reading
A16: Moon phase
A17: Moonrise/Moonset
A18: Time Selected Country
A19: Sunrise/Sunset Time
B7: "HISTORY/ WEATHER" Button
B8: "▲(UP) / °C/ °F"Button
B9: "▼(DOWN)"Button
B10: "Relative /Absolute" Button
B11: "MAX/MIN" Button
B12: "RESET" Button
C2: Battery Compartment
C3: Stand
Back View
D5: Battery Compartment
D6: °C/°F" button
D7: "TX" button
D8: Stand
Sunny
Slightly Cloudy
Cloudy
Rainy
Cloudburst
"
" is shown if the weather forecast is Rainy or
Cloudburst and outdoor temperature (any channel)
is under 0°C.
If there is any inconsistency of weather forecast between
Local Weather Station and this unit, the Local Weather
Station's forecast should prevail. We will not hold responsible
A13
for any trouble that may come up due to wrong forecasting
A14
A15
from this unit.
A16
The trend pointer (LCD A10) indicates the trend of the
A17
barometric pressure.
A18
A19
indicates the barometric pressure trend is increasing.
indicates the barometric pressure trend is steady.
C1
B10
B11
B9
indicates the barometric pressure trend is decreasing.
C2
BAROMETERIC PRESSURE READING
C3
- Press "Absolute/Relative" button (B10) for three seconds
to select Absolute or Relative pressure display. "Abs" is
shown for Absolute pressure; "Rel" is shown for Relative
pressure.
- Absolute pressure is the actual pressure measured by
the Main Unit.
- Relative pressure can be adjusted to sea level's pressure
by holding "Absolute/Relative" button (B10) for 3 seconds.
- Press " ▲" (B8) or "▼" (B9) key to adjust, press
"Absolute/Relative" button (B8) to confirm. Check the Local
Weather Station for Sea Level pressure.
- Press "HISTORY" button (B7) to view the past 12 hours
Barometric Pressure history. The hour is indicated on LCD (A14).
Press "HISTORY" button (B7)
- Press "HISTORY" button (B7) to view the past 12 hour
Barometric Pressure history. The hour is indicated on the LCD.
0 HR = Current Barometric Pressure Reading
-1HR = Barometric Pressure Reading in 1 hour ago
-2HR = Barometric Pressure Reading in 2 hour ago........etc
Hold "▲" button (B8) for three seconds to select the unit
D3
for Barometric Pressure Meter in inHg or mb / hPa.
BAROMETERIC PRESSURE TREAD
D4
BAR GRAPH
D5
D7
1.
The Barometric Pressure Reading at –2hr, -4hr,
D6
-8hr and –12hr is recorded and shown on Barometric
Pressure Bar Graph (A12). The Graph is displayed
D8
in both hPa and inHg.
WEATHER GIRL
1.
Weather Girl (A13) shows different clothing under
different weather condition and Outdoor temperature
(according to the lowest channel). This is to remind
you to wear suitable clothes or take an umbrella with
you before go to outdoor area.
2.
If there is no Thermo Sensor
is registered in the main
unit, LCD shows :
THERMOMETER
Press "°C /°F" button (B8) to select Temperature
1.
to be displayed in Celsius mode or Fahrenheit mode.
2.
If the temperature is out of the measurable range,
LL.L (beyond the minimum temperature) or
HH.H (beyond the maximum temperature) will be
shown on the LCD.
MAXIMUM / MINIMUM TEMPERATURE /
HUMIDITY RECORDING FUNCTION
1.
Press "MAX/MIN" button (B11) to show the maximum or
minimum of indoor/outdoor Temperature/Humidity.
"
" is shown on the LCD if maximum Temperature
/Humidity is shown.
"
" is shown on the LCD if minimum Temperature/
Humidity is shown.
2.
Hold "MAX/MIN" button (B11) for 3 seconds to clear the
recorded maximum and minimum reading.
Advertisement
Table of Contents

Subscribe to Our Youtube Channel
Related Manuals for Oregon Scientific IWA-80004


Summary of Contents for Oregon Scientific IWA-80004
- Page 1 “ ” is shown if the weather forecast is Rainy or MAIN UNIT APPEARANCE: Cloudburst and outdoor temperature (any channel) A9 A10 A11 is under 0°C. If there is any inconsistency of weather forecast between ADVANCED WEATHER STATION Local Weather Station and this unit, the Local Weather MODEL IWA-80004 Station's forecast should prevail.
- Page 2 Alarm Time 2 (“ ” Shown) transmitter comes with a wall mounting/desktop holder. C 2008 Oregon Scientific. All rights reserved When mounting on a wall, screw in place the holder When viewing Alarm Time 1 or Alarm Time 2, using the top and bottom holes. Then secure the transmitter hold “MODE”...
- Page 3 Mexico Alabama Hawaii Minnesota North Carolina Texas Chihuahua Birmingham Honolulu Albert Lea Asheville Abilene Durango Gadsden Hilo Bemidji Charlotte Amarillo Guadalupe Montgomery Kahului Duluth Fayetteville Austin Hermosillo Mobile Waimea Grand Protage Wilmington Brownsville Mexico City Alaska Idaho International Falls Winston-Salem Dallas/Ft.
- Page 4 Code City Code City Code City Code City Code City Dover CWF Lake Charles Terre Haute Montana Scranton Boise City Carson City Huntsville MVN Mount Vernon South Carolina Aberdeen Harrisburg Iowa MWC Milwaukee South Dakota Abilene Cheyenne Idaho North Carolina Sidney Albuquerque District of Columbia...
Need help?
Do you have a question about the IWA-80004 and is the answer not in the manual?
Questions and answers