Advertisement
Quick Links
Operator's Manual
DETAIL BISCUIT JOINER
Double Insulated
Model No.
315.175501
Save this manual for
future reference
_IL
WARNING:
Read and follow
all Safety
Rules and Operating
Instructions
before first use of
this product.
• Safety
• Features
• Operation
• Maintenance
• Parts List
Customer
Help
Line:
1-800-932-3188
Sears
Roebuck
and Co., 3333
Beverly
Rd.,
Hoffman
Estates,
IL 60179
USA
Visit the Craftsman
web page: www.sears.comicraftsman
972000-984
12-02
Advertisement

Related Manuals for Craftsman 315.175501


Summary of Contents for Craftsman 315.175501
- Page 1 Read and follow • Parts List all Safety Rules and Operating Instructions before first use of this product. Customer Help Line: 1-800-932-3188 Sears Roebuck and Co., 3333 Beverly Rd., Hoffman Estates, IL 60179 Visit the Craftsman web page: www.sears.comicraftsman 972000-984 12-02...
- Page 2 DETAILBISCUITJOINER315,175501 BUTTJOINTS MITERJOINTS T-JOINT...
- Page 3 22-23 • Parts Ordering / Service ................. FULL ONE YEAR WARRANTY ON CRAFTSMAN DETAIL BISCUIT JOINER ff this CRAFTSMA# Biscuit Joiner fails to give complete satisfaction within one year from the date of purchase, RETURN IT TO THE NEAREST SEARS STORE IN THE UNITED STATES, and Sears will repair it, free of charge.
- Page 4 • Dress properly. Do not wear loose clothing or WARNING: Read and understand all instruc- tions. Failure to follow all instructions listed below jewelry. Contain long hair. Keep your hair, clothing, and gloves away from moving parts. may result in electric shock, fire and/or serious Loose clothes, jewelry, or long hair can be caught personal injury.
- Page 5 Service • When servicing a tool, use only identical re- • Tool service must be performed only by quail- placement parts. Follow instructions in the fled repair personnel. Service or maintenance Maintenance section of this manual. Use of performed by unqualified personnel could result in unauthorized parts or failure to follow Maintenance Instructions may create a risk of electric shock or a risk of injury,...
- Page 6 Important: Some of the following symbols may be used on your tool. Please study them and learn their meaning. Proper interpretation of these symbols wilt allow you to operate the tool better and safer. SYMBOL NAME DESIGNATION/EXPLANATION Volts Voltage Amperes Current Hertz Frequency (cycles per second)
- Page 7 45 ° and 90 ° No Load Speed 19,000 RPM Fence Angles Input 120 volts, 60 Hz, AC Fence Height Adjustment 0 - 3/4 in. With Fence Angle Set On 90 ° Amperes With Fence Set On 45 ° 5/16 in. - 13/16 in. Depth Of Cut 3.625 Ibs.
- Page 8 YourDetail B iscuit J oiner hasbeendesigned for REVERSIBLE FENCE FOR 45 ° AND 90 ° making fast,accurate, andsimple plunge cutsin CUTS wood,etc.so thatbiscuits canbeusedtojointwoor Your Biscuit Joiner has a reversible fence. By moreboards together. W henusedproperly andonly loosening the height adjustment knobs, the fence can forwhatit is intended, t hisversatile toolwillgiveyou be removed through key hole slots.
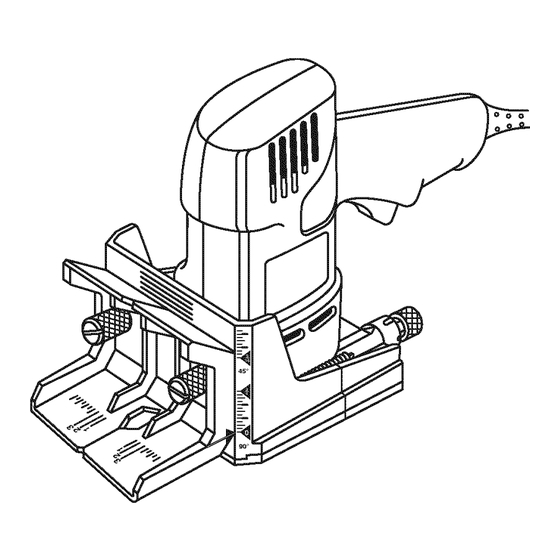
- Page 9 KNOW YOUR DETAIL BISCUIT JOINER WARNING: Do not allow familiarity with tools to make you careless. Remember that a careless See Figure 2. fraction of a second is sufficient to inflict severe Before attempting to use any tool familiarize yourself injury.
-
Page 10: Depth Of Cut Adjustments
DEPTH OF CUT ADJUSTMENTS Note: Knob and jam nut are spring loaded, there- fore pulling them in the direction of the arrow Your Biscuit Joiner can be adjusted to three shown puts pressure on the spring and releases standard cutting depths to accommodate three pressure from the depth adjustment knob. - Page 11 FENCE HEIGHT ADJUSTMENT your WARNING: Failure to unplug Detail See Figure5. Biscuit Joiner could result in accidental starting causing possible serious personal injury. HEIGHT ADJUSTMENT KNOB(S) HEIGHT ADJUSTMENT KNOBS (1) PULL HEIGHT FORWARD FRONT LOWERFENCE SETTINGSCALE FENCE BASE Fig. 5 (2) SLIDE The fence on your Biscuit Joiner can be moved up and DOWN...
- Page 12 • Plug your Biscuit Joiner into power supply and _t, WARNING: Always wearsafety goggles or safety glasses withsideshields whenoperating prepare to make your first cut. Grasp and hold your tools.Failure to dosocouldresult i nobjects Biscuit Joiner securely. beingthrown intoyoureyes,resulting in possible •...
- Page 13 BUTT JOINTS • Place the fence against the board and align the indicator marks on the fence with the centerline See Figure 9. mark(s) on the board. A butt joint is one of the weakest joints in • Depress the switch trigger and let the motor build woodworking.
- Page 14 T- JOINTS Plug your Biscuit Joiner into power supply and cut slots in all boards that require end slots. See Figure See Figures 11-15. 13. Follow procedures explained in "Edge-To- A T-joint is used when the end of a board is joined to Edge Joints".
- Page 15 • Finally, disassemble the workpieces and place a T-JOINTS (Continued) bead of glue in each slot. Also, spread a bead of • Place your Biscuit Joiner on vertical board as glue over the entire surface of the joint. Reinsert shown in Figure 15 and align indicator marks on the biscuits and assemble the workpieces.
- Page 16 FLAT MITER JOINTS (Continued) • Place your Biscuit Joiner on workpiece with the fence resting on the long side of workpiece as • Depress the switch trigger and let the motor build shown in Figure 18. The front base should be to its maximum speed, then gradually push Biscuit against the mitered edge of the workpiece.
- Page 17 Hinge joints are used when joining two boards using • Set fence angle at 90 °. hinges supplied in one of Craftsman's optional hinge kits. Jewelry boxes, doors on clocks, recipe boxes, etc. • Loosen height adjustment knobs, then pull and are typical applications.
- Page 18 BLADE REPLACEMENT • Using a 9/64 in. hex key, remove blade screw. Note: Turn blade screw counterclockwise See Figures 20-22. remove. See Figure 22. After extended use, the blade on your Biscuit Joiner may become dull. If you accidentally hit a nail or other blunt object, it wilt dull or break the blade.
-
Page 19: How To Clean
WARNING: When servicing, use only identical Craftsman replacement parts. Use of any other part may create a hazard or cause product damage. CLEANING BASE ASSEMBLY See Figures 23-25. NOTCH(ES) After extended use, wood particles and resin may build up inside the base assembly of your Biscuit Joiner and clog the path for wood particles going through dust exhaust opening. -
Page 20: Extension Cords
GENERAL WARNING: Always wear safety goggles or safety glasses with side shields during power tool Only the parts shown on parts list, page 23, are operation or when blowing dust. If operation is intended to be repaired or replaced by the customer. dusty, also wear a dust mask. - Page 21 PROBLEM SOLUTION Biscuits do not fit slots. Biscuits not fitting Biscuit slots are too deep or too shallow. Make slots may also cause misalignment of fine adjustments to depth setting. See "TO boards being joined. MAKE FINE ADJUSTMENTS" section on page Biscuit thickness may be out of tolerance.
- Page 22 CRAFTSMAN DETAIL BISCUIT JOINER - MODEL NUMBER 315.175501 SEE NOTE "A" PAGE 23 _,,,_2...
-
Page 23: Parts List
CRAFTSMAN DETAIL BISCUIT JOINER - MODEL NUMBER 315.175501 The model number will be found on a plate attached to the motor housing. Always mention the model number in all correspondence regarding your DETAIL BISCUIT JOINER or when ordering repair parts. - Page 24 Your Home For repair-in your home-of all major brand appliances, lawn and garden equipment, or heating and cooling systems, no matter who made it, no matter who sold it! For the replacement parts, accessories owner's manuals that you need to do-it-yourself. For Sears professional installation of home appliances and items like garage door openers and water heaters.
Need help?
Do you have a question about the 315.175501 and is the answer not in the manual?
Questions and answers
what size biscuits fit my joiner model # 315.265500