Table of Contents
Advertisement
Available languages
Available languages
Quick Links
rator's Manual
LAWN T
24.0 HP, 54"
EUectric Start
ACTO
Mower
Automatic Transmission
Model No.
917.27686
o EspaSoi,
p. 36
This product
has a low emission
engine
which operates
differently
from previously
built engines.
Before
you start the
engine,
read and understand
this Owner's
Manual.
IMPORTANT:
Read and follow all Safety
Rules and Instructionsbefore
operatingthis equipment.
For answers
to your questions
about this product,
Call:
1=800=659=5917
Sears Craftsman Help Line
5 am - 5 pro, Mon - Sat
SEARS,
ROEBUCK
AND COo, HOFFMAN
ESTATES,
IL 60179
U.S.A.
Visit our Craftsman website:www.sears.com/craftsman
Advertisement
Table of Contents

Subscribe to Our Youtube Channel
Related Manuals for Craftsman 917.27686


Summary of Contents for Craftsman 917.27686
- Page 1 For answers to your questions about this product, Call: Read and follow all Safety 1=800=659=5917 Rules and Instructionsbefore Sears Craftsman Help Line operatingthis equipment. 5 am - 5 pro, Mon - Sat SEARS, ROEBUCK AND COo, HOFFMAN ESTATES, IL 60179 U.S.A.
-
Page 2: Limited Warranty
Troubleshooting ........Operation ..........Sears Service ......Back Cover Maintenance Schedule ......LIMITED WARRANTY ON CRAFTSMAN TRACTOR BATTERY 2-YEAR ON TRACTOR When used and maintained according to the operator's manual instructions, if this tractor fails due to a defect in material... -
Page 3: Operation
_DANGER: This cutting machine is capable of amputating hands and feet and throwing objects. Failure to observe the following safety instructions could result in serious injury or death. o Never direct discharged material toward _WARNING: In order to prevent ac- anyone. - Page 4 IL SLOPE OPERATION • Never carry children, even with the blades shut off. They may fall off and Slopes are a major factor related to loss of be seriously injured or interfere with control and tip-over accidents, which can safe machine operation.
-
Page 5: General Service
• Keep machine free of grass, leaves, or ° Remove gas-powered equipment from other debris build_up. Clean oil or fuel the truck or trailer and refuel it on the spillage and remove any fuel-soaked ground. If this is not possible, then debris. -
Page 6: Product Specifications
In the state of California the above is re.. PRODUCT SPECIFICATIONS quired by law (Section 4442 of the Califor- Gasoline Capacity 4 Gallons nia Public Resources Code). Other states and Type: Unleaded Regular may have similar laws. Federal laws apply on federal lands. - Page 7 LL""L ' LL'" ......Mower Front Wheel (t) Wheel __. =_=i=_hou i de r_Bo_t _ (I) Locknut 3/8-16 (1) 1-1/40oD, Washer Mower (1) Front Link (5) Large Retainer Springs - 7/16 (1) 3/40oD. Washers (1) Anti-Swar (2) Small Retainer Springs - 5/16 __(2) Rear Lift Link...
- Page 8 Your new tractor has been assembled at the factory with the exception of those parts left unassembled for shipping purposes, TOOLS REQUIRED FOR ASSEMBLY A socket wrench set will make assembly easier. Standard wrench sizes you need are listed be!owr 3/4"...
- Page 9 6, Removekeyfrombag andstart the engine(see"TOSTARTENGINE"in the Operationsectionof this manual). After enginehas started,movethrottle controlto idle position. 7. Releaseparkingbrake. 8, Slowlydepressforwarddrivepedaland drivetractoroff skid, 9o Applybraketo stoptractorandset parkingbrake, "STOP" 10.Turnignitionkey to position° Continuewith the instructionsthatfollow. NOTE: Be sure mower side suspension ASSEMBLE FRONT WHEEL TO arms (A) are pointing forward before slid- MOWER...
- Page 10 12,Insertotherendof link(E)intoholein frontmowerbracket ( H)andsecurewith washerandretainer spnng(J), 8. ATTACH REARLIFTLINKS(C)- insert rodendof linkassembly intoholeintrac- tor liftshaftsuspension arm (L)andpivot linkdownto mower. L iftrearcornerof 13.Disengage belttensionrod(K)fromIock- mowerandpositionslot in tinkassembly ingbracket(L). overpinon rearmowerbracket ( D)and 14.installbeltontoengineclutchpulley(M), securewithwasherandretainer spring. IMPORTANT: C heckbeltforproperrouting 9o Repeaton opposite sideoftractor. in allmowerpulleygrooves.
- Page 11 CHECK T|RE PRESSURE ,/'CHECKLIST Before you operate your new tractor, we The tires on your tractor were overinflated wish to assure that you receive the best at the factory for shipping purposes° Cor- performance and satisfaction from this rect tire pressure is important for best Quality Product.
- Page 12 These symbols may appear on your tractor or in literature supplied with the product. Learn and understand their meaning. REVERSE NEUTRAL HIGH CHOKE FAST SLOW IGNmON SWITCH PARKING BRAKE MOWER HEIGHT MOWER LIFT ENGINE OFF REVERSE ENGINE ON ENGINE START OPERATION SYSTEM (ROS) ÷...
-
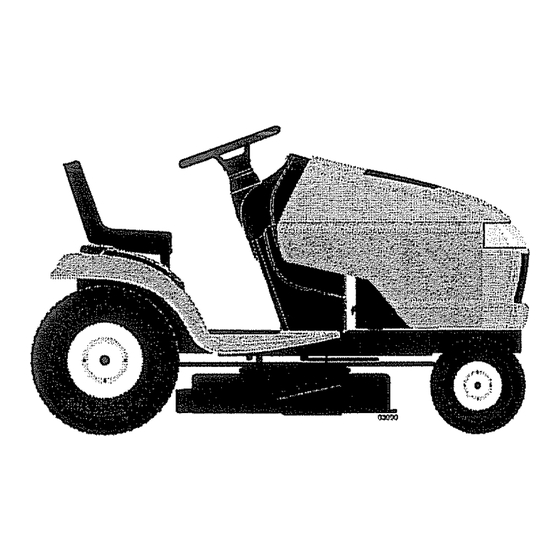
Page 13: Know Your Tractor
KNOW YOUR TRACTOR READTHIS OWNER'S MANUAL AND SAFETY RULES BEFORE OPERATING YOUR TRACTOR Compare the illustrations with your tractor to familiarize yourself with the locations various controls and adjustments. Save this manual for future reference. 03105 Our tractors conform to the applicable safety standards of the American... - Page 14 The operation of any tractor can result in foreign objects thrown into the eyes, which can result in severe eye damage. Always wear safety glasses or eye shields while operating your tractor or performing any adjustments or repairs. We recommend standard safety glasses or a wide vision safety...
- Page 15 TO ADJUST MOWER CUTTING HEIGHT TO USE CHOKE CONTROL (N) Use choke control whenever you are start- The position of the attachment lift lever (A) ing a cold engine. Do not use to start a determines the cutting height. warm engine. o To engage choke control, pull knob out.
- Page 16 _WARNING: Backing up with the at- tachment clutch engaged while mowing is strongly discouraged. Turning the ROS "ON", to allow reverse operation with the attachment clutch engaged, should only be done when the operator decides it is necessary to reposition the machine with 9/16...
-
Page 17: Towing Carts And Other Attach- Ments
BEFORE STARTING ENGONE TO TRANSPORT CHECK ENGINE OIL LEVEL When pushing or towing your tractor, be sure to disengage transmission by placing The engine in your tractor has been freewheel control in freewheeling position. shipped, from the factory, already filled Freewheel control is located at the rear with summer... -
Page 18: To Start Engine
TO START AUTOMATIC TRANSMISSION WARM ENGINE Before driving the unit in cold weather, When starting the engine for the first time or if the engine has run out of fuel, it wilt the transmission should be warmed up as follows: take extra cranking time to move fuel from the tank to the engine. -
Page 19: Mowing Tips
Depress forward drive pedal to full forward position and hold for five (5) seconds and release pedal, Depress reverse drive pedal to full reverse posi- tion and hold for five (5) seconds release pedal° Repeat this procedure three (3) times. Shutoff engine and set parking brake. -
Page 20: General Recommendations
EVERY EVERY BEFORE MAINTENANCE BEFORE EVERY EvE.Y _ERY EACH SEASON STORAGE SCHEDULE HOURS HOURS HOURS HOURS Check Brake.Operalion v" e," Check Tire Pressure Oheck Ope,rator PresencD & ROe Syslems Check for Loose Fasteners ChecldRep!ace Mower Blades Lubrication Chart Check Batten] Level Glean Battery and Terminals Check Transaxle Cooling Check Mower Levelness... - Page 21 ROS "ON" Position TRACTOR Engine "ON" Position (Normal Operating) Always observe safety rules when per- forming any maintenance. BRAKE OPERATION If tractor requires more than five (5) feet to stop at highest speed in highest gear on a level, dry concrete or paved surface, then brake must be serviced.
- Page 22 NOTE: The original equipment battery on SAE VlSCOSI'W GRADES your tractor is maintenance free. Do not attempt to open or remove caps or covers. Adding or checking level of electrolyte not necessary, TEMPERATURE RANGE ANTICIPATED BEFORE NEXT OIL CHANGE TO CLEAN BATTERY AND TERMINALS NOTE: Although...
-
Page 23: Clean Air Screen
CLEAN AIR SCREEN Refill engine with oil through oil fill dip- stick tube. Pour slowly. Do not overfill. Air screen must be kept free of dirt and For approximate capacity see "PROD- chaff to prevent engine damage from UCT SPECIFICATIONS" section of this overheating. - Page 24 CLEANING We do not recommend using a garden hose or pressure washer to clean your o Clean engine, battery, seat, finish, etc, tractor unless the engine and transmis- of all foreign matter. sion are covered to keep water ouL Water •...
- Page 25 9. PJrn tractor steering wheel to the left as far as it will go. Raise mower to its highest position, t0oSlide mower out from under right side At both sides of mower, position blade of tractor. at side and measure the distance TO INSTALL MOWER...
- Page 26 TO REPLACE MOWER DRIVE BELT MOWER DRIVE BELT REMOVAL 1. Park tractor on a level surface° Engage parking brake, 2. Lower attachment lift lever to its lowest position. Disengage belt tension rod (K) from ock bracket (L), CAUTION: Belt tension rod is spring loaded.
- Page 27 TO ADJUST ATTACHMENT CLUTCH BELT INSTALLATION 1. Install new belt from tractor rear to The electric clutch should provide years of service. The clutch has a built-in brake front, over the steering plate (H) and above clutch brake pedal shaft (J). that stops the pulley within 5 seconds.
- Page 28 TO CHECK BRAKE Washers If tractor requires more than five (5) feet to stop at highest speed in highest gear on a level, dry concrete or paved surface, then Retaining brake must be serviced. You may also check brake by: Ring 1.
- Page 29 REPLACING BATTERY TO REPLACE HEADLIGHT BULB Raise hood. _WARNING: Do not short battery Remove bulb holder from the hole in terminals by allowing a wrench or any other object to contact both terminals the backside of the grill. the same time. Before connecting battery, Replace bulb in holder and install bulb...
- Page 30 ENGINE TO ADJUST CARBURETOR Maintenance, repair, or replacement Your carburetor is not adjustable. If your the emission control devices and systems, engine does not operate properly due to which are being done at the customers ex- suspected carburetor problems, take your pense, may be performed by any non-road tractor to a Sears or other qualified...
- Page 31 acids during storage. Acidic gas can dam- Immediately prepare your tractor for stor- age the fuel system of an engine while in age at the end of the season or if the trac- storage_ Will not be used for 30 days or more. RNING: Never store the tractor •...
-
Page 32: Troubleshooting
TROUBLESHOOTING CHART: See appropriatesectionin manualunless directedto Sears servicecenter PROBLEM CAUSE ........CORRECTION Will not start 1. Out of fuel. 1o Fill fuel tank. 2. See 'qO START ENGINE" 2o Engine not"CHOKED" properly. Operation section. 3, Wait several minutes before Engine flooded. attempting to start. - Page 33 TROUBLESHOOTING CHART: See appropriate section in manual unless directed to Sears service center PROBLEM CAUSE CORRECTION Loss of power Faulty spark plugo 6o Clean and regap or change (continued) spark plug, Replace fuel filter. 7r Dirty fuel filter, Stale or dirty fuelo Empty fuel tank and refill tank with fresh, clean gasoline.
- Page 34 TROUBLESHOOTING CHART: See appropriate section in rnanual unless directed to Sears service center PROBLEM CAUSE CORRECTION Mower blades will 1. Obstruction in clutch Remove obstruction_ not rotate mechanism. Worn/damaged mower drive Replace mower drive belt. belt. 3o Replace idler pulley. Frozen idler pulley, 4..
- Page 35 SUGGESTED GUIDE FOR SiGHTiNG SLOPES FOR SAFE OPERATION ..,= ONLY RIDE UP AND DOWN HILL, NOT ACROSS HILL 15 DEGREES MAX. WARNING: To avoid serious injury, operate your tractor up and down the face of slopes, never across the face. Do not mow slopes greater than 15 degrees.
- Page 36 30 dfas, pero en ese caso deber_ pagar un vi_.ticoo Usted podr_ evitarse et costo del vi_tico si ileva el producto a un centro de servicios autorizado de Craftsman. Para saber cudt le queda m&s cerca, Ilame al 1-800-4-MY-HOME®o La cobertura...
- Page 37 _PELIGRO: Esta Maqulna cortadora es capaz de amputar las manosy los pies y de lanzar obJetos, sl no se observan las Instrucclones de seguridad slgutentes se pueden produclr lesiones graves o la muerte. • No hacer funcionar la mdquina sin el ,_ADVERTENCIA: Siempre desconecte et captador de hierba entera, la protecci6n de...
- Page 38 o Escoger una velocidad de marcha baja de ° Nunca permitir que niSos u otras personas modo que no sea necesado pararse o cam- est_n dentro del equipo por remolcar, biar estando en una pendiente. ° En pendientes, el peso del equipo remolcado •...
- Page 39 Las cuchiftas del cortac_sped son afiladas. o Mantener la m_quina libre de hierba, hojas " Envolver la cuchi!la, ponerse guantes y poner u otros residuos acumulados_ Limpiar las la m_=ximaatenci6n cuando se hacen opera- salpicaduras de aceite o carburante y quitar clones en elias.
-
Page 40: Especificaciones
4 Galones Congratulaciones por su buena compra. de gasolina: Regular Sin Plomo Su nuevo producto Craftsman® est& diseSado y fabricado para funcionar de modo liable por Tipo de Acette: SAE 30 (Sobre 32°F) muchos afios. Pero como todos los productos, (AP!-SG-SL) SAE 5W30 (Debajo 32°F) - Page 41 Rueda delantera de la segadore (1) Rueda (1) Tuerca de Seguridad 3/8-16 (1) 1-1/40,D. Arandela Segadora (5) Resorte de Retenci6n (1) 3/40Do Arandela (I) Montaje de la pieza (2) Resorte de Retenci6n de uni6n deantera (2) Rear Lift Link Assemblies (5) 1-3/16 O.D, Arandela Hoja de pendiente (2) Llaves...
- Page 42 Su tractor nuevo ha sido montado en la f_brica con ta excepci6n de aquellas partes que no se han montado pot razones de envfo. Cuando en este manual se mencionan los t_rminos "mano derecha" o "mano izquierda" se refiere a cuando usted se encuentra en la posici6n de operaci6n (sentado!a detr&s del volante de direcciSn), HERRAMIENTAS...
- Page 43 6. Poner e nmarcha elmotor. D espu_s de poner en marcha el motor m over l apalanca delgasenposici6n neutrao 7. Quitar etfrenodemano. 8, Presione l entamente e l pedal d emando haciaadelante y guiareltractor f uera dela plataformao 9. Actuar sobre etfrenoparaparar e l tractor y colocar e! freno de mano,, ! 0.
- Page 44 10., Haga girarelvolante p araquelasruedas queden bienderechas. FIJE LAPIEZA DEUNtON ANTERIOR ( E) - Trabaje p orel lado izquierdo d eltractor° fntroduzca elextremo d e la barra de la pieza de uniSn por el orificio anterior de la barra de suspensi6n anterior del tractor (F), y suj_telo per medio de un resorte de contencibn (G) a trav_s del orificio de la pteza de uni6n...
- Page 45 JLISTA DE Ri=VISi6N ! 4. lnstate ta correa pas_ndola por enclma de la polea del embrague del motor (M). Antes de operar y de dtsfrutar de su tram tor nuevo, le deseamos que reciba el mejor rendimiento y la mayor satisfaccion de este producto de calidad_ Haga el favor de revisar la lista a continuacion: ,/Se...
- Page 46 Estos si'mbolos pueden aparecer sobre su tractor oen la literatura proporcionada con el producto, Aprenda y comprenda sus significados. MARCHA ATR/_S NEUTRO ALTO t3AJO ESTRA_GU- RAP|DO LENTO LAC{ON MOTOR MOTOR MOTOR FRENO DE ALTURA DE LA LEVANTAMIENTO SISTEMA ENCENDIDO ENMAROHA ESTACIONAMIENTO SEGADORA DE LA SEGADORA...
- Page 47 FAMILIARICESE CON SU TRACTOR LEA ESTE MANUAL DEL DUEIqO Y LAS REGLAS DE SEGURIDAD ANTES DE OPERAR SU TRACTOR Compare las ilustraciones con su tractor para familiarizarse con tas ubicaciones de los diversos controles y ajusteso Guarde este manual para referencia en el futuro. 03105 Nuestros tractores cumplen con los estdndares de seguridad del American National Standard tnstitute_...
- Page 48 La operaciSn de cualquier tractor puede hacer que salten objetos extrafios dentro de sus ojos, Io que puede producir dafios graves en _stos. Siempre use anteojos de segurldad o protecciones para los ojos mientras opere su tractor o cuando haga ajustes o reparacloneso Recomendamos gafas de seguridad o una m&scara de vtsi6n amplia de seguddad usada sobre las gafaso tMPULSI6N DE RECORRIDO -...
- Page 49 Para desconectar el mando de crucero, e PARA USAR EL CONTROL DE pujar la palanca hacia atrd.s en la posici6n ESTRANGULACION (N) "OFF", o apretar comptetamente el pedal del Use el control de estrangulaci6n cuando est_ freno. haciendo arrancar un motor frfo. No Io use para hacer arrancar un motor caliente.
- Page 50 ATENCION: Ir marcha atr&s con e! embrague Con la segadora a la altura deseada para la puesto para cortar, no es recomendable.. posici6n de corte, se tienen que montar ias Poniendo el ROSen posici6n "ON", para ruedas calibradoras de modo que queden un poco sobre el sue!o°...
- Page 51 PARA TRANSPORTAR PARA OPERAR EN CERROS A_kADVERTENCIA: No maneje hacia arriba o Cuando empuje o arrastre su tractor asegOrese hacia abajo en cerros con pendientes superio- de desenganchar la transmisi6n poniendo el control de la rueda Iibre en la posici6n de res a 15°...
- Page 52 MOTOR 7o Cuando arranque el motor, empuje lenta- PARA HACER ARRANCAR mente el control de la estrangulaci6n hacia A1hacer arrancar el motor por la primera vez o adentro hasta que el motor empiece a si se ha acabado et combustible del motor, se funcionar suavemente.
-
Page 53: Consejos Para Segar
CONSEJOS PARA SEGAR Sentado en el asiento del tractor, empiece et motor° Despu_s que este corriendo et • No se pueden usar las cadenas para las motor, mueva el control de estrangulacl6n Ilantas cuando la caja de la segadora est_ a la posici6n de lento. -
Page 54: Antes De Cada Uso
PROGRAMA DE ANTES D E CAaDA CADA25 C.ADA50 CADA100 TEMPDRADACADA ALMACENAMtE_"rO MANTENIMtENTO CADA u sa HORAS HORAS FLORAS HDRAS v" I Revir_T la opor_ci_n det fmno Rl_vl_sr _ ptenlOn de b_ Jt_nlatt Wt itt_z _ commi_P, dt_ de Frd..';eh co d_°p6mt°ur at le _._lomo d FE)S Flevlt_arsl h w tule_dores suettos V"... - Page 55 Cuando el motor est,. en marcha con TRACTOR el interruptor de Itave del sistema de Siempre observe tas reglas de seguridad cu- funcionamiento atrds (ROS) en la posici6n ando d_ mantenimiento. "ON" y el embrague del accesorio conectado, OPERACION DEL FRENO cualquier tentativa del operador de viajar Si el tractor necesita mds de cinco (5) pies marcha atr_.s, NO apagard el motor.
- Page 56 4o Limpte lostermtnales y losextremos de! Cambte el aceite despuds de 50 horas de oper- cable delabaterta conuncepilto dealam- aci6n o por 1o menos una vez al a5o si el tractor brehastaquequeden brillantes. se utitiza menos 50 horas el a5o, 5o Cubra losterminales congrasa o parafina.
- Page 57 LtMPIEZA DE LA ENTRADA DE AIRE/AREAS Use un medidor en la tapaJvarilla indicadora DE ENFRIAMENTO del nivel para relleno det aceite para revisar Para asegurar un enfrlamiento adecuado, el nivel. Mantenga el acefte en la Ifnea de asegerese que ta rejilla de! cdsped, las aletas Ileno (FULL) en la varilla indicadora de de enfriamiento, y otras superficies externas del nivel.
- Page 58 DVERTENCIA:PARA EVtTAR LESI6NES SER1AS, ANTES DE DAR CUALQUIER SERVICIO O DE HACER AJUSTES: Presione el pedal de freno completamente y aptique e! freno de estacionamiento. Ponga el embrague del accesorio en la posici6n desenganchado (DISENGAGED)_ Ponga la ilave de ignici6n en la posici6n de apagado (STOP) y remu_vala. 4o Asegt_rese que las cuchillas y que todas las partes movibtes se hayan detenido oomple- tamente.
- Page 59 A ambos lados de la cortadora, ubique la PARA NIVELAR LA SEGADORA cuchitta hacia un lado y mida la distancia Aseg_rese de que los neum_,ticos est_n infla- (A) que hay entre el borde inferior de ta dos a la PSI que se indica en estoso Si est,_n cuchilla y el suelo, Dicha distancia debe ser demasiado inflados o poco inflados, et c_sped la mtsma a ambos lados.
- Page 60 PARA REEMPLAZAR LA CORREA DE TRANSMISION DE LA CUCHILLA DE LA SEGADORA DESMONTAJE DE LA CORREA DE TRANS- MISI6N DE LA SEGADORA Estacione el tractor en una supefficie nive- tada, Ponga el freno de mano. 2o Baje la palanca elevadora a la posici6n de rods abajo.
- Page 61 PARA AJUSTAR EL EMBRAGUE DEL ACCE- Deslice la correa hacia la parte de atr,_sdel $ORIO tractor, retffeta de la placa de direcci6n (H) y si_quela det tractor,, Et embrague el_ctrico debe entregarle aSos MONTAJE DE LA CORREA de servicio. El embrague cuenta con un freno incorporado que para a la polea dentro de 5 1o Instale la correa nueva pas_ndola de la segundos.
- Page 62 PARA VERIFICAR S! FtJNCiONA BIEN Arandelas EL FRENO Si e! tractor necesita mds de cinco (5) pies Anillo de para detenerse a la mdxima velocidad y a! Relenci6n cambio rods alto en una supefficie nivetada, de hormigSn o pavimentada, es precise hacerle el servicio at freno.
- Page 63 PARA CAMBIAR LA BOMBILLA DE LA LUZ REEMPLAZAR LA BATERIA DELANTERA _ADVERTENCIA: He haga cortocircuitocon 1. Levante el cap6o Ios terminales de la bateri'a al permitir que tJna Tire el sujetador de la bombilla fuera del llave de tuerca o cuaiquier otto objeto entre en contacto con ambos terminales a la misma agujero en la parte trasera del enrejado.
- Page 64 MOTOR PARA AJUSTAR EL CARBURADOR Su carburador no es ajustable. St su motor no El mantenimiento, la reparaci6n, o el reemplazo opera adecuadamente debido a problemas de cualquier dispositivos o sistemas del control de la emisi6n, los cuales sean hechos a! costo sospechados de carburador, tleve usted su trac- tor a un centre de servicio autorizado para su del cltente, pueden ser realizados por cualquier...
- Page 65 gasolina acldica puede daSar el sistema de Inmedlatamente prepare su tractor para el combustible de un motor durante et periodo de almacenamiento al final de la temporada o si el almacenamiento. tractor no se va a usar por 30 d[as o m_s. Vaciar el dep6sito del carburante poniendo _I_ADVERTENCIA: Nunca almacene el trac-...
- Page 66 IDENTIFICACI6N DE PROBLEMAS: Vea la secci6n aproplada en el manual a menos qua estd dlrigido a un centro de servicio Sears. CORRECCi6N PROBLEMA CAUSA No arranca I. Sin combustible. t. Llene el estanque de combustible. 2, Motor sin la"ESTRANGULACI6N _ 2o Vea "PARA ARRANCAR EL MOTOR' en la secci6n de operaci6n.
- Page 67 IDENTIFICAC!ON DE PROBLEMAS: Vea la secci6n aproptada en et manual a menos que est_ dtrfgtdo a un centro de servicio fears. CAUSA CORRECCI(SN PROBLEMA Pdrdlda de fuerza 4. Filtro de aire sucio_ o Limpie/cambie el filtro de aire. o Revise el nivel de aceite/cambie (contlnuado) 5_ Nivel de aceite bajo/aceite sucio.
- Page 68 IDENTIFICAClON DE PROBLEMAS: Vea la secci6n aproplada en el manual a menos que estd dirigido a un centro de servicio Sears. CORRECC|ON CAUSA Las cuchillas 3_ Cambie la polea de gufa_ 3, Potea de gufa atasoada. 4, Mandril de la cuchilla atascado_ 4, Pongase en contacto con un segadoras no rotan oentro de servtcio Sears o con un...
- Page 71 GUfA SUGERIDA PARA MEDIR LAS PENDIENTES CON LA VISTA PARA UNA OPERACION SEGURA SOLAMENTE ANDE CUESTA ARRIBA O CUESTA ABAJO Y NO ATRAVIESE EL CERRO 15 GRADES MAX....ADVERTENCIA: Para euitar dafios graves, haga funcionar su tractor arrlba _ J_ y abaJo de las pendientP..s,nunca transversalmente con respacto a tas pendientes.
- Page 72 Your Home !i!iiiiii!i!i!i For repair - in your home - of all major brand appliances, :7:::_::_:_ lawn and garden equipment, or heating and cooling systems, no matter made it, no matter who sold iiiiii!iii!!ii For the replacement parts, accessories owner's manuals that you need to do-it-yourself.
Need help?
Do you have a question about the 917.27686 and is the answer not in the manual?
Questions and answers