Table of Contents
Advertisement
Available languages
Available languages
Operator's
Manual
JCRAFTSMAN°I
PRUNER A'I-rACHMENT
Model
No.
358,792450
•
Safety
• Assembly
•
Operation
•
Maintenance
•
Parts List
•
Espar_ol,
p. 16
WARNING:
Read and follow all Safety Rules and Operating
Instructions before first use of this product.
For answers to your questions
about this product:
Call 7 am-7
pm, Mon.-Sat.,
or 10 am-7
pm, Sun.
1-800-235-5878
(Hours listed are Central Time)
Sears, Roebuck
and Co., Hoffman
Estates,
IL 60179 U.S.A.
545001436
9/12/06
Advertisement
Table of Contents

Related Manuals for Craftsman 358.792450


Summary of Contents for Craftsman 358.792450
- Page 1 Operator's Manual JCRAFTSMAN°I PRUNER A'I-rACHMENT Model 358,792450 • Safety • Assembly • Operation • Maintenance • Parts List • Espar_ol, p. 16 WARNING: Read and follow all Safety Rules and Operating Instructions before first use of this product. For answers to your questions about this product: Call 7 am-7 pm, Mon.-Sat.,...
-
Page 2: One Year Full Warranty
Sears store, Sears Service Center, or other Craftsman outlet in the United States for free repair (or replacement if repair proves impossible). -
Page 3: Plan Ahead
PLAN AHEAD HAZARD ZONE • Read this manual carefully until you completely understand and can follow all safety rules, precautions, and oper- ating instructions before attempting to use the unit. 50 feet • Restrict the use of your pruner to adult users who understand and can I_I_..__..Y (15meters) - Page 4 • Avoid d angerous situations. Donot sharp e dges orcorners. Do not e x- use inpresence offlammable liquids pose c ords toheat, oil, o rwater. orgases toavoid c reating afire or • Keep t he extension cord clear ofop- erator and obstacles atall t imes.
- Page 5 • Use only recommended CraftsmanCR_ ately i fitbecomes damaged, broken orisotherwise removed. parts a nd accessories. • Be sure chain s tops m oving when e n- • Always stop t he unit when w ork i s gine idles ( see CARBURETOR ADJUST- delayed orwhen w alking from one MENT section ofpowerhead...
- Page 6 • Never let t hemoving chain c ontact around the throttle handle whether any object atthe tipofthe guide b ar. your are right handed or left handed. • Keep t he working area f ree from ob- • Stand with your weight evenly bal- structions such asother trees, anced on both feet.
- Page 7 • Store a ttachment indoors, out o freach wise healthy people. Ifsymptoms occur ofchildren. such a s numbness, pain, loss o fstrength, Ifsituations occur which a renotcov- change inskin color ortexture, orloss o f feeling inthe fingers, hands, orjoints, dis- ered inthis manual, use care and good continue theuseofthis tool a ndseek judgment.
- Page 8 NOTE: The lower shoulder strap Insert two screws into the screw clamp h as two spacer tabs attached. holes. These t abs are provided toadapt this Secure shoulder strap clamp by attachment foruse with powerheads tightening screws with the hex that h ave a 1"diameter upper shaft wrench.
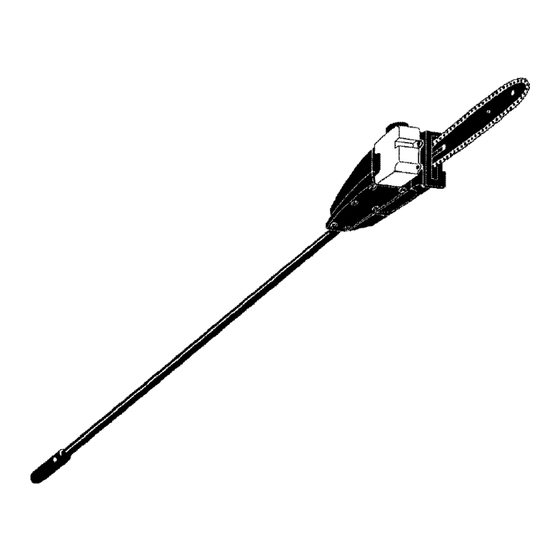
- Page 9 KNOW YOUR PRUNER ATTACHMENT READ THiS OPERATOR'S MANUAL AND SAFETY RULES BEFORE OPERATING YOUR PRUNER Aqq-ACHMENT Compare the illustrations with your attachment to familiarize yourself with the location of the various controls and adjustments. Save this manual for future reference. Coupler Hanger J "-°...
- Page 10 For maximum guide bar and chain life, left shoulder. we recommend you use Craftsman'.¢_ PRUNING chain saw bar oil. If Craftsman bar oil is not available, you may use a good _bWARNING: Be alert for and grade SAE 30 oil until you are able to guard against kickback.
- Page 11 • Watch out f orbranches immediately 1. Make the first cut 6 inches from behind thebranch being p runed. If the tree trunk on the bottom of the the chain h its the rear b ranch, dam- limb. Use top of guide bar to make age totheunit m ay occur.
- Page 12 1=Use the screwdriver end ofthe CHECK CHAIN SHARPNESS chain a djustment tool ( bar tool) t o A sharp chain makes wood chips. A move c hain a round guide b ar t o dull chain makes a sawdust powder ensure kinks d onot e xist.
-
Page 13: Chain Sharpening
z% _______ Cutters Depth Gauge 4t_WARNING: Always stop unit and disconnect spark plug wire (or disconnect powerhead from power source) before performing mainte- nance, service, or adjustments except for carburetor adjustments. Drive Links CHAIN SHARPENING Chain sharpening is a complicated task that requires special tools. - Page 14 If your pruner attachment is to be all.WARNING: Perform the follow- stored for a period of time: • Clean the entire attachment. ing steps after each use: • Allow attachment to cool before • Lightly oil external metal surfaces storing or transporting. and guide bar.
- Page 15 Sears, Centre de Servicios Sears u otra tienda Craftsman en los Estados Unidos para su reparaci6n gratuita (o reemplazo si no es posible repararlo).
- Page 16 PIENSE ANTES DE PROCEDER • Mantenga a los ni_os, espectadores • Antes de utilizar la cortadora de ra- animales a una distancia minima de mas, lea attentamente este manual 15 metros (50 pies) del &rea de traba- hasta estar seguro o comprenderlo jo o cuando est&...
- Page 17 SEGURIDAD ELECTRICA (para ca- bajo es el nOmero de clasificaci6n bezas de motor electricos) m&s grueso ser& el cable. • No utilice m&s de uno los cables de ADVERTENCIA: Evite ambi- extensi6n. entes peligrosos. No use su aparato en • No abuse del cord6n. Nunca maneje lugares hQmedos o mojados ni cerca el aparato por el cable de extensi6n o...
- Page 18 • Debe p roveerse Interrupter deFal- • Haga uso de la cortadora de ramas lasenelCircuito aTierra ( Ground 0nicamente en lugares exteriores bien Fault Circuit Interruptor- GFCI) enel ventillados. circuito oeneltomacorriente usado • No haga uso de la cortadora de ra- con este aparato.
- Page 19 cia adelante, esto puede ocurrir cuan- Elimine o evite todo obst&culo que la do la punta de la barra guia de la cor- cortadora de ramas pueda enfrentar tadora de ramas entra en contacto al cortar. AI cortar una rama, no deje con cualquier objeto como puede ser la barra guia entrar en contacto con...
- Page 20 envolviendo totalmente lamanija de TRANSPORTE Y ALMACENADO gatillo a celerador, sea ud. d erecho o • No sostenga el cuchilla expuesta. zurdo. • Pare le cabeza de motor antes de de- • P_.rese con elpeso d istribuido igual- jar el @.reade trabajo. mente entre l os dos pies.
-
Page 21: Montaje
CONTENIDO DE LA CAJA Coloque el bot6n de conexi6n/ desconexi6n del accesorio en el Verifique que todos los articulos de la siguiente lista est6n incluidos. agujero de la guia del acoplador. Modelo 358.792450 Empuje el accesorio en el acopla- • Cortadora de Ramas Accesorio dor hasta que el bot6n de conex- •... - Page 22 perior que tienen 1 pulgada del e jesu- Asegure la abrazadera de la cor- perior dedi&metro (laabrazadera tea para el hombre apretando correa para hombre noapretar& abajo tornillos con la Ilave hexagonal. con seguridad eneleje superior de1 Antes de poner en marcha el motor pulgada dedi&metro sinusar estas o iniciar cualquier tarea de corte,...
- Page 23 CONOZCA EL CORTADORA DE RAMAS ACCESORIO LEA ESTE MANUAL DEL USUARIO Y LAS REGLAS DE SEGURIDAD ANTES DE COM- ENZAR A USAR ESTE CORTADORA DE RAMAS AOCESORIO. Compare las ilustra- clones con su aparato para familiarizarse con la ubicaci6n de los diversos con- troles y ajustes.
- Page 24 • Sostenga el empuSadura del aceler- SAE 30 de buena calidad haeta ob- ador con su mane derecha con un tener el aceite marcha Craftsman. dedo en el gatillo. cantidad de lubricaci6n est medida • Mantenga el extremo con el motor autom&ticamente...
-
Page 25: Puntos Importantes
• Mantenga el almohadilla de la correa al hombro centrada en el hombro izquierda y el sePial de peligro centrada en su espalda. • Mantenga todo el peso de la herra- mienta en el hombro izquier- do.Siempre que no se halle cortan- oorte Segundo do, suelte el gatillo acelerador... - Page 26 Herramienta de la cadena _I_ADVERTENClA: Siempre apa- gue el aparato y desconecte la bujia (o desconecte aparato de la corriente Barra el6ctrica) antes de hacer cualquier guia mantenimiento. VERIFIQUE QUE NO HAYA PIEZAS Afloje las tuerca del abrazadera DANADAS NI GASTADAS la barra hasta que est6n tan ajus- Entre en contacto con el Centro de Ser-...
- Page 27 izquierda (en contra del s entido del • Limpie los orificios del aceite y el ra- reloj). Vuelva aajustar las tuerca del nura de la barra despu6s de cada 5 abrazadera delabarra. horas de la operac_on. 9. Silacadena seencuentra dema- siado f loja, colgar&...
- Page 28 _,ADVERTENClA: Siempre apa- Punta de_ gue el aparato y desconecte la bujia la Barra __ (o desconecte aparato de la corriente el6ctrica) antes de realizar mantenimi- ento, servicio, o ajustes, excepto de ajustes del carburador. AFILAClON DE LA CADENA La afilaci6n de la cadena requiere her- ramientas especiales.
-
Page 29: Ajuste De La Cadena
13. Instale las tuercas del abrazadera de la barra y ajQstelas a mano Oni- camente. No los ajuste mrs por abora. Vaya a la secci6n AJUSTE DE LA CADENA. AJUSTE DE LA CADENA Ofificio inferior Vea TENSION DE LA CADENA en la Clavija de secci6n de MANTENIMIENTO.
Need help?
Do you have a question about the 358.792450 and is the answer not in the manual?
Questions and answers