Advertisement
Available languages
Available languages
Operator's
Manual
JCRAFTSMAN°I
LAWN EDGER ATTACHMENT
Model
No.
358,792403
•
Safety
• Assembly
•
Operation
•
Maintenance
•
Parts List
•
Espar_ol,
p. 12
WARNING:
Read and follow all Safety Rules and Operating
Instructions before first use of this product.
For answers to your questions
about this product:
Call 7 am-7
pm, Mon.-Sat.,
or 10 am-7
pm, Sun.
1-800-235-5878
(Hours listed are Central Time)
Sears, Roebuck
and Co., Hoffman
Estates,
IL 60179 U.S.A.
530164970
9/12/06
Advertisement
Table of Contents

Related Manuals for Craftsman 358.792403


Summary of Contents for Craftsman 358.792403
- Page 1 Operator's Manual JCRAFTSMAN°I LAWN EDGER ATTACHMENT Model 358,792403 • Safety • Assembly • Operation • Maintenance • Parts List • Espar_ol, p. 12 WARNING: Read and follow all Safety Rules and Operating Instructions before first use of this product. For answers to your questions Call 7 am-7 pm, Mon.-Sat., 1-800-235-5878...
-
Page 2: Full One Year Warranty
When used and maintained according to the operator's manual, if this product fails due to a defect in material or workmanship it to any Sears store, Sears Service Center, or other Craftsman outlet in the U nited States for free repair (or replacement if repair proves impossible). - Page 3 • Dress properly. Always wear safety glasses orsimilar eye protection when operating, orperforming maintenance onyour unit ( safety glasses are avail- able). Eye protection should be marked Z87. • Always wear face ordust mask i fop- eration isdusty. • Always wear hea W ,long p ants, long sleeves, boots, and gloves.
-
Page 4: Unit Maintenance
Replace parts that are cracked, chipped, or damaged before using the unit. • Use only recommended Craftsman parts and accessories. Never use wire, wire rope, string, flailing de- vices, etc. • Be sure blade stops turning when... - Page 5 • Keep a llparts ofyour body a way f rom the blade and muffler. • Always push t he unit s lowly over the ground. Stay a lert foruneven side- walks, holes i nthe terrain, large roots, etc. • Donot f orce t he unit. Use only f or jobs e xplained inthis manual.
- Page 6 (with trimmer attachment) CARTON CONTENTS Check carton contents against the fol- lowing list. Model 358.792403 • Edger attachment • Handlebar • Handlebar mounting bracket for 1" (2.5 cm) shaft • Handlebar mounting bracket for 7/8" (2.2 cm) shaft • Bracket cover (2) •...
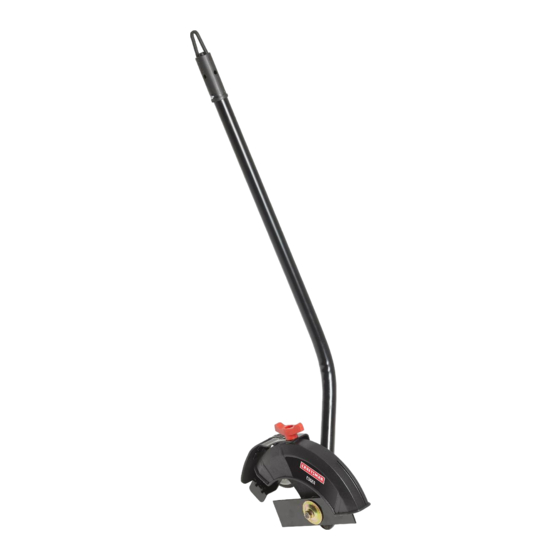
- Page 7 KNOW YOUR E DGER ATTACHMENT READ THiS OPERATOR'S MANUAL AND SAFETY RULES BEFORE OPERATING YOUR EDGER A'F]-AOHMENT,Compare the illustrations with your attachment to familiarize yourself with the location of the various controls and adjustments. for future reference. Depth Adjustment Knob Gearbox BLADE The BLADE is designed...
- Page 8 3.Push t he attachment into thecou- pler u ntil the locking/release button snaps i nto the primary hole. 4.Before using t he unit, tighten the knob s ecurely byturning clockwise. couple r Primary Hole Guide Recess Upper Locking/ Attachment Shaft Release Button _WARNING:...
-
Page 9: Maintenance
SETTING THE EDGING DEPTH _WARNING: Never attempt to ad- just the cut depth when the engine is running. Always release the throttle trig- ger, wait until the blade stops turning, move the powerhead ON/OFF switch to the OFF position, and disconnect spark plug (or disconnect from power source) before making adjustments. -
Page 10: Blade Replacement
BLADE REPLACEMENT _,WARNING: The blade will con- tinue to spin after the engine stops or after the throttle trigger has been re- leased. To avoid serious injury, make sure the blade has stopped coasting and disconnect the spark plug (or dis- connect powerhead from power... - Page 11 Sears u otra tienda Craftsman en los Estados Unidos para su reparaci6n (o reemplazo si no es posible repararlo).
- Page 12 intente remover elmaterial osostenga elmaterial a sercortado mientras las cuchillas se encuentren enmovimiento. Aseg0rese que lacuchilla yelmotor del cabeza s e haya detenido y/odesco- necte e laparato de lacorriente electrica antes deremover el material quese haya atascado enlacuchilla decorte. No sostenga niagarre elaparato por l a cuchilla decorte.
- Page 13 had&). Aseg0rese que el cable de ex- tensi6n se encuentre en buenas condiciones. Si est& da_ado, c&mbie- Io. Los cables de extensi6n demasia- do finos causar&n una baja en el vol- taje de linea, provocando baja de potencia y exceso de calentamiento. En caso de duda, use un cable de clasificaci6n m&s alta.
- Page 14 • Inspeccione el aparato totalmente antes de cada uso. Cambie las pie- zas da_adas. Verifique que no haya p6rdidas de combustible. Asegt_rese que todos los fijadores esten en su lugar correspondiente y bien fijos. • Haga el mantenimiento del aparato segun los procedimientos recomen- dados.
- Page 15 Las cuchillas pueden arrojar B_o_s objetos al aire ._ ADVERTENCIA: Las cuchilla Permita que las cuchil- ,_ giran momentane- I la se detengan antes amente despu#s I de remover las de la de soltar el I zona que se esta gatillo.
- Page 16 Cabeza demotor de32cc (con elaccesorio del c ortadora) ... CONTENIDO DE LACAJA Use lasiguiente lista para v eriflcar todas lapiezas hayan s ide incluido: Modelo 358.792403 • Cortadora de bordes accesorio • Mango • Soporte del mango para el eje de 1 pulgada (2,5 cm) •...
- Page 17 CONOZCA EL CORTADORA DE BORDES LEA ESTE MANUAL DEL USUARIO Y LAS REGLAS DE SEGURIDAD ANTES DE COM- ENZAR A USAR ESTE CORTADORA DE BORDES ACCESORIO. Compare clones con su aparato para familiarizarse troles y ajustes. Guarde este manual para uso futuro. Perilla de Ajuste de Profundidad Caja de Engranajes...
- Page 18 INSTALAClON DEL ACCESORIO 1.Retire latapa deeje del a ccesorio (si p resente) ydeseche. 2.Coloque el bot6n de conexi6n/des- conexi6n del accesorio en el aguj- ero de la guia del acoplador del eje superior. 3. Empuje el accesorio en el acopla- dor hasta que el bot6n de conex- i6n/desconexi6n se encaje en el...
- Page 19 • Tenga cuidado al cortar cerca de los &rboles o de plantas valiosas. cuchilla met&lica de alta velocidad puede cortar las raices y daf_ar las plantas. • Si la cuchilla se para, haga retroced- er inmediatemente el aparato para permitir que la cuchilla vuelva a firar. Si la cuchilla sigue detenida, pare el motor, desconecte...
-
Page 20: Mantenimiento
MANTENIMIENTO DE LA CUCHILLA _.ADVERTENCIA: La cuchilla sigue girando despu6s de que el mo- tor para y despu6s de que se suelte el gatillo. Para evitar graves heridas, aseg0rese de que la cuchilla se haya detenido completamente y desco- necte la bujia (o desconecte aparato de la corriente el6ctrica) antes de hac-... - Page 21 _IADVERTENClA: Realice los siguientes pasos despu6s de cada USO: • Deje enfriar el motor y el cajetin de engranajes antes de guardarlo o de transportarlo. • AImacene el aparato con todos los protector del cuchilla en su lugar correspondiente. Posicione al apa- rato de modo que la cuchilla no pue-...
Need help?
Do you have a question about the 358.792403 and is the answer not in the manual?
Questions and answers