
Related Manuals for Yamaha SPM-K30


Summary of Contents for Yamaha SPM-K30
- Page 1 SPM-K30 WALL MOUNT BRACKET SUPPORT MURAL Installation Manual Manuel d’installation Installationsanleitung Instllationsanvisningar Manuale d’installazione Manual de instalación Installatiehandleiding Руководство по установке...
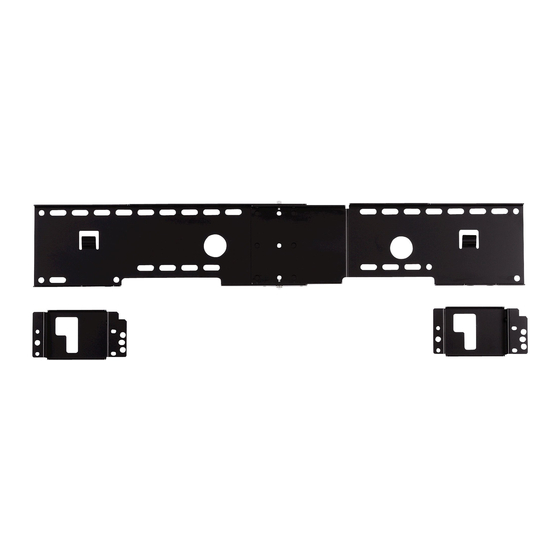
- Page 2 DIMENSIONS AFMETINGEN DIMENSIONS Га б а ри т ы ABMESSUNGEN MATTSKISSER DIMENSIONI DIMENSIONES Large wall mount bracket Grote wandbevestigingsbeugel Grand support mural Большой кронштейн настенного крепления Große Wandhalterung Stort väggmonteringsfäste Staffa di installazione a muro grande Soporte de montaje en pared grande ■...
- Page 3 ■ YSP-4000/YSP-40D/HTY-7040 1.4kg 332.5 302.5 332.5 272.5 302.5 242.5 272.5 212.5 242.5 182.5 212.5 152.5 182.5 102.5 152.5 24- 7x22 4- 7 122.5 152.5 SPM-K30 152.5 182.5 182.5 212.5 YSP-4000/ 212.5 YSP-40D/ (mm) 312.5 HTY-7040 Small wall mount bracket Kleine wandbevestigingsbeugel Petit support mural Малые...
- Page 4 Unit with bracket Toestel met de beugel Le système avec son support Аппарат с кронштейном Einheit mit Halterung Ljudprojektorn med fästet Unità con staffa Unidad con ménsula ■ YSP-3000/YSP-30D/YSP-3050/HTY-7030 ■ YSP-800/YSP-900 (mm) (mm) ■ YSP-4000/YSP-40D/HTY-7040 (mm)
-
Page 5: Wall Mount Bracket
SPM-K30 WALL MOUNT BRACKET SPM-K30 Installation Manual Thank you very much for purchasing the Wall Mount Bracket SPM-K30. Be sure to read this manual thoroughly before using this bracket. After you have read this manual, retain it for future reference. When installing the Digital Sound Projector using this bracket, all installation work must be performed by a qualified contractor or dealer personnel. - Page 6 ACCESSORIES ACCESSORIES Check that all of the following parts are included. Large wall mount bracket (LEFT) (x1) Large wall mount bracket (RIGHT) (x1) Small wall mount brackets Small wall mount brackets Safety wires (x2) (Type A) (x2) (Type B) (x2) Length 300 mm Projector mounting screws Projector mounting screws...
-
Page 7: Assembling Procedure
ASSEMBLING PROCEDURE ASSEMBLING PROCEDURE The dimensions after assembling the parts vary depending on the type of the Digital Sound Projector. Check the positions of the screw holes before assembling the parts. YSP-800, YSP-900 Projector mounting screws (M4) (supplied) 630 mm YSP-3000, YSP-30D, YSP-3050, HTY-7030 Projector mounting screws (M4) - Page 8 ASSEMBLING PROCEDURE YSP-4000, YSP-40D, HTY-7040 Projector mounting screws (M4) (supplied) 730 mm En 4...
-
Page 9: Installation Procedure
INSTALLATION PROCEDURE INSTALLATION PROCEDURE Make sure to leave adequate ventilation space around the unit and follow the instructions below. The illustrations used in each step are the examples of YSP-800 and YSP-900. 1 Attach the large wall mount bracket to the wall. In order to secure the unit to the wall, you will need to attach the bracket to the wall first in a manner befitting the structure and quality of the wall. - Page 10 INSTALLATION PROCEDURE 3 Attach the small wall mount brackets to the Digital Sound Projector. The small wall mount brackets vary depending on the type of the Digital Sound Projector. Refer to the following table for details on the type of the Digital Sound Projector and the compatible small wall mound brackets (Type A or B). Use supplied projector mounting screws (M6 x 4 for YSP-4000, YSP-40D or HTY-7040 and M4 x 8 for other models) to securely attach the two small wall mount brackets to the rear left and right sides of the Digital Sound Projector.
- Page 11 INSTALLATION PROCEDURE 4 Attach the safety wire. Attach the safety wire to the small wall mount bracket to prevent the Digital Sound Projector from falling. Slip one end through the loop Safety wire at the other end Slip the safety wire between the bracket and the projector Repeat the same...
-
Page 12: Secure The Unit
INSTALLATION PROCEDURE 6 Secure the unit. Align the holes in the large wall mount bracket with the holes in the bottom of the small wall mount brackets, and then use two of the supplied projector mounting screws (M6 x 16) to secure the unit. The positions of the screw holes vary depending on the type of the Digital Sound Projector. - Page 13 (www.yamaha-hifi.com/ or www.yamaha-uk.com/ for U.K. resident). The product is guaranteed to be free from defects in workmanship or materials for a period of two years from the date of the original purchase. Yamaha undertakes, subject to the conditions listed below, to have the faulty product or any part(s) repaired, or replaced at Yamaha’s discretion, without any charge for parts or labour.
- Page 14 YAMAHA ELECTRONIQUE FRANCE S.A. RUE AMBROISE CROIZAT BP70 CROISSY-BEAUBOURG 77312 MARNE-LA-VALLEE CEDEX02, FRANCE YAMAHA ELECTRONICS (UK) LTD. YAMAHA HOUSE, 200 RICKMANSWORTH ROAD WATFORD, HERTS WD18 7GQ, ENGLAND YAMAHA SCANDINAVIA A.B. J A WETTERGRENS GATA 1, BOX 30053, 400 43 VÄSTRA FRÖLUNDA, SWEDEN Printed in Malaysia WK82320 YAMAHA MUSIC AUSTRALIA PTY, LTD.
Need help?
Do you have a question about the SPM-K30 and is the answer not in the manual?
Questions and answers