Advertisement
Available languages
Available languages
Quick Links
OPERATOR'S M ANUAL
®
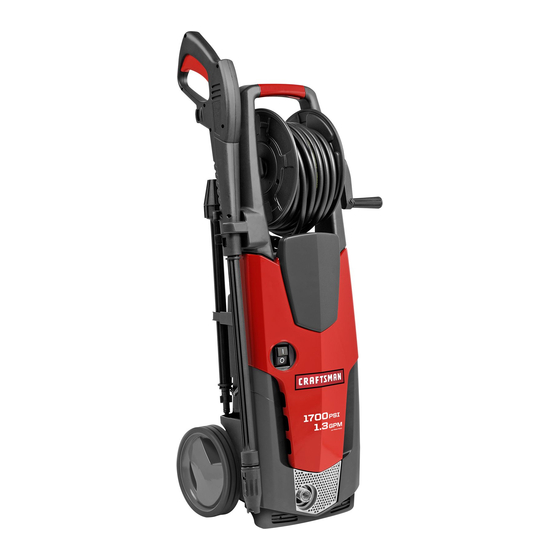
1700 PSi*
1.3 GPIVl
ELECTRIC PRESSURE WASHER
WiTH HOSEREEL
iViodelNo. 580.752850
HOURS: IVIon.- Fri. 8 a.m. to 5 p.m. (CT)
WARNING
Before using this product, read this
manual and follow all Safety Rules
and Operating Instructions.
ADVERTENCIA
Antes de utiiizar el producto, lea este
manual y siga todas las Reglas de
Seguridad e Instrucciones de Uso.
,, Safety
,, Assembly
,, Operation
,, Maintenance
,, Parts
,, EspaNol,p. 22
* This pressure washer is rated in accordance to the Pressure Washer Manufacturers Association
(PWMA) standard PWl01 (Testing and Rating Performance of Pressure Washers).
* Esta limpiadora a presiOn est_ clasificada conforme a la norma PWI01 (comprobaciOn y clasificaciOn de rendimiento de limpiadoras
a presiOn) de la AsociaciOn de fabricantes de bombas a presiOn (Pressure Washer Manufacturers Association, PWMA).
Sears Brands ManagementCorporation, HoffmanEstates, IL 60179 U.S.A.
Visit our Craftsman website: www.craftsman.com
Part No. 315607GS - (10/19/2011 )
Advertisement

Related Manuals for Craftsman 580.752850


Summary of Contents for Craftsman 580.752850
- Page 1 * Esta limpiadora a presiOn est_ clasificada conforme a la norma PWI01 (comprobaciOn y clasificaciOn de rendimiento de limpiadoras a presiOn) de la AsociaciOn de fabricantes de bombas a presiOn (Pressure Washer Manufacturers Association, PWMA). Sears Brands ManagementCorporation, HoffmanEstates, IL 60179 U.S.A. Visit our Craftsman website: www.craftsman.com Part No. 315607GS - (10/19/2011 )
- Page 2 For warranty coverage details to obtain free repair or replacement, visit the web site: www.craftsman.com This warranty does not cover spray guns, hoses, nozzle extensions, nozzles, spray tips or filters, which are expendableparts that can wear out from normal use within the warranty period.
- Page 3 Read _. WARNING Risk of electrocution. Contacting both t his manual carefully and become familiar with your pressurewasher. Knowits applications, its limitations, and any hazards involved. *_¢ power conductors, at the same time could cause .electricshock or burn resulting in death or serious injury.
- Page 4 _, WARNING R isk ofeye orbodily injury. Spray c ould A WARNING R isk offire.Spraying flammable liquids could result i ndeath, serious i njury and/or internal harm resulting inserious injury. property damage. splash b ack, propel objects o r cause •...
- Page 5 KNOWYOURPRESSURE WASHER Read the Operator's Manual and safety rules before operating your pressure washer. Comparethe illustrations with your pressure washer to familiarize yourself with the locations of various controls and adjustments. Savethis manual for future reference. A - Spray Gun -- Controls the application of water onto H - Accessory Tray -- Provides convenient storage for cleaning surface with trigger device, includes trigger lock.
- Page 6 ASSEMBLINGPRESSURE WASHER Your electric pressure washer requires some assembly but is quickly ready for use Your Craftsman pressure washer will need assembly before If you have any problemswith the assembly of your operation: pressurewasher, please caii the pressurewasher heJpJine 1. Fill out and send in registration card.
- Page 7 Assemble Main Unit Slide the handle (C) into the slots at top of main unit. install two (2) screws to secure the handle to the main 1. Slide wheel shafts (A) into holes at sides of main unit (F). unit. Wheels are installed correctly when you hear a CLICKand Slide accessory tray (D) into slots at back of main unit.
- Page 8 Assernble Hose Reel 3. Place hose reel assembly (C) into slots of handle (B). 4. Place large retainer (E) on right side of hose reel shaft as When performing the following assembly procedures, pay shown, and secure using two screws. Placesmall retainer close attention to the illustration at the bottom of this page.
- Page 9 LubricateO-Rings Lubricate all connectionsshown below, following these instructions: Lubrication of o-rings is extremely important for installation 1. inspect and clean connecting surfaces prior to lubrication and operation. The use of a lubricant (petroleum or synthetic and assembly. grease) during assembly helps seat o-rings properly and 2.
- Page 10 ConnectHosesand Water Supply Attach opposite end of high pressure hose to the spray gun. Press red button (F) on spray gun, then insert end NOTICE Use ONLYcold water (less than 100°F). of high pressure hose (G) into gun until it SNAPSinto place.
- Page 11 HOWTO USEYOURPRESSURE WASHER Slide the foam lance (Q) onto the adjustable fan jet wand (R). Apply further inward pressure to wand until you hear if you have any problems operating your pressure washer, a CLICKand the locking tab (S) falls into place over the pleasecall the pressure washer helpline at 1-800-222-3136.
- Page 12 Plug electrical power cord into an electrical circuit rated Howto Stop YourElectricPressureWasher for 120 Volts AC at 15 Amps that is properly installed and grounded in accordance with all local codes and The electric pressure washer motor runs only when the ordinances.
- Page 13 ApplyingDetergent To adjust detergent mixture (point wand nozzle away from you): _, WARNING Chemical Burn Hazard. No detergent dispensed -- Turn spray adjustment barrel (C) fully clockwise. " in death, serious injury and/or property IVlostdetergent dispensed -- Turn spray adjustment damage.
- Page 14 PRODUCT SPECIFICATIONS OWNER'SRESPONSIBILITIES GeneralRecommendations PressureWasherSpecifications Outlet Pressure ....1700 PSi (117.2 BARS)* Regular maintenancewiii improve the performance and extend the life of the pressure washer. See any Sears or other Flow Rate ....... 1.3 GPM (4.9 LPM)* qualified service dealer for service. Detergent Mix ....
- Page 15 Check and Clean Water Inlet Screen NozzleMaintenance Remove water inlet coupling (A). Then remove water inlet Excessivepump pressure can cause a pulsing sensation felt screen (B) from the unit's water inlet (C) using a needle nose while squeezing the spray gun trigger. The principal cause pliers.
- Page 16 AFTEREACHUSE Water should not remain in the unit for long periods of time. Sediments or minerals can deposit on pump parts and "freeze" pump action. Follow these procedures after every use: 1. Turn off water supply, point gun in a safe direction, press trigger lock button and squeezetrigger to relieve trapped pressure.
- Page 17 WINTEROR LONGTERMSTORAGE Protecting Pump To protect the pump from damage caused by mineral Water should not remain in the unit for long periods of deposits or freezing, use PumpSaver, Model 6039, to treat time. Sediments or minerals can deposit on pump parts and pump.
- Page 18 ProbJern Cause Correction 1. Water inlet is blocked. 1. Clearinlet, 2. inadequatewater supply. 2. Provide adequatewater flow. 3. Garden hose is kinked or leaking. 3. Straighten garden hose or replace if leaking. Pump has following problems:failure 4. Checkand clean water inlet screen. 4.
- Page 21 CRAFTSMAN 1700 PSi ElectricPressure Washer 580.752850 Exploded View and Parts List ..j---J_a I ,,: ;_ 16 m " item Part# Parts Not Illustrated Description 316243GS HANDLE Part # Description 316037GS GRIP 315607GS MANUAL, OPERATOR 316257GS COVER 316397GS KIT, HARDWARE...
- Page 22 Una vez que haya accedido al Contrato de Protecci6n de Reparaci6n,Io Onico que debe hacer para programar el Los productos Craftsman® est_n dise_ados y fabricados servicio es reaiizar una iiamada telef6nica. Las lineas est_n para tenet muchos a_os de vida Otil. Pero, como todo...
- Page 23 ADVERTENCIARiesgo de eiectrocuci6n. Poner en Lea esle manual delenidarnenley farniliaricese con la lirnpiadora a presi6n eldclrica. Conozca sus aplicaciones, sus lirnitaciones y todo pelioro energia podria provocar una descarga ei6ctrica o _¢ ontacto al mismo tiempo ambos conductores de asociado. incendio que causen muertes o lesiones graves.
- Page 24 ,A ADVERTENCIA Riesgo de lesiones oculares o ADVERTENCIA Peligro de quemaduras quimicas .'!;;;;iiiii_ I ._ Los productos quimicos pueden empujar objetos o provocar da_os " provocar quemaduras que produzcan la Ol._ _ corporaies. La pistoia puede salpicar, internos que ocasionen una lesi6n grave. muerte, lesiones graves y/o da_os a la * Cuandoutiiice o est6 cerca de este dispositivo, col6quese propiedad.
- Page 25 CONOZCA SU LliViPIADORA A PRESI( N Lea el IVlanualdel usuarioy las norrnas de seguridad antes de utilizar la Iirnpiadoraa presi6n. Compare los dibujos con la Nmpiadoraa presi6n para famiNarizarsecon la ubicaci6n de los distintos controles y ajustes. Guardeeste manual para consultas futuras. A- Pistola pulverizadora:controla ia aplicaci6n de agua G- IVlangueraa alia presi6n: conecte un extreme a la salida sobre la superficie per limpiar con un gatillo.
- Page 26 Antes de utilizarla, tendr_ que montar la limpiadora a presi6n Si tiene alg_n problernapara rnontarla limpiadora a Craftsman: presi6n, p6ngase en contactocon la Ifnea de ayuda de 1. Lleney envie la tarjeta de registro. limpiadoras a presi6n Ilamando al 1-800-222-3136.
- Page 27 IVlontajede la unidadprincipal 3. Coloque la manija (C) en las ranuras en la parte superior de la unidad principal. Coloque dos (2) tornillos para fijar 1. Deslice los ejes de las ruedas (A) hasta los agujeros a la manija a la unidad principal. los lados de la unidad principal (F).
- Page 28 Arrneel carrete de la rnanguera Coloqueel carrete de la manguera armado (C) en las ranuras de la manija (D). AI realizar los siguientes procedimientos de montaje, preste Coloqueel aro de tope m_s grande (E) sobre ei lado atenciOna los gr_ficos que aparecen al final de esta p_gina. derecho del eje del carrete de ia manguera, tal como se muestra, y asegOrelocon dos tomillos.
- Page 29 Lubriquelas juntast6ricas Lubriquetodas las conexiones moslradas debajo. Para clio, siga estas instrucciones: La lubricaci6n de las juntas t6ricas es extremadamente 1. Revisey limpie las superficies de conexi6n antes de importante para la instaiaci6n y el funcionamiento. El uso de lubricar y armar. un lubricante (grasa lubricante o sint6tica) durante ei montaje 2.
- Page 30 Conectelas mangueras y el suministrode agua Coioqueel extremo opuesto de la manguera a alta presi6n en ia pistola pulverizadora. Presioneel bot6n rojo AV/SO SOLO use agua fria (menos de 100 °F/38 °C). (F) de la pistola pulverizadora. Luego, coloque el extremo de la manguera a alta presi6n (G) en la manguera hasta 1.
- Page 31 COIViO USARLA LliViPIADORA A PRESION Coloque la lanza de espuma (Q) en la varilla del ventilador ajustable (R). EjerzamAs presiOnsobre la varilla hasta oir Si tiene alg0n probiema para usar la limpiadora a presi6n, un CLIO, luego la traba (S) estar_ en la posici0n correcta p6ngase en contacto con la linea de ayuda de limpiadoras a sobre el borde (T) de la varilla.
- Page 32 C6mo detener la limpiadoraa presi6nei6ctrica Enchufe el cable de energia en un circuito el6ctrico de 120 VCA a 15 A que est6 correctamente instaiado y conectado Ei motor de la limpiadora a presiOnel6ctrica solo funciona a tierra de acuerdo con las normas y disposiciones locales.
- Page 33 • Si acerca demasiado la boquilla, especialmente en el AFISO Debeconectar todas las mangueras antes de arrancar la limpiadora a presiOnel6ctrica. uso a alta presi6n, podria Ilegar a da_ar la superficie que est_ limpiando. 7. Arranque la limpiadora a presi6n el6ctrica seg0n las •...
- Page 34 ESPECIFICACIONES DELPRODUCTO RESPONSABILIDADES DELPROPIETARIO Recomendaciones Generales Especificaciones d e la limpiadoraa presi6n Presi6n de salida ..... 1700 PSI (117,2 BARES)* Un mantenimiento regular mejorar_ el funcionamiento y extender_ la vida 0til de la limpiadora a presi6n. Para Velocidad de flujo ....1,3 GPM (4,9 LPM)* mantenimiento, p6ngaseen contacto con alg0n proveedor de Mezclade detergente ..
- Page 35 Verificaci6ny limpieza de la pantalla de entrada iVlantenimiento de la boquilla de agua Una presi6n excesiva en la bomba puede provocar una sensaci6n de pulsaci6n al apretar el gatillo de la pistola Quite el acoplamiento de la entrada de agua (A). Luego, retire la pantalia de entrada de agua (B) de ia entrada de agua de pulverizadora.
- Page 36 3. Desconectela manguera de la pistoia pulverizadoray de iVlantenimiento de la bomba y del motor la saiida de alta presiOnde la bomba. Dreneei agua de La bombay el motor de la Nmpiadoraa presiOnel6ctrica la manguera, de la pistola y de la varilla. Utilice un trapo no requieren mantenimiento.
- Page 37 ALIViACENAiViiEHTO ENIHViERNO0 Protecci6n de la bomba DURAHTE LARGOSPERJODOS Para proteger ia bomba de da_os provocados por dep6sitos de mineraies o congelamiento, utiiice la PumpSaver, El agua no deberia permanecer durante mucho tiempo en la modelo 6039, para tratar la bomba. Esto evita da_os por unidad.
- Page 38 Problema CalJsa Soluci6n 1. Libere la entrada. 1. La entrada de agua est_ bloqueada. 2. Suministro de agua inadecuado. 2. Proporcione un flujo de agua adecuado. 3. La manguera para jardin est_ 3. Estire ia manguera para jardin o enroscada o tiene p6rdidas. reempl_celasi pierde.
- Page 40 Your Home For troubleshooting, product manuals and expert advice: www.managemylife.com For repair - in your home - of all major brand appliances, lawn and garden equipment, or heating and cooling systems, no matter who made it, no matter who sold it! For the replacement parts, accessories owner's manuals that you need to do-it-yourself.
Need help?
Do you have a question about the 580.752850 and is the answer not in the manual?
Questions and answers
Pressure hose quick connect to wand missing o ring. What size is o ring