Table of Contents
Advertisement
Features
• Unified Zenith
TVNCR Remote
Control SC3720
• Slow Motion
• LED Display
• New Larger Controls
• On-Screen
Programming
• 1 Year, 8 Event Timer
• Instant Recording
• 181 Channel
Capability
• Auto Channel Search
• Auto Digital
Picture Tracking
• Center Load Tape
System
• Quick Start Loading
• Auto Playback
System
• Auto Counter Reset
• Counter Memory
• Index Search System
• HQ Circuitry
VRi 4110
Video Cassette Recorder
Operating Guide and Warranty
Return your Product
Registration
Card
and your VCR could be Free!
..........
I
IIIP'
Advertisement
Table of Contents

Related Manuals for Zenith VRL4110


Summary of Contents for Zenith VRL4110
- Page 1 VRi 4110 Features • Unified Zenith TVNCR Remote Control SC3720 • Slow Motion • LED Display • New Larger Controls • On-Screen Programming • 1 Year, 8 Event Timer • Instant Recording • 181 Channel Capability • Auto Channel Search •...
- Page 2 I_LECTRIQUES, Electronics Corporation. Unauthorized modification TRODUIRE LA LAME LA PLUS LARGE DE LA could void the user's authority to operate this product. FICHE DANS LA BORNE CORRESPONDANTE LA PRISE ET POUSSER JUSQU'AU FOND. Copyright © Zenith Electronics Corporation 1993 VCRWARN1...
-
Page 3: Introduction
Zenith VCR for many years to come. Mon-Fri, 8:00 a.m. - 4:30 p.m. Central Time Your new Zenith VCR has been designed and built to give Send the model number, serial number, and date of pur- you the very best in quality, features and performance. There... -
Page 4: Specifications
Specifications Input These specifications are subject to change Minus 8 dB into _>47,000 ohms without notice. Weight and dimensions are ap- Output proximate. Minus 8 dB into < 1,000 ohms Power Requirements Recording System Operating Voltage Type 120 V, 60 Hz Rotary Helical Scan Power Consumption Heads... -
Page 5: Table Of Contents
VCR, Counter Memory ... 6-2, 10-1 13 Product Registration Antenna, Cable Box and TV Set 4-1 Card Replacing an old VCR with a Zenith 7 Recording Tapes VCR ......Receive Current Product Info ..13-1 Recording ...... New VCR Owner Connections .. -
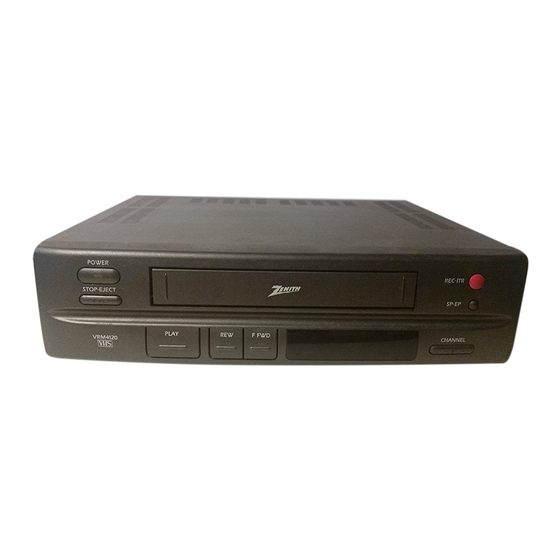
Page 6: Vcr Front Panel
VCR Front Panel Controls VRL4110 • 4HEADS(DA).ON SCREEN PROGRAMMINGoHQ SP-LP.EP I ,,- Jl CHANNEL • V,_R ;HI IL_"_M (r" 1. POWER -- Press to turn VCR on or off. Red clock will reset to -:- - . A power failure will light will be on while VCR is on. -
Page 7: Jacks
VCR Back Panel Connection Jacks nal to your TV set. The TV will receive the signal from your VCR over this channel. Your TV set's channel and this VCR switch must both be set to the same number; either 3 or 4 to view what is VHFAJHF/GA_/ being recorded or played back.. - Page 8 Remote Control Control Keys on the Zenith SC3720 Dual Function Remote Control and VCR with the remote control will allow you to operate each unit individually. Some of the ad- vanced features on your TV cannot be accessed with the SC3720. Use the remote control provided with your TV for these advanced fea- tures.
- Page 9 These keys can cause damage to the remote control. are also used for direct channel access. • Zenith is not responsible for damage caused by 25. SELECT -- Use this key to choose informa- such battery leakage.
- Page 10 VCR ANT OUT jack. Connect hookup cable. If any parts are the other end to the ANT IN missing notify your nearest Step 1. Zenith Dealer.) jack on the TV set. Connect your antenna cable to Disconnect antenna...
- Page 11 Connections These illustrations are designed Step 1 Antenna To VCR Connections to help you connect your VCR VCR BACK PANEL Antenna Cables Inside or Outside to your antenna and TV set. VHF or UHF ( )ANT[] / Step 1. OUT c.s c_{ Identify your particular anten- VHF/UHr/CA1V...
-
Page 12: Vcr Back Panel
CATV (Cable TV) Converter Box Connections The connection illustrations shown in Figures 1 and 2 show Figure I CATV "Converter After" VCR Connections the common methods of con- necting your VCR to cable ser- VCR BACK PANEL vice and your TV set. Figure 1. -
Page 13: Vcr
VCR Menu Settings On-Screen Menus Main On-Screen Menu (VCR Features) This VCR is controlled by an on-screen menu programming system. There are 5 VCR Feature menus which you choose using the remote control. These menus are then shown on your TV screen. Each menu (Use and sub-menu asks you to either make a choice 2-Press ENTER key... -
Page 14: Channel Search
VCR Menu Settings Set the Current Time Press 4 to choose TUNING FEATURES. Set the clock on the front of the VCR in the mes- Press 1- Tuning Band. The on-screen menu for sage center. Use the VCR remote control to TUNING BAND appears. -
Page 15: Error Messages
VCR Menu Settings 3. Choose CHANNEL SAVE/SKIP. Each chan- nel the VCR has found will come up in numerical STOP VCR CH 11 sequence. As you press CHANNEL up choose SKIPPED to delete any weaker channels as desired. Choose SAVED to keep the channels with an adequate signal. - Page 16 SELECT OUIT ® ®®® ®®® ®®® Turn the TV on and tune it to Channel 3.* (If you have • a Zenith TV use the remote control, press 3, then ENTER.) Switch the remote control to VCR mode. Insert a VHS cassette...
-
Page 17: Additional Playback Features
Jet Search, faster tape scanning. C. Press PLAY to continue watching the tape. D. Tracking Adjustment Auto/Manual Your Zenith VCR automatically adjusts for optimum tracking every time you play a tape. If however, tape was recorded on a different... -
Page 18: Recording
120D MENU SOURCE SELECT QUIT ® 1. Turn the TV on and tune it to Channel 3.* (If you have MUTE a Zenith remote control, press 3, then ENTER.) *See Footnote at the bottom of page 6-1. SEARCH 2. Change... -
Page 19: Features
Additional Recording Features POWEm IIIC.IIll IIO_ i,Ig.Ct MODE VRLA11C • 4H£ADS(DA) SCREEN PROGRAMMING • HQ _LI'. r---i r---1 C_ R..A,_,a( SELECT QUIT ®®® CHANNEL ®®® ®®® A. Recording Length of time. VOLU_E Press and hold down REC/ITR until REC lights in the message center. -
Page 20: Instant Timer Recording
Instant Timer Recording I=OWlI IIIIO_I.IICT I I ,=w l ,L*V ..AM l ,_AN_L \ SELECT QUIT Q®® ®®® ®®® A. Instant Timer Recording Press and hold down REC/ITR one time until the REC Q ( E.,E. ) symbol lights to enter the VCR into Record... -
Page 21: Notes
Notes 8 -- 2... -
Page 22: Timer Recording
POwer 04rF OI4 C-iT--') FI.A_QK CHANNEL ®® Turn the TV on and tune to Channel 3.* (If you have a VOLUME Zenith TV use the remote control, press 3, then ® ( -,- ) ENTER.) *See Footnote at the bottom of page 6-1. -
Page 23: Timer Recording
Timer Recording Tuning Band Channel --will automatically come up if you specified TV in the Tuning Features menu, Tuning Band submenu. CATV -- will automatically come up if you specified CATV in the Tuning Features menu, Tuning Band submenu before you Program lit6 record: entered... -
Page 24: Recording Speed Selection
I_ _ 111 lTl ..Additional Operations Tape Counter Resets Automatically Recording Speed Selection Your video recorder can record in three speeds: When a tape is inserted into the VCR the counter is automatically reset to 0:00:00. Once Standard Play (SP), Long Play (LP), and Ex- tended Play (EP). -
Page 25: Counter Memory
i rl Additional Operations Press "0" to zero the counter at that loca- to that location on the tape. The following tion. Press MEMORY to be able to return display will appear when counter memory is on. 5. Press QUIT to remove counter display. -
Page 26: Service Information
llmllllll lull IFI II IIII Service Information Before Calling for Service Following are some common problems associated with operating a VCR. Please refer to the following Problem/Resolution Chart before calling for service. Problem/Resolution Chart Operating Problems Observed Condition Possible Cause Probable Solution No power to the VCR. -
Page 27: Maintenance
Video Head Cleaning After long periods of use, the video heads may become clogged with accumulated dirt, causing distor- tion. When this occurs, use do-it-yourself wet head cleaning cassettes available through your Zenith dealer. Caution: Do not use dry head cleaning systems. They may seriously damage both the video recorder and cassette. -
Page 28: Accessories
Prlce Per Item Item Number Description exciting offer, please fill out this card and return a photocopy Attn: Accessory Offers Zenith Video Tech Corporation 1900 N. Austin Avenue Chicago, Ulinols 80639 Charge card customers, to speed Sales Tax: Please add your state sales tax if you... -
Page 29: Product Registration
Product Registration Card Product Card lost or misplaced? You could win a full refund on your new Zenith product. The Product Registration Card furnished with your video Look for the Product Registration Card on your new video product is pre-printed with its Model and Serial numbers. - Page 30 Owner's Responsibility Cassette Recorder/Video Player Effective Warranty Date - Warranty begins on the Welcome into the Zenith family! We believe that you date of original consumer installation. For your con- will be pleased with your new Zenith video product. venience, keep the dealer's dated bill of sale or Please read this Consumer Protection Plan carefully.
-
Page 31: Setting The Clock
VRL 4110 Quick Reference Guide enter the information for the current time. Enter Quick Play Setup Month, Date, Year etc. (Day of the week, Mon- To play a tape follow this sequence. day Tuesday etc., comes on automatically). When 1. Turn on the TV and tune it to Channel 3. finished press QUIT to exit the Time Set Menu. - Page 32 VRL 4110 Quick Reference Guide Recording with a Camcorder Recording Using the Timer Turn on the TV set and the VCR. (Recording while you are away.) Turn on both the TV set and VCR. (You must Press MENU on the remote control to choose have specified either TV or CATV in the Tuning the Main Menu (VCR FEATURES).
- Page 34 I III I ZENITH ELE(.._I'RONICS CORPORATION Printed m Korea Zenith Part No. 206-2609 1000 MILWAUKEE AVENUE Issue O GLENVIEW, ILLINOIS 60025...
Need help?
Do you have a question about the VRL4110 and is the answer not in the manual?
Questions and answers